


1. 背景
在微服务框架下,有些操作需要依赖不同的服务,操作不同的数据库,为了保证操作的完整性,我们需要分布式事物。Seata 是阿里巴巴开源的一款分布式事务解决方案,致力于提供高性能和简单易用的分布式事务服务。Seata 将为用户提供了 AT、TCC、SAGA 和 XA 事务模式,为用户打造一站式的分布式解决方案。本文介绍AT和TCC事物模式的使用。
2. 准备工作
2.1 Nacos服务器
nacos-server-1.3.2,下载链接:https://github.com//blog/download.html。
2.2 Seata服务器
seata-1.3.0,下载链接:https://seata.io/zh-cn/blog/download.html。
3. 部署
3.1 nacos部署
3.1.1 创建数据库
Nacos-server解压之后,进入配置目录,nacos-mysql.sql是需要先创建nacos_config数据库,再通过sql语句创建表结构和初始化数据,schema.sql是通过模式创建数据库以及表结构和初始化数据,nacos-dm.sql是我自己修改的达梦数据库,这里用nacos-mysql.sql去创建一下数据库。
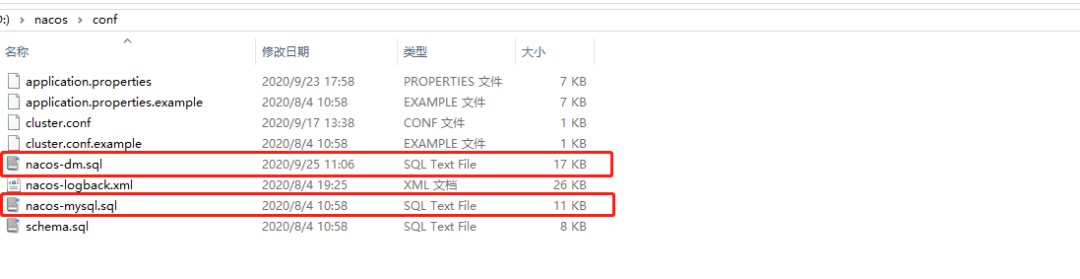
数据库创建后如下图所示:
3.1.2 配置
application.properties应用的基本配置,包括访问路径,端口,数据库信息配置,更多参考application.properties.example。
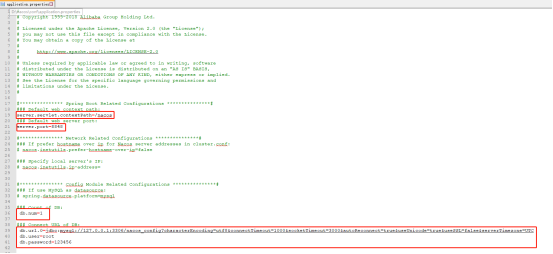
新建cluster.conf,集群节点配置,根据情况配置,这里配置如下。

3.1.3 启动
配置完成后,就可以去bin目录,选择对应的脚本去启动nacos服务了。
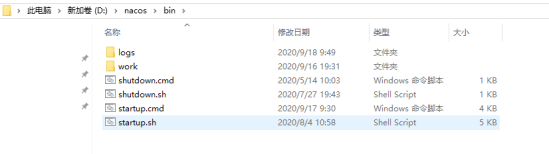
这里注意一下,根据自己的机器,设置合理的内存。要不会因为内存不足,无法启动。
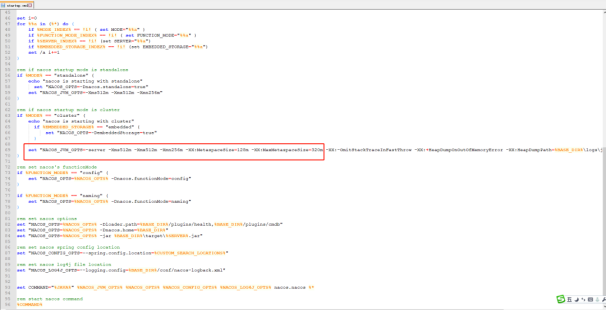
启动默认以集群的形式启动:sh startup.sh
单机启动:sh startup.sh -m standalone
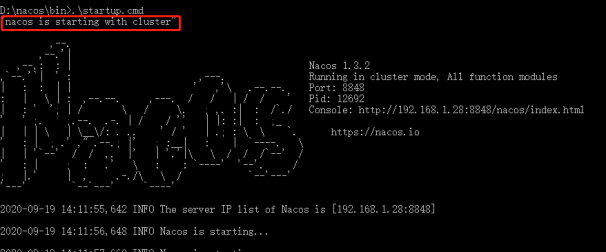
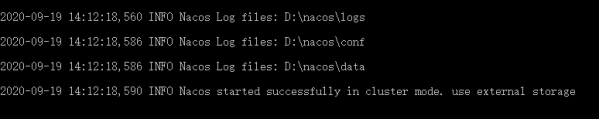
启动成功,会有提示,同时也显示日志记录等。
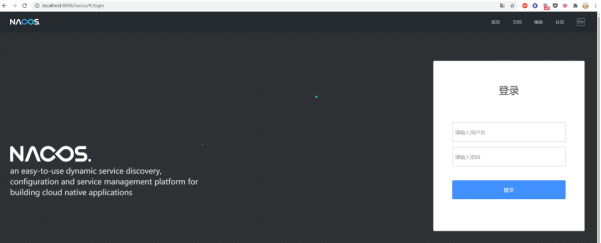
3.1.4 登录查看
启动完成之后,可以访问:http://localhost:8848/nacos/,会跳转登录页,默认登录账号密码都是nacos。
登录进去,可以看到左边的配置管理以及注册的服务。

3.2 seata部署
3.2.1 创建数据库
MySQL:
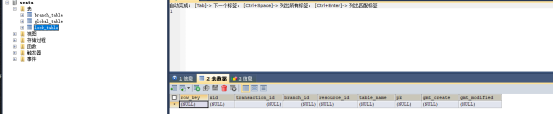
创建seata数据库,创建下面3张表。
(1)global_table 存储全局session数据
CREATE TABLE IF NOT EXISTS `global_table`(
`xid` VARCHAR(128) NOT NULL,
`transaction_id` BIGINT,
`status` TINYINT NOT NULL,
`application_id` VARCHAR(32),
`transaction_service_group` VARCHAR(32),
`transaction_name` VARCHAR(128),
`timeout` INT,
`begin_time` BIGINT,
`application_data` VARCHAR(2000),
`gmt_create` DATETIME,
`gmt_modified` DATETIME,
PRIMARY KEY (`xid`),
KEY `idx_gmt_modified_status` (`gmt_modified`, `status`),
KEY `idx_transaction_id` (`transaction_id`)
) ENGINE = InnoDB DEFAULT CHARSET = utf8;
(2)branch_table 存储分支session数据
CREATE TABLE IF NOT EXISTS `branch_table`(
`branch_id` BIGINT NOT NULL,
`xid` VARCHAR(128) NOT NULL,
`transaction_id` BIGINT,
`resource_group_id` VARCHAR(32),
`resource_id` VARCHAR(256),
`branch_type` VARCHAR(8),
`status` TINYINT,
`client_id` VARCHAR(64),
`application_data` VARCHAR(2000),
`gmt_create` DATETIME(6),
`gmt_modified` DATETIME(6),
PRIMARY KEY (`branch_id`),
KEY `idx_xid` (`xid`)
) ENGINE = InnoDB DEFAULT CHARSET = utf8;
(3)lock_table 存储锁数据
CREATE TABLE IF NOT EXISTS `lock_table`(
`row_key` VARCHAR(128) NOT NULL,
`xid` VARCHAR(96),
`transaction_id` BIGINT,
`branch_id` BIGINT NOT NULL,
`resource_id` VARCHAR(256),
`table_name` VARCHAR(32),
`pk` VARCHAR(36),
`gmt_create` DATETIME,
`gmt_modified` DATETIME,
PRIMARY KEY (`row_key`),
KEY `idx_branch_id` (`branch_id`)
) ENGINE = InnoDB DEFAULT CHARSET = utf8;
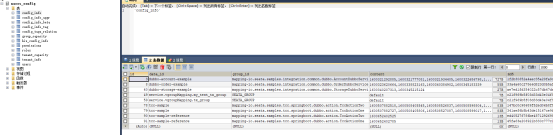
创建数据库和3张表完成后如下:
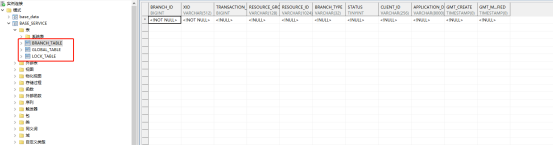
达梦数据库:
GLOBAL_TABLE:
CREATE TABLE "GLOBAL_TABLE"
(
"XID" VARCHAR(128) NOT NULL,
"TRANSACTION_ID" BIGINT,
"STATUS" TINYINT NOT NULL,
"APPLICATION_ID" VARCHAR(32),
"TRANSACTION_SERVICE_GROUP" VARCHAR(32),
"TRANSACTION_NAME" VARCHAR(128),
"TIMEOUT" INT,
"BEGIN_TIME" BIGINT,
"APPLICATION_DATA" VARCHAR(2000),
"GMT_CREATE" TIMESTAMP(0),
"GMT_MODIFIED" TIMESTAMP(0),
NOT CLUSTER PRIMARY KEY("XID")) STORAGE(ON "MAIN", CLUSTERBTR) ;
CREATE INDEX "IDX_GMT_MODIFIED_STATUS" ON "GLOBAL_TABLE"("GMT_MODIFIED" ASC,"STATUS" ASC) STORAGE(ON "MAIN", CLUSTERBTR) ;
CREATE INDEX "IDX_TRANSACTION_ID" ON "GLOBAL_TABLE"("TRANSACTION_ID" ASC) STORAGE(ON "MAIN", CLUSTERBTR) ;
CREATE UNIQUE INDEX "INDEX1055115508310400" ON "GLOBAL_TABLE"("XID" ASC) STORAGE(ON "MAIN", CLUSTERBTR) ;
BRANCH_TABLE:
CREATE TABLE "BRANCH_TABLE"
(
"BRANCH_ID" BIGINT NOT NULL,
"XID" VARCHAR(128) NOT NULL,
"TRANSACTION_ID" BIGINT,
"RESOURCE_GROUP_ID" VARCHAR(32),
"RESOURCE_ID" VARCHAR(256),
"BRANCH_TYPE" VARCHAR(8),
"STATUS" TINYINT,
"CLIENT_ID" VARCHAR(64),
"APPLICATION_DATA" VARCHAR(2000),
"GMT_CREATE" TIMESTAMP(0),
"GMT_MODIFIED" TIMESTAMP(0),
NOT CLUSTER PRIMARY KEY("BRANCH_ID")) STORAGE(ON "MAIN", CLUSTERBTR) ;
CREATE INDEX "IDX_XID" ON "BRANCH_TABLE"("XID" ASC) STORAGE(ON "MAIN", CLUSTERBTR) ;
CREATE UNIQUE INDEX "INDEX1055115537125099" ON "BRANCH_TABLE"("BRANCH_ID" ASC) STORAGE(ON "MAIN", CLUSTERBTR) ;
LOCK_TABLE:
CREATE TABLE "LOCK_TABLE"
(
"ROW_KEY" VARCHAR(128) NOT NULL,
"XID" VARCHAR(96),
"TRANSACTION_ID" BIGINT,
"BRANCH_ID" BIGINT NOT NULL,
"RESOURCE_ID" VARCHAR(256),
"TABLE_NAME" VARCHAR(32),
"PK" VARCHAR(36),
"GMT_CREATE" TIMESTAMP(0),
"GMT_MODIFIED" TIMESTAMP(0),
NOT CLUSTER PRIMARY KEY("ROW_KEY")) STORAGE(ON "MAIN", CLUSTERBTR) ;
CREATE INDEX "IDX_BRANCH_ID" ON "LOCK_TABLE"("BRANCH_ID" ASC) STORAGE(ON "MAIN", CLUSTERBTR) ;
CREATE UNIQUE INDEX "PRIMARY" ON "LOCK_TABLE"("ROW_KEY" ASC) STORAGE(ON "MAIN", CLUSTERBTR) ;
达梦数据库建完如下:
3.2.2 配置
把下载的seata服务解压之后,进入conf配置目录。
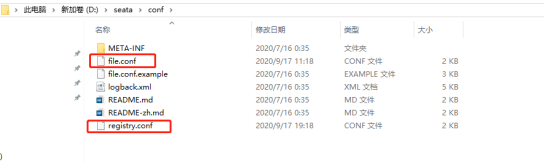
打开file.conf文件存储设置,默认是file,这里选择模式为db,使用达梦数据库,更多设置可参考file.conf.example。
file.conf配置修改如下:
## transaction log store, only used in seata-server
store {
## store mode: file、db、redis
mode = "db"
## file store property
file {
## store location dir
dir = "sessionStore"
# branch session size , if exceeded first try compress lockkey, still exceeded throws exceptions
maxBranchSessionSize = 16384
# globe session size , if exceeded throws exceptions
maxGlobalSessionSize = 512
# file buffer size , if exceeded allocate new buffer
fileWriteBufferCacheSize = 16384
# when recover batch read size
sessionReloadReadSize = 100
# async, sync
flushDiskMode = async
}
## database store property
db {
##the implement of javax.sql.DataSource, such as DruidDataSource(druid)/BasicDataSource(dbcp)/HikariDataSource(hikari) etc.
datasource = "druid"
## mysql/oracle/postgresql/h2/oceanbase etc.
dbType = "dm"
driverClassName = "com.mysql.jdbc.Driver"
url = "jdbc:dm://localhost:5236/seata"
user = "SYSDBA"
password = "123456789"
minConn = 5
maxConn = 30
globalTable = "global_table"
branchTable = "branch_table"
lockTable = "lock_table"
queryLimit = 100
maxWait = 5000
}
## redis store property
redis {
host = "127.0.0.1"
port = "6379"
password = ""
database = "0"
minConn = 1
maxConn = 10
queryLimit = 100
}
}
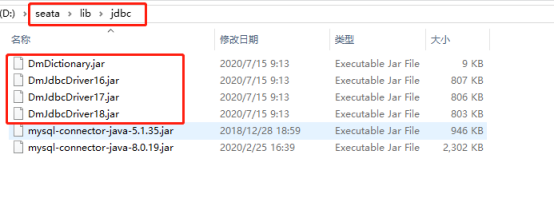
需要将达梦的数据库jar导入到seata的lib目录下的jdbc目录,如下:
registry.conf为注册信息的配置,支持很多配置,都给了配置的例子,这里选nacos,注意这里配置的集群名称为cluster=default,后面客户端配置会用到。
registry.conf配置如下:
registry {
# file 、nacos 、eureka、redis、zk、consul、etcd3、sofa
type = "nacos"
nacos {
application = "seata-server"
serverAddr = "127.0.0.1:8848"
group = "SEATA_GROUP"
namespace = ""
cluster = "default"
username = ""
password = ""
}
eureka {
serviceUrl = "http://localhost:8761/eureka"
application = "default"
weight = "1"
}
redis {
serverAddr = "localhost:6379"
db = 0
password = ""
cluster = "default"
timeout = 0
}
zk {
cluster = "default"
serverAddr = "127.0.0.1:2181"
sessionTimeout = 6000
connectTimeout = 2000
username = ""
password = ""
}
consul {
cluster = "default"
serverAddr = "127.0.0.1:8500"
}
etcd3 {
cluster = "default"
serverAddr = "http://localhost:2379"
}
sofa {
serverAddr = "127.0.0.1:9603"
application = "default"
region = "DEFAULT_ZONE"
datacenter = "DefaultDataCenter"
cluster = "default"
group = "SEATA_GROUP"
addressWaitTime = "3000"
}
file {
name = "file.conf"
}
}
config {
# file、nacos 、apollo、zk、consul、etcd3
type = "nacos"
nacos {
serverAddr = "127.0.0.1:8848"
namespace = ""
group = "SEATA_GROUP"
username = ""
password = ""
}
consul {
serverAddr = "127.0.0.1:8500"
}
apollo {
appId = "seata-server"
apolloMeta = "http://192.168.1.204:8801"
namespace = "application"
}
zk {
serverAddr = "127.0.0.1:2181"
sessionTimeout = 6000
connectTimeout = 2000
username = ""
password = ""
}
etcd3 {
serverAddr = "http://localhost:2379"
}
file {
name = "file.conf"
}
}
3.2.3 启动
配置完成之后,可进入bin目录,选择启动脚本,进行启动。

3.2.4 查看
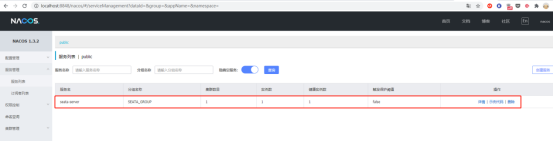
启动成功,可查看nacos,可看到seata服务已经注册到nacos上了。
3.3 客户端使用
3.3.1 AT模式
客户端使用如下:
pom.xml引入
springCloud引入:
com.alibaba.cloud
spring-cloud-starter-alibaba-nacos-discovery
com.alibaba.cloud
spring-cloud-starter-alibaba-nacos-config
com.alibaba.cloud
spring-cloud-starter-alibaba-seata
springboot引入:
org.springframework.cloud
spring-cloud-starter-alibaba-nacos-discovery
nacos-client
com.alibaba.nacos
com.alibaba
dubbo-registry-nacos
io.seata
seata-all
com.alibaba.nacos
nacos-client
com.alibaba.boot
nacos-config-spring-boot-starter
nacos-client
com.alibaba.nacos
>
新建SeataAutoConfig类如下:
package io.seata.samples.integration.account.config;
import com.alibaba.druid.pool.DruidDataSource;import
io.seata.rm.datasource.DataSourceProxy;import io.seata.spring.annotation.GlobalTransactionScanner;import org.apache.ibatis.session.SqlSessionFactory;import org.mybatis.spring.SqlSessionFactoryBean;import org.mybatis.spring.transaction.SpringManagedTransactionFactory;import org.springframework.beans.factory.annotation.Autowired;import org.springframework.boot.autoconfigure.jdbc.DataSourceProperties;import org.springframework.context.annotation.Bean;import org.springframework.context.annotation.Configuration;import org.springframework.core.io.support.PathMatchingResourcePatternResolver;import org.springframework.jdbc.datasource.DataSourceTransactionManager;
/**
* @Author:
@Description seata global configuration
* @Date Created in 2020/9/21 10:28
*/
@Configuration
public class SeataAutoConfig {
/**
* autowired datasource config
*/
@Autowired
private DataSourceProperties dataSourceProperties;
/**
* init durid datasource
* @Return: druidDataSource datasource instance
*/
@Bean
public DruidDataSource druidDataSource(){
DruidDataSource druidDataSource = new DruidDataSource();
druidDataSource.setUrl(dataSourceProperties.getUrl());
druidDataSource.setUsername(dataSourceProperties.getUsername());
druidDataSource.setPassword(dataSourceProperties.getPassword());
druidDataSource.setDriverClassName(dataSourceProperties.getDriverClassName()); druidDataSource.setInitialSize(0);
druidDataSource.setMaxActive(180);
druidDataSource.setMaxWait(60000);
druidDataSource.setMinIdle(0);
druidDataSource.setValidationQue
ry("Select 1 from DUAL");
druidDataSource.setTestOnBorrow(false);
druidDataSource.setTestOnReturn(false);
druidDataSource.setTestWhileIdle(true);
druidDataSource.setTimeBetweenEvictionRunsMillis(60000);
druidDataSource.setMinEvictableIdleTimeMillis(25200000);
druidDataSource.setRemoveAbandoned(true);
druidDataSource.setRemoveAbandonedTimeout(1800);
druidDataSource.setLogAbandoned(true);
return druidDataSource;
}
/**
* init datasource proxy
* @Param: druidDataSource datasource bean instance
* @Return: DataSourceProxy datasource proxy
*/
@Bean
public DataSourceProxy dataSourceProxy(DruidDataSource druidDataSource){
return new DataSourceProxy(druidDataSource);
}
@Bean
public DataSourceTransactionManager transactionManager(DataSourceProxy dataSourceProxy) {
return new DataSourceTransactionManager(dataSourceProxy);
}
/**
* init mybatis sqlSessionFactory
* @Param: dataSourceProxy datasource proxy
* @Return: DataSourceProxy datasource proxy
*/
@Bean
public SqlSessionFactory sqlSessionFactory(DataSourceProxy dataSourceProxy) throws Exception {
SqlSessionFactoryBean factoryBean = new SqlSessionFactoryBean();
factoryBean.setDataSource(dataSourceProxy);
factoryBean.setMapperLocations(new PathMatchingResourcePatternResolver()
.getResources("classpath*:/mapper/*.xml"));
factoryBean.setTransactionFactory(new SpringManagedTransactionFactory());
return factoryBean.getObject();
}
/**
* init global transaction scanner
* @Return: GlobalTransactionScanner
*/
@Bean
public GlobalTransactionScanner globalTransactionScanner(){
return new GlobalTransactionScanner("account-gts-seata-example", "tx_group");
}
}
file.conf配置:
transport {
# tcp udt unix-domain-socket
type = "TCP"
#NIO NATIVE
server = "NIO"
#enable heartbeat
heartbeat = true
# the client batch send request enable
enableClientBatchSendRequest = true
#thread factory for netty
threadFactory {
bossThreadPrefix = "NettyBoss"
workerThreadPrefix = "NettyServerNIOWorker"
serverExecutorThread-prefix = "NettyServerBizHandler"
shareBossWorker = false
clientSelectorThreadPrefix = "NettyClientSelector"
clientSelectorThreadSize = 1
clientWorkerThreadPrefix = "NettyClientWorkerThread"
# netty boss thread size,will not be used for UDT
bossThreadSize = 1
#auto default pin or 8
workerThreadSize = "default"
}
shutdown {
# when destroy server, wait seconds
wait = 3
}
serialization = "seata"
compressor = "none"
}
service {
#transaction service group mapping
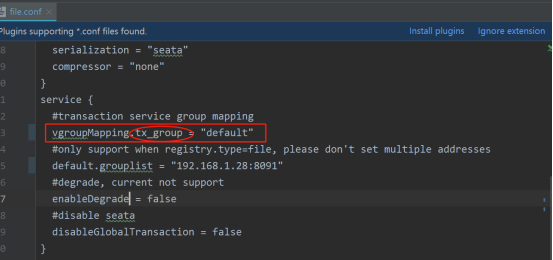
vgroupMapping.tx_group = "default"
#only support when registry.type=file, please don't set multiple addresses
default.grouplist = "192.168.1.28:8091"
#degrade, current not support
enableDegrade = false
#disable seata disableGlobalTransaction = false
}
client {
rm {
asyncCommitBufferLimit = 10000
lock {
retryInterval = 10
retryTimes = 30
retryPolicyBranchRollbackOnConflict = true
}
reportRetryCount = 5
tableMetaCheckEnable = false
reportSuccessEnable = false
}
tm {
commitRetryCount = 5
rollbackRetryCount = 5
}
undo {
dataValidation = true
logSerialization = "jackson"
logTable = "undo_log"
}
log {
exceptionRate = 100
}
}
registry.conf:
registry {
# file 、nacos 、eureka、redis、zk、consul、etcd3、sofa type = "nacos"
nacos {
application = "seata-server"
serverAddr = "127.0.0.1:8848"
group = "SEATA_GROUP"
namespace = ""
username = ""
password = ""
}
eureka {
serviceUrl = "http://localhost:8761/eureka"
weight = "1"
}
redis {
serverAddr = "localhost:6379"
db = "0"
password = ""
timeout = "0"
}
zk {
serverAddr = "127.0.0.1:2181"
sessionTimeout = 6000
connectTimeout = 2000
username = ""
password = ""
}
consul {
serverAddr = "127.0.0.1:8500"
}
etcd3 {
serverAddr = "http://localhost:2379"
}
sofa {
serverAddr = "127.0.0.1:9603"
region = "DEFAULT_ZONE"
datacenter = "DefaultDataCenter"
group = "SEATA_GROUP"
addressWaitTime = "3000"
}
file {
name = "file.conf"
}}
config {
# file、nacos 、apollo、zk、consul、etcd3、springCloudConfig
type = "nacos"
nacos {
serverAddr = "127.0.0.1:8848"
namespace = ""
group = "SEATA_GROUP"
username = ""
password = ""
}
consul {
serverAddr = "127.0.0.1:8500"
}
apollo {
appId = "seata-server"
apolloMeta = "http://192.168.1.204:8801"
namespace = "application"
}
zk {
serverAddr = "127.0.0.1:2181"
sessionTimeout = 6000
connectTimeout = 2000
username = ""
password = ""
}
etcd3 {
serverAddr = "http://localhost:2379"
}
file {
name = "file.conf"
}
}
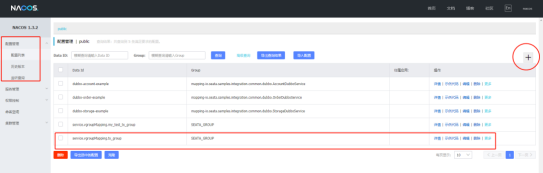
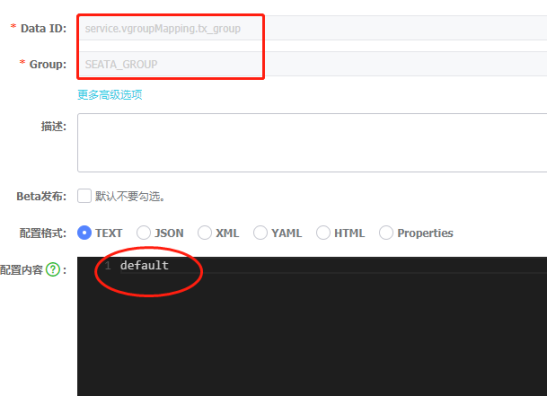
需要在nacos中添加一个配置,需要和你客户端配置的默认事物组(transaction service group mapping),保持一致。
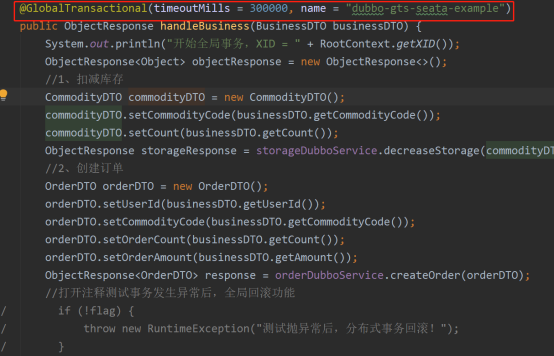
使用时,通过@GlobalTransactional注解,像本地事物一样去使用。
3.3.2 TCC模式
TCC模式主要需要嵌入到业务内,seata客户端配置同上AT模式,这里不再重复,下面主要描述业务实现,需要先声明3个接口,参与分布式事物的,都需要实现这3个接口,BusinessActionContext业务上下文对象固定,@BusinessActionContextParameter业务参数不固定,根据实际情况定义。接口声明如下:
/** * Prepare boolean.
* @param actionContext the action context
* @param a he a
* @return the boolean
*/
@TwoPhaseBusinessAction(name = "DubboTccActionOne", commitMethod = "commit", rollbackMethod = "rollback")
boolean prepare(BusinessActionContext actionContext,@BusinessActionContextParameter(paramName = "a") int a);
/** * Commit boolean.
* @param actionContext the action context
* @return the boolean
*/
boolean commit(BusinessActionContext actionContext);
/** * Rollback boolean.
* @param actionContext the action context
* @return the boolean
*/
boolean rollback(BusinessActionContext actionContext);
业务中接口的实现:
@Override
public boolean prepare(BusinessActionContext actionContext, int a) {
String xid = actionContext.getXid();
System.out.println("TccActionOne prepare, xid:" + xid + ", a:" + a);
return true;
}
@Override
public boolean commit(BusinessActionContext actionContext) {
String xid = actionContext.getXid();
System.out.println("TccActionOne commit, xid:" + xid + ", a:" + actionContext.getActionContext("a"));
ResultHolder.setActionOneResult(xid, "T");
return true;
}
@Overridepublic boolean rollback(BusinessActionContext actionContext) {
String xid = actionContext.getXid();
System.out.println("TccActionOne rollback, xid:" + xid + ", a:" + actionContext.getActionContext("a"));
ResultHolder.setActionOneResult(xid, "R");
return true;
}
正常提交事物模式:
/**
* 发起分布式事务 *
* @return string string
*/
@GlobalTransactional
public String doTransactionCommit() {
//第一个TCC 事务参与者
boolean result = tccActionOne.prepare(null, 1);
if (!result) {
throw new RuntimeException("TccActionOne failed.");
}
List list = new ArrayList();
list.add("c1");
list.add("c2");
result = tccActionTwo.prepare(null, "two", list);
if (!result) {
throw new RuntimeException("TccActionTwo failed.");
}
return RootContext.getXID();
}
遇到异常,回滚事物:
/**
* Do transaction rollback string.
* @param map the map
* @return the string
*/
@GlobalTransactional
public String doTransactionRollback(Map map) {
//第一个TCC 事务参与者
boolean result = tccActionOne.prepare(null, 1);
if (!result) {
throw new RuntimeException("TccActionOne failed.");
}
List list = new ArrayList();
list.add("c1");
list.add("c2");
result = tccActionTwo.prepare(null, "two", list);
if (!result) {
throw new RuntimeException("TccActionTwo failed.");
}
map.put("xid", RootContext.getXID());
throw new RuntimeException("transacton rollback");
}
4. 验证方式
4.1 正常提交事物验证
正常提交事物,操作多个业务,多个数据库,操作成功后,查看数据库数据,检验数据的正确性。
4.2 提交事物异常回滚事物
声明一个异常,在提交事物过程中,遇到异常,会回滚事物,再查看数据库数据,检验数据的正确性。


 3704
3704


 被折叠的 条评论
为什么被折叠?
被折叠的 条评论
为什么被折叠?
 到【灌水乐园】发言


