


前言:
@Autowired注解代码定义
@Target({ElementType.CONSTRUCTOR, ElementType.FIELD, ElementType.METHOD,
ElementType.ANNOTATION_TYPE})
@Retention(RetentionPolicy.RUNTIME)
@Documentedpublic @interfaceAutowired {boolean required() default true;
}
从上述定义中,我们可以得出@Autowired注解只有一个属性即required属性,此属性的默认值为true,即默认情况下它要求依赖对象必须存在,如果不存在会出现空指针等错误;如果允许为null,可以设置它required属性为false.其中@Autowired注解和标注的变量的类的set和get方法无关,自动装配的实现并不是依赖set方法的方式实现的.在xml中利用
这种方式是依赖对应类的set方法的方式实现的 @Autowired注解使用之前首先确定判断一下此处能够使用@Autowired注解.
一、 @Autowired注解使用场景介绍
(1)构造函数
(2)成员变量
(3)Setter方法
(4)普通方法
二、 @Autowired注解所涉及的原理部分
其实在启动spring IoC时,容器自动装载了一个AutowiredAnnotationBeanPostProcessor后置处理器,当容器扫描到@Autowied、@Resource或@Inject时,就会在IoC容器自动查找需要的bean,并装配给该对象的属性
AutowiredAnnotationBeanPostProcessor在Spring容器初始化时会最先执行determineCandidateConstructors方法,先看起源码:
public class AutowiredAnnotationBeanPostProcessor extendsInstantiationAwareBeanPostProcessorAdapterimplementsMergedBeanDefinitionPostProcessor, PriorityOrdered, BeanFactoryAware {//此方法的含义是解析Bean类里构造函数上的@Autowired注解,如果有合适的标识了@Autowired的构造函数,//则在实例化此Bean时会使用此构造函数,@Import和@ComponentScan得到的Bean会如此解析,//@Bean标识方法生成的Bean不会如此
public Constructor>[] determineCandidateConstructors(Class> beanClass, finalString beanName)throwsBeanCreationException {//Let's check for lookup methods here..
if (!this.lookupMethodsChecked.contains(beanName)) {try{
ReflectionUtils.doWithMethods(beanClass,newReflectionUtils.MethodCallback() {
@Overridepublic void doWith(Method method) throwsIllegalArgumentException, IllegalAccessException {
Lookup lookup= method.getAnnotation(Lookup.class);if (lookup != null) {
LookupOverride override= newLookupOverride(method, lookup.value());try{
RootBeanDefinition mbd=(RootBeanDefinition) beanFactory.getMergedBeanDefinition(beanName);
mbd.getMethodOverrides().addOverride(override);
}catch(NoSuchBeanDefinitionException ex) {throw newBeanCreationException(beanName,"Cannot apply @Lookup to beans without corresponding bean definition");
}
}
}
});
}catch(IllegalStateException ex) {throw new BeanCreationException(beanName, "Lookup method resolution failed", ex);
}catch(NoClassDefFoundError err) {throw new BeanCreationException(beanName, "Failed to introspect bean class [" + beanClass.getName() +
"] for lookup method metadata: could not find class that it depends on", err);
}this.lookupMethodsChecked.add(beanName);
}//Quick check on the concurrent map first, with minimal locking.
Constructor>[] candidateConstructors = this.candidateConstructorsCache.get(beanClass);if (candidateConstructors == null) {//Fully synchronized resolution now...
synchronized (this.candidateConstructorsCache) {//对每个类的构造函数只解析一次,解析完会存储结果,以备下次服用
candidateConstructors = this.candidateConstructorsCache.get(beanClass);if (candidateConstructors == null) {
Constructor>[] rawCandidates;try{
rawCandidates=beanClass.getDeclaredConstructors();
}catch(Throwable ex) {throw newBeanCreationException(beanName,"Resolution of declared constructors on bean Class [" + beanClass.getName() +
"] from ClassLoader [" + beanClass.getClassLoader() + "] failed", ex);
}
List> candidates = new ArrayList>(rawCandidates.length);
Constructor> requiredConstructor = null;
Constructor> defaultConstructor = null;for (Constructor>candidate : rawCandidates) {//查看构造函数上是否标识@Autowired注解,获取注解的属性
AnnotationAttributes ann =findAutowiredAnnotation(candidate);if (ann == null) {
Class> userClass =ClassUtils.getUserClass(beanClass);if (userClass !=beanClass) {try{
Constructor> superCtor =userClass.getDeclaredConstructor(candidate.getParameterTypes());//如果此构造函数是重载了父类的构造函数,则寻找父类的构造函数,查看是否标识@Autowired注解,获取注解的属性
ann =findAutowiredAnnotation(superCtor);
}catch(NoSuchMethodException ex) {//Simply proceed, no equivalent superclass constructor found...
}
}
}//当构造函数上存在@Autowired注解
if (ann != null) {//@Autowired默认的required = true,当有一个required = true的@Autowired标识的构造函数时,//不能有其他的构造函数再标识@Autowired,否则会报错
if (requiredConstructor != null) {throw newBeanCreationException(beanName,"Invalid autowire-marked constructor: " + candidate +
". Found constructor with 'required' Autowired annotation already: " +requiredConstructor);
}//@Autowired的required的属性值,true / false
boolean required =determineRequiredStatus(ann);if(required) {if (!candidates.isEmpty()) {throw newBeanCreationException(beanName,"Invalid autowire-marked constructors: " + candidates +
". Found constructor with 'required' Autowired annotation: " +candidate);
}
requiredConstructor=candidate;
}
candidates.add(candidate);
}else if (candidate.getParameterTypes().length == 0) {
defaultConstructor=candidate;
}
}if (!candidates.isEmpty()) {//Add default constructor to list of optional constructors, as fallback.
当没有构造函数标识@Autowired时,设置默认的构造函数作为额外选择if (requiredConstructor == null) {if (defaultConstructor != null) {
candidates.add(defaultConstructor);
}//如果没有默认的无参构造函数,且有@Autowired(required = false)的构造函数,则发出警告信
else if (candidates.size() == 1 &&logger.isWarnEnabled()) {
logger.warn("Inconsistent constructor declaration on bean with name '" + beanName +
"': single autowire-marked constructor flagged as optional - " +
"this constructor is effectively required since there is no " +
"default constructor to fall back to: " + candidates.get(0));
}
}
candidateConstructors= candidates.toArray(new Constructor>[candidates.size()]);
}//若只有一个构造函数,且没标识@Autowired,其参数长度>0,将其作为候选者
else if (rawCandidates.length == 1 && rawCandidates[0].getParameterTypes().length > 0) {
candidateConstructors= new Constructor>[] {rawCandidates[0]};
}//没有合适的构造函数
else{
candidateConstructors= new Constructor>[0];
}this.candidateConstructorsCache.put(beanClass, candidateConstructors);
}
}
}return (candidateConstructors.length > 0 ? candidateConstructors : null);
}
}
AutowiredAnnotationBeanPostProcessor筛选@Autowired标识的构造函数的代码就是这些,筛选出这些构造函数之后,Spring使用ConstructorResolver这个类来择取合适的构造函数,流程如下:
首先对这些构造函数按修饰符优先public排序,修饰符相同再按参数的长短排序,最先解析参数最长的public修饰的构造函数,其优先级最高.
对构造函数的每一个参数解析,如果每一个参数均能从Spring容器中找到合适的Bean,则此将此构造函数作为最优解,如果容器内Bean不能满足所有参数,则解析下一个构造函数。
如果存在两个参数长度相同的构造函数,且容器内Bean均能满足参数解析,则按参数类型和Bean类型的差异性求取参数的差异权重,比如参数是接口,Bean是实现类,则差异加2,参数是集合,Bean是单个类,则转换成集合,差异加2等等,比较两个构造函数的差异权重大小,差异小的那个作为最优解。如果两个差异权重相等,则抛出含有模棱两可的构造函数的BeanCreationException。
当有了最优解的构造函数后,如果下一个构造函数的参数长度等于最优解,则解析此构造函数,如果参数长度小于最优解,则不再解析,直接忽略之后的所有构造函数。
当得到了构造函数最优解之后,将此构造函数存入此Bean的BeanDefinition中,以备下次复用,就是说只对构造函数候选者集合解析一次,下次实例化Bean的时候可以直接得到这个最优解。
以上的情况是基于Spring容器实例化Bean的情况,就是实例化时不会附带Arguments,就是不带参数,如果是使用者自己实例化Bean时,通过BeanFactory的 Object getBean(String name, Object… args) throws BeansException; T getBean(Class requiredType, Object… args) throws BeansException;方法实例化时,按照构造函数的顺序传入实例化参数,则Spring在找合适的构造函数时会忽略之前缓存的最优解,以同样的顺序解析构造函数候选者集合,看看哪些构造函数的参数适合传入的参数,找不到合适的则跑出BeanCreationException。
以上就是@Autowired注解在构造函数上的用法的原理及流程。
注意事项:
在使用@Autowired时,首先在容器中查询对应类型的bean,
如果查询结果刚好为一个,就将该bean装配给@Autowired指定的数据
如果查询的结果不止一个,那么@Autowired会根据名称来查找。
如果查询的结果为空,那么会抛出异常。解决方法时,使用required=false
上述过程说明了@Autowired注解默认是按照类型装配注入的,默认情况下它要求依赖对象必须存在如果允许为null,可以设置它required属性为false,如果想按照名称来转配注入,则需要结合@Qualifier一起使用;
三、 处理使用@Autowired注解出现自动装配的歧义性问题
使用@Autowired注解的过程中,如果出现NoUniqueBeanDefinitionException异常,大多是因为自动装配或者其他方式装配所导致的歧义性.即一个接口存在两个以上的实现类.即在自动装配的时候,可能出现因重名问题导致的NoUniqueBeanDefinitionException异常.
@Autowired是按类型进行装配的,那么我一个接口UserInterface,有多个实现类
AImpl(@service(name="userInterface1")),BImpl(@service(name="userInterface2")
等等这些实现类都加入了Spring容器,当在一个类中使用如下语句:
@Autowired
private IUserInterface userInterface;
在下面列举一下了一下,上述问题以及类似的装配歧义性解决问题方法.
方法一
首先加上注解@Qualifier来区分不同的实例.通过在实现接口的类上通过value属性去命名不同的名称,对于@Repository、@Service 和 @Controller 和 @Component四个注解都有类似value属性可以设置,例如:
@Service(value="userServiceImpl")public class UserServiceImpl implementsIUserService{
}
@Autowired
@Qualifier("userServiceImpl")private IUserService userServiceImpl;
方法二
因为一个接口存在两个以上的实现类,也可以通过标识首选哪个bean,来解决歧义性问题.例如:
@Component
@Primarypublic class UserServiceImpl implementsIUserService{
}
此时,如果引用到了IUserService接口的实现类注入,则首先注入@Promary注解标注的类,但是此时有一个问题,在同一个接口的实现类中,你只能使用一次@Primary,如果对于AImpl和BImpl都使用了@primary,则还是会发生装配的歧义性.此时,建议使用(1)的方式来解决歧义性问题.
方法三
最后一种方式,可以使用自定义的限定符注解,但是此种情况很少出现,再次就不做介绍,可自行百度.
四、 Spring通过哪些特性实现自动装配的?
Spring从两个角度来实现自动化装配:
(1)组件扫描(component scanning):Spring会自动发现应用上下文中所创建的bean.
(2)自动装配(autowiring):Spring自动满足bean之间的依赖.
组件扫描和自动装配组合在一起就能发挥出强大的威力,它们能够将你的显示配置降低到最少.
五、@Autowired和@Resource之间的区别
在本文只列举出@Autowired和@Resource之间常见的表面区别,至于区别的原因需要查看Spring官方文档中的@Autowired注解实现方式和Java中@Resource注解实现方式.
(1)、@Autowired默认是按照类型装配注入的,默认情况下它要求依赖对象必须存在如果允许为null,可以设置它required属性为false,如果想按照名称来转配注入,则需要结合@Qualifier一起使用;
(2)、@Resource默认是按照名称来装配注入的,只有当找不到与名称匹配的bean才会按照类型来装配注入;
(3)、@Resource注解是由J2EE提供,而@Autowired是由spring提供,故减少系统对spring的依赖建议使用@Resource的方式;
(4)、@Resource和@Autowired都可以书写标注在字段或者该字段的setter方法之上
(5)、@Resource默认按照名称装配,当找不到与名称匹配的bean才会按照类型装配,可以通过name属性指定,如果没有指定name属 性,当注解标注在字段上,即默认取字段的名称作为bean名称寻找依赖对象,当注解标注在属性的setter方法上,即默认取属性名作为bean名称寻找 依赖对象.注意:如果没有指定name属性,并且按照默认的名称仍然找不到依赖的对象时候,会回退到按照类型装配,但一旦指定了name属性,就只能按照名称装配了.
六、Spring是如何启动自动扫描的
在这里列举出三种启动自动扫描的方式.
方式一:此种情况下,针对比较特殊的情形,即项目中运用了SpringBoot,则可以利用@SpringBootApplication注解的方式启动自动扫描功能.
importorg.springframework.boot.SpringApplication;importorg.springframework.boot.autoconfigure.SpringBootApplication;
@SpringBootApplicationpublic classApplication {public static voidmain(String[] args) {
SpringApplication.run(Application.class, args);
}
}
方式二:通过XML配置方式,启动自动扫描功能.XML配置方式
标签将会开启Spring Beans的自动扫描,并可设置base-package属性,表示Spring将会扫描该目录以及子目录下所有被@Component标注修饰的类,对它们进行装配。
方式三:通过Java配置方式,启动自动扫描功能.
importorg.springframework.context.annotation.ComponentScan;importorg.springframework.context.annotation.Configuration;
@Configuration
@ComponentScan(basePackages= "com.cn.config")public classBlogSystemConfig {/*** 在这里实现java方式的配置,*/}
在这里给出一个具体的实例:
importorg.apache.commons.dbcp.BasicDataSource;importorg.springframework.context.annotation.Bean;importorg.springframework.context.annotation.Configuration;
@Configuration
@ComponentScan(basePackages= "com.cn.config")public classDataSourceConfig {
@Bean(name="dataSource")//java配置方式,配置数据源(dataSource)
publicBasicDataSource dataSource(){
BasicDataSource dataSource= newBasicDataSource();
dataSource.setDriverClassName("org.postgresql.Driver");
dataSource.setUrl("jdbc:postgresql://127.0.0.1:5432/center_db?useUnicode=true&characterEncoding=UTF-8");
dataSource.setUsername("postgres");
dataSource.setPassword("123456");
dataSource.setInitialSize(5);
dataSource.setMaxActive(10);returndataSource;
}
}
关于@Configuration和@ComponentScan两个注解:
(1)@Configuration表示这个Java文件是一个配置文件,这类Java代码的作用在于配置,要和普通的Java代码区分开发,因此一般我们需要将其放在一个专门的包中,在代码例子中是com.cn.config。
(2)@ComponentScan表示开启Spring Beans扫描,类似于XML配置,这里也可以可以设置basePackages属性。
如果@ComponentScan注解没有显示去给其他的属性赋值的话,比如此处给basePackages赋值了,如果没有的话,@ComponentScan注解会扫描与配置类相同的包.
注意:
关于@Repository、@Service 和 @Controller 和 @Component四个注解的使用情形
在持久层、业务层和控制层分别采用 @Repository、@Service 和 @Controller 对分层中的类进行注释,而用 @Component 对那些比较中立的类进行注释.这里就是说把这个类交给Spring管理,重新起个名字叫userManager,由于不好说这个类属于哪个层面,就用@Component.
七、Spring存在几种装配方式?
目前,在Spring中,一共提供三种装配方式:
(1)基于标注的自动装配
(2)基于XML配置的显式装配
(3)基于Java配置的显式装配
在实际项目中,一般是上述三种装备方式都可能存在,不过基于标注的自动装配方式是在项目中最常用的.通过给Java类增加相应的标注,就能够启用Spring隐式的Bean发现机制,并自动完成装配过程.我们在开发中应该尽可能使用自动装配,足以应付开发中的绝大多数情况.在某些情况下,基于XML配置和基于Java配置的显式装配会有用武之地,比如实例化一个第三方库中的Bean.这种情况下,Java配置和XML配置我们优先使用Java配置,因为这是一种类型安全的方式,能够在编译时就尽早发现错误.
关于上述所说的类型安全可以这样理解:
如果使用字符串的形式,在xml中类名或其他硬编码方式提供的信息,在开发时是发现不了的,会在运行时抛出异常。而使用Java配置形式,类名或其他硬编码配置信息写错的话,编译时就会提示错误,比如Eclipse中就会提示找不到类的错误信息,这就避免了这种情况下的运行时异常,因此是更加安全的.
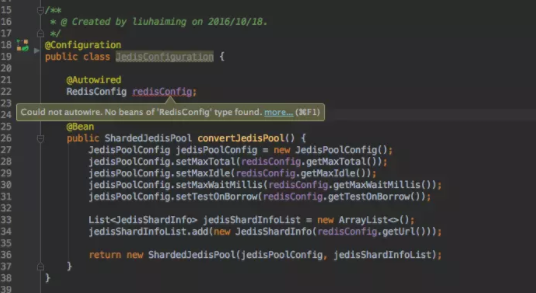
八、@Configuration 中使用@ Autowired 注解 IDE 报错
在 Spring Boot 项目中会用 @Configuration 注解来初始化配置, 这时可以通过 @autowired 自动注入封装好的model对象, 方便使用yml中的配置的数据。
这样做代码运行没问题,通过该对象也可以成功的获取yml配置文件中的数据,但是 IDE 却给出 “Could not autowird. No beans of'RedisConfig' type found.” 的错误提示。
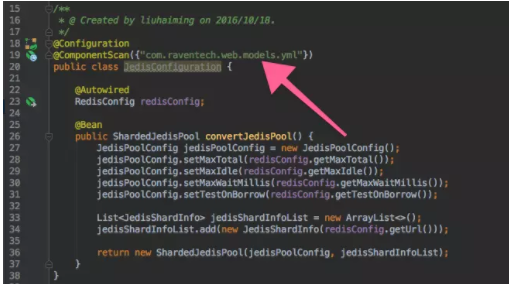
我们手动的在 @Configuration 注解下面添加 @ComponentScan 注解并指定所需model类的包地址就可以解决整个问题了。
原因估计是因为在项目的启动的最初阶段,IDE 还没有扫描到model类,无法发现对应的 bean ,于是就需要我们手动的给其指定需要扫描的包了。
参考:https://blog.csdn.net/z69183787/article/details/105989548


 377
377


 被折叠的 条评论
为什么被折叠?
被折叠的 条评论
为什么被折叠?
 到【灌水乐园】发言


