ueditor编辑器java使用_java/springboot整合UEditor编辑器

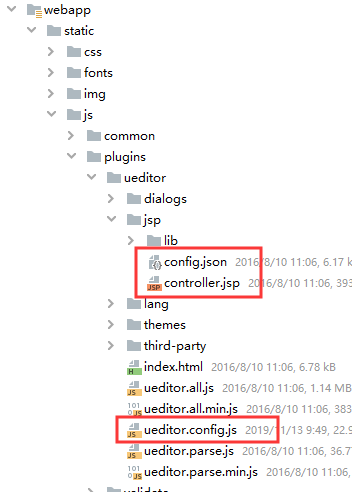
官网下载jsp版ueditor放进项目,其实放在哪个目录看项目习惯(有些按照网上的来就是路径问题导致),主要是获取配置的时候能找到相应的路径。

d6a6b14fde03958aa0ba349ca9559173.png

页面上引入相应js,加上也可script方式

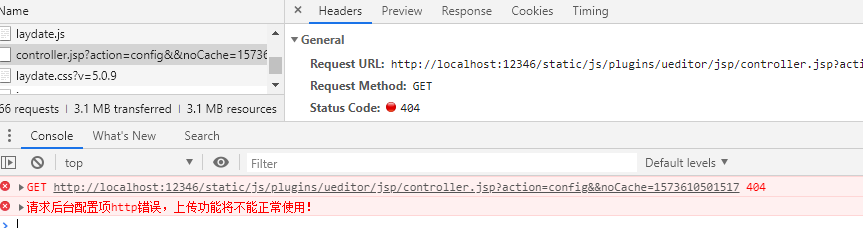
ueditor加载会去读取:服务器统一请求接口路径,默认为:serverUrl: URL + "jsp/controller.jsp"

加载时首先会以get方式去读取配置信息(jsp/config.json里面的内容),然后再以post请求去上传图片或视频(请求后面带的参数会不一样【get】http://xxxx/xx?action=config或者【post】http://xxxx/xx?action=uploadimage)

get请求不到的话会报:请求后台配置项http错误,上传功能将不能正常使用!

59ab068458ef8f4a182fa861b6143f82.png

get请求到了但返回配置错误的话上传会出错:

0304df6be5aa1c18a405139273de9932.png

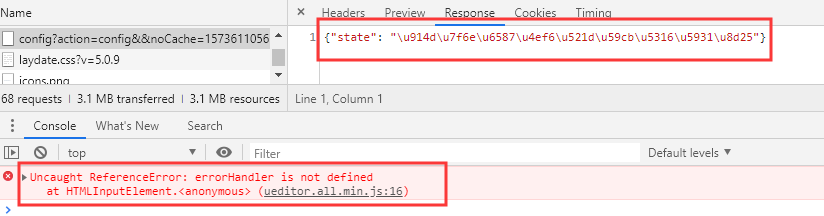
需要注意的是jsp版本的,而使用的是spring boot,请求应该经过控制器,而不能直接去访问这个jsp,当我们直接在浏览器输入这个请求http://xxxx/ueditor/jsp/controller.jsp?action=config&&noCache=12342时你会发现,这成了一个下载链接,可以下载contoller.jsp。

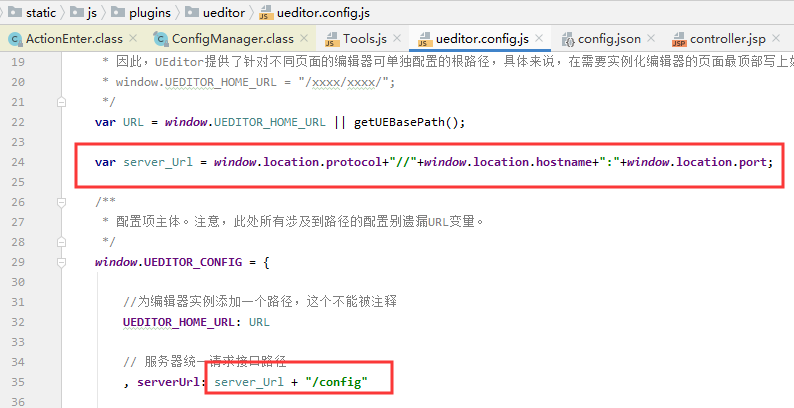
所以注意如果不修改serverUrl: URL + "jsp/controller.jsp"那一定要保证controller.jsp能正常访问且返回config.json里面的配置。

70b873de6909d9f5dab9d00e65ddfde0.png

返回格式一定需要是这样:

a4e50c854ee77891e9cc45c59c4ed4d3.png

在此提供两种方式获取config配置:

1.继续使用读取js/config.json目录里的配置,修改ueditor.config.js中配置的服务器统一请求接口路径serverUrl的值去后台执行方法获取,如下:

8687356f23a671b8d292a139fcbd1b90.png

后台方法(方法名自定义):

e0b3c35c1d483128638eb3942347e4c0.png

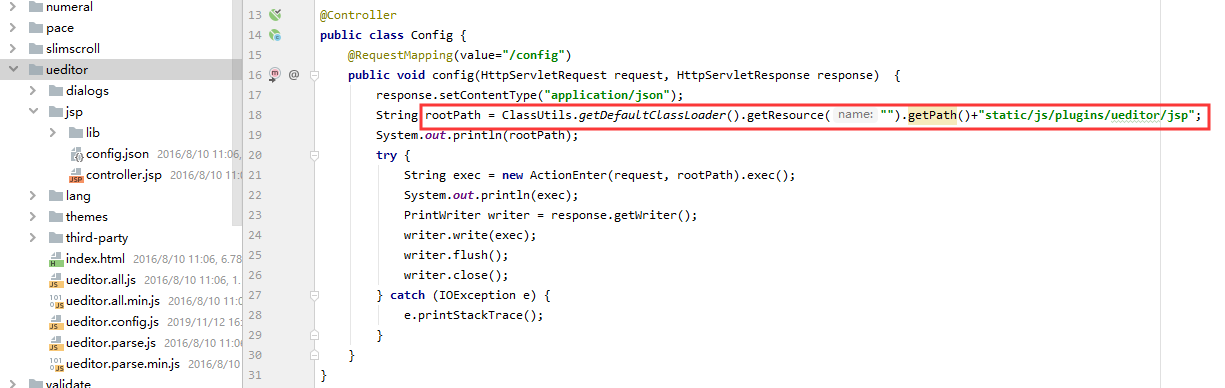
这个rootPath是指向的是config.json所在的目录(static/js/plugins/ueditor/jsp),spring boot中应该这样修改才能获取的到,然后用PrintWriter来输出json格式的配置信息。那么这个方法就作为了ueditor向服务器发送请求的控制器了,从而取代了controller.jsp的作用

这个controller可以用现有的,也可新建。但一定要注意这个请求一定是http://xxxx/config不能是http://xxxx/file(或其他)/config,代码如下:

@Controller

public class Config {

@RequestMapping(value="/config")

public void config(HttpServletRequest request, HttpServletResponse response) {

response.setContentType("application/json");

String rootPath = ClassUtils.getDefaultClassLoader().getResource("").getPath()+"static/js/plugins/ueditor/jsp

  • 0
    点赞
  • 0
    收藏
    觉得还不错? 一键收藏
  • 0
    评论
可以使用以下步骤在Spring Boot中集成UEditor富文本编辑器: 1.下载UEditor插件,将其解压缩到项目的静态资源目录(如:src/main/resources/static/ueditor)中。 2.在Spring Boot的配置文件application.properties或application.yml中添加如下配置: ```properties spring.resources.static-locations=classpath:/static/ ``` 或 ```yaml spring: resources: static-locations: classpath:/static/ ``` 3.编写一个Controller来访问UEditor插件,代码如下: ```java @Controller @RequestMapping("/ueditor") public class UeditorController { @GetMapping("/") public String index() { return "ueditor/index"; } @PostMapping("/upload") @ResponseBody public String upload(HttpServletRequest request) { String result = ""; try { // 获取UEditor上传的文件 MultipartFile file = ((MultipartHttpServletRequest) request).getFile("upfile"); // 获取文件名 String fileName = file.getOriginalFilename(); // 获取文件后缀 String suffix = fileName.substring(fileName.lastIndexOf(".")); // 生成新的文件名 String newFileName = UUID.randomUUID().toString() + suffix; // 获取文件保存路径 String savePath = "src/main/resources/static/ueditor/upload/"; File saveFile = new File(savePath + newFileName); // 保存文件 file.transferTo(saveFile); // 返回文件访问路径 result = "{\"state\":\"SUCCESS\",\"url\":\"/ueditor/upload/" + newFileName + "\",\"title\":\"" + fileName + "\",\"original\":\"" + fileName + "\"}"; } catch (Exception e) { e.printStackTrace(); result = "{\"state\":\"ERROR\"}"; } return result; } } ``` 4.在静态资源目录中创建一个index.html文件,代码如下: ```html <!DOCTYPE html> <html> <head> <meta charset="UTF-8"> <title>UEditor Demo</title> <!-- 引入UEditor --> <script type="text/javascript" src="/ueditor/ueditor.config.js"></script> <script type="text/javascript" src="/ueditor/ueditor.all.min.js"></script> <script type="text/javascript" src="/ueditor/lang/zh-cn/zh-cn.js"></script> </head> <body> <!-- 编辑器容器 --> <script id="editor" type="text/plain"></script> <!-- 实例化编辑器 --> <script type="text/javascript"> var editor = UE.getEditor('editor'); </script> </body> </html> ``` 5.启动应用,访问http://localhost:8080/ueditor/,即可看到UEditor富文本编辑器。 注意:在上传文件时,需要先创建一个文件夹(如:upload),并将其放在静态资源目录中。同时,需要对文件保存路径进行修改。

“相关推荐”对你有帮助么?

  • 非常没帮助
  • 没帮助
  • 一般
  • 有帮助
  • 非常有帮助
提交
评论
添加红包

请填写红包祝福语或标题

红包个数最小为10个

红包金额最低5元

当前余额3.43前往充值 >
需支付:10.00
成就一亿技术人!
领取后你会自动成为博主和红包主的粉丝 规则
hope_wisdom
发出的红包
实付
使用余额支付
点击重新获取
扫码支付
钱包余额 0

抵扣说明:

1.余额是钱包充值的虚拟货币,按照1:1的比例进行支付金额的抵扣。
2.余额无法直接购买下载,可以购买VIP、付费专栏及课程。

余额充值