


一.概述
本章使用 Entity Framework Core 构建执行基本数据访问的 http://ASP.NET Core MVC 应用程序。使用迁移(migrations)基于数据模型创建数据库,是一种code first模式。可以在Windows 上使用 Visual Studio 2017,或在 Windows、macOS 或 Linux 上使用 .NET Core CLI 来学习。已经安装了NET Core 2.1 SDK,这里使用Visual Studio 2017和sql server 2012演示。
1.1 创建新项目
(1) 打开 Visual Studio 2017
(2) 选择 http://ASP.NET Core Web 应用程序。
(3) 输入 EFGetStarted.AspNetCore.NewDb 作为名称。
(4) 在新建 http://ASP.NET Core Web 应用程序 对话框中:
确保在下拉列表中选择“.NET Core”和“http://ASP.NET Core 2.2”
选择“Web 应用程序(模型视图控制器)”项目模板
确保将“身份验证”设置为“无身份验证”
(5) 编译
出错:“任务不支持“SharedCompilationId”参数。请确认该参数存在于此任务中” ,安装如下:
PM> install-package Microsoft.Net.Compilers1.2 安装 Entity Framework Core
要安装 EF Core,需要把目标对象的 EF Core 数据库提供程序安装。本篇使用SQL Server数据库,需要安装 SQL Server 提供程序包。
install-package Microsoft.EntityFrameworkCore.SqlServer -Version 2.2.0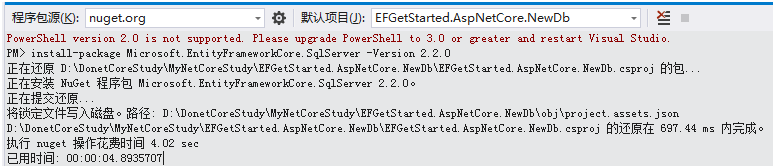
1.3 创建模型
右键单击“Models”文件夹,然后选择“添加”>“类。输入“Model.cs”作为名称。
/// <summary>
    /// 创建模型
    /// using Microsoft.EntityFrameworkCore;
    /// </summary>
    public class BloggingContext : DbContext
    {
        public BloggingContext(DbContextOptions<BloggingContext> options)
            : base(options)
        { }

        public DbSet<Blog> Blogs { get; set; }
        public DbSet<Post> Posts { get; set; }
    }

    public class Blog
    {
        public int BlogId { get; set; }
        public string Url { get; set; }

        public ICollection<Post> Posts { get; set; }
    }

    public class Post
    {
        public int PostId { get; set; }
        public string Title { get; set; }
        public string Content { get; set; }

        public int BlogId { get; set; }
        public Blog Blog { get; set; }
    }
1.4 使用依赖注入注册上下文
服务(例如 BloggingContext)在应用程序启动期间通过依赖关系注入进行注册。 需要这些服务的组件(如 MVC 控制器)可以通过向构造函数或属性添加相关参数来获得对应服务。
public void ConfigureServices(IServiceCollection services)
        {
            services.Configure<CookiePolicyOptions>(options =>
            {
                // This lambda determines whether user consent for non-essential cookies is needed for a given request.
                options.CheckConsentNeeded = context => true;
                options.MinimumSameSitePolicy = SameSiteMode.None;
            });
            services.AddMvc().SetCompatibilityVersion(CompatibilityVersion.Version_2_2);
            /*
              using EFGetStarted.AspNetCore.NewDb.Models;
              using Microsoft.EntityFrameworkCore;
             */
                     var connection = "Data Source = {ip};Initial Catalog = EFGetStarted.AspNetCore.NewDb; User ID = hsr;Password =js*2015;";
                      services.AddDbContext<BloggingContext>
                (options => options.UseSqlServer(connection));
        }
上面通过services.AddDbContext< BloggingContext)服务注入到容器中,并使用UseSqlServer 连接方式。我在sql 2012中已手动建立了EFGetStarted.AspNetCore.NewDb库。在生产应用中,通常会将连接字符串放在配置文件或环境变量中。 为简单起见,本篇在代码中定义它。
1.5 创建数据库
以下步骤使用迁移Migration创建数据库。根据上面1.3以有的模型。在工具”>“NuGet 包管理器”>“包管理器控制台”,运行以下命令:
   PM> Add-Migration InitialCreate
    The Entity Framework Core Package Manager Console Tools don't support PowerShell version 2.0. Upgrade to PowerShell version 3.0 or higher,
    restart Visual Studio, and try again.
解决方案: https://blog.csdn.net/lilinoscar/article/details/81739770
PM> Add-Migration InitialCreate
        Microsoft.EntityFrameworkCore.Infrastructure[10403]
              Entity Framework Core 2.2.1-servicing-10028 initialized 'BloggingContext' using provider 'Microsoft.EntityFrameworkCore.SqlServer'
     with options: None
      To undo this action, use Remove-Migration.
在vs 2017当前项目结构中查看,自动生成二个.cs类, 如下所示:

PM> Update-Database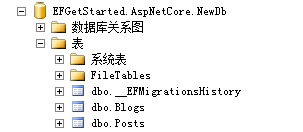
Add-Migration 命令为迁移搭建基架,以便为模型创建一组初始表。 Update-Database 命令创建数据库并向其应用新的迁移。
1.6 创建控制器
生成 Blogs实体 控制器和视图。右键单击“控制器”文件夹,然后选择“添加”>“控制器”
public class BlogsController : Controller
{
public BloggingContext BloggingContext { get; }
public BlogsController(BloggingContext bloggingContext)
{
this.BloggingContext = bloggingContext;
}
// GET: /<controller>/
public IActionResult Index()
{
return View();
}
[HttpGet]
public IActionResult Create()
{
return View();
}
[HttpPost]
public async Task<IActionResult> Create([Bind("Url")] Blog blog)
{
BloggingContext.Add<Blog>(blog);
await BloggingContext.SaveChangesAsync();
return View();
}
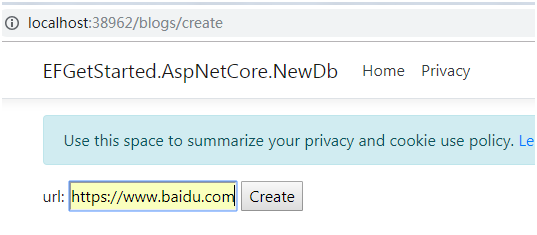
}1.7 创建视图
新建视图,结构目录是:Views-- Blogs-- Create.cshtml
@model EFGetStarted.AspNetCore.NewDb.Models.Blog;
@{
<form asp-controller="Blogs" asp-action="Create" method="post" >
<p>
url: <input type="text" asp-for="Url" />
<input type="submit" value="Create" />
</p>
</form>
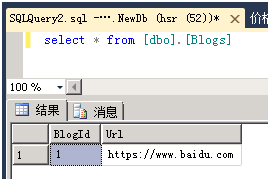
}演示如下,点击create按钮,异步调用后台控制器Blogs下的Create的HttpPost特性方法。插入一条数据到Blogs数据表中。
参考文献:
官方文档:ASP.NET Core 新建数据库
欢迎添加个人微信号:Like若所思。
欢迎关注我的公众号,不仅为你推荐最新的博文,还有更多惊喜和资源在等着你!一起学习共同进步!


 209
209

 被折叠的 条评论
为什么被折叠?
被折叠的 条评论
为什么被折叠?
 到【灌水乐园】发言


