


本来我想一口气发完的,但感觉这次的文章写得实在太差,逻辑感不强,也比较长,所以本文尝试分为三部分:
- 原型与api https://zhuanlan.zhihu.com/p/91179318
- 上下文切换 https://zhuanlan.zhihu.com/p/91184528
- 完善功能 https://zhuanlan.zhihu.com/p/91186796
这部分主要讲上下文切换的实现。
ucontext
我们实现了上下文切换主要是使用了glibc提供的ucontext.h。它提供了四个api:
/* Get user context and store it in variable pointed to by UCP.  */
extern int getcontext (ucontext_t *__ucp) __THROWNL;

/* Set user context from information of variable pointed to by UCP.  */
extern int setcontext (const ucontext_t *__ucp) __THROWNL;

/* Save current context in context variable pointed to by OUCP and set
   context from variable pointed to by UCP.  */
extern int swapcontext (ucontext_t *__restrict __oucp,
			const ucontext_t *__restrict __ucp) __THROWNL;

/* Manipulate user context UCP to continue with calling functions FUNC
   and the ARGC-1 parameters following ARGC when the context is used
   the next time in `setcontext' or `swapcontext'.

   We cannot say anything about the parameters FUNC takes; `void'
   is as good as any other choice.  */
extern void makecontext (ucontext_t *__ucp, void (*__func) (void),
			 int __argc, ...) __THROW;
上一篇中实现C的原型的时候,就有展示过怎么用了。我们最主要的使用到了上下文切换的功能。而ucontext还支持了非局部转跳(setjmp/longjmp)等功能,多保存了些我们不需要的上下文信息。最主要的是glibc windows上也没有(但是有winapi提供的WinFiber)。
上下文切换
现在我们要去ucontext化,如何实现上下文切换功能呢?我们需要先要了解一下x86-64和posix abi的调用约定(先假定是非windows的x64平台)
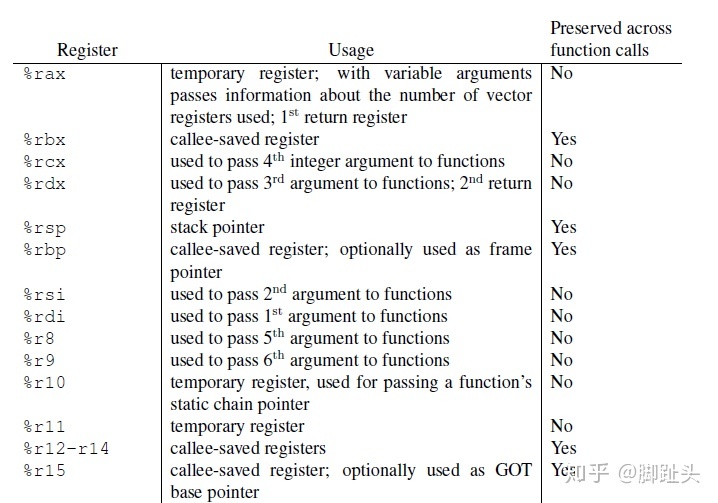
寄存器
- rax作为返回值。不需要保护。
- rsp栈指针寄存器,指向栈顶。需要被保护。
- rdi, rsi, rdx, rcx, r8, r9依次对应函数的前六个参数,当参数超过6个,才会压栈。不需要保护。
- rbx, rbp, r12到r15,用于数据存储,“属于”调用者。需要被保护。
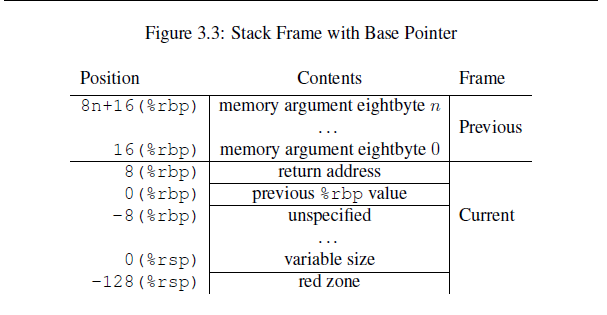
调用栈调用栈是从上往下增长的,一个函数的栈帧长这样:
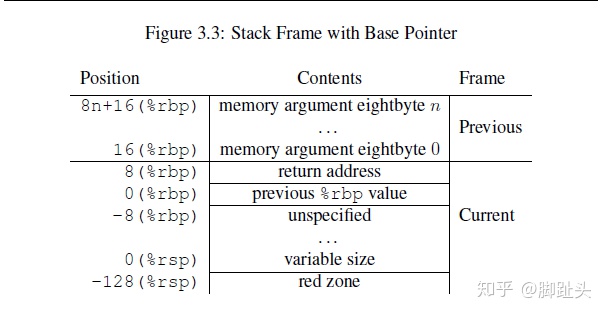
当前函数栈帧从高地址(栈底)到低地址(栈顶)分别有返回地址,局部变量等东西。然后前一个帧栈有函数参数。
函数调用
call指令:先将下一条指令的地址(return address)push到栈顶,然后转跳到函数体ret指令:将return address(栈顶,rsp所指向的位置) pop到rip中。- 在执行call之后,会将rsp挪到新的位置,创造一个新的帧栈。
- 在执行ret之前,会将rsp挪回去,销毁当前帧栈。
对于上下文切换我们只需要把需要被保护的寄存器存起来就好,同时也不需要处理浮点数的东西。
#[derive(Debug, Default, Clone, Copy)]
#[repr(C)]
struct Ctx {
    rsp: u64,
    r15: u64,
    r14: u64,
    r13: u64,
    r12: u64,
    rbx: u64,
    rbp: u64,
    gen_ptr: u64, // 当做参数指向协程generator
}

extern "C" {
    fn switch_ctx(old: *mut Ctx, new: *const Ctx);
}
上下文切换实现起来十分的简单,只要简单的保存上下文,恢复上下文就可以了。switch_ctx的汇编实现:
switch_ctx:
    ; 这里没像普通函数那样子开辟新的栈帧
    ; 保存当前上下文到old
    mov     %rsp, 0x00(%rdi)
    mov     %r15, 0x08(%rdi)
    mov     %r14, 0x10(%rdi)
    mov     %r13, 0x18(%rdi)
    mov     %r12, 0x20(%rdi)
    mov     %rbx, 0x28(%rdi)
    mov     %rbp, 0x30(%rdi)
    ; 从new恢复上下文
    mov     0x00(%rsi), %rsp ; 修改栈指针,使得调用栈从自定义的空间中开始
    mov     0x08(%rsi), %r15
    mov     0x10(%rsi), %r14
    mov     0x18(%rsi), %r13
    mov     0x20(%rsi), %r12
    mov     0x28(%rsi), %rbx
    mov     0x30(%rsi), %rbp
    ; 将gen_ptr当做第一个参数传给bootstrap
    mov     0x38(%rsi), %rdi
    ret
还有makecontext对应的过程:
unsafe fn init_ctx<Send, Recv>(
    ctx: &mut Ctx,
    dual_gen: Box<Gen<Recv, Send>>, // caller的generator
    stack_ptr: *mut u8,
    stack_size: usize,
) {
    // bootstrap的第一个参数,并用Box::into_raw释放其所有权。
    // 进入bootstrap前给rdi寄存器
    ctx.gen_ptr = Box::into_raw(dual_gen) as u64;
    // 设置协程入口点为bootstrap
    ptr::write(
        // 这里要给栈底设置足够多的空闲位置
        stack_ptr.add(stack_size - 32) as *mut u64,
        bootstrap::<Send, Recv> as u64,
    );
    // 让栈顶指针指向返回地址(bootstrap)
    // 当switch_ctx返回时,就会将所指向的地址(bootstrap)弹到rip中,然后执行bootstrap
    ctx.rsp = stack_ptr.add(stack_size - 32) as u64;
}
现在只需要将swapcontext换成我们写的switch_ctx,然后将makecontext换成init_ctx,最后在bootstrap最后手动调用switch_ctx就好。
其中bootstrap的签名为:
unsafe fn bootstrap<Send, Recv>(dual_gen_raw: *mut Gen<Recv, Send>) -> !
伪小结
本篇的实现参考了文章
Introductioncfsamson.gitbook.io
将ucontext替换为了自己的实现的上下文切换的函数。这里的汇编代码可以先编译成静态库然后给rust使用,也可以编写build.rs执行编译打包的脚本,直接在cargo工程中编写汇编。


 3506
3506

 被折叠的 条评论
为什么被折叠?
被折叠的 条评论
为什么被折叠?
 到【灌水乐园】发言


