


这篇文章主要讲解在 django3 的项目中,如何使用 websocket
这是一个 代理IP 的小项目,当前为0.2版本,该版本分为三端,服务器端,代理IP端,用户端
可以做到在任意一台服务器和任意内网电脑上一键部署,一键启动,使该服务器通过内网机器为你提供代理IP服务。可以做到在服务器数量有限的情况下,部署更多的代理IP
该项目今后的发展方向是在手机上部署代理IP端,以获得更多的代理IP
当前环境为:
ubuntu 20.04python 3.8aiohttpasynciodjango 3.1daphnenginx项目流程图:
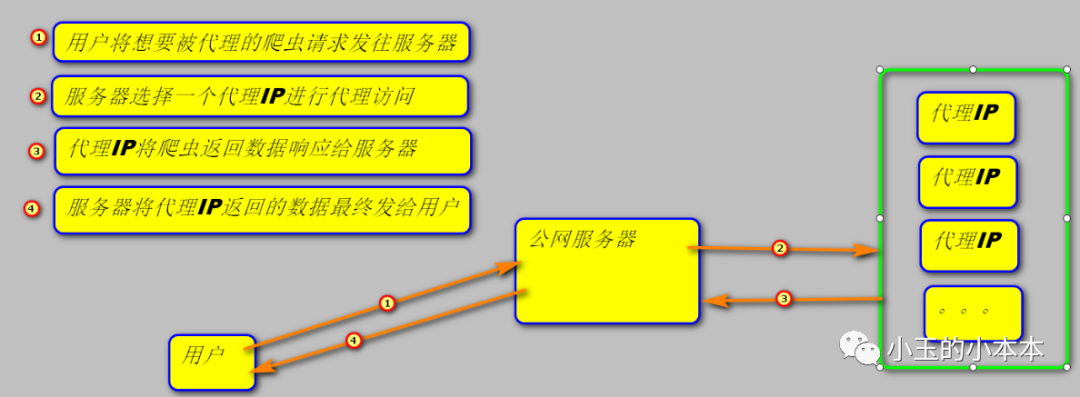
看起来很简单的4个步骤,在技术选型上却想了很久,曾经想过轮询和消息队列的模型,都遇见一个无法绕过的问题:服务器和用户连接的这个进程,如何才能知道代理IP那边已经完成了任务?
后来突发奇想,能不能让TCP的连接不断开,有这个保证的话,可能会想到一些办法。我就上百度去搜,发现这个技术已经有了,就是websocket,这名字我是见过的,在我爬取招聘网站信息提取关键词的时候,我还以为那是socket的一种别称,就没注意过它……
这里,我主要先讲一下
websocket 如何与采用 asgi 协议的 django3.X 项目结合食用.
如果asgi.py文件还不会写,那么请先看最下面的 【asgi.py 文件的编写】,那个不是我的原创,就放在后面了
websocket 的使用在 django3 里面有3个参数,他们分别是:(scope, receive, send)
async def application(scope, receive, send): """ var connection = new WebSocket('ws://127.0.0.1:8000/abc') scope: 详细如下 {'type': 'websocket', 'path': '/abc', 'raw_path': b'/abc', 'headers': [(b'host', b'127.0.0.1:8000'), (b'upgrade', b'WebSocket'), (b'connection', b'Upgrade'), (b'sec-websocket-version', b'13'), (b'sec-websocket-key', b'2viLa4ZBnF2953ARONVITw=='), (b'accept', b'*/*'), (b'accept-encoding', b'gzip, deflate'), (b'user-agent', b'Python/3.8 aiohttp/3.6.2')], 'query_string': b'', 'client': ['127.0.0.1', 47220], 'server': ['127.0.0.1', 8000], 'subprotocols': [], 'asgi': {'version': '3.0'}} receive: 详细如下 tasks=1>> send:
"""
从上面的注解可以看出:
scope 是一个详细信息的字典,其中包含了(协议类型,请求路径,请求头,查询字符串,客户端IP,服务端IP和其他的东西)
receive 是一个接收消息的对象,很明显可以看到其中包含了一条管道对象,而这条管道,我理解为就是收发消息的通道
send 是一个发送消息的对象,里面也包含了这条管道。
每一个建立的 websocket 都拥有独一无二的 这三个参数,也就是说,这三个参数合在一起,就相当于是我们建立的 websocket,
这也是当初困扰我的问题,如何在一个websocket里面,向另一个websocket发送消息,其实我们只需要拿到另一个websocket的 send 参数就可以了。
接下来,我们只要在连接建立之后,将这三个参数存入一个全局变量中,或是数据库中,我们就可以在任何地方,任何时候,调用任意一个websocket,以实现我们由服务端,主动向客户端发送消息的需求
# 这里展示一下,在代理IP与服务器建立的websocket连接中,调用客户与服务器连接的send对象,向客户发送消息pmip_dict = {}async def bypmip(scope, receive, send): """ 服务器端逻辑:将代理IP的IP做键,websocket对象作值,存入pmip_dict字典,如果该键已经存在,则拒绝连接,断开连接时删除该键值对 循环等待接收代理IP服务器的消息(这个消息包含爬虫返回的信息在内),再将该消息转发给提出此需求的客户 """ while True: event = await receive() if event['type'] == 'websocket.connect': # 初次建立连接时,会进入这个分支 ip = scope['client'][0] if not pmip_dict.get(ip, ''): # 将代理IP的IP做键,整个websocket作为值,存入字典 pmip_dict[ip] = [scope, receive, send] await send({'type': 'websocket.accept'}) else: await send({'type': 'websocket.no'}) elif event['type'] == 'websocket.receive': # 连接建立以后,接收到的消息会进入这个分支 # 判断这条消息是给哪个客户的,进行选择发送 # print(event) # >>> {'type': 'websocket.receive', 'bytes': b'user=127.0.0.1:40766,text=\nspan role="presentation" cm-text=" " style="box-sizing: border-box;font-family: var(--monospace);display: inline-block;"> html>\n\n\n…………} message = event['bytes'] # >>> b'user=127.0.0.1:40766,text=\n\n\n\n………… user = re.search(rb'user=(?P.*?),text', message, re.S).group('IP').decode() text = re.search(rb',text=(?P.*)',message,re.S).group('text') if target_send := clien_dict.get(user,None)[-1]: # 【这里就是在代理IP与服务器的websocket连接中,调用客户与服务器的send对象,向客户发送消息】 await target_send({'type': 'websocket.send', 'bytes': text}) elif event['type'] == 'websocket.disconnect': # 断开连接时,会进入这个分支 try: del pmip_dict[ip] except Exception as e: pass print('断开连接') breakasgi.py 文件的编写(这里是百度上找的)
import osfrom django.core.asgi import get_asgi_application# 【【【【记得改】】】】from [你的项目名字].websocket import websocket_application# 【【【【记得改】】】】os.environ.setdefault('DJANGO_SETTINGS_MODULE', 'myasgi.settings')django_application = get_asgi_application()async def application(scope, receive, send): if scope['type'] == 'http': # http 请求的入口 await django_application(scope, receive, send) elif scope['type'] == 'websocket': # websocket 请求的入口 await websocket_application(scope, receive, send) else: raise NotImplementedError(f"Unknown scope type {scope['type']}")接着在 asgi.py 文件的同级目录下,建立一个 websocket.py文件,并在里面创建一个函数 websocket_application,这个函数里就是整个websocket 完整逻辑
async def websocket_application(scope, receive, send): # 主函数 # 这里面是你自己的逻辑,怎么写都行 # 我这里是鉴别来者身份,并执行对应函数 result = await authentication(scope) await method_dict[result](scope, receive, send)用 daphne 启动项目
# 进入项目目录下daphne [你的项目名字].asgi:application基于 nginx 的 daphne(百度找的,亲测可用)
修改nginx 的配置文件 /etc/nginx/sites-enabled/default,添加或修改如下信息
upstream socket { ip_hash; server 127.0.0.1:8000 fail_timeout=0;}# 上面的IP端口自定义,就是daphne运行的端口server { listen 80 default_server; listen [::]:80 default_server; ... location / { proxy_pass http://socket; proxy_http_version 1.1; proxy_set_header Upgrade $http_upgrade; proxy_set_header Connection "upgrade"; } ...}启动daphne
# 在项目的 mannerge.py 同级目录下执行daphne [你的项目名字].asgi:application到这里,整个项目就启动了,欢迎点赞分享
欢迎关注我的微信公众号:不定期更新一些python相关的文章


 402
402


 被折叠的 条评论
为什么被折叠?
被折叠的 条评论
为什么被折叠?
 到【灌水乐园】发言


