


最近的项目需要搞一个人脸识别的东西!就是视频认证,然后根据认证的信息判断是否是本人操作!
因为之前没搞过人脸识别,所以找了半天解决方案,最后选定了用百度的人脸识别产品!
文档地址:https://cloud.baidu.com/doc/FACE/s/ak8jyl0ar
百度人脸识别产品优势:
1.快速集成,基本上零代码开发
2.因为之前用过百度的其它API,所以感觉百度的API文档介绍还是挺全面的,简单明了,不像抖音小程序那样,乱七八糟(吐槽下抖音小程序)
废话不多说,下面是集成步骤:
1.当然是先去注册百度开放平台,登录后到人工智能-人脸识别产品
2.然后创建应用,最后在创建人脸实名认证项目,如下图:
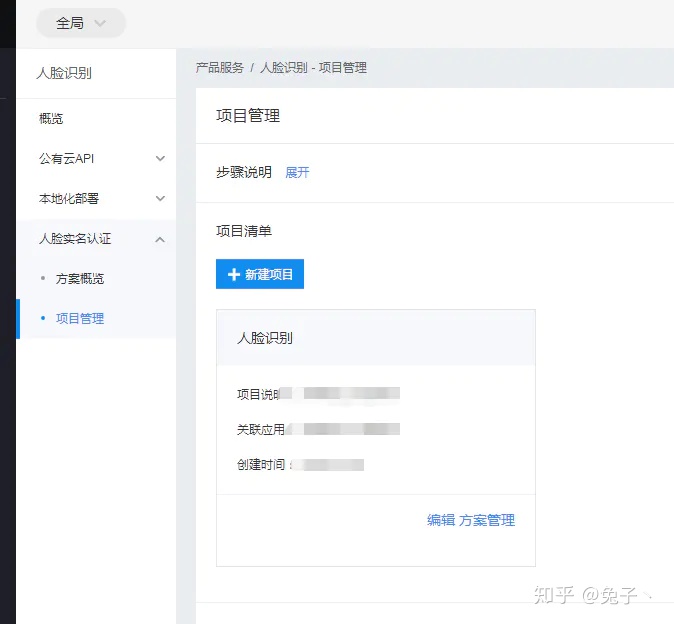
image.png
3.点击方案管理,新建方案。创建后的页面如下图:
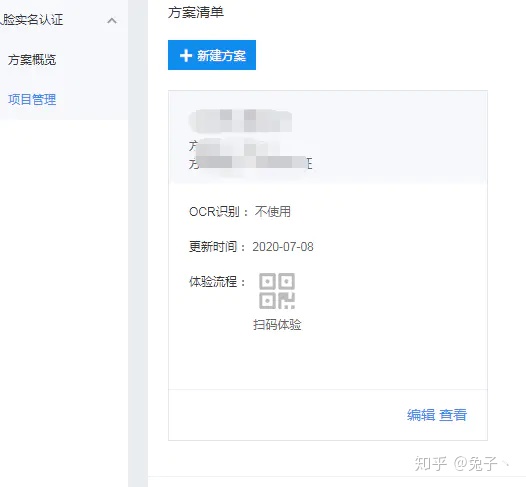
image.png
4.扫码就可以体验人脸识别了。
后台获取用户认证信息(java版):
文档地址:https://ai.baidu.com/ai-doc/FACE/Bk8k29mmq
1.首先要获取access_token,代码如下
/**
	 * 获取API访问token 该token有一定的有效期,需要自行管理,当失效时需重新获取.
	 *
	 * @param ak
	 *            - 百度云官网获取的 API Key
	 * @param sk
	 *            - 百度云官网获取的 Securet Key
	 * @return assess_token 示例:
	 *         "24.460da4889caad24cccdb1fea17221975.2592000.1491995545.282335-1234567"
	 */
	private static String getAuth(String ak, String sk) {

		String getAccessTokenUrl = HOST + "grant_type=client_credentials" + "&client_id=" + ak + "&client_secret=" + sk;
		try {
			URL realUrl = new URL(getAccessTokenUrl);
			// 打开和URL之间的连接
			HttpURLConnection connection = (HttpURLConnection) realUrl.openConnection();
			connection.setRequestMethod("GET");
			connection.connect();
			// 定义 BufferedReader输入流来读取URL的响应
			BufferedReader in = new BufferedReader(new InputStreamReader(connection.getInputStream()));
			String result = "";
			String line;
			while ((line = in.readLine()) != null) {
				result += line;
			}

			JSONObject jsonObject = new JSONObject(result);
			System.err.println(result);
			String access_token = jsonObject.getString("access_token");
			Calendar calendar = Calendar.getInstance();
			calendar.add(Calendar.SECOND, jsonObject.getInt("expires_in"));
			EXPIRES_IN = calendar.getTime();
			ACCESS_TOKEN = access_token;
			return access_token;
		} catch (Exception e) {
			System.err.printf("获取token失败!");
			e.printStackTrace(System.err);
		}
		return null;
	}
2.获取token后在获取verifyToken,此token用于获取认证URL和认证成功后的用户信息
获取verifyToken的代码如下:
/**
	 * 获取verify_token,用户获取认证URL和认证后的用户信息
	 *
	 * <p>
	 * Title: getVerifyToken
	 * </p>
	 *
	 * <p>
	 * Description:
	 * </p>
	 *
	 * @return
	 */
	private static String getVerifyToken() {

		String verifyToken = "";
		String host = "https://aip.baidubce.com/rpc/2.0/brain/solution/faceprint/verifyToken/generate";

		try {
			Map<String, Object> map = new HashMap<>();
			map.put("plan_id", 10414);

			String param = GsonUtils.toJson(map);

			// 注意这里仅为了简化编码每一次请求都去获取access_token,线上环境access_token有过期时间,
			// 客户端可自行缓存,过期后重新获取。
			String accessToken = getAuth();

			String result = HttpUtil.post(host, accessToken, "application/json", param);
			JSONObject jsonObject = new JSONObject(result);
			JSONObject v = jsonObject.getJSONObject("result");
			verifyToken = v.getString("verify_token");
			return verifyToken;
		} catch (Exception e) {
			e.printStackTrace();
		}
		return verifyToken;
	}
3.获取认证URL,用于返回给前端H5页面。
其中SUCCESS_URL为认证成功后跳转的页面,此URL不可自定义参数,所以这里需要把获取的verifyToken缓存起来,用于认证成功后根据verifyToken获取用户信息.
/**
	 * 获取认证URL
	 *
	 * <p>
	 * Title: getVerifyURL
	 * </p>
	 *
	 * <p>
	 * Description:
	 * </p>
	 *
	 * @return
	 */
	public static Map<String, String> getVerifyURL() {

		// https://brain.baidu.com/face/print/?token=xxx&successUrl=https://xxx&failedUrl=https://xxx
		String url = "https://brain.baidu.com/face/print/";
		String token = getVerifyToken();

		url += "?token=" + token;
		url += "&successUrl=" + SUCCESS_URL;
		url += "&failedUrl=" + FAIL_URL;

		Map<String, String> map = new HashMap<>();
		map.put("token", token);
		map.put("url", url);
		return map;
	}
4.获取用户认证信息
public static String getCardNum(String verifyToken) {
		String url = "https://aip.baidubce.com/rpc/2.0/brain/solution/faceprint/result/detail";
		String idCard = "";
		try {
			Map<String, Object> map = new HashMap<>();
			map.put("verify_token", verifyToken);

			String param = GsonUtils.toJson(map);

			// 注意这里仅为了简化编码每一次请求都去获取access_token,线上环境access_token有过期时间,
			// 客户端可自行缓存,过期后重新获取。
			String accessToken = getAuth();

			String result = HttpUtil.post(url, accessToken, "application/json", param);
			JSONObject jsonObject = new JSONObject(result);
			JSONObject res = jsonObject.getJSONObject("result");

			JSONObject cardConfirm = res.getJSONObject("idcard_confirm");

			idCard = cardConfirm.getString("idcard_number");

		} catch (Exception e) {
			// TODO: handle exception
		}
		return idCard;
	}
附上GsonUtils类和HttpUtil类
1.GsonUtils
import java.lang.reflect.Type;

import com.google.gson.Gson;
import com.google.gson.GsonBuilder;
import com.google.gson.JsonParseException;

/**
 * Json工具类.
 */
public class GsonUtils {
	private static Gson gson = new GsonBuilder().create();

	public static String toJson(Object value) {
		return gson.toJson(value);
	}

	public static <T> T fromJson(String json, Class<T> classOfT) throws JsonParseException {
		return gson.fromJson(json, classOfT);
	}

	@SuppressWarnings("unchecked")
	public static <T> T fromJson(String json, Type typeOfT) throws JsonParseException {
		return (T) gson.fromJson(json, typeOfT);
	}
}
2.HttpUtil
import java.io.BufferedReader;
import java.io.DataOutputStream;
import java.io.InputStreamReader;
import java.net.HttpURLConnection;
import java.net.URL;
import java.util.List;
import java.util.Map;

/**
 * http 工具类
 */
public class HttpUtil {

	public static String post(String requestUrl, String accessToken, String params) throws Exception {
		String contentType = "application/x-www-form-urlencoded";
		return HttpUtil.post(requestUrl, accessToken, contentType, params);
	}

	public static String post(String requestUrl, String accessToken, String contentType, String params) throws Exception {
		String encoding = "UTF-8";
		if (requestUrl.contains("nlp")) {
			encoding = "GBK";
		}
		return HttpUtil.post(requestUrl, accessToken, contentType, params, encoding);
	}

	public static String post(String requestUrl, String accessToken, String contentType, String params, String encoding) throws Exception {
		String url = requestUrl + "?access_token=" + accessToken;
		return HttpUtil.postGeneralUrl(url, contentType, params, encoding);
	}

	public static String postGeneralUrl(String generalUrl, String contentType, String params, String encoding) throws Exception {
		URL url = new URL(generalUrl);
		// 打开和URL之间的连接
		HttpURLConnection connection = (HttpURLConnection) url.openConnection();
		connection.setRequestMethod("POST");
		// 设置通用的请求属性
		connection.setRequestProperty("Content-Type", contentType);
		connection.setRequestProperty("Connection", "Keep-Alive");
		connection.setUseCaches(false);
		connection.setDoOutput(true);
		connection.setDoInput(true);

		// 得到请求的输出流对象
		DataOutputStream out = new DataOutputStream(connection.getOutputStream());
		out.write(params.getBytes(encoding));
		out.flush();
		out.close();

		// 建立实际的连接
		connection.connect();
		// 获取所有响应头字段
		Map<String, List<String>> headers = connection.getHeaderFields();
		// 遍历所有的响应头字段
		for (String key : headers.keySet()) {
			System.err.println(key + "--->" + headers.get(key));
		}
		// 定义 BufferedReader输入流来读取URL的响应
		BufferedReader in = null;
		in = new BufferedReader(new InputStreamReader(connection.getInputStream(), encoding));
		String result = "";
		String getLine;
		while ((getLine = in.readLine()) != null) {
			result += getLine;
		}
		in.close();
		System.err.println("result:" + result);
		return result;
	}
}
以上为h5集成人脸识别认证的步骤!如果对你有帮助,就点个赞吧!!!


 4045
4045


 被折叠的 条评论
为什么被折叠?
被折叠的 条评论
为什么被折叠?
 到【灌水乐园】发言


