


1 说明
1.1 reportlab高级制作多格式PDF:即包含文字、表格、柱状图。
1.2 复习python的class和装饰器的高级基础知识。
1.3 列表转换字符串、读取txt文件等python基础知识。
1.4 经典,通俗易懂,适合收藏和转发。

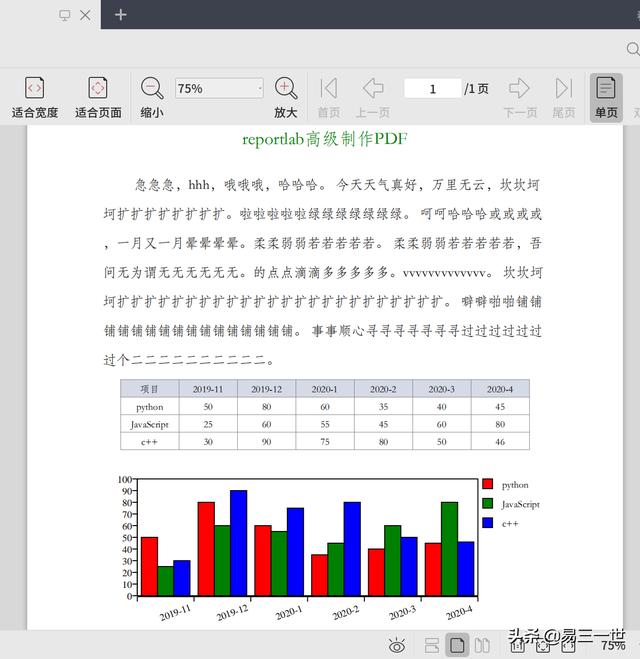
2 reportlab高级制作多格式PDF
2.1 代码
#---导入模块---有点多,且繁琐,可以优化---from reportlab.platypus import Table, SimpleDocTemplate, Paragraphfrom reportlab.lib.pagesizes import letterfrom reportlab.lib.styles import getSampleStyleSheetfrom reportlab.lib import colorsfrom reportlab.graphics.charts.barcharts import VerticalBarChartfrom reportlab.graphics.charts.legends import Legendfrom reportlab.graphics.shapes import Drawing#---导入中文字体模块和注册---from reportlab.pdfbase import pdfmetricsfrom reportlab.pdfbase.ttfonts import TTFont#hwfs是hwfs字体,自己下载,放在根目录下pdfmetrics.registerFont(TTFont('hwfs', 'hwfs.ttf'))#---定义类---class Graphs: def __init__(self): pass # 装饰器:绘制标题 @staticmethod def draw_title(): style = getSampleStyleSheet() #格式 ct = style['Normal'] #字体名,上面已经注册过的 ct.fontName = 'hwfs' #字体大小 ct.fontSize = 18 # 设置行距 ct.leading = 50 # 颜色 ct.textColor = colors.green # 居中 ct.alignment = 1 # 添加标题并居 title = Paragraph('reportlab高级制作PDF', ct) return title # 绘制内容 @staticmethod def draw_text(): style = getSampleStyleSheet() # 常规字体(非粗体或斜体) ct = style['Normal'] # 使用的字体s ct.fontName = 'hwfs' ct.fontSize = 14 # 设置自动换行 ct.wordWrap = 'CJK' # 居左对齐 ct.alignment = 0 # 第一行开头空格 ct.firstLineIndent = 32 # 设置行距 ct.leading = 30 #格式:Paragraph(text, style, bulletText=None, frags=None, caseSensitive=1, encoding='utf8') #注意文件目录和文件内容,调用外部txt文件内容 with open('/home/xgj/Desktop/reportlab/2.txt','r') as f: #读取全部,返回一个列表 text2 = f.readlines() #列表转换为字符串,返回是一大串字符串,如果文字较多而且有分段落的,可能就不适合。 text1 = ''.join(text2) #print(text1) text=Paragraph(text1,ct) return text # 绘制表格 @staticmethod def draw_table(*args): #宽度 col_width = 60 #表格样式设置 style = [ ('FONTNAME', (0, 0), (-1, -1), 'hwfs'),# 字体 ('BACKGROUND', (0, 0), (-1, 0), '#d5dae6'),# 设置第一行背景颜色 ('ALIGN', (0, 0), (-1, -1), 'CENTER'),# 对齐 ('VALIGN', (-1, 0), (-2, 0), 'MIDDLE'),# 对齐 ('GRID', (0, 0), (-1, -1), 0.5, colors.grey),# 设置表格框线为grey色,线宽为0.5 ] table = Table(args, colWidths=col_width, style=style) return table # 创建图表 @staticmethod def draw_bar(bar_data=[], ax=[], items=[]): #画布大小 drawing = Drawing(500, 250) bc = VerticalBarChart() bc.x = 35 bc.y = 100 bc.height = 120 bc.width = 350 bc.data = bar_data bc.strokeColor = colors.black bc.valueAxis.valueMin = 0 bc.valueAxis.valueMax = 100 bc.valueAxis.valueStep = 10 bc.categoryAxis.labels.dx = 8 bc.categoryAxis.labels.dy = -10 bc.categoryAxis.labels.angle = 20 bc.categoryAxis.categoryNames = ax # 图示 leg = Legend() leg.fontName = 'hwfs' leg.alignment = 'right' leg.boxAnchor = 'ne' leg.x = 465 leg.y = 220 leg.dxTextSpace = 10 leg.columnMaximum = 3 leg.colorNamePairs = items drawing.add(leg) drawing.add(bc) return drawingif __name__ == "__main__": #生成的pdf的内容 #content = list() content=[] # 第一:文章的标题 content.append(Graphs.draw_title()) # 第二:添加文章的文字段落 content.append(Graphs.draw_text()) # 第三:表格: # 表格数据 data = [ ('项目', '2019-11', '2019-12', '2020-1', '2020-2', '2020-3', '2020-4'), ('python', 50, 80, 60, 35, 40, 45), ('JavaScript', 25, 60, 55, 45, 60, 80), ('c++', 30, 90, 75, 80, 50, 46)] #添加表格 content.append(Graphs.draw_table(*data)) # 第四:图表 #图标的数据 b_data = [ (50, 80, 60, 35, 40, 45), (25, 60, 55, 45, 60, 80), (30, 90, 75, 80, 50, 46) ] ax_data = ['2019-11', '2019-12', '2020-1', '2020-2', '2020-3', '2020-4'] leg_items = [(colors.red, 'python'), (colors.green, 'JavaScript'), (colors.blue, 'c++')] # 附加:添加文章的文字段落 #content.append(Graphs.draw_text()) #添加图标柱状图 content.append(Graphs.draw_bar(b_data, ax_data, leg_items)) # 生成pdf文件 newpdf = SimpleDocTemplate('/home/xgj/Desktop/reportlab/report.pdf', pagesize=letter) newpdf.build(content)2.2 图
3 python的class类:
3.1 python的面向对象是一种编程方式,此编程方式的实现是基于对类和对象的使用。
类是一个模板,模板中包装了多个“函数”供使用。
对象,根据模板创建的实例(即:对象),实例用于调用被包装在类中的函数。
面向对象三大特性:封装、继承和多态。
3.2 Python 3.x中取消了经典类,默认都是新式类。
新式类的语法 -> class 类名(object): pass
3.3 通过例子来讲解新式类的语法
代码:
#方法一#定义person这个类#class person(object): #与下面相同作用,也就是object这个对象就是下面的内容class person(): #定义speak函数 def speak(self): #person对象调用了speak函数的这个方法,self就是那个对象;可以把self理解为一个形参 print("%s 说:我今年%s岁" % (self.name, self.age)) #类person 实例化一个对象chaxunchaxun = person()# 给对象查询chaxun添加属性,用‘点’chaxun.name = "李白"chaxun.age = 1000# 调用类中的 speak()方法chaxun.speak()#方法二#class person(object): #与下面相同class person(): # 定义构造方法 #__init__() 是类的初始化方法;它在类的实例化操作后 会自动调用,不需要手动调用 def __init__(self, n, a): # 设置属性 self.name = n self.age = a # 定义普通方法 def speak(self): print("%s 说:我今年%s岁" % (self.name, self.age)) #类person 实例化一个对象chaxunchaxun = person("李白",1000) # 调用类中的 speak()方法chaxun.speak()# 在python中使用__开头 并以__结尾的方法,称之为魔法方法;
# __init__(self) 是类的初始化方法,也称构造方法,是一种特殊的魔法方法。
# __init__(self)在实例化后,会自动调用,而不用手动调用,所以一般把属性设置在_init__()里。
# 常用到的魔法方法还有:__str__(self) 、 __del__(self)等。
============
4 python3的装饰器:
4.1 理解装饰器的前提:
4.1.1 所有东西都是对象(函数可以当做对象传递)
4.1.2.闭包
4.2 闭包的概念:
1)函数嵌套
2)内部函数使用外部函数的变量
3)外部函数的返回值为内部函数
4.3 使用装饰器的缺点:
4.3.1.位置错误的代码->不要在装饰器之外添加逻辑功能
4.3.2.不能装饰@staticmethod (第一个代码中使用)或者 @classmethod已经装饰过的方法
4.3.3.装饰器会对原函数的元信息进行更改,比如函数的docstring,__name__,参数列表。
装饰器需要实例讲解更清楚,暂时到这里,喜欢的收藏和转发,自己整理,分享出来。
=========未完待续==========


 479
479


 被折叠的 条评论
为什么被折叠?
被折叠的 条评论
为什么被折叠?
 到【灌水乐园】发言


