


前言
早期的SpringBoot中还支持使用Velocity作为页面模板,现在的SpringBoot中已经不支持Velocity了,页面模板主要支持Thymeleaf和Freemarker,当然,作为Java最基本的页面模板Jsp也是支持的。今天,先来讲一下如何整合Thymeleaf。一、Thymeleaf简介
Thymeleaf是新一代Java模板引擎,支持HTML原型。由于Thymeleaf模板的后缀为.html,可以让前端工程师在浏览器中直接打开查看样式,预览的时候非常方便,也可以让后端工程师结合真实数据查看显示效果。并且SpringBoot为Thymelead提供了自动化配置解决方案,因此在SpringBoot中使用Thymeleaf非常方便。二、整合Thymeleaf
2.1、引入Thymeleaf依赖 <dependency> <groupId>org.springframework.bootgroupId> <artifactId>spring-boot-starter-thymeleafartifactId> dependency> <dependency> <groupId>org.springframework.bootgroupId> <artifactId>spring-boot-starter-webartifactId> dependency>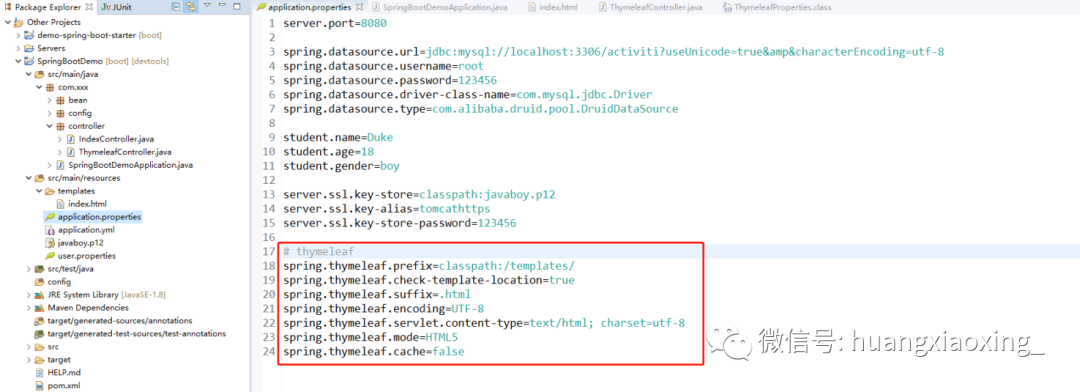
# thymeleaf spring.thymeleaf.prefix=classpath:/templates/spring.thymeleaf.check-template-location=truespring.thymeleaf.suffix=.htmlspring.thymeleaf.encoding=UTF-8spring.thymeleaf.servlet.content-type=text/html; charset=utf-8spring.thymeleaf.mode=HTML5spring.thymeleaf.cache=false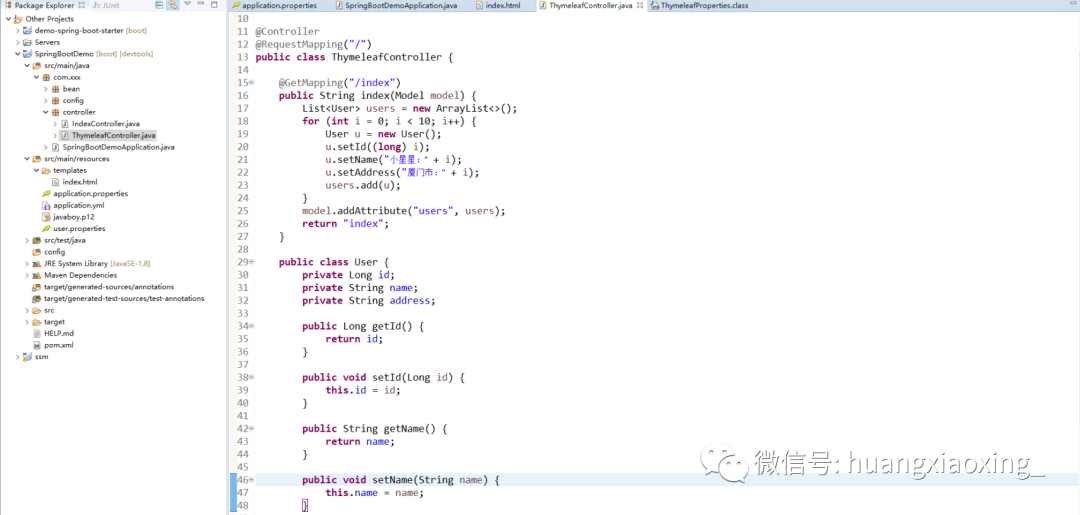
package com.xxx.controller;import java.util.ArrayList;import java.util.List;import org.springframework.stereotype.Controller;import org.springframework.ui.Model;import org.springframework.web.bind.annotation.GetMapping;import org.springframework.web.bind.annotation.RequestMapping;@Controller@RequestMapping("/")public class ThymeleafController { @GetMapping("/index") public String index(Model model) { List users = new ArrayList<>(); for (int i = 0; i < 10; i++) { User u = new User(); u.setId((long) i); u.setName("小星星:" + i); u.setAddress("厦门市:" + i); users.add(u); } model.addAttribute("users", users); model.addAttribute("userName", "小星星"); return "index"; } public class User { private Long id; private String name; private String address; public Long getId() { return id; } public void setId(Long id) { this.id = id; } public String getName() { return name; } public void setName(String name) { this.name = name; } public String getAddress() { return address; } public void setAddress(String address) { this.address = address; } }}<html lang="en" xmlns:th="http://www.thymeleaf.org"><head><meta charset="UTF-8"><title>Titletitle>head><body> <table border="1"> <tr> <td>编号td> <td>用户名td> <td>地址td> tr> <tr th:each="user : ${users}"> <td th:text="${user.id}">td> <td th:text="${user.name}">td> <td th:text="${user.address}">td> tr> table>body>html>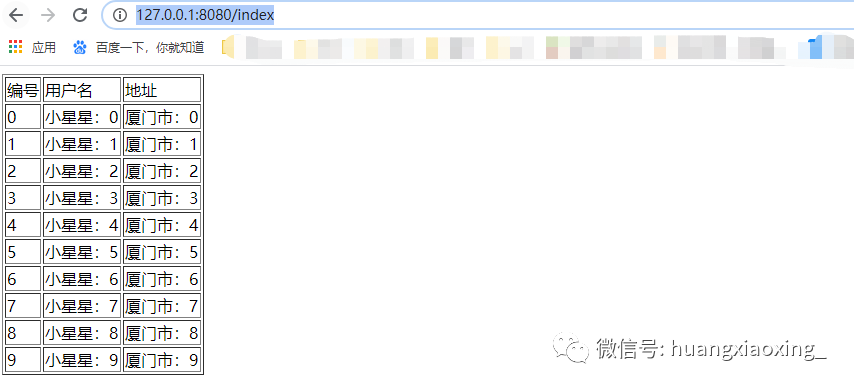
三、基本语法
3.1、引入标签 首先要在html标签里面引入xmlns:th="http://www.thymeleaf.org"才能使用th:*这样的语法 3.2、获取变量值 通过在标签内部,使用${}来取值,对于javaBean对象,使用变量名.属性名来获取,跟EL表达式用法一样。 注:只有卸载标签内部才会生效,例如xxx
的意思是使用hello来代替p之前的内容,实际显示在页面上的数据是hello 3.3、引入URL Thymelead引入url采用@{...}来获取,例如, 3.4、字符串替换 或者都可以实现替换。 注:|...|中只能包含变量表达式${...},不能包含其他常量、条件表达式等。 3.5、运算符 在表达式中可以使用各类算数运算符+,-,*,/,%,例如th:with="isEven(=${count}%2==0)",逻辑运算符>,=,==,!=都可以使用,唯一需要注意的是使用时需要用它的HTML转义字符3.6、条件th:if是该标签在满足条件的时候才会显示,th:unless是不成立的时候才显示:LoginThymeleaf同时支持使用switch结构判断,默认属性(default)用*表示,例如:<div th:switch="${user.role}"> <p th:case="'admin'">User is an administratorp> <p th:case="#{roles.manager}">User is a managerp> <p th:case="*">User is some other thingp>div><tr th:each="user : ${users}"> <td th:text="${user.id}">td> <td th:text="${user.name}">td> <td th:text="${user.address}">td>tr>四、常用标签
th:text:替换原来text中的东西
th:value:替换原来value的值
th:object:替换标签的对象,th:object=“对象”
th:field:填充,如图上面有对象,可以直接用*{属性}取值
th:checked:当check的值为true时候为选中,false时为未选中
th:remove:删除
th:href:用@{}替换连接地址
th:if:如果值为true的时候才显示标签,否则不显示
th:unless:不成立的时候才显示
th:each:用户循环遍历结果集
th:style:替换样式
th:action:替换action地址,用@{}取地址
th:alt:用@{}取地址
th:class:替换class的样式
th:fragment:定义一个framemet模板,在后面引用他


 2776
2776


 被折叠的 条评论
为什么被折叠?
被折叠的 条评论
为什么被折叠?
 到【灌水乐园】发言


