


Sphinx概述
一个基于SQL的全文检索引擎,它提供了比数据库更专业的搜索功能,并且sphinx特别为一些脚本语言设计了搜索的API接口,如PHP、Python等,同时为MySQL也设计了一个存储引擎插件。

Sphinx应用场景
网站中的搜索
CMS中的搜索
安装和配置Sphinx
①。三种安装方式:
下载二进制
下载MAC OSx系统的二进制文件。
解压
1
tar -zxvf sphinx-2.2.10-release-osx10.10-x86_64.tar.gz移动到指定的安装目录
本人一般安装在~/Documents/software目录下面。
1
mv sphinx-2.2.10-release-osx10.10-x86_64 ~/Documents/software/sphinx-2.2.10
下载源码
编译
1
2
3
./configure
make
make install
使用brew安装
1
brew install sphinx --with-mysql
安装信息:使用命令安装的时候,使用–with参数,将相应的数据库的库文件也编译到里面。否则会报错:ERROR: source ‘user_core_0’: unknown type ‘pgsql’; skipping.
1
2
3
4
5
6
7
8
9
10
11
12
13
14
15
16
17
18
19
20
21
22
23
24
25
26
27
28
29
30
31
32
33
34
35
36
==> Using the sandbox
==> Downloading http://sphinxsearch.com/files/sphinx-2.2.11-release.tar.gz
######################################################################## 100.0%
==> Cloning https://github.com/snowballstem/snowball.git
Cloning into '/Users/zhoujunwen/Library/Caches/Homebrew/sphinx--stemmer--git'...
remote: Counting objects: 2433, done.
remote: Total 2433 (delta 0), reused 1 (delta 0), pack-reused 2432
Receiving objects: 100% (2433/2433), 578.26 KiB | 343.00 KiB/s, done.
Resolving deltas: 100% (1499/1499), done.
==> Checking out revision 9b58e92c965cd7e3208247ace3cc00d173397f3c
==> make dist_libstemmer_c
==> tar xzf dist/libstemmer_c.tgz -C /private/tmp/sphinx-20170531-15389-1rdhnqy/sphinx-2.2.11-release
==> ./configure --prefix=/usr/local/Cellar/sphinx/2.2.11 --localstatedir=/usr/local/var --with-libstemmer --with-mysql --without-pgsql
==> make install
==> Caveats
This is not sphinx - the Python Documentation Generator.
To install sphinx-python use pip.
Sphinx has been compiled with libstemmer support.
Sphinx depends on either MySQL or PostreSQL as a datasource.
You can install these with Homebrew with:
brew install mysql
For MySQL server.
brew install mysql-connector-c
For MySQL client libraries only.
brew install postgresql
For PostgreSQL server.
We don't install these for you when you install this formula, as
we don't know which datasource you intend to use.
==> Summary
? /usr/local/Cellar/sphinx/2.2.11: 15 files, 16.5MB, built in 1 minute 21 seconds
②。配置环境变量
注意: 我们根据第一种安装方式进行配置。其他方式相同,仅仅是文件的位置不同而已。命令行安装后的配置文件见附录命令行安装后的配置文件
1
2
export SPHINX_HOME=/Users/zhoujunwen/Documents/software/sphinx-2.2.10
export PATH=$PATH:$SPHINX_HOME/bin
③。创建测试数据
1
2
3
4
5
6
7
8
9
10
11
12
13
14
15
16
17
18
19
20
21
22
23
24
25
DROP TABLE IF EXISTS `test`.`user`;
CREATE TABLE `test`.`user` (
`id` int(11) NOT NULL AUTO_INCREMENT,
`name` varchar(20) NOT NULL,
`age` int(11) NOT NULL,
`gender` tinyint(4) NOT NULL DEFAULT '0',
`status` tinyint(4) DEFAULT '0',
`create_time` timestamp NOT NULL DEFAULT CURRENT_TIMESTAMP ON UPDATE CURRENT_TIMESTAMP,
PRIMARY KEY (`id`)
) ENGINE=InnoDB DEFAULT CHARSET=utf8
REPLACE INTO test.user (name, age, gender, status, create_time ) VALUES
( '张三', 22, 0, 0, NOW()),
( '李四', 28, 0, 0, NOW()),
( '王五', 45, 0, 0, NOW()),
( '周惇', 70, 0, 0, NOW()),
( '李广', 76, 0, 0, NOW()),
( '霍去病', 56, 0, 0, NOW());
REPLACE INTO test.user (name, age, gender, status, create_time ) VALUES('zhangsan',24,0,0,now());
REPLACE INTO test.user (name, age, gender, status, create_time ) VALUES('fanbinbin',24,0,0,now());
REPLACE INTO test.user (name, age, gender, status, create_time ) VALUES('chenyanxi',24,0,0,now());
REPLACE INTO test.user (name, age, gender, status, create_time ) VALUES('zhangsan123',24,0,0,now());
REPLACE INTO test.user (name, age, gender, status, create_time ) VALUES('zhangsan456',24,0,0,now());
REPLACE INTO test.user (name, age, gender, status, create_time ) VALUES('zhang123san',24,0,0,now());
REPLACE INTO test.user (name, age, gender, status, create_time ) VALUES('zhangsan',24,0,0,now());
④。配置spinx+mysql
注意:由于直接使用了编译好的二进制文件,因此不像其他操作系统或者教程一样,配置文件在/usr/local/etc/sphinx/下面,而是在我们的二进制解压目录下面。如果是命令行安装的,则各个文件均在不同的目录。
在解压目录下面,有两个.in结尾的文件:sphinx-min.conf.in和 sphinx.conf.in。这是两个默认的配置文件模板。
我们copy一份,做修改即可,一般conf文件的名称和数据库一致亦或从命名上可以看出是哪个数据库就OK。
1
cp sphinx.conf.in sphinx-test.conf
我们使用vim sphinx-test.conf打开test数据库对应的文件:
1
2
3
4
5
6
7
8
9
10
11
12
13
14
15
16
17
18
19
20
21
22
23
24
25
26
27
28
29
30
31
32
33
34
35
36
37
38
39
40
41
42
43
44
45
46
47
48
49
50
51
52
53
54
55
56
57
58
59
60
61
62
63
64
65
66
67
68
69
70
71
72
73
74
75
76
77
78
79
80
81
82
83
84
85
86
87
88
89
90
91
92
93
94
95
96
97
98
99
100
101
102
103
104
105
106
107
108
109
110
111
112
113
114
115
116
117
118
119
120
121
122
123
124
125
126
#############################################################################
## 数据源定义,数据从哪里来。
#############################################################################
source test
{
# 数据源类型,没有设置默认值,需要自己指定,可以指定的数据库类型:mysql, pgsql, mssql, xmlpipe, xmlpipe2, odbc
type = mysql
sql_host = localhost
sql_user = test
sql_pass =
sql_db = test
sql_port = 3306
}
# 注意: ERROR: index 'test_user': No fields in schema - will not index.
# 需要将属性中的某个字符串自动建立为sql_field_string。所以,此处修改
# name的sql_attr_string 为 sql_field_string。
source test_user : test # test_user继承test
{
sql_query = SELECT id,name, age, gender,create_time,status from user
sql_attr_uint = id
sql_attr_uint = age
sql_attr_uint = status
sql_field_string = name
sql_attr_uint = gender
sql_attr_timestamp = create_time
}
#############################################################################
## 索引定义。索引,当有数据源之后,从数据源处构建索引。索引实际上就是相当于一个字典检索。有了整本字典内容以后,才会有字典检索。
#############################################################################
index test
{
type = plain
source = test_user
path = @CONFDIR@/data/test_user
docinfo = extern
dict = keywords
mlock = 0
min_word_len = 1
morphology = none
}
# 注意:对于一个没有sql_query的source,不能建立index。
#index test_user: test
#{
# path = @CONFDIR@data/test_user
# source = test_user
# morphology = stem_en
#}
index rt
{
type = rt
path = @CONFDIR@/data/rt
rt_field = title
rt_field = content
rt_attr_uint = gid
# rt_attr_bigint = guid
# rt_attr_float = gpa
# rt_attr_timestamp = ts_added
# rt_attr_string = author
# rt_attr_multi = tags
# rt_attr_multi_64 = tags64
# rt_attr_json = extra_data
}
#############################################################################
## indexer settings
#############################################################################
indexer
{
# 建立索引的时候,索引内存限制
mem_limit = 128M
# 每秒最大I/O操作次数,用于限制I/O操作
max_iops = 40
# 最大允许的I/O操作大小,以字节为单位,用于I/O节流
max_iosize = 1048576
# 对于XMLLpipe2数据源允许的最大的字段大小,以字节为单位
max_xmlpipe2_field = 4M
# 写缓冲区的大小,单位是字节
write_buffer = 1M
# 文件字段可用的最大缓冲区大小,字节为单位
max_file_field_buffer = 32M
}
#############################################################################
## searchd settings
#############################################################################
searchd
{
# listen = 127.0.0.1
# listen = 192.168.0.1:9312
# listen = 9312
# listen = /var/run/searchd.sock
listen = 9312
listen = 9306:mysql41
log = @CONFDIR@/log/searchd.log
query_log = @CONFDIR@/log/query.log
read_timeout = 5
client_timeout = 300
max_children = 30
persistent_connections_limit = 30
pid_file = @CONFDIR@/log/searchd.pid
seamless_rotate = 1
preopen_indexes = 1
unlink_old = 1
mva_updates_pool = 1M
max_packet_size = 8M
max_filters = 256
max_filter_values = 4096
max_batch_queries = 32
}
Sphinx如何工作
sphinx配置文件
利用indexer工具生成索引数据
1
2
pwd
# /Users/zhoujunwen/Documents/software/sphinx-2.2.101
./bin/indexer --config ./shpinx-test.conf --all
索引生成成功的话会在 ./data下生成相应的索引文件。
运行indexer时,窗口信息如下,表示配置成功了:
./bin/indexer –config ./shpinx-test.conf –all
Sphinx 2.2.11-id64-release (95ae9a6)
Copyright (c) 2001-2016, Andrew Aksyonoff
Copyright (c) 2008-2016, Sphinx Technologies Inc (http://sphinxsearch.com)
using config file ‘/usr/local/etc/sphinx.conf’…
indexing index ‘test_user’…
collected 6 docs, 0.0 MB
total 6 docs, 39 bytes
total 0.268 sec, 145 bytes/sec, 22.37 docs/sec
skipping non-plain index ‘rt’…
total 11 reads, 0.000 sec, 2.9 kb/call avg, 0.0 msec/call avg
total 10 writes, 0.000 sec, 0.1 kb/call avg, 0.0 msec/call avg
在./data目录下执行tree或者ls命令查看文件:
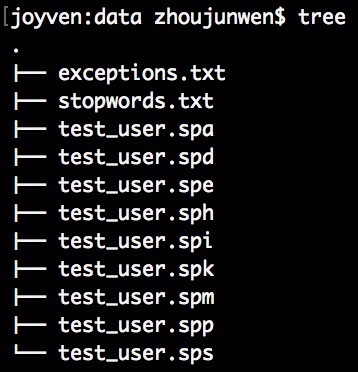
扩展名
描述
.spa
存储文档属性
.spd
存储每个词ID可匹配的文档ID列表
.sph
存储索引头信息
.spi
存储词列表
.spm
存储MVA数据
.spp
存储每个词的命中列表
searchd:守护进程,使用indexer工具生成的数据做查询
1
./bin/searchd --config ./shpinx-test.conf
默认shpinx会在端口9312、9306两个端口上监听,其中9312端口是走的shpinx协议,走这个端口需要通过api、shpinx自带的search客户端、mysql的shpinxSE引擎来访问,而9306走的是mysql41协议,这个端口可以直接通过mysql客户端连接,然后进行相关的搜索查询.

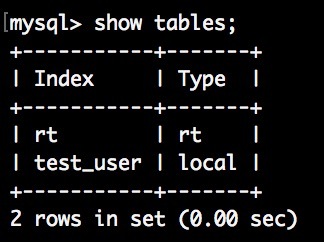
查看是否启动成功,我们在命令行通过Sphinx连接查询:
1
mysql -h0 -P 9306 # -h0 = -h 127.0.0.1
连接成功,可以向查询mysql一样查询索引里面的数据:
1
show tables;
安装php扩展php-sphinx
如果安装的sphinx是通过下载的源码文件安装的,那么在源码的api目录,有libsphinxclient这个文件。执行./configure,编译安装 make && make install安装libsphinxclient。否则回报错误:
checking for libsphinxclient headers in default path… not found
configure: error: Cannot find libsphinxclient headers
然后再安装php-sphinx的扩展:
1
2
3
wget https://pecl.php.net/get/sphinx-1.3.3.tgz
tar zxvf sphinx-1.3.3.tgz
phpize && ./configure && make && make install
如果是brew命令安装的,请直接使用下面命令安装即可:
1
brew install php56-sphinx
是否安装成功,可以使用该命令查看:php -i "(command-line 'phpinfo()')"。
测试代码
创建文件test.php,编写代码:
1
2
3
4
5
6
7
8
$s = new SphinxClient;
$s->setServer("localhost", 9312);
$s->setMatchMode(SPH_MATCH_ANY);
$s->setMaxQueryTime(3);
$result = $s->query("zhangsan");
var_dump($result);
?>
执行: php test.php
1
2
3
4
5
6
7
8
9
10
11
12
13
14
15
16
17
18
19
20
21
22
23
24
25
26
27
28
29
30
31
32
33
34
35
36
37
38
39
40
41
42
43
44
45
46
47
48
49
50
51
52
53
54
55
56
57
58
array (
'error' => '',
'warning' => '',
'status' => 0,
'fields' =>
array (
0 => 'name',
),
'attrs' =>
array (
'uid' => 1,
'name' => 7,
'age' => 1,
'gender' => 1,
'create_time' => 2,
'status' => 1,
),
'matches' =>
array (
13 =>
array (
'weight' => 1,
'attrs' =>
array (
'uid' => 13,
'name' => 'zhangsan',
'age' => 24,
'gender' => 0,
'create_time' => 2017,
'status' => 0,
),
),
7 =>
array (
'weight' => 1,
'attrs' =>
array (
'uid' => 7,
'name' => 'zhangsan',
'age' => 24,
'gender' => 0,
'create_time' => 2017,
'status' => 0,
),
),
),
'total' => 2,
'total_found' => 2,
'time' => 0,
'words' =>
array (
'zhangsan' =>
array (
'docs' => 2,
'hits' => 2,
),
),
)
附录
命令行安装后的配置文件
1
2
3
4
5
6
7
8
9
10
11
12
13
14
15
16
17
18
19
20
21
22
23
24
25
26
27
28
29
30
31
32
33
34
35
36
37
38
39
40
41
42
43
44
45
46
47
48
49
50
51
52
53
54
55
56
57
58
59
60
61
62
63
64
65
66
67
68
69
70
71
72
73
74
75
76
77
78
79
80
81
82
83
84
85
86
87
88
89
90
91
92
93
94
95
96
97
98
99
100
101
102
103
104
105
106
107
108
109
110
111
112
113
114
115
116
117
118
119
120
121
122
123
124
125
126
127
source test
{
type = mysql
sql_host = localhost
sql_user = root
sql_pass = dj123456
sql_db = test
sql_port = 3306 # optional, default is 3306
}
source test_user : test
{
sql_ranged_throttle = 100
sql_query = SELECT id, id as uid,name, age, gender,create_time,status from user
sql_attr_uint = uid
sql_attr_uint = age
sql_attr_uint = status
sql_field_string = name
sql_attr_uint = gender
sql_attr_timestamp = create_time
}
index test_user
{
type = plain
source = test_user
path = /usr/local/var/data/test_user
docinfo = extern
mlock = 0
min_word_len = 1
morphology = none
stopwords = /usr/local/var/data/stopwords.txt
wordforms = /usr/local/var/data/wordforms.txt
exceptions = /usr/local/var/data/exceptions.txt
global_idf = /usr/local/var/sphinx/global.idf
}
#index test_user : test
#{
# path = /usr/local/var/data/test_user
# source = test_user
# morphology = stem_en
#}
index rt
{
# 'rt' index type must be specified to use RT index
type = rt
# index files path and file name, without extension
# mandatory, path must be writable, extensions will be auto-appended
path = /usr/local/var/data/rt
# RAM chunk size limit
# RT index will keep at most this much data in RAM, then flush to disk
# optional, default is 128M
#
# rt_mem_limit = 512M
# full-text field declaration
# multi-value, mandatory
rt_field = title
rt_field = content
# unsigned integer attribute declaration
# multi-value (an arbitrary number of attributes is allowed), optional
# declares an unsigned 32-bit attribute
rt_attr_uint = gid
# RT indexes currently support the following attribute types:
# uint, bigint, float, timestamp, string, mva, mva64, json
#
# rt_attr_bigint = guid
# rt_attr_float = gpa
# rt_attr_timestamp = ts_added
# rt_attr_string = author
# rt_attr_multi = tags
# rt_attr_multi_64 = tags64
# rt_attr_json = extra_data
}
indexer
{
# 建立索引的时候,索引内存限制
mem_limit = 128M
# 每秒最大I/O操作次数,用于限制I/O操作
max_iops = 40
# 最大允许的I/O操作大小,以字节为单位,用于I/O节流
max_iosize = 1048576
# 对于XMLLpipe2数据源允许的最大的字段大小,以字节为单位
max_xmlpipe2_field = 4M
# 写缓冲区的大小,单位是字节
write_buffer = 1M
# 文件字段可用的最大缓冲区大小,字节为单位
max_file_field_buffer = 32M
}
searchd
{
listen = 9312
listen = 9306:mysql41
log = /usr/local/var/log/searchd.log
query_log = /usr/local/var/log/query.log
read_timeout = 5
client_timeout = 300
max_children = 30
persistent_connections_limit = 30
pid_file = /usr/local/var/log/searchd.pid
seamless_rotate = 1
preopen_indexes = 1
unlink_old = 1
mva_updates_pool = 1M
max_packet_size = 8M
max_filters = 256
max_filter_values = 4096
max_batch_queries = 32
workers = threads
}
重要的命令
1
2
3
/usr/local/Cellar/sphinx/2.2.11/bin/indexer --config /usr/local/etc/sphinx.conf --all
/usr/local/bin/searchd --config /usr/local/etc/sphinx.conf
命令行安装php56-sphinx的输出信息
1
2
3
4
5
6
7
8
9
10
11
12
13
14
15
16
17
18
19
20
21
22
23
24
25
26
27
28
29
30
31
32
33
34
35
36
37
38
39
40
41
42
43
44
45
46
47
48
49
50
51
52
53
54
55
56
57
==> Installing php56-sphinx from josegonzalez/php
==> Installing dependencies for josegonzalez/php/php56-sphinx: libxml2, libsphinxclient
==> Installing josegonzalez/php/php56-sphinx dependency: libxml2
==> Downloading https://homebrew.bintray.com/bottles/libxml2-2.9.4_3.sierra.bottle.tar.gz
######################################################################## 100.0%
==> Pouring libxml2-2.9.4_3.sierra.bottle.tar.gz
==> Using the sandbox
==> Caveats
This formula is keg-only, which means it was not symlinked into /usr/local,
because macOS already provides this software and installing another version in
parallel can cause all kinds of trouble.
If you need to have this software first in your PATH run:
echo 'export PATH="/usr/local/opt/libxml2/bin:$PATH"' >> ~/.bash_profile
For compilers to find this software you may need to set:
LDFLAGS: -L/usr/local/opt/libxml2/lib
CPPFLAGS: -I/usr/local/opt/libxml2/include
For pkg-config to find this software you may need to set:
PKG_CONFIG_PATH: /usr/local/opt/libxml2/lib/pkgconfig
If you need Python to find bindings for this keg-only formula, run:
echo /usr/local/opt/libxml2/lib/python2.7/site-packages >> /usr/local/lib/python2.7/site-packages/libxml2.pth
mkdir -p /Users/zhoujunwen/Library/Python/2.7/lib/python/site-packages
echo 'import site; site.addsitedir("/usr/local/lib/python2.7/site-packages")' >> /Users/zhoujunwen/Library/Python/2.7/lib/python/site-packages/homebrew.pth
==> Summary
? /usr/local/Cellar/libxml2/2.9.4_3: 281 files, 10.4MB
==> Installing josegonzalez/php/php56-sphinx dependency: libsphinxclient
==> Downloading https://homebrew.bintray.com/bottles-php/libsphinxclient-2.2.11.sierra.bottle.tar.gz
######################################################################## 100.0%
==> Pouring libsphinxclient-2.2.11.sierra.bottle.tar.gz
? /usr/local/Cellar/libsphinxclient/2.2.11: 5 files, 67KB
==> Installing josegonzalez/php/php56-sphinx
==> Downloading https://pecl.php.net/get/sphinx-1.3.2.tgz
######################################################################## 100.0%
==> /usr/local/opt/php56/bin/phpize
==> ./configure --prefix=/usr/local/Cellar/php56-sphinx/1.3.2 --with-php-config=/usr/local/opt/php56/bin/php-config
==> make
==> Caveats
To finish installing sphinx for PHP 5.6:
* /usr/local/etc/php/5.6/conf.d/ext-sphinx.ini was created,
do not forget to remove it upon extension removal.
* Validate installation via one of the following methods:
*
* Using PHP from a webserver:
* - Restart your webserver.
* - Write a PHP page that calls "phpinfo();"
* - Load it in a browser and look for the info on the sphinx module.
* - If you see it, you have been successful!
*
* Using PHP from the command line:
* - Run `php -i "(command-line 'phpinfo()')"`
* - Look for the info on the sphinx module.
* - If you see it, you have been successful!
==> Summary
? /usr/local/Cellar/php56-sphinx/1.3.2: 3 files, 74.5KB, built in 19 seconds


 254
254


 被折叠的 条评论
为什么被折叠?
被折叠的 条评论
为什么被折叠?
 到【灌水乐园】发言


