


一、查看本机配置和检查dlib是否能用gpu,不能用gpu也行,就是处理速度不同,不在乎的话以下检查可跳过。
我的显卡:GTX750TI
本机原来就有装cuda、cudnn(原来供tensorflow gpu使用)
1、查看cuda版本:
命令行输入:nvcc --version

查到是v10.0版本;
2、查看cudnn版本
输入文件地址打开查看
C:Program FilesNVIDIA GPU Computing ToolkitCUDAv10.0includecudnn.h

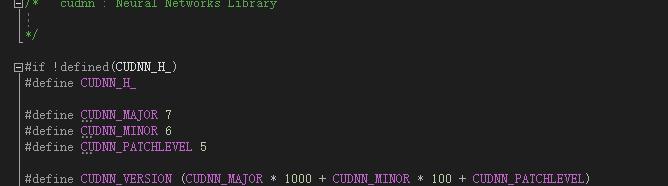
查到是7.6.5版本。
2、dlib是本地编译安装的(看我之前安装配置的视频可见,据说只有本地编译才能使用GPU)
输入命令查看dlib是否能用GPU:
>python
>>> import dlib
>>> print(dlib.DLIB_USE_CUDA)

OK可以使用gpu。
顺便检查一下tensorflow版本,这步是多余的,我只是忘了我装的TF版本。
>>> tf.__version__
二、开始测试python调用face_recognition功能
1、打开python编辑器(我用的是jupyter lab,需安装。)
在做测试的工程文件附近空白处按住shift键,同时点击鼠标右键,在弹出菜单点击箭头处打开命令行终端,输入jupyter lab回车执行:


即可打开编辑器,新建一个可即时运行python3的文件mian.ipynb:

2、写入测试命令:
import face_recognition#导入人脸识别库import numpy as np#人脸定位框image = face_recognition.load_image_file('./pictures/unknown_pictures/1.jpg')#读取一张图片face_locations = face_recognition.face_locations(image)#执行检测并返回人脸位置print('检测到有 {} 人'.format(len(face_locations)))print(face_locations)检测到有 5 人
[(70, 429, 106, 393), (66, 137, 102, 101), (74, 305, 110, 269), (66, 205, 102, 169), (90, 549, 126, 513)]
#人脸对比known_image = face_recognition.load_image_file('./pictures/known_people/TaylorSwift.jpg')known_image_encoding = face_recognition.face_encodings(known_image)unknown_image = face_recognition.load_image_file('./pictures/unknown_pictures/2.jpg')unknown_image_encoding = face_recognition.face_encodings(unknown_image)[0]result = face_recognition.compare_faces(known_image_encoding,unknown_image_encoding)#print(unknown_image_encoding)print(result)[True]
#人脸截取from matplotlib import pyplot as plt#绘图库unknown_image = face_recognition.load_image_file('./pictures/unknown_pictures/4.jpg')#读取一张图片face_locations = face_recognition.face_locations(unknown_image)#执行检测并返回人脸位置plt.figure(figsize=(10,10))#figsize里面的系数越大,画布越大,当然运行时间越长plt.imshow(unknown_image)#处理将要显示的图片plt.show()#显示主图片plt.figure(figsize=(10,10))#figsize里面的系数越大,画布越大,当然运行时间越长for i,face_location in enumerate(face_locations): top, right, bottom, left = face_location #print(i,top, right, bottom, left) plt.subplot(350+i+1) plt.imshow(unknown_image[top:bottom,left:right])#处理将要显示经切片的图片,numpy.ndarray的切片方法plt.show()#显示图片type(unknown_image)

numpy.ndarray
#人脸画框,注释from matplotlib import pyplot as plt#绘图库unknown_image = face_recognition.load_image_file('./pictures/unknown_pictures/4.jpg')#读取一张图片face_locations = face_recognition.face_locations(unknown_image, number_of_times_to_upsample=0, model="cnn")#执行HOG模型检测并返回人脸位置(相对慢),使用神经网络检测number_of_times_to_upsample=0, model="cnn",初加载会比较慢,加载后再检测就很快了。plt.figure(figsize=(10,10))#figsize里面的系数越大,画布越大,当然运行时间越长plt.imshow(unknown_image)#处理将要显示的图片for i,face_location in enumerate(face_locations): top, right, bottom, left = face_location #print(i,top, right, bottom, left) #画定位框,plt.Rectangle((起点),框尺寸) people_color = '#%06x'%np.random.randint(0xffffff)#随机6个十六进制的颜色颜色 plt.text(left, top-8, i, bbox={'facecolor':people_color, 'alpha':0.5, 'pad':1})#添加注释 plt.gca().add_patch(plt.Rectangle((left, top), bottom - top, right - left,fill=False,linewidth = 2,edgecolor = people_color))#执行画框plt.show()#显示图片
#检测并绘制关键点from matplotlib import pyplot as plt#绘图库image = face_recognition.load_image_file('./pictures/unknown_pictures/10.jpg')#读取一张图片face_landmarks_list = face_recognition.face_landmarks(image)plt.figure(figsize=(10,10))#figsize里面的系数越大,画布越大,当然运行时间越长plt.imshow(image)#处理将要显示的图片a = face_landmarks_list[0]for wuguan in a.values(): for sxy in wuguan: #print(sxy) plt.scatter(sxy[0], sxy[1], c='b', s=5)#执行画点plt.show()#显示图片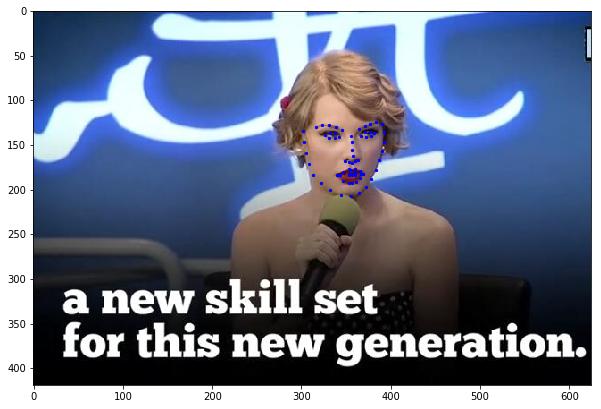
#摄像头检测人脸import face_recognitionimport numpy as npimport cv2import numpy as npfrom PIL import Image, ImageDraw, ImageFontdef cv2ImgAddText1(img, text, left, top, textColor=(0, 255, 0), textSize=20):#opencv不支持中文,得用这个函数解决 fontText = ImageFont.truetype("./simsun.ttc", textSize) img_pil = Image.fromarray(img) draw = ImageDraw.Draw(img_pil) draw.text((left, top), text, fill = textColor, font=fontText) img = np.array(img_pil) return img # This is a super simple (but slow) example of running face recognition on live video from your webcam.# There's a second example that's a little more complicated but runs faster.# PLEASE NOTE: This example requires OpenCV (the `cv2` library) to be installed only to read from your webcam.# OpenCV is *not* required to use the face_recognition library. It's only required if you want to run this# specific demo. If you have trouble installing it, try any of the other demos that don't require it instead.# Get a reference to webcam #0 (the default one)video_capture = cv2.VideoCapture(0)# Load a sample picture and learn how to recognize it.obama_image = face_recognition.load_image_file("./pictures/known_people/TaylorSwift.jpg")obama_face_encoding = face_recognition.face_encodings(obama_image)[0]# Load a second sample picture and learn how to recognize it.biden_image = face_recognition.load_image_file("./pictures/known_people/Clinton.jpg")biden_face_encoding = face_recognition.face_encodings(biden_image)[0]# Create arrays of known face encodings and their namesknown_face_encodings = [ obama_face_encoding, biden_face_encoding]known_face_names = [ "TaylorSwift", "Clinton"]# Initialize some variablesface_locations = []face_encodings = []face_names = []process_this_frame = Truewhile True: # Grab a single frame of video ret, frame = video_capture.read() # Resize frame of video to 1/4 size for faster face recognition processing small_frame = cv2.resize(frame, (0, 0), fx=0.25, fy=0.25) # Convert the image from BGR color (which OpenCV uses) to RGB color (which face_recognition uses) rgb_small_frame = small_frame[:, :, ::-1] # Only process every other frame of video to save time if process_this_frame: # Find all the faces and face encodings in the current frame of video face_locations = face_recognition.face_locations(rgb_small_frame, model="cnn")#使用神经网络检测 face_encodings = face_recognition.face_encodings(rgb_small_frame, face_locations) face_names = [] for face_encoding in face_encodings: # See if the face is a match for the known face(s) matches = face_recognition.compare_faces(known_face_encodings, face_encoding) name = "Unknown" # # If a match was found in known_face_encodings, just use the first one. # if True in matches: # first_match_index = matches.index(True) # name = known_face_names[first_match_index] # Or instead, use the known face with the smallest distance to the new face face_distances = face_recognition.face_distance(known_face_encodings, face_encoding) best_match_index = np.argmin(face_distances) if matches[best_match_index]: name = known_face_names[best_match_index] face_names.append(name) process_this_frame = not process_this_frame # Display the results for (top, right, bottom, left), name in zip(face_locations, face_names):#[face_locations, face_names] # Scale back up face locations since the frame we detected in was scaled to 1/4 size top *= 4 right *= 4 bottom *= 4 left *= 4 # Draw a box around the face cv2.rectangle(frame, (left, top), (right, bottom), (0, 0, 255), 2) # Draw a label with a name below the face cv2.rectangle(frame, (left, bottom - 35), (right, bottom), (0, 0, 255), cv2.FILLED) #font = cv2.FONT_HERSHEY_DUPLEX #cv2.putText(frame, name, (left + 6, bottom - 6), font, 1.0, (255, 255, 255), 1) frame = cv2ImgAddText1(frame, name, left, bottom-25, textColor=(0, 255, 0),textSize=20)#opencv不支持中文,得用这个函数解决 # Display the resulting image cv2.imshow('Video', frame) # Hit 'q' on the keyboard to quit! if cv2.waitKey(1) & 0xFF == ord('q'): break# Release handle to the webcamvideo_capture.release()cv2.destroyAllWindows()
#动态截屏检测from PIL import ImageGrabimport face_recognitionimport numpy as npimport cv2from PIL import Image, ImageDraw, ImageFontdef cv2ImgAddText1(img, text, left, top, textColor=(0, 255, 0), textSize=20):#cv2.putText不支持中文,得用这个函数解决 fontText = ImageFont.truetype("./simsun.ttc", textSize) img_pil = Image.fromarray(img) draw = ImageDraw.Draw(img_pil) draw.text((left, top), text, fill = textColor, font=fontText) img = np.array(img_pil) return img # Load a sample picture and learn how to recognize it.obama_image = face_recognition.load_image_file("./pictures/known_people/TaylorSwift.jpg")TaylorSwift_face_encoding = face_recognition.face_encodings(obama_image)[0]# Load a second sample picture and learn how to recognize it.biden_image = face_recognition.load_image_file("./pictures/known_people/Clinton.jpg")Clinton_face_encoding = face_recognition.face_encodings(biden_image)[0]# Load a second sample picture and learn how to recognize it.biden_image = face_recognition.load_image_file("./pictures/known_people/马云.jpg")mayun_face_encoding = face_recognition.face_encodings(biden_image)[0]# Load a second sample picture and learn how to recognize it.biden_image = face_recognition.load_image_file("./pictures/known_people/成龙.jpg")chenglong_face_encoding = face_recognition.face_encodings(biden_image)[0]# Create arrays of known face encodings and their namesknown_face_encodings = [ TaylorSwift_face_encoding, Clinton_face_encoding, mayun_face_encoding, chenglong_face_encoding]known_face_names = [ "Taylor Swift", "Clinton", "马云", "成龙"]# Initialize some variablesface_locations = []face_encodings = []face_names = []process_this_frame = Truewhile True: # Grab a single frame of video frame = np.array(ImageGrab.grab(bbox=(0, 40, 800, 600)))#动态截屏 # Resize frame of video to 1/4 size for faster face recognition processing small_frame = cv2.resize(frame, (0, 0), fx=0.45, fy=0.45) # Convert the image from BGR color (which OpenCV uses) to RGB color (which face_recognition uses) rgb_small_frame = small_frame # Only process every other frame of video to save time if process_this_frame: # Find all the faces and face encodings in the current frame of video face_locations = face_recognition.face_locations(rgb_small_frame, model="cnn")#使用神经网络检测 face_encodings = face_recognition.face_encodings(rgb_small_frame, face_locations) face_names = [] for face_encoding in face_encodings: # See if the face is a match for the known face(s) matches = face_recognition.compare_faces(known_face_encodings, face_encoding, tolerance=0.6) name = "Unknown" # # If a match was found in known_face_encodings, just use the first one. # if True in matches: # first_match_index = matches.index(True) # name = known_face_names[first_match_index] # Or instead, use the known face with the smallest distance to the new face face_distances = face_recognition.face_distance(known_face_encodings, face_encoding) best_match_index = np.argmin(face_distances) if matches[best_match_index]: name = known_face_names[best_match_index] face_names.append(name) process_this_frame = not process_this_frame # Display the results for (top, right, bottom, left), name in zip(face_locations, face_names): # Scale back up face locations since the frame we detected in was scaled to 1/4 size top = int(top * 0.9) right = int(right * 1) bottom = int(bottom * 1.1) left = int(left * 0.98) # Draw a box around the face cv2.rectangle(small_frame, (left, top), (right, bottom-5), (10, 0, 100), 1) # Draw a label with a name below the face cv2.rectangle(small_frame, (left, bottom - 10), (right, bottom), (10, 0, 100), cv2.FILLED) font = cv2.FONT_HERSHEY_DUPLEX #cv2.putText(frame, name, (left + 6, bottom - 6), font, 1.0, (255, 255, 255), 1) small_frame = cv2ImgAddText1(small_frame, name, left, bottom-10, textColor=(255, 2, 255),textSize=10)#cv2.putText不支持中文,得用这个函数解决 small_frame = cv2.resize(small_frame, (800, 550)) # Display the resulting image cv2.imshow('Video', small_frame[:,:,::-1]) # Hit 'q' on the keyboard to quit! if cv2.waitKey(1) & 0xFF == ord('q'): breakcv2.destroyAllWindows()


 7409
7409

 被折叠的 条评论
为什么被折叠?
被折叠的 条评论
为什么被折叠?
 到【灌水乐园】发言


