


使用Java代码和注解完成Spring配置
使用Java代码和注解进行Spring的配置。
个人理解:
使用Spring的时候可以使用XML文件配置,也可以使用Java代码配置。使用Java代码配置的时候,相当于使用Java类作为XML的配置文件,通过使用java代码创建bean实例,并通过java代码完成依赖的注入操作。当需要变更依赖注入时,可通过修改java代码实现。
使用注解配置的时候,个人理解存在两种方式第一种是注解+XML形式,第二种是Java代码+注解形式。使用Java+注解的形式,相当于在Java代码中指定组件扫描,在具体的bean中使用注解标识。
/*
1.使用Java配置时,配置文件使用@Configuration修饰,在Java代码中使用@Bean修饰
2.在获取bean时,通过AnnotationConfigApplicationContext获取
3.如果需要结合注解配置时,则使用@ComponentScan注解开启扫描
4.常用的注解有以下几类
*/
@Controller
@Bean
@Service
@Component
@Repository
@Autowired
使用Maven插件或者命令行创建一个普通的Java工程
具体创建过程省略
创建包结构:
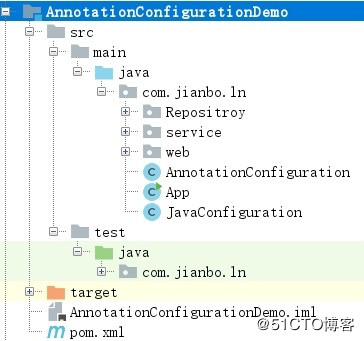
按照web层,service层,数据库层的方式分别创建三个包
App.java是项目的启动文件
JavaConfiguration.java java配置类,不使用注解
AnnotationConfiguration.jar java+注解的配置类
在Pom文件内添加Spring的依赖
org.springframework
spring-context
5.0.4.RELEASE
如果需要使用junit进行单元测试时,添加junit依赖
junit
junit
4.8.2
代码解析
使用Java配置+注解的方式
web、service、repository层的代码分析
在包下分别创建文件:
每个类均有一个构造函数和一个addUser的方法构成。
web/UserController.java
在web层,模拟SpringMVC中的Controller层。此处使用@Controller注解配置此类,依赖项userService通过@Autowired自动装配。
@Controller
public class UserController {
public UserController(){
System.out.println("UserController 构造");
}
@Autowired
private UserService userService;
/*
public UserController(UserService userService){
this.userService = userService;
}*/
public void addUser(){
System.out.println("Controller:UserController");
this.userService.addUser();
}
}
service/UserService.java
@Service
public class UserService {
@Autowired
private UserRepository userRepository;
/*
public UserService(UserRepository userRepository){
this.userRepository = userRepository;
}
*/
public UserService(){
System.out.println("UserService 构造");
}
public void addUser(){
System.out.println("service:addUser ");
this.userRepository.addUser();
}
}
Repositroy/UserRepository.java
@Repository
public class UserRepository {
public UserRepository(){
System.out.println("UserRepository 构造");
}
public void addUser(){
System.out.println("Repository:addUser");
}
}
UserController依赖UserService,UserService依赖UserRepository。其中UserController使用注解@Controller修饰,请其交给Spring管理。UserService使用@Service修饰,UserRepository使用@Repository修饰。使用@Autowired自动装配。
给类添加注解以后,相当于这几个bean都有spring管理。
配置类代码解析
AnnotationConfiguration.java
此文件是配置类,需要标注说明该文件是配置类,同时通过@ComponentScan指定进行组件扫描。
@Configuration
@ComponentScan
public class AnnotationConfiguration {
/*
@Bean("myController")
MyController getMyController(){
return new MyController();
}*/
}
测试代码解析
本实例中引入junit
TestApp.java
特别注意,需要使用:AnnotationConfigApplicationContext
其他的使用方式和XML配置是一致的,无区别。
public class TestApp {
ApplicationContext applicationContext;
@Before
public void setUp(){
applicationContext =
new AnnotationConfigApplicationContext(AnnotationConfiguration.class);
}
@Test
public void TestUserController(){
UserController userController =
(UserController)applicationContext.getBean("userController");
userController.addUser();
}
}
运行结果
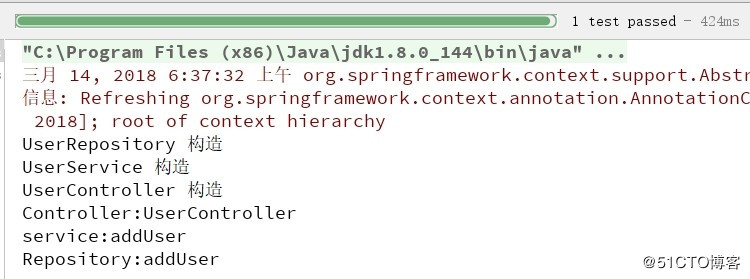
先运行构造函数
总结
为什么说是Java+注解的方式进行配置,使用Java代码书写配置类,相关Bean的配置使用的是注解。
其实还存在很多搭配:
java + java
xml + xml
xml + 注解


 775
775


 被折叠的 条评论
为什么被折叠?
被折叠的 条评论
为什么被折叠?
 到【灌水乐园】发言


