


写在前面:文章内容为本人的学习过程,路过大神不喜勿喷!
一、对于Spring Cloud Config快速实现需要以下三个模块:
- EurekaServer 注册中心(主要是为了对外发布服务管理)
- ConfigServer 远程配置中心服务(对接远程仓库主要服务)
- ConfigClient 客户端服务
二、整体项目架构
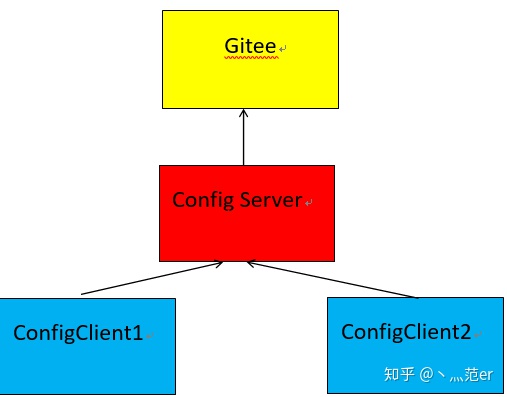
- GItee是自己在码云的一个仓库 (https://gitee.com/)(并不局限于使用Gitee,GitHub等其他的远程仓库也行)
- ConfigServer是Spring Cloud Config的一个从远程仓库读取文件的服务
- ConfigClient是自己项目所对外提供的微服务
三、开始搭建
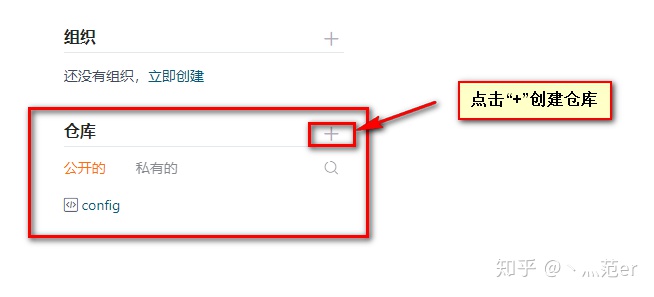
1.创建自己的远程仓库,用于管理配置文件
2.创建好仓库后,我们来创建一个ConfigServer
2.1首先创建一个maven项目,作为父类项目,管理其他子类项目(此操作应该不是问题,在此略过!)
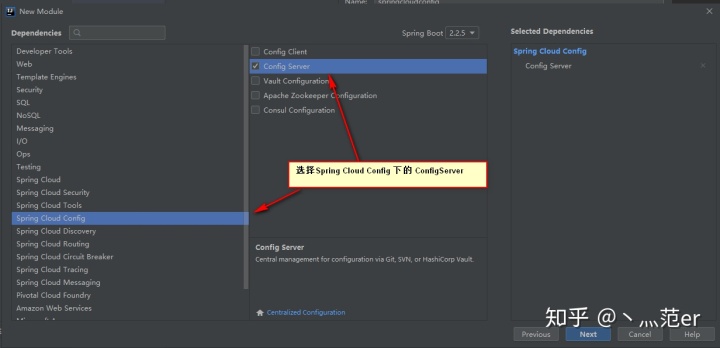
2.2在此maven项目中创建一个SpringBoot项目,使用IDEA脚手架,快速搭建

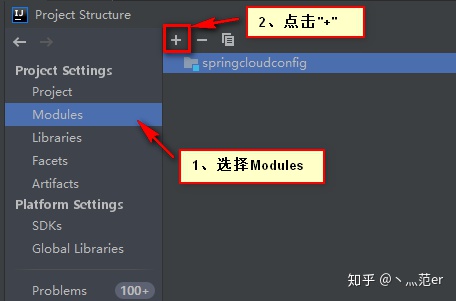
再选择New Module

在选择Next,填写必要名称
在选择Next,填写必要名称
再选择FInish
2.3自此项目创建完成,接下来修改配置文件
ConfigServer的pom.xml中需要有:
<
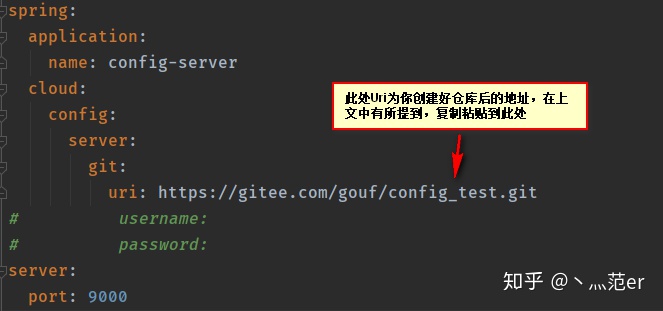
spring:
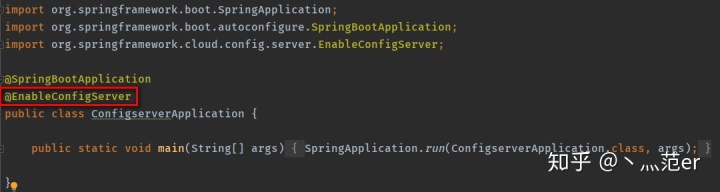
2.4在项目的启动类上添加 @EnableConfigServer
2.5 自此ConfigServer服务完成,接下来测试
进入新建的仓库,创建新配置文件


提交文件后回到IDEA中启动ConfigServer服务,访问地址 :

请求结果如下:

其中我们不难发现,name 和 profiles 分别对应着我们创建文件时"-"前后的名称,label 表示的是分支名称,我们是在主分支上,在创建文件时会选择,默认是master主分支,在 propertySources 下的 source 中是我们自己设置的key。
出现此页面也表示在我们服务ConfigServer中获取到了远端库中的配置文件。
3.再来创建一个Eureka注册中心
3.1 同样是Springboot项目,创建过程同上,不同的是选择依赖项:
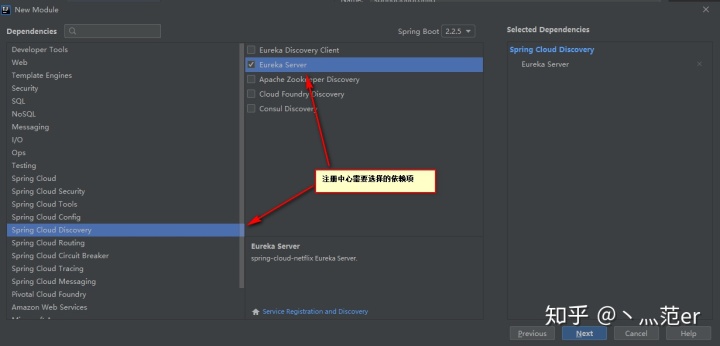
EurekaServer的pom.xml中需要有:
        <dependency>
            <groupId>org.springframework.cloud</groupId>
            <artifactId>spring-cloud-starter-netflix-eureka-server</artifactId>
        </dependency>
3.2 生成项目后修改配置文件,此处是单服务中心,以yml文件为例:
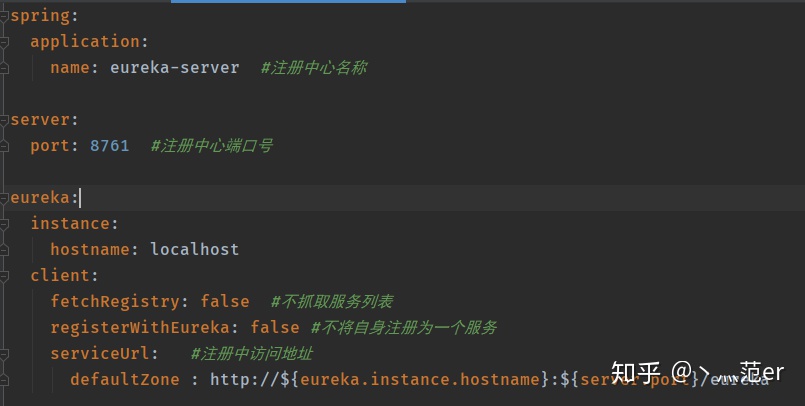
spring:
application:
name: eureka-server #注册中心名称
server:
port: 8761 #注册中心端口号
eureka:
instance:
hostname: localhost
client:
fetchRegistry: false #不抓取服务列表
registerWithEureka: false #不将自身注册为一个服务
serviceUrl: #注册中访问地址
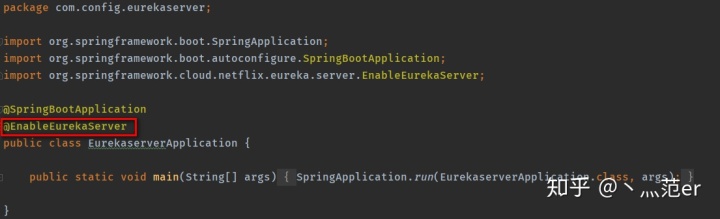
defaultZone : http://${eureka.instance.hostname}:${server.port}/eureka3.3 在启动类上添加注解 @EnableEurekaServer 开启服务中心
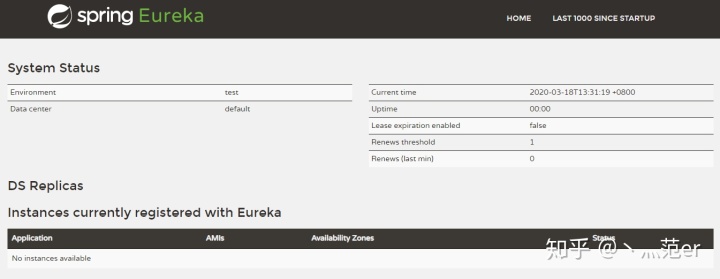
3.4 启动Eureka服务,访问 http://localhost:8761 , 出现以下页面,说明启动成功
此时注意在Application中还没有服务
4.再来创建我们的ConfigClient
4.1 同样是Springboot项目,创建过程同上,依赖项选择:

此处需要三个依赖项,Spring Web、Spring Cloud Config Client、Eureka Client的依赖
pom.xml文件中需要有:
        <dependency>
            <groupId>org.springframework.boot</groupId>
            <artifactId>spring-boot-starter-web</artifactId>
        </dependency>
        <dependency>
            <groupId>org.springframework.cloud</groupId>
            <artifactId>spring-cloud-starter-config</artifactId>
        </dependency>
        <dependency>
            <groupId>org.springframework.cloud</groupId>
            <artifactId>spring-cloud-starter-netflix-eureka-client</artifactId>
        </dependency>
4.2 修改配置文件
此处注意,由于我们希望的是配置文件全部都配置在远程仓库中,所以我们不需要配置application.yml,应该将其修改为bootstrap.yml,注意:此名字必须为bootstrap.yml
bootstrap.yml中配置如下:
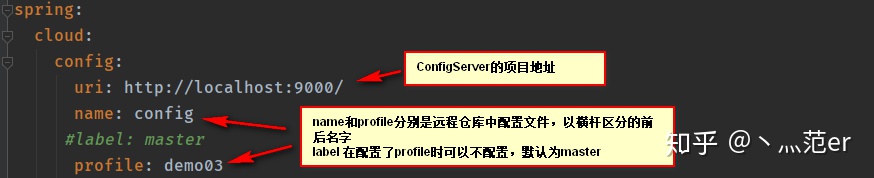
 spring:
   cloud:
    config:
      uri: http://localhost:9000/
      name: config
     #label: master
      profile: demo03
bootstrap.yml(bootstrap.properties)用来在程序引导时执行,应用于更加早期配置信息读取,如可以使用来配置application.yml中使用到参数等。
application.yml(application.properties) 应用程序特有配置信息,可以用来配置后续各个模块中需使用的公共参数等。
bootstrap.yml 先于 application.yml 加载
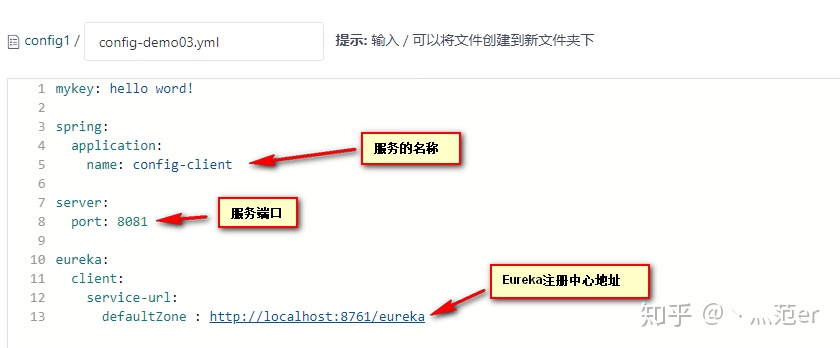
4.3 回到我们的远程仓库中,我们创建或者上传我们ConfigClient所需要的配置文件
在这里我将config-demo03.yml 进行修改,添加需要的配置项
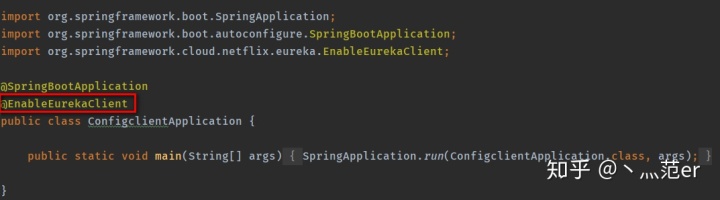
4.4 在启动项上添加注释 @EnableEurekaClient
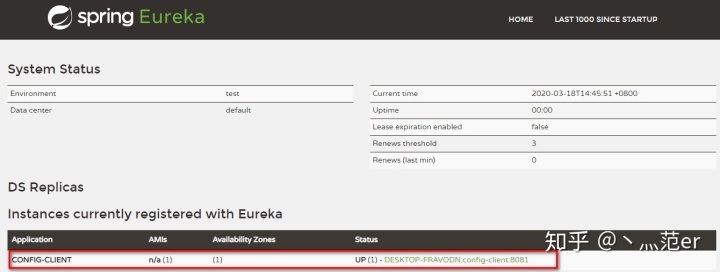
启动项目,如果控制台没有报错,访问我们的注册中心,会发现我们的服务也被注册到注册中心了,而且服务端口还是8081,是我们在远程仓库中的配置文件的端口号:
为了进一步测试,写一个controller来访问下我们的mykey
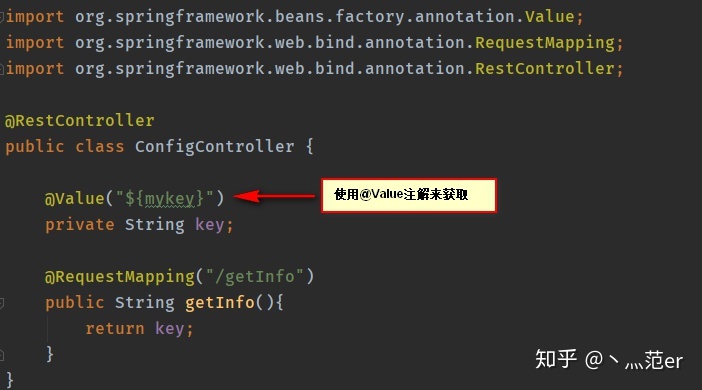
重新启动服务,访问服务地址 http://localhost:8081/getInfo
如果返回如下,则说明我们的ConfigClient通过读取远程的配置文件,获取到配置的值

四、完成基础项目搭建
我自己的Demo:
https://gitee.com/gouf/config1.gitgitee.com写在后面
在整个的项目创建过程中有以下需要注意的地方:
- 在创建远程仓库时的路径、名称以及要是用Readme来初始化仓库
- 每个项目中需要在启动项上配置不同的注解来表示不同的功能
- 在ConfigClient端不需要application.yml文件,需要将其更为bootstrap.yml
- 启动项目的顺序为:ConfigServer -> EurekaServer -> ConfigClient,前两个不分先后,但是要注意ConfigClient需要在ConfigServer和EurekaServer后启动,原因是它需要去ConfigServer中读取启动配置文件,同时启动后又要注册到Eureka中
- 建议在更改远端的配置文件后重启ConfigServer,重新读取远端的配置文件,当然也有不重启更新的方法,个人比较愿意在更改后重启,所以热更新的方法不在此赘述
最后的最后:希望文章可以帮到大家,路过大神不喜勿喷,我们共同学习,加油吧!!!!


 1519
1519


 被折叠的 条评论
为什么被折叠?
被折叠的 条评论
为什么被折叠?
 到【灌水乐园】发言


