


普通用户建议尝试下修改家里的DNS地址为DNSPod DNS+ 用了好几年了,比较稳定,没有挟持。
119.29.29.29
182.254.116.116
这两个看看
DNSPerf是由Nominum开发的免费工具,可以简单地收集域名服务DNS的准确延迟和吞吐量指标。这些工具易于使用,并可模拟典型的互联网,因此网络运营商可以对其命名和寻址基础设施进行基准测试,
DNSPerf可以自我调整DNS查询负载,以模拟网络条件。DNSPerf中的新功能提高了延迟测量的精度,并允许每个数据包每个查询的延迟报告成为可能。DNSPerf现在是多线程的,在多核系统中可以支持多个DNSPerf客户端(每个客户端需要两个核心)。DNSPerf的输出也得到了改进,使其更加简洁有用。延迟数据可以用来制作详细的图表,因此网络运营商可以简单地利用这些数据。ResPerf系统性地提高查询速率并监控响应速率,以模拟缓存DNS服务
这里介绍下macOS下通过brew来安装
brew install dnsperf
➜ ~ brew install dnsperfUpdating Homebrew...==> Auto-updated Homebrew!Updated 1 tap (homebrew/core).==> New Formulaerustscan vivid webify==> Updated FormulaeUpdated 240 formulae.==> Downloading https://homebrew.bintray.com/bottles/json-c-0.15.catalina.bottle.ta######################################################################## 100.0%==> Downloading https://homebrew.bintray.com/bottles/libuv-1.39.0.catalina.bottle.t==> Downloading from https://d29vzk4ow07wi7.cloudfront.net/dec21e413749391240327cdc######################################################################## 100.0%==> Downloading https://homebrew.bintray.com/bottles/bind-9.16.7.catalina.bottle.ta==> Downloading from https://d29vzk4ow07wi7.cloudfront.net/18f25bc05253751cd74b3054######################################################################## 100.0%==> Downloading https://homebrew.bintray.com/bottles/krb5-1.18.2.catalina.bottle.ta==> Downloading from https://d29vzk4ow07wi7.cloudfront.net/db39e4570abab6459fb857cb######################################################################## 100.0%==> Downloading https://homebrew.bintray.com/bottles/libxml2-2.9.10_1.catalina.bott==> Downloading from https://d29vzk4ow07wi7.cloudfront.net/bab6280370d9e7171d34e79e######################################################################## 100.0%==> Downloading https://homebrew.bintray.com/bottles/dnsperf-2.3.4.catalina.bottle.==> Downloading from https://d29vzk4ow07wi7.cloudfront.net/29ce167d9cac25446abbab39######################################################################## 100.0%安装之后有提示配置环境变量这里我直接贴出来 echo 'export PATH="/usr/local/opt/krb5/bin:$PATH"' >> ~/.zshrc echo 'export PATH="/usr/local/opt/krb5/sbin:$PATH"' >> ~/.zshrc echo 'export PATH="/usr/local/opt/libxml2/bin:$PATH"' >> ~/.zshrc export LDFLAGS="-L/usr/local/opt/libxml2/lib" export CPPFLAGS="-I/usr/local/opt/libxml2/include" echo 'export PATH="/usr/local/opt/krb5/bin:$PATH"' >> ~/.zshrc echo 'export PATH="/usr/local/opt/krb5/sbin:$PATH"' >> ~/.zshrc echo 'export PATH="/usr/local/opt/libxml2/bin:$PATH"' >> ~/.zshrc export LDFLAGS="-L/usr/local/opt/libxml2/lib" export CPPFLAGS="-I/usr/local/opt/libxml2/include"然后下载对应的测试文件
通过迅雷反倒能下载到这个81M的文件了ftp://ftp.nominum.com/pub/nominum/dnsperf/data/queryfile-example-current.gzmd5 queryfile-example-current.gzMD5 (queryfile-example-current.gz) = 851024fb2d6320ae126b0dcc4f5bb578https://www.dns-oarc.net/files/dnsperf/data/queryfile-example-10million-201202.gzmd5sum queryfile-example-10million-201202.gz851024fb2d6320ae126b0dcc4f5bb578 queryfile-example-10million-201202.gz通过md5验证2个文件都是一样的gunzip queryfile-example-current.gz文件如下queryfile-example-current查看文件属性file queryfile-example-currentqueryfile-example-current: ASCII text我这里搞一个测试样本命名为queryfile-example-current
cat queryfile-example-current───────┬─────────────────────────────────────────────────────────────────────────── │ File: queryfile-example-current───────┼─────────────────────────────────────────────────────────────────────────── 1 │ www.baidu.com. AAAA 2 │ qq.com. MX 3 │ www.sina.com. A 4 │ toutiao.com. A 5 │ mp.toutiao.com. A 6 │ a.root-servers.net A 7 │ api.twitter.com. A───────┴───────────────────────────────────────────────────────────────────────────下面开始压测:
The command below queries a DNS server at 119.29.29.29 for 60 seconds, it will send 10 queries per second.
下面的命令查询位于119.29.29.29的DNS服务器60秒,它将每秒发送10次查询
//dnsperf -s 119.29.29.29 -d queryfile-example-current-h -l 60 -c 1 -Q 10DNS Performance Testing ToolVersion 2.3.4[Status] Command line: dnsperf -s 119.29.29.29 -d queryfile-example-current -l 60 -c 1 -Q 10[Status] Sending queries (to 119.29.29.29)[Status] Started at: Wed Sep 23 14:50:36 2020[Status] Stopping after 60.000000 seconds[Timeout] Query timed out: msg id 10********省略部分Query timed out[Status] Testing complete (time limit)Statistics: Queries sent: 600 Queries completed: 584 (97.33%) Queries lost: 16 (2.67%) Response codes: NOERROR 584 (100.00%) Average packet size: request 30, response 107 Run time (s): 60.083784 Queries per second: 9.719761 Average Latency (s): 0.042009 (min 0.033826, max 0.836407) Latency StdDev (s): 0.059575 顺带对比下我搭建的unbound的性能,综合看来性能差距还是很大的,毕竟这个unbound是有缓存的 dnsperf -s 10.211.55.3 -d queryfile-example-current -l 60 -c 1 -Q 10DNS Performance Testing ToolVersion 2.3.4[Status] Command line: dnsperf -s 10.211.55.3 -d queryfile-example-current -l 60 -c 1 -Q 10[Status] Sending queries (to 10.211.55.3)[Status] Started at: Wed Sep 23 14:53:26 2020[Status] Stopping after 60.000000 seconds[Status] Testing complete (time limit)Statistics: Queries sent: 600 Queries completed: 600 (100.00%) Queries lost: 0 (0.00%) Response codes: SERVFAIL 600 (100.00%) Average packet size: request 30, response 30 Run time (s): 60.001556 Queries per second: 9.999741 Average Latency (s): 0.002403 (min 0.000206, max 0.632553) Latency StdDev (s): 0.027955//通过上面结果可以看到unbound还是不错的。
Average Latency (s): 0.002403 (min 0.000206, max 0.632553)
The following command is a little less kind on your DNS server located at 119.29.29.29 in that it will act as 20 clients over 30 seconds with 60 queries a second and give a step by step output for each query.
下面的命令在你位于119.29.29.29它将在30秒内充当20个客户端,每秒查询60次,并对每次查询给出一步步的输出
dnsperf -s 119.29.29.29 -d queryfile-example-current -l 30 -c 20 -Q 60 -v这里为了配合上图,贴一个本地的测试结果
dnsperf -s 10.211.55.3 -d queryfile-example-current -l 30 -c 20 -Q 60 -v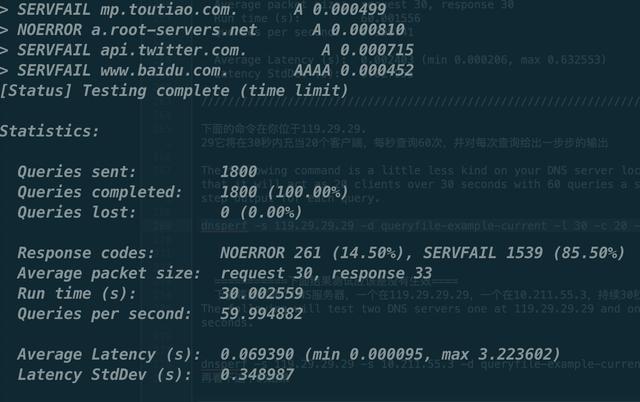
下面继续添加一个关于Linux的安装
参考下Linux的安装:https://foxutech.com/how-to-install-dnsperf/How to Install DNSPerf on UbuntuFirstly, we will need to install some dependancies:# apt-get install libbind-dev libkrb5-dev libssl-dev libcap-dev libxml2-dev -y# apt-get install bind9utils make -yNow let’s download the source code# wget ftp://ftp.nominum.com/pub/nominum/dnsperf/2.0.0.0/dnsperf-src-2.0.0.0-1.tar.gzUncompress and compile.# tar xfvz dnsperf-src-2.0.0.0-1.tar.gz# cd dnsperf-src-2.0.0.0-1# ./configure# make# make installinstall dnsperf 2.1 on CentOS7.2Let’s see How to install DNSPerf on CentOS/Redhat 7.2Here also same, first we have to install Bind service from Binery with Library and dependencies. Download from https://www.isc.org/downloads/ # tar xzvf bind-9.10.4b2.tar.gz # cd bind-9.10.4b2Build a make using configure # ./configureRerun to add all required libraries, # ./configure # make # make installinstall dnsperfYou can download dnsperf at http://nominum.com/measurement-tools# tar xzvf dnsperf-src-2.1.0.0-1.tar.gz# cd dnsperf-src-2.1.0.0-1# sh configure# make# make installTo make sure all DNsperf file;# ls /usr/local/bin/*perf*/usr/local/bin/dnsperf /usr/local/bin/resperf /usr/local/bin/resperf-repor


 187
187

 被折叠的 条评论
为什么被折叠?
被折叠的 条评论
为什么被折叠?
 到【灌水乐园】发言


