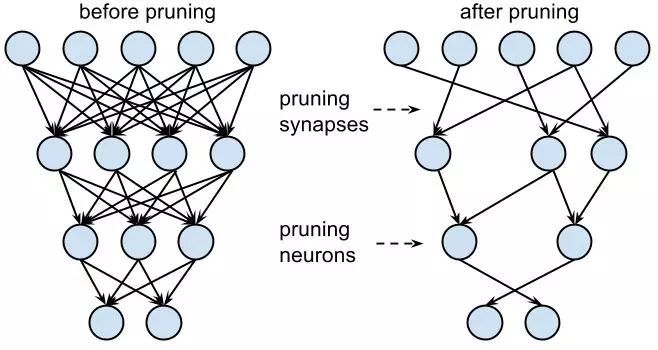
近期在搞模型优化--pruning相关的探索,发现pytorch中也已经支持了部分prune的接口,使用了一下,真香。本文主要资料来源于Pruning Tutorial,不喜勿喷。
先进的深度学习技术依赖于过参数化的模型,然后这样的模型部署非常的困难。与此相反的是,我们人脑神经元是稀疏连接的。使用一些技术通过降低模型参数的数量以此来达到压缩模型的目的是非常重要的,因为这样不仅仅可以降低内存占用、降低功耗以及硬件的开销同时不损失精度,能够在设备端部署更加轻量的模型,也有助于在设备端完成计算保护用户隐私。在现有的研究现状下,pruning操作被用于动态的学习过参数以及欠参数网络的差异,学习稀疏子网络的价值以及使用lottery tickets初始化对于网络结构搜索技术的破坏性等等。
pytorch要求为1.4.0以上版本。
import torch
from torch import nn
import torch.nn.utils.prune as prune
import torch.nn.functional as F

device = torch.device("cuda" if torch.cuda.is_available() else "cpu")

class LeNet(nn.Module):
    def __init__(self):
        super(LeNet, self).__init__()
        # 1 input image channel, 6 output channels, 3x3 square conv kernel
        self.conv1 = nn.Conv2d(1, 6, 3)
        self.conv2 = nn.Conv2d(6, 16, 3)
        self.fc1 = nn.Linear(16 * 5 * 5, 120)  # 5x5 image dimension
        self.fc2 = nn.Linear(120, 84)
        self.fc3 = nn.Linear(84, 10)

    def forward(self, x):
        x = F.max_pool2d(F.relu(self.conv1(x)), (2, 2))
        x = F.max_pool2d(F.relu(self.conv2(x)), 2)
        x = x.view(-1, int(x.nelement() / x.shape[0]))
        x = F.relu(self.fc1(x))
        x = F.relu(self.fc2(x))
        x = self.fc3(x)
        return x

model = LeNet().to(device=device)
到这里我们构建了一个模型LeNet,接下来我们会使用pytorch提供的剪枝工具对LeNet进行剪枝操作。
module = model.conv1
print(list(module.named_parameters()))
print(list(module.named_buffers()))
使用pytorch的同学都知道name_parameters是torch.nn.Module类提供的获取可学习参数的方法,将会返回一个list,其中包含有”weights“和”bias“的初始值。
但是name_buffers是用来干啥的呢?目前打印出来的结果为空,别急,我们接着往下走。
裁剪单个Module
prune.random_unstructured(module,name="weight", amount=0.3)如果我们想要裁剪一个Module,首先我们需要选取一个pruning的方案,目前torch.nn.utils.prune中已经支持
- RandomUnstructured
- L1Unstructured
- RandomStructured
- LnStructured
- CustomFromMask
我们也可以通过继承BasePruningMethod来自定义我们自己的pruning的方法。
然后我们指定module以及需要pruning的参数的name,最后使用合适的参数,指定pruning的参数。在上述代码中,我们将随机裁剪30%的连接(conv1中weights参数30%的连接)。其中name用于指定module中的某个parameter,amount用于执行需要裁剪连接的比例(0.0到1.0)或者直接给定一个绝对值。
print(list(module.named_parameters()))这时候我们会看到weight_orig,和之前打印的数值是没有变化的,但是weights的参数不见了。
print(list(module.named_buffers()))原来我们会产生一个weight_mask的掩码,本身不会直接作用于模型,会产生一个weight的属性,这时候原module是不存在weight的parameter,仅仅是一个attribute.
print(module.weight)最后,使用pytorch的forward_pre_hooks会在每次forward之前应用这个pruning操作,需要指出的是当module被裁剪之后,它的每一个paramter都需要一个forward_pre_hooks来标识将被裁剪。当前我们只进行了conv1模块的weight裁剪,所以以下命令将只能看到一个hook。
print(module._forward_pre_hooks)同样,我们还可以对conv1的bias进行L1unstructured的裁剪,和上述类似。
迭代裁剪
单个module中的parameters是可以多次裁剪的,无非就是顺序的组合不同的mask和调用不同的pruning方法,结果是一致的,我们可以通过调用PruningContainer的compute_mask方法来实现在旧mask之上添加新的mask的逻辑。
prune.ln_structured(module, name="weight", amount=0.5, n=2, dim=0)这时候hook就会变成torch.nn.utils.prune.PruningContainer的类型,将会存储应用在weights参数上的所有prune操作。
for hook in module._forward_pre_hooks.values():
    if hook._tensor_name == "weight":
       break
print(list(hook))
序列化裁剪后的模型
所有的裁剪后的tensor都是存储在state_dict当中,这就非常便于我们做模型的序列化以及save操作。
print(model.state_dict().keys())接下来我们会想,如何将pruning操作永久的作用于模型,而不保存类似weight_orig以及weight_mask 这样的Tensor,同时移除forward_pre_hook.
prune中提供了remove操作, 需要注意的是,remove并不能undo裁剪的操作,使得什么都没发生过一样,仅仅是永久化,重新将weight赋值给module的源tensor.
prune.remove(module, 'weight')
print(list(module.named_parameters()))
这时候我们会发现直接weight就是裁剪后的值,而weight_orig不见了。
如果希望裁剪模型中的多个参数,可以遍历module然后重复上述操作即可。
全局剪枝
相比之前的操作仅仅作用到指定的module,指定的参数,global pruning更加强大,可以通过如下配置来实现:
model = LeNet()

parameters_to_prune = (
    (model.conv1, 'weight'),
    (model.conv2, 'weight'),
    (model.fc1, 'weight'),
    (model.fc2, 'weight'),
    (model.fc3, 'weight'),
)

prune.global_unstructured(
    parameters_to_prune,
    pruning_method=prune.L1Unstructured,
    amount=0.2,
)
这就非常方便,因为日常使用中我们往往追求一个全局的最终的一个效果,而不大关注特定的module的稀疏程度。
print(
    "Sparsity in conv1.weight: {:.2f}%".format(
        100. * float(torch.sum(model.conv1.weight == 0))
        / float(model.conv1.weight.nelement())
    )
)
print(
    "Sparsity in conv2.weight: {:.2f}%".format(
        100. * float(torch.sum(model.conv2.weight == 0))
        / float(model.conv2.weight.nelement())
    )
)
print(
    "Sparsity in fc1.weight: {:.2f}%".format(
        100. * float(torch.sum(model.fc1.weight == 0))
        / float(model.fc1.weight.nelement())
    )
)
print(
    "Sparsity in fc2.weight: {:.2f}%".format(
        100. * float(torch.sum(model.fc2.weight == 0))
        / float(model.fc2.weight.nelement())
    )
)
print(
    "Sparsity in fc3.weight: {:.2f}%".format(
        100. * float(torch.sum(model.fc3.weight == 0))
        / float(model.fc3.weight.nelement())
    )
)
print(
    "Global sparsity: {:.2f}%".format(
        100. * float(
            torch.sum(model.conv1.weight == 0)
            + torch.sum(model.conv2.weight == 0)
            + torch.sum(model.fc1.weight == 0)
            + torch.sum(model.fc2.weight == 0)
            + torch.sum(model.fc3.weight == 0)
        )
        / float(
            model.conv1.weight.nelement()
            + model.conv2.weight.nelement()
            + model.fc1.weight.nelement()
            + model.fc2.weight.nelement()
            + model.fc3.weight.nelement()
        )
    )
)
这时的压缩率是全局考虑,有些module裁剪的比例高,有些更低。
扩展自定义剪枝方法
这部分我建议查看一下
https://github.com/pytorch/pytorch/blob/master/torch/nn/utils/prune.pygithub.com实现自定义剪枝逻辑即可,还是比较简单。
希望以上对各位有用,不正之处多多指教。


 777
777

 被折叠的 条评论
为什么被折叠?


