


前言
实践是最好的学习方式,技术也如此。
文章目录
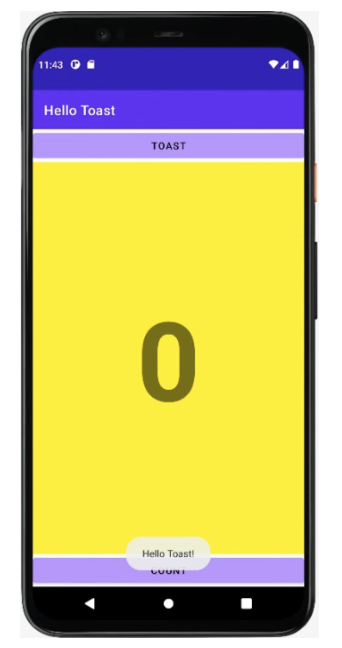
一、功能需求(一)
1、功能需求描述
- 组成:两个 Button 元素(
Button1和Button2)和一个TextView; - 功能:用户点击
Button1,屏幕显示一条消息(a Toast);点击Button2增加TextView中显示的 “计数器” ,计数器从0开始;
2、知识点
-
View
- 定义应用中的界面结构;
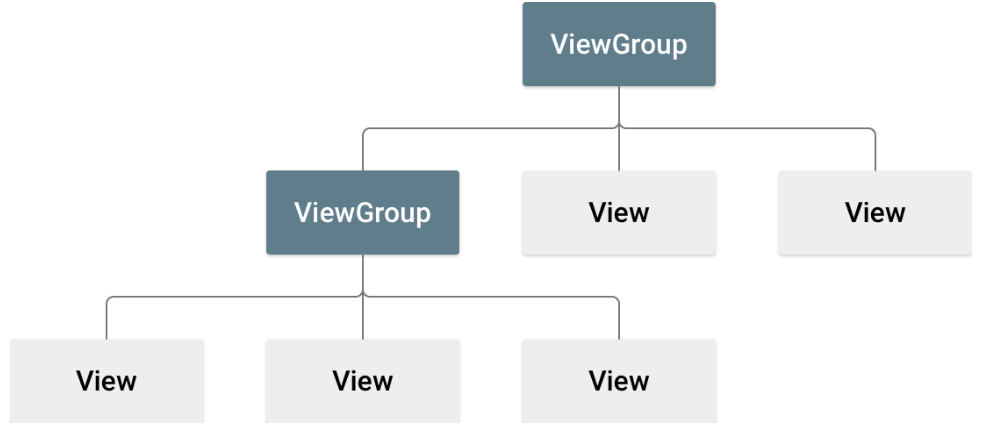
- 布局中的所有元素均使用
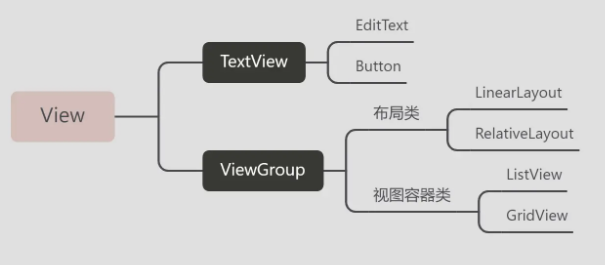
View和ViewGroup对象的层次结构进行构建; View通常用于绘制用户可见的并与之交互的内容;ViewGroup是不可见的容器,用于定义 View 和其它 ViewGroup 对象的布局结构;- View 对象通常称为 控件,可以是多个子类之一;例如
Button或TextView;
ViewGroup 对象通常称为 布局,可以是提供不同布局结构之一;例如LinearLayout或ConstraintLayout;
- View 对象通常称为 控件,可以是多个子类之一;例如
-
常用属性
match_parent- 用于
layout_width或layout_height; - 扩展 View 以按宽度或高度填充其父级。当 LinearLayout 是根 View 时,它会扩展到屏幕的大小(父 View )
- 用于
Wrap_content(指占满父容器此时要控件的宽或高等于父容器的宽或高);- 用于
layout_width或layout_height; - 缩小尺寸,使 View 足够大以包含其内容。如果没有内容, View 将变得不可见(指控件的高或宽随内容的长度决定);
- 用于
- 具体展示参考链接:链接
3、布局与程序设计
调色板窗格:显示
组件树窗格:显示 UI 元素的视图层次结构;View 元素被组织成父级和子级的树形层次结构,子级继承其父级的属性;
创建布局
为 Button 添加 OnClick 属性和处理程序;单击处理程序是当用户单击或点击可单击 UI 元素时调用的方法
public class MainActivity extends AppCompatActivity {
    private int mCount = 0;
    private TextView mShowCount;


    @Override
    protected void onCreate(Bundle savedInstanceState) {
        super.onCreate(savedInstanceState);

        setContentView(R.layout.activity_main);  // 指定一个视图
        Log.i("myapplication", "1521");
        }

    public void showToast(View view) {
        Toast toast = Toast.makeText(this, R.string.toast_message, Toast.LENGTH_SHORT);
        toast.show();
    }

    public void countUp(View view) {
        mCount ++;
        mShowCount = (TextView) findViewById(R.id.show_count);
        if (mShowCount != null) {
            mShowCount.setText(Integer.toString(mCount));
        }
    }
}
二、功能需求(二)
1、功能需求描述
- 为手机和平板电脑等较大显示器水平和垂直方向创建布局变体;通常在另一个视图组中使用,以水平或垂直排列 UI 元素。
2、知识点
1)LinearLayout
- LinearLayout:是一个 ViewGroup,将视图结合排列在水平或垂直行中,以水平或垂直排列 UI 元素。
- 修改属性;
- 修改视图控件位置 -> 修改代码位置;
- 修改权重 (android:layout_weight),额外空间分配;
<?xml version="1.0" encoding="utf-8"?>
<LinearLayout xmlns:android="http://schemas.android.com/apk/res/android"
    xmlns:app="http://schemas.android.com/apk/res-auto"
    xmlns:tools="http://schemas.android.com/tools"
    android:layout_width="match_parent"
    android:layout_height="match_parent"
    android:orientation="vertical"
    tools:context=".MainActivity">

    <Button
        android:id="@+id/button_toast"
        android:layout_width="match_parent"
        android:layout_height="wrap_content"
        android:backgroundTint="@android:color/holo_purple"
        android:text="@string/button_label_toast"
        android:textColor="@android:color/black"
        android:onClick="showToast" />


    <TextView
        android:id="@+id/show_count"
        android:layout_width="match_parent"
        android:layout_height="wrap_content"
        android:layout_weight="1"
        android:background="#FFFF00"
        android:gravity="center"
        android:text="@string/count_initial_value"
        android:textColor="@android:color/holo_purple"
        android:textSize="160sp"
        android:textStyle="bold" />

    <Button
        android:id="@+id/button_count"
        android:layout_width="match_parent"
        android:layout_height="wrap_content"
        android:backgroundTint="@android:color/holo_purple"
        android:text="@string/button_label_count"
        android:textColor="@android:color/black"
        android:onClick="countUp" />

</LinearLayout>
2)RelativeLayout
- 视图分组,其中每个视图相对于组内的其他视图进行定位和对齐,用于构建布局;
- 相对于其他元素的位置:
android:layout_below="@+id/xxx"; - 相对于父视图的位置:
android:layout_centerHorizontal="true"
android:layout_below=“@+id/show_count”:相对于其他视图的位置
<?xml version="1.0" encoding="utf-8"?>
<RelativeLayout xmlns:android="http://schemas.android.com/apk/res/android"
    xmlns:app="http://schemas.android.com/apk/res-auto"
    xmlns:tools="http://schemas.android.com/tools"
    android:layout_width="match_parent"
    android:layout_height="match_parent"
    android:orientation="vertical"
    tools:context=".MainActivity">

    <Button
        android:id="@+id/button_toast"
        android:layout_width="match_parent"
        android:layout_height="wrap_content"
        android:backgroundTint="@android:color/holo_purple"
        android:text="@string/button_label_toast"
        android:textColor="@android:color/black"
        android:onClick="showToast" />


    <TextView
        android:id="@+id/show_count"
        android:layout_width="match_parent"
        android:layout_height="wrap_content"
        android:layout_weight="1"
        android:background="#FFFF00"
        android:gravity="center"
        android:text="@string/count_initial_value"
        android:textColor="@android:color/holo_purple"
        android:textSize="160sp"
        android:textStyle="bold"
        android:layout_below="@+id/button_toast"
        android:layout_alignParentLeft="true"
        android:layout_alignParentStart="true"
        />

    <Button
        android:id="@+id/button_count"
        android:layout_width="match_parent"
        android:layout_height="wrap_content"
        android:backgroundTint="@android:color/holo_purple"
        android:text="@string/button_label_count"
        android:textColor="@android:color/black"
        android:onClick="countUp"
        android:layout_below="@+id/show_count"
        android:layout_centerHorizontal="true"
        />

</RelativeLayout>
三、功能需求(三)
1、功能需求描述
1)滚动单个元素
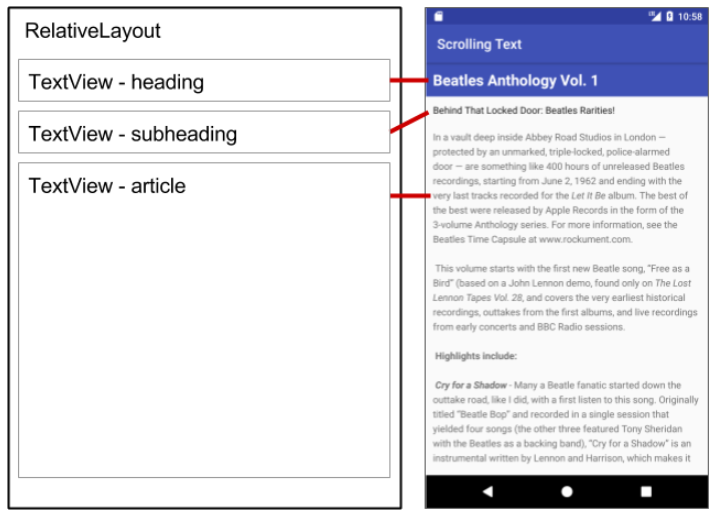
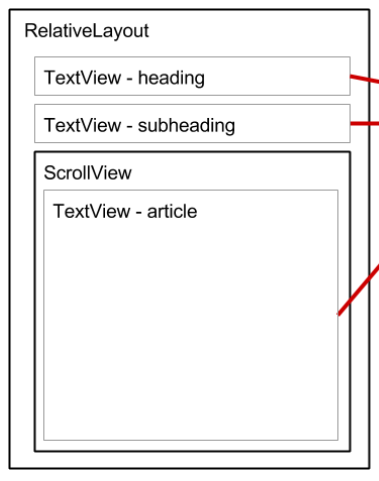
- 显示文章标题(TextView)、副标题(TextView)、文章(TextView);
文本和滚动试图
文本信息超出了显示屏的显示范围,创建滚动视图,用户向上或向下滑动垂直滚动,向左或向右滑动水平滚动
知识点
- 使用 ScrollView 滚动单个子 View (例如 TextView )。一个 ScrollView 只能容纳一个子 View 或 ViewGroup 。
<ScrollView</ScrollView>
<RelativeLayout xmlns:android="http://schemas.android.com/apk/res/android"
    xmlns:tools="http://schemas.android.com/tools"
    android:layout_width="match_parent"
    android:layout_height="match_parent"
    tools:context="com.example.android.scrollingtext.MainActivity">

    <TextView
        android:id="@+id/article_heading"
        android:layout_width="match_parent"
        android:layout_height="wrap_content"
        android:background="@color/colorPrimary"
        android:padding="@dimen/padding_regular"
        android:text="@string/article_title"
        android:textAppearance=
                        "@android:style/TextAppearance.DeviceDefault.Large"
        android:textColor="@android:color/white"
        android:textStyle="bold" />

    <TextView
        android:id="@+id/article_subheading"
        android:layout_width="match_parent"
        android:layout_height="wrap_content"
        android:layout_below="@id/article_heading"
        android:padding="@dimen/padding_regular"
        android:text="@string/article_subtitle"
        android:textAppearance=
                        "@android:style/TextAppearance.DeviceDefault" />

    <ScrollView
        android:layout_width="wrap_content"
        android:layout_height="wrap_content"
        android:layout_below="@id/article_subheading">

        <TextView
            android:id="@+id/article"
            android:layout_width="wrap_content"
            android:layout_height="wrap_content"
            android:autoLink="web"
            android:lineSpacingExtra="@dimen/line_spacing"
            android:padding="@dimen/padding_regular"
            android:text="@string/article_text" />

    </ScrollView>

</RelativeLayout>
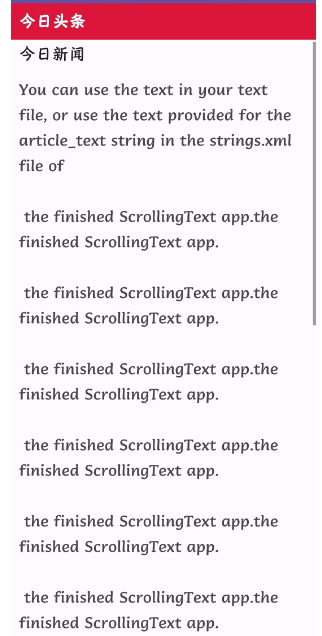
2)滚动多个元素
- 将文章副标题和文章一起滚动
知识点
- 使用
ViewGroup(例如 LinearLayout )作为 ScrollView 中的子 View 来滚动多个 View 元素。将元素括在 LinearLayout 内

<?xml version="1.0" encoding="utf-8"?>
<RelativeLayout xmlns:android="http://schemas.android.com/apk/res/android"
    xmlns:tools="http://schemas.android.com/tools"
    android:layout_width="match_parent"
    android:layout_height="match_parent"
    tools:context=".MainActivity">

    <TextView
        android:layout_width="match_parent"
        android:layout_height="wrap_content"
        android:id="@+id/article_heading"
        android:background="@color/head_backgroud"

        android:textColor="@android:color/white"
        android:padding="@dimen/padding_regular"
        android:textAppearance="@android:style/TextAppearance.DeviceDefault"
        android:textStyle="bold"
        android:text="@string/article_title"/>

    <ScrollView
        android:layout_width="wrap_content"
        android:layout_height="wrap_content"
        android:layout_below="@id/article_heading">

        <LinearLayout
            android:layout_width="match_parent"
            android:layout_height="wrap_content"
            android:orientation="vertical">

            <TextView
                android:layout_width="match_parent"
                android:layout_height="wrap_content"
                android:id="@+id/article_subheading"
                android:padding="@dimen/padding_regular"
                android:textAppearance="@android:style/TextAppearance.DeviceDefault"
                android:text="@string/article_subtitle"/>

            <TextView
                android:layout_width="match_parent"
                android:layout_height="wrap_content"
                android:id="@+id/article"
                android:autoLink="web"
                android:padding="@dimen/padding_regular"
                android:text="@string/article_text"

                android:lineSpacingExtra="@dimen/line_spacing"/>

        </LinearLayout>
    </ScrollView>

</RelativeLayout>
2、效果展示
四、更改启动器图标
- 启动器图标:应用程序图标或产品图标,显示在设备的屏幕;


 1332
1332


 被折叠的 条评论
为什么被折叠?
被折叠的 条评论
为什么被折叠?
 到【灌水乐园】发言


