delphi 7 autoupgraderpro如何安装_一招模版转换:如何快速从QuickReport 6迁移到FastReport VCL 6...

本文提供了一种快速将报表模板从QuickReport 6转换到FastReport VCL 6的方法。通过使用ConverterQR2FR.pas,即使没有QuickReport 6也可进行转换。步骤包括创建新应用、添加组件、编写代码,并详细解释了如何将转换后的模板加载到FastReport VCL Designer中,以及如何绑定数据集以确保报表正确显示。
摘要由CSDN通过智能技术生成
e4c62699cecc28a621548e123fa62824.png

一招模版转换:如何快速从QuickReport 6迁移到FastReport VCL 6

今天,我们将研究从QuickReport 6到FastReport VCL 6的迁移。

让我们使用FastReport VCL 6.3中包含的更新的Converter来完成它,即使您没有在计算机上安装QuickReport 6,它也可以转换您的模板。

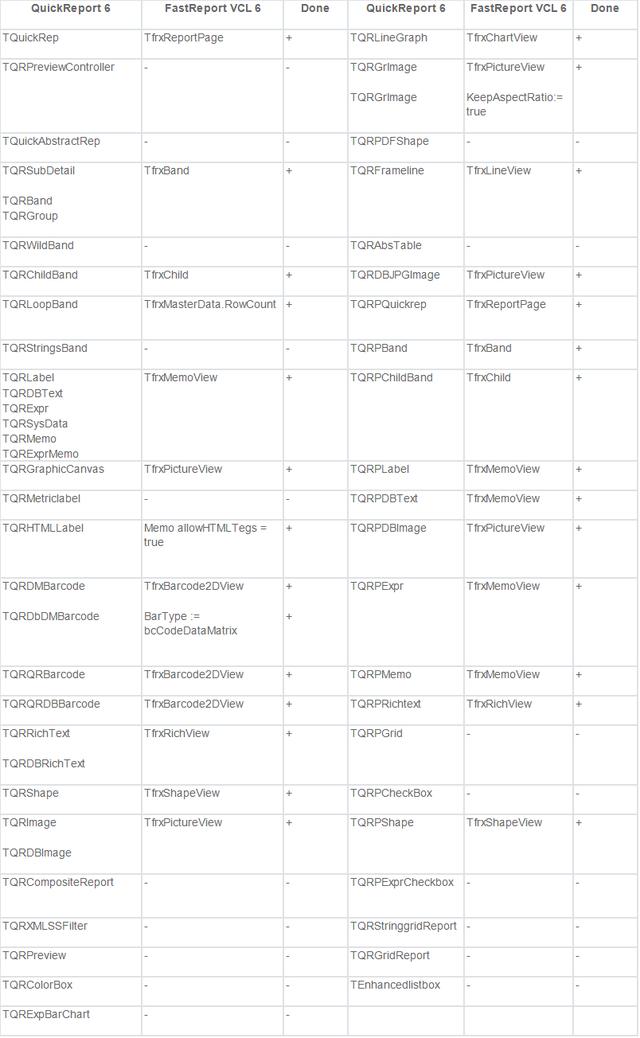
转换器(ConverterQR2FR.pas)具有从QuickReport 6到FastReport VCL 6的以下可转换组件列表,在下表中列出。

5a32476f6ae8e3677682e068f2a39a55.png

一招模版转换:如何快速从QuickReport 6迁移到FastReport VCL 6

从QuickReport 6到FastReport VCL 6的转换。

选择*.dfm格式的Delphi格式,您可以在其中找到TQuickRep对象,并在其中构建我们需要的报表。或选择*.qr2格式的QuickReport 6设计器的报表模板。

我们将制作一个由表单、一对组件和一个按钮组成的简单转换器。

执行以下操作列表:

1.创建一个新的应用程序(File -> New -> VCL Forms Application)。

2.在Uses子句中输入ConverterQR2FR

3.根据安装的组件,您可能需要从ConverterQR2FR.pas的Uses子句中删除以下块:

VCLTee.TeeProcs, VCLTee.TeEngine, VCLTee.Chart, VCLTee.Series, VCLTee.TeCanvas

frxChart, frxBDEComponents, frxIBXComponents

4.将以下组件拖放到表单中&

自動更新插件。 AutoUpgrader is a component for building software updates. Delphi programmers can use this component to create their own software packages without writing a single line of code, which includes ready-made wizards that can be activated for different purposes, as well as multiple languages ​​for the application interface. It uses updates and the interesting feature is that when the end user runs the update software, the application will recognize the user’s current operating system language and display the application’s interface in the same language. This component currently translates all wizards into 13 different languages, including English, Spanish, German, French, Russian, Portuguese, Italian, Chinese and more. Of course, if you are not interested in using the program’s pre-installed wizards, you can easily design an ambient wizard with your own texts and images for the entire process. If you have installed a new version of your application in the encrypted web directory, you can do so by configuring the username and password of access files, or allow this component to be displayed to the user when the login window needs it. And users can access the app by entering the appropriate username and password. With AutoUpgrader end users of your app will always use the latest version of your products. This package consists of two components, one HTTP web / HTTP based HTTP protocol (which supports upload and cache IE and …) and another acThread, a threaded caponity for use on ActiveFirms. Delphi programmers, with this component no longer need a basic design of update programs, and can focus on the logic of their program, such as updating the program to components such as AutoUpgrader.
2. Installation ---------------------------------------------------- to Borland Developer Studio 2006 ================================ 1. Create "..\Lib\AutoUpgraderPro" directory. 2. Unzip files and copy them to "BDS\Lib\AutoUpgraderPro". 3. Start Borland Developer Studio 2006 IDE (do not start C++ Builder, even if you want to install it only for BCB 2006. AutoUpgrader should be installed for entire BDS 2006 anyway). 4. Open "AutoUpgraderProBDS2006.bdsproj" file. 5. Install package to the components palette (right-click on "AutoUpgraderProBDS2006.bpl" node in the Project Manager and select "Install" menu item). * In case if you decided to use the package only in C++ Builder Personallity of BDS 2006, you can do following steps instead of previously described steps 3, 4 and 5: 3. Start C++ Builder 2006 IDE. 4. Open "AutoUpgraderProBDS2006CBuilder.bdsproj" file. 5. Install package to the components palette (right-click on "AutoUpgraderProBDS2006CBuilder.bpl" node in the Project Manager and select "Install" menu item). to Delphi 2 =========== 1. Unzip files from "Delphi2" directory to your "Delphi 2\Lib" directory. 2. Start Delphi 2 IDE. 3. Select "Component \ Install..." menu item. 4. Press "Add" button and select "_AUReg.pas" file. 5. Rebuild library. to Delphi 3 =========== 1. Unzip files from "Delphi3" directory and copy them to "Delphi 3\Lib". 2. Start Delphi 3 IDE. 3. Open "AutoUpgraderProD3.dpk" file. 4. Install package to the components palette ("Install" button). to Delphi 4 =========== 1. Unzip files from "Delphi4" directory and copy them to "Delphi 4\Lib". 2. Start Delphi 4 IDE. 3. Open "AutoUpgraderProD4.dpk" file. 4. Install package to the components palette ("Install" button). to Delphi 5 =========== 1. Unzip files from "Delphi5" directory and copy them to "Delphi 5\Lib". 2. Start Delphi 5 IDE. 3. Open "AutoUpgraderProD5.dpk" file. 4. Install package to the components palette ("Install" button). to
评论
添加红包

请填写红包祝福语或标题

红包个数最小为10个

红包金额最低5元

当前余额3.43前往充值 >
需支付:10.00
成就一亿技术人!
领取后你会自动成为博主和红包主的粉丝 规则
hope_wisdom
发出的红包
实付
使用余额支付
点击重新获取
扫码支付
钱包余额 0

抵扣说明:

1.余额是钱包充值的虚拟货币,按照1:1的比例进行支付金额的抵扣。
2.余额无法直接购买下载,可以购买VIP、付费专栏及课程。

余额充值