


什么是TabHost?
TabHost组件的主要功能是可以进行应用程序分类管理,例如:在用户使用windows操作系统的时候,经常见到如图所示的图形界面。

TabHost选项卡,说到这个组件,不得不先说一件事情,翻翻谷歌提供给我们的API,我们可以发现这样的一段话:
它告诉我们,这个组件在安卓4.0之后已经被废弃了,建议我们新的程序应该使用Fragment组件来代替它。
其实并不出乎意料,使用过TabHost的朋友应该都知道:
1、它的设计违反了Activity单一窗口原则,它可以同时加载多个Activity,然后再它们之间进行来回切换。
2、有个很致命的问题就是当我们点击别的选项时,按下Back后退键,它会使整个应用程序都退出,而不是切换到前一个选项卡,虽然我们可以在主程序里覆写OnKeyDown这个方法,但这样就会导致每一次按下Back后退键都只能回到第一个选项菜单。
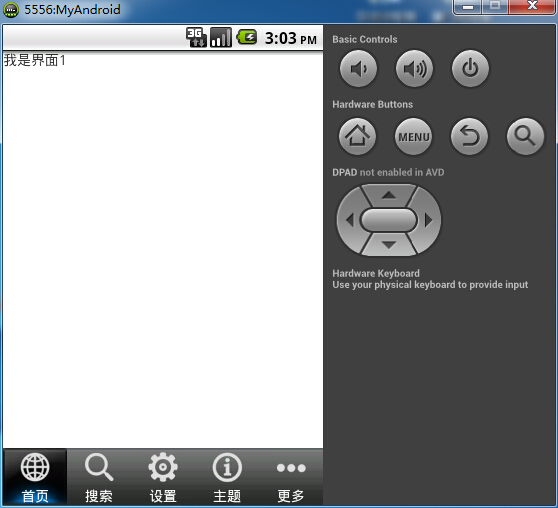
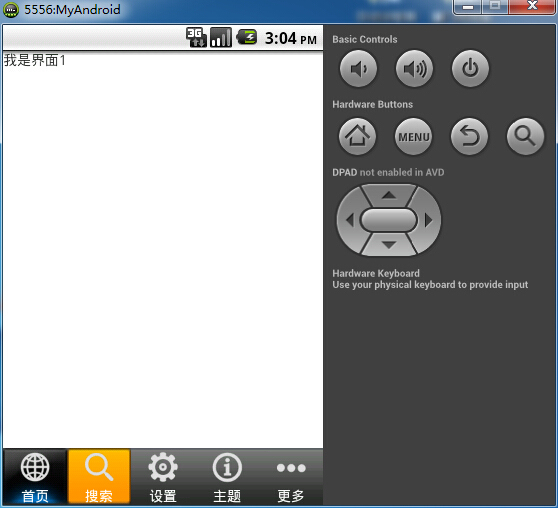
但作为开发者,这个具有历史里程碑的组件,我们还是需要去掌握下,下面给几张图来看下今天要实现的效果:

下面附上代码(注释很详细)
实现TabHost有两种方式:
方式一:直接让一个Activity程序继承TabActivity类(通过getTabHost取得实例);
方式二:定义XML布局文件利用findViewById()方法取得TagHost组件,通过setup()方法实例化并进行若干配置;
下面讲解以第二种方式为例,先看下项目结构:
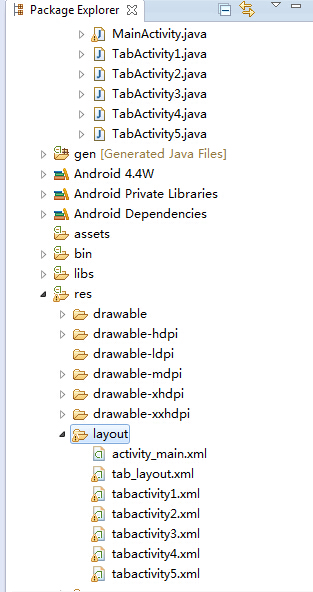
1、TabHost主布局文件
activity_main.xml(为了使选项卡显示在屏幕下方,这里采用了相对布局)
1
2 android:id="@+id/mytabhost"
3 android:layout_width="fill_parent"
4 android:layout_height="fill_parent">
5
6
7
8
10 android:layout_height="fill_parent"
11 >
12
13
17
18
20 android:layout_width="fill_parent"
21 android:layout_height="fill_parent"
22 >
23
24
25
26
27
29 android:layout_width="fill_parent"
30 android:layout_height="wrap_content"
31 android:background="@drawable/tab_widget_background"
32 android:layout_alignParentBottom="true"
33 >
34
35
36
37
38
TabHost的布局的文件必须遵循下面几点:
1、所有的用于标签配置的文件,必须以“”为根节点;
2、为了保证标签页和标签内容显示正常(例如:标签提示要放在标签显示内容之上)则可以采用一个布局管理器进行布局(例如:LinearLayout,RelativeLayout..)
3、定义一个“”的标签,用于表示整个标签容器,另外在定义此组件ID为“tabs”,表示允许加入多个标签
4、由于TabHost是FrameLayout的子类,所以要想定义标签页内容必须使用FrameLayout布局,并且标签ID为“tabcontent”
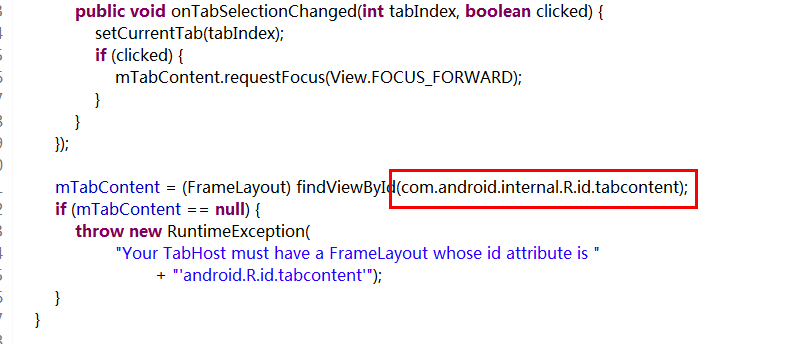
至于为什么要遵循这些条件,我们打看下TabHost的源码就可以发现:


2、每个标签的布局文件
tab_layout.xml
1 <?xml version="1.0" encoding="utf-8"?>
2
3 android:layout_width="wrap_content"
4 android:layout_height="wrap_content"
5 android:gravity="center_horizontal"
6 android:background="@drawable/tab_selector"
7 android:orientation="vertical" >
8
9
11 android:layout_width="wrap_content"
12 android:layout_height="wrap_content"
13 android:padding="3dp" />
14
15
17 android:layout_width="wrap_content"
18 android:layout_height="wrap_content"
19 android:textColor="@android:color/white"/>
20
21
3、一个选择器,用于美观效果
tab_selector.xml
1 <?xml version="1.0" encoding="utf-8"?>
2
3
5 >
6
8 >
9
10
4、跳转Activity的布局文件(由于基本一致,这里只给出其中一个)
tabactivity.xml
1 <?xml version="1.0" encoding="utf-8"?>
2
3 android:layout_width="match_parent"
4 android:layout_height="match_parent" >
5
6
8 android:layout_height="match_parent"
9 android:orientation="vertical" >
10
11
12
14 android:layout_width="wrap_content"
15 android:layout_height="wrap_content"
16 android:text="我是界面1"/>
17
18
19
5、JAVA主代码
1 packagecom.example.tabhosttest;2
3 importandroid.app.ActivityGroup;4 importandroid.content.Intent;5 importandroid.os.Bundle;6 importandroid.view.View;7 importandroid.widget.ImageView;8 importandroid.widget.TabHost;9 importandroid.widget.TabHost.TabSpec;10 importandroid.widget.TextView;11
12 public class MainActivity extendsActivityGroup{13
14 private TabHost tabHost;//声明一个TabHost对象15
16 //资源文件
17 private Class activitys[]={TabActivity1.class,TabActivity2.class,TabActivity3.class,TabActivity4.class,TabActivity5.class};//跳转的Activity
18 private String title[]={"首页","搜索","设置","主题","更多"};//设置菜单的标题
19 private int image[]={R.drawable.tab_icon1,R.drawable.tab_icon2,R.drawable.tab_icon3,R.drawable.tab_icon4,R.drawable.tab_icon5,};//设置菜单
20
21 @Override22 protected voidonCreate(Bundle savedInstanceState) {23 super.onCreate(savedInstanceState);24 setContentView(R.layout.activity_main);25 initTabView();//初始化tab标签
26
27 }28
29 private voidinitTabView() {30 //实例化tabhost
31 this.tabHost=(TabHost) findViewById(R.id.mytabhost);32 //由于继承了ActivityGroup,所以需要在setup方法里加入此参数,若继承TabActivity则可省略
33 tabHost.setup(this.getLocalActivityManager());34
35 //创建标签
36 for(int i=0;i
38 View view=View.inflate(this, R.layout.tab_layout, null);39
40 //设置imageview
41 ImageView imageView=(ImageView) view.findViewById(R.id.image);42 imageView.setImageDrawable(getResources().getDrawable(image[i]));43 //设置textview
44 TextView textView=(TextView) view.findViewById(R.id.title);45 textView.setText(title[i]);46 //设置跳转activity
47 Intent intent=new Intent(this, activitys[i]);48
49 //载入view对象并设置跳转的activity
50 TabSpec spec=tabHost.newTabSpec(title[i]).setIndicator(view).setContent(intent);51
52 //添加到选项卡
53 tabHost.addTab(spec);54 }55
56 }57
58
59 }
这里有个重载方法setIndicator(),这里是用来设置标签页:
设置标题,此时无图标
设置标题、图标(这里的图标可以用getResources().getDrawable(int id))来设置
设置自定义view
还有个setContent(Intent intent),这里是用来设置标签内容的,也就是我们要跳转的Activity
由于这里有5个选项卡,因此就有5个Activity,具体内容就看自己需求了,这里就不再给出
记得写完Activity要在AndroidManifest.xml配置文件中声明
1 <?xml version="1.0" encoding="utf-8"?>
2
3 package="com.example.tabhosttest"
4 android:versionCode="1"
5 android:versionName="1.0" >
6
7
9 android:targetSdkVersion="21" />
10
11
13 android:icon="@drawable/ic_launcher"
14 android:label="@string/app_name"
15 android:theme="@style/AppTheme" >
16
18 android:label="@string/app_name" >
19
20
21
22
23
24
25
27 android:label="@string/app_name" >
28
29
31 android:label="@string/app_name" >
32
33
35 android:label="@string/app_name" >
36
37
39 android:label="@string/app_name" >
40
41
43 android:label="@string/app_name" >
44
45
46
47
好了,到这里底部导航菜单就实现了,试试吧~


 322
322


 被折叠的 条评论
为什么被折叠?
被折叠的 条评论
为什么被折叠?
 到【灌水乐园】发言


