


 本文详细介绍了如何在Kubernetes环境中使用Nacos创建命名空间,配置多台ActiveMQbroker(如activemq0.xml,activemq1.xml,activemq2.xml),创建configMap和StatefulSet来部署一个3节点的ActiveMQ集群,以及验证部署成功的过程。
目录
这里以3个borker的集群为例,不同个数根据自己去修做相应的内容修改
1、创建命名空间 nacos-cluster
这个根据自己需求创建指定的名称空间,我这里空间吗为nacos-cluster,如果改名,下边对应名称空间地方修改即可
kubectl create ns activemq-cluster |
2、配置文件准备
根据需要部署的集群数量准备对应的配置文件,该文件实际就是对安装软件对应的配置文件修改
修改的内容为borkerName和增加multicast广播地址


2.1 activemq0.xml
<!--
Licensed to the Apache Software Foundation (ASF) under one or more
contributor license agreements. See the NOTICE file distributed with
this work for additional information regarding copyright ownership.
The ASF licenses this file to You under the Apache License, Version 2.0
(the "License"); you may not use this file except in compliance with
the License. You may obtain a copy of the License at
http://www.apache.org/licenses/LICENSE-2.0
Unless required by applicable law or agreed to in writing, software
distributed under the License is distributed on an "AS IS" BASIS,
WITHOUT WARRANTIES OR CONDITIONS OF ANY KIND, either express or implied.
See the License for the specific language governing permissions and
limitations under the License.
-->
<!-- START SNIPPET: example -->
<beans
xmlns="http://www.springframework.org/schema/beans"
xmlns:xsi="http://www.w3.org/2001/XMLSchema-instance"
xsi:schemaLocation="http://www.springframework.org/schema/beans http://www.springframework.org/schema/beans/spring-beans.xsd
http://activemq.apache.org/schema/core http://activemq.apache.org/schema/core/activemq-core.xsd">
<!-- Allows us to use system properties as variables in this configuration file -->
<bean class="org.springframework.beans.factory.config.PropertyPlaceholderConfigurer">
<property name="locations">
<value>file:${activemq.conf}/credentials.properties</value>
</property>
</bean>
<!--
The <broker> element is used to configure the ActiveMQ broker.
-->
<broker xmlns="http://activemq.apache.org/schema/core" brokerName="borker0" dataDirectory="${activemq.data}">
<destinationPolicy>
<policyMap>
<policyEntries>
<policyEntry topic=">" >
<!-- The constantPendingMessageLimitStrategy is used to prevent
slow topic consumers to block producers and affect other consumers
by limiting the number of messages that are retained
For more information, see:
http://activemq.apache.org/slow-consumer-handling.html
-->
<pendingMessageLimitStrategy>
<constantPendingMessageLimitStrategy limit="1000"/>
</pendingMessageLimitStrategy>
</policyEntry>
</policyEntries>
</policyMap>
</destinationPolicy>
<!--
The managementContext is used to configure how ActiveMQ is exposed in
JMX. By default, ActiveMQ uses the MBean server that is started by
the JVM. For more information, see:
http://activemq.apache.org/jmx.html
-->
<managementContext>
<managementContext createConnector="false"/>
</managementContext>
<!--
Configure message persistence for the broker. The default persistence
mechanism is the KahaDB store (identified by the kahaDB tag).
For more information, see:
http://activemq.apache.org/persistence.html
-->
<persistenceAdapter>
<kahaDB directory="${activemq.data}/kahadb"/>
</persistenceAdapter>
<!--
The systemUsage controls the maximum amount of space the broker will
use before disabling caching and/or slowing down producers. For more information, see:
http://activemq.apache.org/producer-flow-control.html
-->
<systemUsage>
<systemUsage>
<memoryUsage>
<memoryUsage percentOfJvmHeap="70" />
</memoryUsage>
<storeUsage>
<storeUsage limit="100 gb"/>
</storeUsage>
<tempUsage>
<tempUsage limit="50 gb"/>
</tempUsage>
</systemUsage>
</systemUsage>
<!--
The transport connectors expose ActiveMQ over a given protocol to
clients and other brokers. For more information, see:
http://activemq.apache.org/configuring-transports.html
-->
<networkConnectors>
<networkConnector uri="multicast://default" duplex="false"/> <!-- 这里defalut广播名可以是随意取的 -->
</networkConnectors>
<transportConnectors>
<!-- DOS protection, limit concurrent connections to 1000 and frame size to 100MB -->
<transportConnector name="openwire" uri="tcp://0.0.0.0:61616?maximumConnections=1000&wireFormat.maxFrameSize=104857600" discoveryUri="multicast://default">
</transportConnector>
<transportConnector name="amqp" uri="amqp://0.0.0.0:5672?maximumConnections=1000&wireFormat.maxFrameSize=104857600"/>
<transportConnector name="stomp" uri="stomp://0.0.0.0:61613?maximumConnections=1000&wireFormat.maxFrameSize=104857600"/>
<transportConnector name="mqtt" uri="mqtt://0.0.0.0:1883?maximumConnections=1000&wireFormat.maxFrameSize=104857600"/>
<transportConnector name="ws" uri="ws://0.0.0.0:61614?maximumConnections=1000&wireFormat.maxFrameSize=104857600"/>
</transportConnectors>
<!-- destroy the spring context on shutdown to stop jetty -->
<shutdownHooks>
<bean xmlns="http://www.springframework.org/schema/beans" class="org.apache.activemq.hooks.SpringContextHook" />
</shutdownHooks>
</broker>
<!--
Enable web consoles, REST and Ajax APIs and demos
The web consoles requires by default login, you can disable this in the jetty.xml file
Take a look at ${ACTIVEMQ_HOME}/conf/jetty.xml for more details
-->
<import resource="jetty.xml"/>
</beans>
<!-- END SNIPPET: example -->
2.2 activemq1.xml
同activemq0.xml文件,修改里面brokerName="broker1"
2.3 activemq2.xml
同activemq0.xml文件,修改里面brokerName="broker2"
3、创建configMap cm-activemq
[K8S@k8s-master activemq-cluster]$ pwd
/home/K8S/k8s-project/activemq-cluster
[K8S@k8s-master activemq-cluster]$ tree
.
├── activemq-cluster.yaml
└── xmls
    ├── activemq0.xml
    ├── activemq1.xml
    └── activemq2.xml

1 directory, 4 files
[K8S@k8s-master activemq-cluster]$ kubectl create cm cm-activemq --from-file ./xmls/ -n activemq-cluster #根据文件创建configMap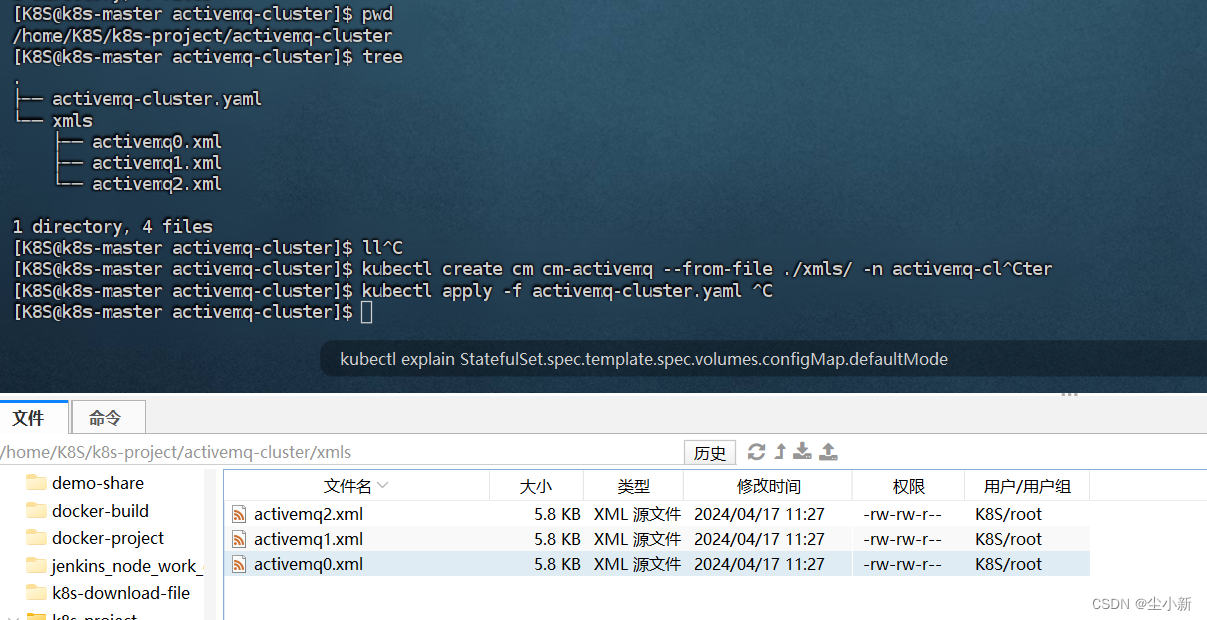
4、创建activemq-cluster.yaml
注意1:因为这里每个实例要映射到配置文件不同,所以这里用了3个StatefulSet来分别独立管理每一个pod的创建
注意2:
- #测试过apache/activemq-classic,可以修改borkerName但是集群网络不能互通
- #测试过webcenter/activemq,修改brokerName无效,故此只能2个实例集群,多台实例无效
- #最终使用这个镜像rmohr/activemq 能实现多台实例集群
apiVersion: v1
kind: Service
metadata:
  name: activemq-cluster
  namespace: activemq-cluster
spec:
  selector:
    app: activemq-cluster
  ports:
    - port: 8161
      targetPort: 8161
      protocol: TCP
      name: admin
      nodePort: 30168
    - port: 61616
      targetPort: 61616
      protocol: TCP
      name: tcp
      nodePort: 30618
  type: NodePort
---
apiVersion: apps/v1
kind: StatefulSet
metadata:
  name: activemq-cluster0  #这里根据集群数量配置多个statefulSet,因为每个deploy中容器挂在的activemq文件不同
  namespace: activemq-cluster
spec:
  serviceName: activemq-headless-cluster
  replicas: 1
  selector:
    matchLabels:
      name: activemq-cluster0 # statufulSet管理的pod标签
  template:
    metadata:
      labels:
        name: activemq-cluster0  #Pod的标签
        app: activemq-cluster
    spec:
      containers:
        - name: activemq

			#测试过apache/activemq-classic,可以修改borkerName但是集群网络不能互通
            #测试过webcenter/activemq,修改brokerName无效,故此只能2个实例集群,多台实例无效
			#最终使用这个镜像能实现多台实例集群
          image: rmohr/activemq
          ports:
            - containerPort: 61616
              name: tcp
            - containerPort: 8161
              name: admin
          volumeMounts:
            - name: config-activemq
              mountPath: /opt/activemq/conf/activemq.xml   #configmap中的activemq0.xml文件挂在到容器的这个目录下
              subPath: activemq.xml
      volumes:
        - name: timezone
          hostPath:
            path: /usr/share/zoneinfo/Asia/Shanghai
        - name: config-activemq
          configMap:
            name: cm-activemq
            items:
              - key: activemq0.xml  # cm-activemq 的key
                path: activemq.xml  # cm-activemq 的key对应的值的以文本名为activemq.xml的形式展现
---
apiVersion: apps/v1
kind: StatefulSet
metadata:
  name: activemq-cluster1
  namespace: activemq-cluster
spec:
  serviceName: activemq-headless-cluster
  replicas: 1
  selector:
    matchLabels:
      name: activemq-cluster1
  template:
    metadata:
      labels:
        name: activemq-cluster1
        app: activemq-cluster
    spec:
      containers:
        - name: activemq
          image: rmohr/activemq
          ports:
            - containerPort: 61616
              name: tcp
            - containerPort: 8161
              name: admin
          volumeMounts:
            - name: config-activemq
              mountPath: /opt/activemq/conf/activemq.xml
#              mountPath: /opt/apache-activemq/conf/activemq.xml
              subPath: activemq.xml
      volumes:
        - name: timezone
          hostPath:
            path: /usr/share/zoneinfo/Asia/Shanghai
        - name: config-activemq
          configMap:
            name: cm-activemq
            items:
              - key: activemq1.xml
                path: activemq.xml
---
apiVersion: apps/v1
kind: StatefulSet
metadata:
  name: activemq-cluster2
  namespace: activemq-cluster
spec:
  serviceName: activemq-headless-cluster
  replicas: 1
  selector:
    matchLabels:
      name: activemq-cluster2
  template:
    metadata:
      labels:
        name: activemq-cluster2
        app: activemq-cluster
    spec:
      containers:
        - name: activemq
          image: rmohr/activemq
          # image: apache/activemq-classic:latest
          ports:
            - containerPort: 61616
              name: tcp
            - containerPort: 8161
              name: admin
          volumeMounts:
            - name: config-activemq
              mountPath: /opt/activemq/conf/activemq.xml
#              mountPath: /opt/apache-activemq/conf/activemq.xml
              subPath: activemq.xml
      volumes:
        - name: timezone
          hostPath:
            path: /usr/share/zoneinfo/Asia/Shanghai
        - name: config-activemq
          configMap:
            name: cm-activemq
            items:
              - key: activemq2.xml
                path: activemq.xml
---
apiVersion: v1
kind: Service
metadata:
  name: activemq-headless-cluster
  namespace: activemq-cluster
spec:
  ports:
  - port: 61616
    targetPort: tcp
    name: tcp
  - port: 8161
    targetPort: web
    name: web
  - port: 1883
    targetPort: mqtt
    name: mqtt
  selector:
    app: activemq-cluster
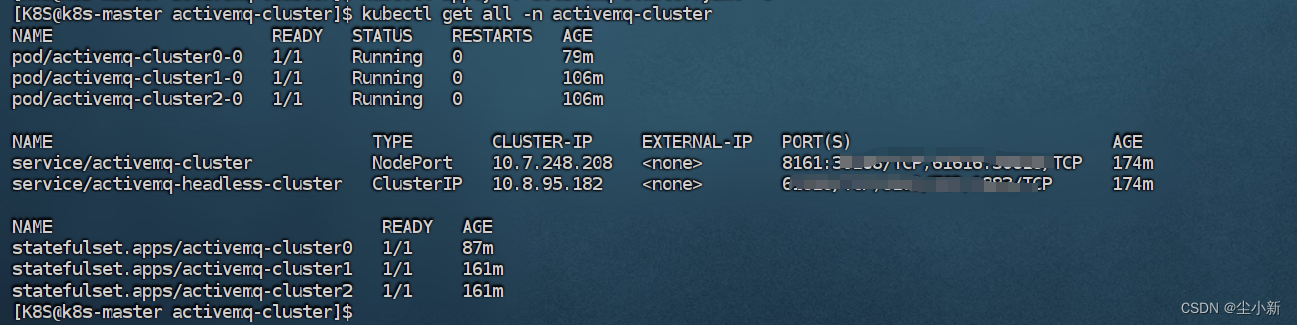
5、执行命令部署
[K8S@k8s-master activemq-cluster]$ kubectl apply -f activemq-cluster.yaml 6、部署成功,查看结果
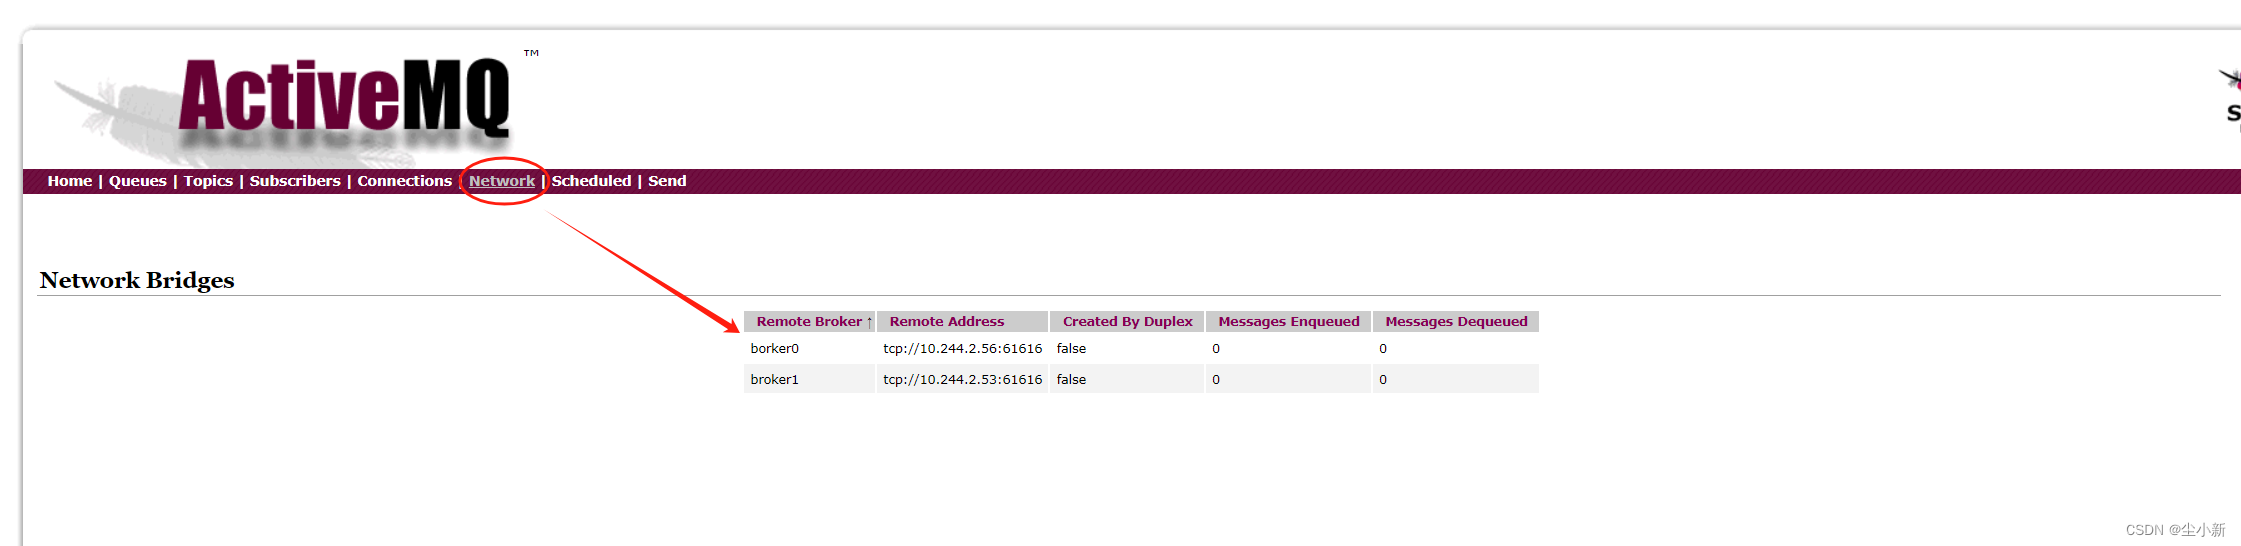
当前访问的是borker0,这里每次访问的borker可能不一样,也有可能是borker1、borker2

查看Connections和Network存在2个连接说明3台实例集群成功
看当前访问的Connections页面,这里显示borker0和broker2,说明我们当前访问的是broker1

看当前访问的Network页面,这里显示borker0和broker1,说明我们当前访问的是broker2


 913
913

 被折叠的 条评论
为什么被折叠?
被折叠的 条评论
为什么被折叠?
 到【灌水乐园】发言


