


1 openVINO下有个demos,里面是一个总工程,如果对单个demo研究势必要从总工程拿出来,否则不好调试。这里以human_pose_estimation_demo为例,看看如何从零开始搭建openVINO工程
2 这里选择Makefile作为编译手段。
3 重要的位置已经加粗,红色字体或注意两字,请悉知
上一节,我分享了用gcc/g++方式完成。可以参考
https://blog.csdn.net/weixin_39956356/article/details/107246477
上一节,我分享了用cmake方式完成。可以参考:
https://blog.csdn.net/weixin_39956356/article/details/107282625
目录
1 Ubuntu18.04环境
- l_openvino_toolkit_p_2020.3.194.tgz(最新版,截至2020.07.02)
- vscode(主要是可以很好的调试)
2 搭建human_pose_Demo_vscode工程(Makefile)
详细的基本概念务必看,可以参考
https://blog.csdn.net/weixin_39956356/article/details/107246477
2.1 复制文件
2.2 创建launch.json,tasks.json,c_cpp_properties.json
这里可以不需要tasks.json,也可以加上
2.3 编译外部依赖common、thirdparty
这三部分内容请参考上面的文章。Makefile方式很简单,主要是写出Makefile。,为此我写了一个简单的Makefile。
目标是这个,很简单。

2.4 自己写Makefile
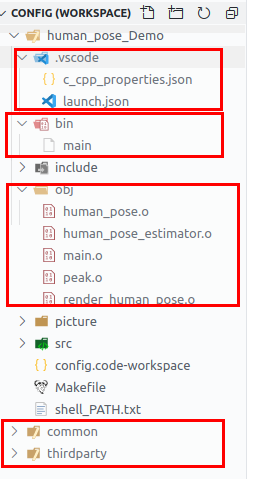
注意:这里提前新建obj,bin文件夹,obj存放中间文件,bin存放目标文件。
注意:clean仅仅是清除obj下的文件
#$(shell mkdir obj bin)			# 需要新建这些文件夹
DIR_INC = ./include
INFERENCE_ENGINE_INC = /opt/intel/openvino/deployment_tools/inference_engine/include
OPENCV_INC = /opt/intel/openvino/opencv/include
COMMON_INC = ../common/
GFLAGS_INC =  ../thirdparty/gflags/include

OPENCV_LIB = /opt/intel/openvino/opencv/lib
INFERENCE_ENGINE_LIB = /opt/intel/openvino/deployment_tools/inference_engine/lib/intel64

DIR_SRC = ./src
DIR_OBJ = ./obj
DIR_BIN = ./bin

# 取出所有的.cpp
SRC = $(wildcard ${DIR_SRC}/*.cpp)
# notdir:去除路径, patsubst,$(patsubst <pattern>,<replacement>,<text>),从<text>查找模式<pattern>,ok就替换成<replacement>
OBJ = $(patsubst %.cpp, ${DIR_OBJ}/%.o, $(notdir ${SRC}))
# 输出只支持warning和error
$(warning ${SRC})
$(warning ${OBJ})

TARGET = main
BIN_TARGET = ${DIR_BIN}/${TARGET}


CXXFLAGS = -std=c++11 -g -Wall -pthread -I${DIR_INC} -I${COMMON_INC} -I${INFERENCE_ENGINE_INC} -I${OPENCV_INC} -I${GFLAGS_INC}
LDFLAGS = -L${OPENCV_LIB} -lopencv_core -lopencv_highgui -lopencv_imgcodecs -lopencv_imgproc -lopencv_videoio -L${INFERENCE_ENGINE_LIB} -linference_engine -linference_engine_c_api -linference_engine_legacy -linference_engine_nn_builder ../thirdparty/gflags/lib/Debug/libgflags_nothreads.a ../thirdparty/gflags/lib/Debug/libgflags_nothreads.a

${BIN_TARGET}:${OBJ}
	$(CXX) $(OBJ) ${LDFLAGS} -o $@

${DIR_OBJ}/%.o:${DIR_SRC}/%.cpp
	$(CXX) $(CXXFLAGS) -c $< -o $@

.PHONY:
	clean

clean:
	-rm -rf ${DIR_OBJ}/*.o
下图是一个目标样例,为了更好管理文件,就多新建了bin和obj
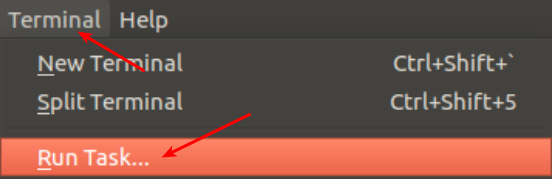
2.4 tasks.json可有可无
tasks.json是编译用的,单词是复数可以有多个任务。下面就写一个tasks.json。
注意这个tasks.jon的任务是调用make取编译,因此不需要选择什么活动文件,让vscode推测我们的意图了。
注意:选择others

{
// See https://go.microsoft.com/fwlink/?LinkId=733558
// for the documentation about the tasks.json format
“version”: “2.0.0”,
“tasks”: [
// task 1, make -j
{
“label”: “build”,
“type”: “shell”,
“command”: “make”,
“args”: ["-j"]
},
// task 2, make clean
{
“label”: “clean”,
“type”: “shell”,
“command”: “make”,
“args”: [“clean”],
}
]
}
注意:上面我就简单的建立了两个任务,很简单,一个是make -j和make clean
注意:其中 "label":是它的名字,一个叫build,另一个是clean

2.4 tasks.json可以没有
其实没有必要新建两个task,因为下方有shell,直接执行命令即可

2.4 老话题launch.json(调试)
你到底是希望vscode先编译成可执行文件之后调试, 还是已经有了可执行程序,只需要调试。毫无疑问,这里是后者,因为make已经完成了编译,并且可执行程序是bin/main。这种做法,就和cmake工程想法一模一样了
这里选择Makefile作为活动文件即可。主要是不要有preLaunchTask,请参考上面的文章。
{
    // Use IntelliSense to learn about possible attributes.
    // Hover to view descriptions of existing attributes.
    // For more information, visit: https://go.microsoft.com/fwlink/?linkid=830387
    "version": "0.2.0",
    "configurations": [
        {
            "name": "(gdb) Launch",
            "type": "cppdbg",
            "request": "launch",
            "program": "${workspaceFolder}/bin/${fileBasenameNoExtension}",
            "args": ["-m", "/home/wzk/intel/human-pose-estimation-0001/FP16/human-pose-estimation-0001.xml",
                    "-d", "CPU"
             ],
            "stopAtEntry": false,
            "cwd": "${workspaceFolder}",
            "environment": [],
            "externalConsole": false,
            "MIMode": "gdb",
            "setupCommands": [
                {
                    "description": "Enable pretty-printing for gdb",
                    "text": "-enable-pretty-printing",
                    "ignoreFailures": true
                }
            ]
        }
    ]
}
2.4 老话题c_cpp_properties.json(文件智能感知)
你会想,上面都可以执行了,为什么还出现红色波浪号和错误,上节并没有解释,这里一起说了,因为编译链接给计算机看的,代码给人看的,进而专门设计了c_cpp_properties.json(文件智能感知),把导航的头文件放进去,就ok了
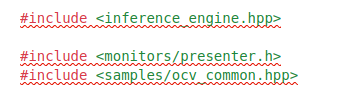

注意主工程位置,这时就没有错误的提示
{
    // Use IntelliSense to learn about possible attributes.
    // Hover to view descriptions of existing attributes.
    // For more information, visit: https://go.microsoft.com/fwlink/?linkid=830387
    "version": "0.2.0",
    "configurations": [
        {
            "name": "(gdb) Launch",
            "type": "cppdbg",
            "request": "launch",
            "program": "${workspaceFolder}/bin/${fileBasenameNoExtension}",
            "args": ["-m", "/home/wzk/intel/human-pose-estimation-0001/FP16/human-pose-estimation-0001.xml",
                    "-d", "CPU"
             ],
            "stopAtEntry": false,
            "cwd": "${workspaceFolder}",
            "environment": [],
            "externalConsole": false,
            "MIMode": "gdb",
            "setupCommands": [
                {
                    "description": "Enable pretty-printing for gdb",
                    "text": "-enable-pretty-printing",
                    "ignoreFailures": true
                }
            ]
        }
    ]
}
3 总结
到这里就要结束本期的三篇文章了,涉及以下内容
- vscode安装和插件的使用方式,如cmake使用方式
- 理解launch.json,tasks.json,c_cpp_properties.json三个文件的含义,按需新建
- 能使用传统编译方式,这种很像vs的做法,强大的IDE把所有的事都做了
- 介绍cmake/Makefile配合vscode的方式,进行编译和调试
最后,一个问题,vscode到底给我们带来了什么便利?
答:我觉得是调试,因为编译没有vscode也可以干,比如make/cmake。难道你愿意用gdb调试大型工程?


 804
804


 被折叠的 条评论
为什么被折叠?
被折叠的 条评论
为什么被折叠?
 到【灌水乐园】发言


