


目录
天小天:(一)Spark Streaming 算子梳理 — 简单介绍streaming运行逻辑
天小天:(二)Spark Streaming 算子梳理 — flatMap和mapPartitions
天小天:(三)Spark Streaming 算子梳理 — transform算子
天小天:(四)Spark Streaming 算子梳理 — Kafka createDirectStream
天小天:(五)Spark Streaming 算子梳理 — foreachRDD
天小天:(六)Spark Streaming 算子梳理 — glom算子
天小天:(七)Spark Streaming 算子梳理 — repartition算子
天小天:(八)Spark Streaming 算子梳理 — window算子
前言
本文主要介绍KafkaUtils.createDirectStream的实现过程,包括实现的结构及如何消费kafka数据。
例子
object DirectKafkaWordCount {
  def main(args: Array[String]) {
    if (args.length < 2) {
      System.err.println(s"""
        |Usage: DirectKafkaWordCount <brokers> <topics>
        |  <brokers> is a list of one or more Kafka brokers
        |  <topics> is a list of one or more kafka topics to consume from
        |
        """.stripMargin)
      System.exit(1)
    }

    StreamingExamples.setStreamingLogLevels()

    val Array(brokers, topics) = args

    // Create context with 2 second batch interval
    val sparkConf = new SparkConf().setAppName("DirectKafkaWordCount")
    val ssc = new StreamingContext(sparkConf, Seconds(2))

    // Create direct kafka stream with brokers and topics
    val topicsSet = topics.split(",").toSet
    val kafkaParams = Map[String, String]("metadata.broker.list" -> brokers)
    val messages = KafkaUtils.createDirectStream[String, String](
      ssc,
      LocationStrategies.PreferConsistent,
      ConsumerStrategies.Subscribe[String, String](topicsSet, kafkaParams))

    // Get the lines, split them into words, count the words and print
    val lines = messages.map(_.value)
    val words = lines.flatMap(_.split(" "))
    val wordCounts = words.map(x => (x, 1L)).reduceByKey(_ + _)
    wordCounts.print()

    // Start the computation
    ssc.start()
    ssc.awaitTermination()
  }
}
这里的例子是Spark源码example中的例子,主要实现的是拉取Kafka数据,并计算work count的过程。
入参解释
入参为
ssc: StreamingContext: Streaming上下文locationStrategy:LocationStrategy:Kafka消费者的分布策略consumerStrategy: ConsumerStrategy[K, V]:Kafka配置
一共三个参数,第一个和第三个参数比较好理解,只要使用过应该没什么问题。第二个参数可能不是很理解,这里会详细讲解下LocationStrategy.
下面看下LocationStrategy类的源码:
object LocationStrategies {
  /**
   *  :: Experimental ::
   * Use this only if your executors are on the same nodes as your Kafka brokers.
   */
  @Experimental
  def PreferBrokers: LocationStrategy =
    org.apache.spark.streaming.kafka010.PreferBrokers

  /**
   *  :: Experimental ::
   * Use this in most cases, it will consistently distribute partitions across all executors.
   */
  @Experimental
  def PreferConsistent: LocationStrategy =
    org.apache.spark.streaming.kafka010.PreferConsistent

  /**
   *  :: Experimental ::
   * Use this to place particular TopicPartitions on particular hosts if your load is uneven.
   * Any TopicPartition not specified in the map will use a consistent location.
   */
  @Experimental
  def PreferFixed(hostMap: collection.Map[TopicPartition, String]): LocationStrategy =
    new PreferFixed(new ju.HashMap[TopicPartition, String](hostMap.asJava))

  /**
   *  :: Experimental ::
   * Use this to place particular TopicPartitions on particular hosts if your load is uneven.
   * Any TopicPartition not specified in the map will use a consistent location.
   */
  @Experimental
  def PreferFixed(hostMap: ju.Map[TopicPartition, String]): LocationStrategy =
    new PreferFixed(hostMap)
}
这里一共提供了三种位置策略,策略名和使用时机分别为:
PreferBrokers:当Spark集群和Kafka集群属于同一组机器时使用;PreferConsistent:最常用的策略,当Spark机器和Kafka机器不属于同一组机器时使用;PreferFixed:当数据分布不均衡,由用户自行制定KafkaPartition和机器的关系。
从源码中可以看到PreferFixed有两个方法,区别只是一个入参是Java的Map,一个是Scala的Map,其他实现没有区别。
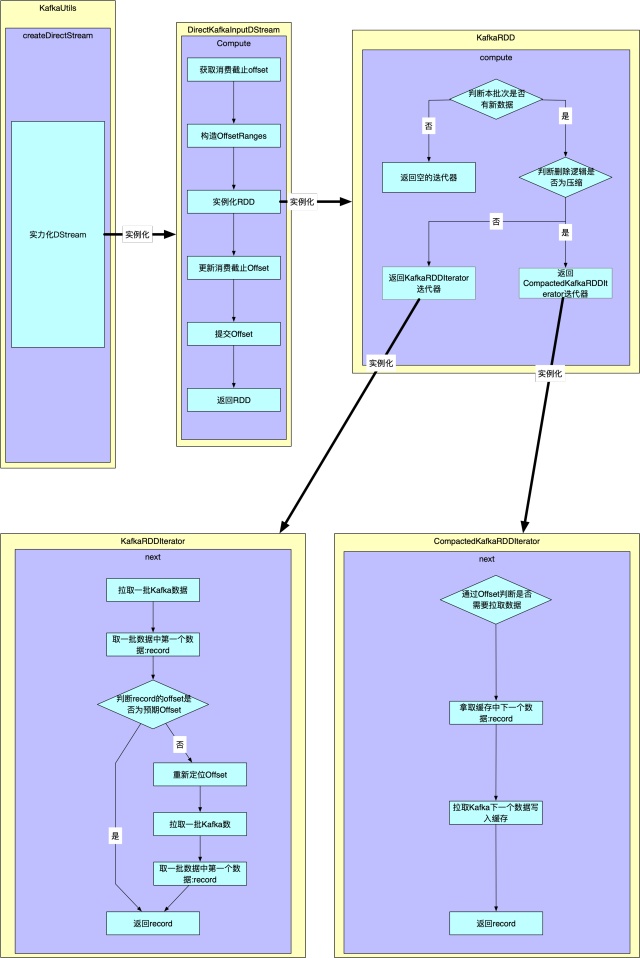
总体逻辑
这部分,我们从整体看下createDirectStream是如何生成RDD并且消费Kafka消息的。
KafkaUtils逻辑
这里我们调用的是createDirectStream方法,也就是用户调用的方法。具体代码如下:
def createDirectStream[K, V](
      ssc: StreamingContext,
      locationStrategy: LocationStrategy,
      consumerStrategy: ConsumerStrategy[K, V],
      perPartitionConfig: PerPartitionConfig
    ): InputDStream[ConsumerRecord[K, V]] = {
    new DirectKafkaInputDStream[K, V](ssc, locationStrategy, consumerStrategy, perPartitionConfig)
}入参中PerPartitionConfig是每个Partition的配置,默认的分区配置仅包含每个分区的消费速率,也就是反压的配置。
实现逻辑就很简单,只有实例化DStream的一个逻辑。
DirectKafkaInputDStream逻辑
这里我们只讲compute方法的逻辑,首先我们看下代码。
override def compute(validTime: Time): Option[KafkaRDD[K, V]] = {
    // 获取本批次消费截止的Offset [1]
    val untilOffsets = clamp(latestOffsets())
    // 构造包含topic、partition、开始及结束offset类的集合
    val offsetRanges = untilOffsets.map { case (tp, uo) => // tp:代表topic partition,uo代表:until offset的简写,意为本批次消费到哪个offset
      val fo = currentOffsets(tp) // from offset,即当前offset
      OffsetRange(tp.topic, tp.partition, fo, uo)
    }

    // 是否使用消费者缓存,这里的逻辑会在讲KafkaRDDIterator时说到。
    val useConsumerCache = context.conf.getBoolean("spark.streaming.kafka.consumer.cache.enabled",
      true)

    // 生成kafkaRDD
    val rdd = new KafkaRDD[K, V](context.sparkContext, executorKafkaParams, offsetRanges.toArray,
      getPreferredHosts, useConsumerCache)

    // Report the record number and metadata of this batch interval to InputInfoTracker.
    // 本批次的一些信息,与业务处理关系不大,我们暂时略过
    val description = offsetRanges.filter { offsetRange =>
      // Don't display empty ranges.
      offsetRange.fromOffset != offsetRange.untilOffset
    }.map { offsetRange =>
      s"topic: ${offsetRange.topic}tpartition: ${offsetRange.partition}t" +
        s"offsets: ${offsetRange.fromOffset} to ${offsetRange.untilOffset}"
    }.mkString("n")
    // Copy offsetRanges to immutable.List to prevent from being modified by the user
    val metadata = Map(
      "offsets" -> offsetRanges.toList,
      StreamInputInfo.METADATA_KEY_DESCRIPTION -> description)
    val inputInfo = StreamInputInfo(id, rdd.count, metadata)
    ssc.scheduler.inputInfoTracker.reportInfo(validTime, inputInfo)

    // 更新当前消费截止Offset,下个批次的from offset就是从这里取
    currentOffsets = untilOffsets
    // 提交offset,具体实现接下来会说到 [2]
    commitAll()
    // 返回RDD
    Some(rdd)
}上面的代码和注释解释了compute逻辑,有两个地方需要补充。
val untilOffsets = clamp(latestOffsets()):方法的第一个逻辑,也是这里最复杂的逻辑,里面涉及到反压的部分逻辑。这里不会展开介绍,如果想知道具体的原理,可以参考:Spark-Streaming反压(back-pressure)commitAll():这里提交Offset的前提是用户在代码逻辑中调用了commitAsync方法才会提交,否则这里不会做任何事情。涉及到的方法及代码及逻辑注释如下:
 /**
   * Queue up offset ranges for commit to Kafka at a future time.  Threadsafe.
   * @param offsetRanges The maximum untilOffset for a given partition will be used at commit.
   */
  def commitAsync(offsetRanges: Array[OffsetRange]): Unit = {
    commitAsync(offsetRanges, null)
  }

  /**
   * Queue up offset ranges for commit to Kafka at a future time.  Threadsafe.
   * @param offsetRanges The maximum untilOffset for a given partition will be used at commit.
   * @param callback Only the most recently provided callback will be used at commit.
   */
  def commitAsync(offsetRanges: Array[OffsetRange], callback: OffsetCommitCallback): Unit = {
    commitCallback.set(callback)
    // 把要提交Offset的offsetRanges写入到commitQueue中
    commitQueue.addAll(ju.Arrays.asList(offsetRanges: _*))
  }

  protected def commitAll(): Unit = {
    val m = new ju.HashMap[TopicPartition, OffsetAndMetadata]()
    // 获取队列中第一个OffsetRange,如果用户没有调用commitAsync方法,则队列为空,之后的逻辑就会跳过,实际上不执行任何提交Offset的操作
    var osr = commitQueue.poll()
    while (null != osr) {
      val tp = osr.topicPartition
      val x = m.get(tp)
      val offset = if (null == x) { osr.untilOffset } else { Math.max(x.offset, osr.untilOffset) }
      // 把topic及对应的offset写入到m中
      m.put(tp, new OffsetAndMetadata(offset))
      osr = commitQueue.poll()
    }
    if (!m.isEmpty) {
      // 如果m不为空,则提交offset
      consumer.commitAsync(m, commitCallback.get)
    }
  }
KafkaRDD逻辑
同样我们这里只关心compute方法逻辑,具体代码及相应的注释如下:
override def compute(thePart: Partition, context: TaskContext): Iterator[ConsumerRecord[K, V]] = {
    // 获取Partition信息,part中主要包含topic、partition、当前批次开始offset、当前批次结束offset
    val part = thePart.asInstanceOf[KafkaRDDPartition]
    // 检验开始offset是否小于等于结束offset
    require(part.fromOffset <= part.untilOffset, errBeginAfterEnd(part))
    // 开始offset和结束offset是否一致。如果一致返回空的迭代器。
    if (part.fromOffset == part.untilOffset) {
      logInfo(s"Beginning offset ${part.fromOffset} is the same as ending offset " +
        s"skipping ${part.topic} ${part.partition}")
      Iterator.empty
    } else {
      logInfo(s"Computing topic ${part.topic}, partition ${part.partition} " +
        s"offsets ${part.fromOffset} -> ${part.untilOffset}")
      // 通过读取配置,判断这个topic是否为压缩的topic。
      // 如果是则返回CompactedKafkaRDDIterator迭代器,如果不是则返回KafkaRDDIterator迭代器。
      if (compacted) {
        new CompactedKafkaRDDIterator[K, V](
          part,
          context,
          kafkaParams,
          useConsumerCache,
          pollTimeout,
          cacheInitialCapacity,
          cacheMaxCapacity,
          cacheLoadFactor
        )
      } else {
        new KafkaRDDIterator[K, V](
          part,
          context,
          kafkaParams,
          useConsumerCache,
          pollTimeout,
          cacheInitialCapacity,
          cacheMaxCapacity,
          cacheLoadFactor
        )
      }
    }
  }
}
KafkaRDDIterator逻辑
我们先看KafkaRDDIterator的逻辑,因为KafkaRDDIterator和CompactedKafkaRDDIterator有相似处,并且我们经常使用的也是这个迭代器。
我们可以先简单看下代码结构,之后会对代码详细讲解。
/**
 * An iterator that fetches messages directly from Kafka for the offsets in partition.
 * Uses a cached consumer where possible to take advantage of prefetching
 */
private class KafkaRDDIterator[K, V](
  part: KafkaRDDPartition, // partition信息
  context: TaskContext, // 上下文
  kafkaParams: ju.Map[String, Object], // kafka的配置信息
  useConsumerCache: Boolean, // 是否缓存kafka的consumer
  pollTimeout: Long, // poll的超时时间
  cacheInitialCapacity: Int, // map 初始容量
  cacheMaxCapacity: Int, // map 最大容量
  cacheLoadFactor: Float // map 负载因子
) extends Iterator[ConsumerRecord[K, V]] {
  // 获取消费者group id
  val groupId = kafkaParams.get(ConsumerConfig.GROUP_ID_CONFIG).asInstanceOf[String]

  context.addTaskCompletionListener(_ => closeIfNeeded())
  // 获取consumer,如果是使用缓存consumer则从缓存中取,如果未取到则创建新的consumer。
  //详细的解释会在代码段下面说明。
  val consumer = if (useConsumerCache) {
    CachedKafkaConsumer.init(cacheInitialCapacity, cacheMaxCapacity, cacheLoadFactor)
    if (context.attemptNumber >= 1) {
      // just in case the prior attempt failures were cache related
      CachedKafkaConsumer.remove(groupId, part.topic, part.partition)
    }
    CachedKafkaConsumer.get[K, V](groupId, part.topic, part.partition, kafkaParams)
  } else {
    CachedKafkaConsumer.getUncached[K, V](groupId, part.topic, part.partition, kafkaParams)
  }

  // 向kafka请求的offset,初始化为开始offset
  var requestOffset = part.fromOffset

  def closeIfNeeded(): Unit = {
    if (!useConsumerCache && consumer != null) {
      consumer.close()
    }
  }

  // 判断是否还有下一个元素。
  // 通过判断请求的offset是否小于截止的offset,如果小于说明还有下一个元素,如果不小于则没有下一个元素。
  override def hasNext(): Boolean = requestOffset < part.untilOffset

  // 获取下一个元素,其中主要的逻辑是get方法获取下一个记录,取到之后把请求offset加一,并返回该条记录。
  //其中get方法会在代码段候详细说到。
  override def next(): ConsumerRecord[K, V] = {
    if (!hasNext) {
      throw new ju.NoSuchElementException("Can't call getNext() once untilOffset has been reached")
    }
    val r = consumer.get(requestOffset, pollTimeout)
    requestOffset += 1
    r
  }
}这里先说下入参useConsumerCache、cacheInitialCapacity、cacheMaxCapacity和cacheLoadFactor这四个参数,这四个参数涉及到是否使用缓存consumer及缓存consumer的一些逻辑。
在实例化KafkaRDDIterator时就会执行初始化consumer的逻辑。这里的consumer对应的类是CachedKafkaConsumer而并不是kafka的consumer。kafka的consumer是在CachedKafkaConsumer类中封装的。这里是需要注意的,否则之后可能混淆。我们把consumer初始化的逻辑单独贴出来解释。
val consumer = if (useConsumerCache) { // 使用缓存consumer的逻辑
    // 初始化CachedKafkaConsumer,init的逻辑一会说。
    CachedKafkaConsumer.init(cacheInitialCapacity, cacheMaxCapacity, cacheLoadFactor)
    if (context.attemptNumber >= 1) {
      // just in case the prior attempt failures were cache related
      // 防止之前的失败和缓存有关,所以在这里清除对应缓存
      CachedKafkaConsumer.remove(groupId, part.topic, part.partition)
    }
    // 获取consumer,get的逻辑也会单独讲。
    CachedKafkaConsumer.get[K, V](groupId, part.topic, part.partition, kafkaParams)
  } else {
    // 不使用consumer缓存的方式实例化consumer
    CachedKafkaConsumer.getUncached[K, V](groupId, part.topic, part.partition, kafkaParams)
  }
CachedKafkaConsumer.init(cacheInitialCapacity, cacheMaxCapacity, cacheLoadFactor)涉及到的逻辑:
  // Don't want to depend on guava, don't want a cleanup thread, use a simple LinkedHashMap
  // 相当于一个static方法,在内存中只缓存一个cache实例。
  private var cache: ju.LinkedHashMap[CacheKey, CachedKafkaConsumer[_, _]] = null

  /** Must be called before get, once per JVM, to configure the cache. Further calls are ignored */
  def init(
      initialCapacity: Int,
      maxCapacity: Int,
      loadFactor: Float): Unit = CachedKafkaConsumer.synchronized { // 线程锁
    // 如果cache还没有被初始化,则通过下面逻辑初始化。
    // 从这里我们可以看出,这个init方法就是初始化cache。
    if (null == cache) {
      logInfo(s"Initializing cache $initialCapacity $maxCapacity $loadFactor")
      // 实例化LinkedHashMap
      cache = new ju.LinkedHashMap[CacheKey, CachedKafkaConsumer[_, _]](
        initialCapacity, loadFactor, true) {
        // 重写removeEldestEntry方法,保证缓存的consumer不会超出设置的最大缓存容量。
        override def removeEldestEntry(
          entry: ju.Map.Entry[CacheKey, CachedKafkaConsumer[_, _]]): Boolean = {
          // 如果Map大小大于设置的最大容量,则断开最近最少使用的consumer连接,并删除最近最少使用的consumer。
          // 至于为什么这个entry就是就是最近最少使用的,并且返回true就是删除,可以自行学习下LinkedHashMap实现原理。
          if (this.size > maxCapacity) {
            try {
              entry.getValue.consumer.close()
            } catch {
              case x: KafkaException =>
                logError("Error closing oldest Kafka consumer", x)
            }
            true
          } else {
            false
          }
        }
      }
    }
  }
上面的逻辑就是初始化cache的逻辑。其中cache用到了LinkedHashMap是因为这个类可以控制缓存consumer的个数。至于为什么要控制consumer的缓存个数,笔者认为是由于consumer不只含有kafka的consumer的连接,还有一次poll的数据,所以为了控制cache占用内存的大小所以设置了这个逻辑。
CachedKafkaConsumer.get[K, V](groupId, part.topic, part.partition, kafkaParams)逻辑:
  /**
   * Get a cached consumer for groupId, assigned to topic and partition.
   * If matching consumer doesn't already exist, will be created using kafkaParams.
   */
  def get[K, V](
      groupId: String,
      topic: String,
      partition: Int,
      kafkaParams: ju.Map[String, Object]): CachedKafkaConsumer[K, V] =
    CachedKafkaConsumer.synchronized {// 线程锁
      // 以groupID,topic,partition作为key
      val k = CacheKey(groupId, topic, partition)
      // 从缓存中取consuemr
      val v = cache.get(k)
      if (null == v) {
        // 当key没有对应的consumer时,实例化consumer,并且写入缓存中。
        logInfo(s"Cache miss for $k")
        logDebug(cache.keySet.toString)
        val c = new CachedKafkaConsumer[K, V](groupId, topic, partition, kafkaParams)
        cache.put(k, c)
        c
      } else {
        // any given topicpartition should have a consistent key and value type
        // 返回consuemr
        v.asInstanceOf[CachedKafkaConsumer[K, V]]
      }
    }
CachedKafkaConsumer.getUncached[K, V](groupId, part.topic, part.partition, kafkaParams)逻辑逻辑:
  /**
   * Get a fresh new instance, unassociated with the global cache.
   * Caller is responsible for closing
   */
  def getUncached[K, V](
      groupId: String,
      topic: String,
      partition: Int,
      kafkaParams: ju.Map[String, Object]): CachedKafkaConsumer[K, V] =
    // 实例化consumer,没有缓存的逻辑
new CachedKafkaConsumer[K, V](groupId, topic, partition, kafkaParams)至此初始化consumer的逻辑介绍完了。接下来我们看下next方法中的consumer.get(requestOffset, pollTimeout)实现,其中需要说明的是这里的consumer对象和上文提到的consumer对象是同一个对象,都是CachedKafkaConsumer类:
// consumer 缓存的kafka数据,避免每次查询都需要请求kafka
  protected var buffer = ju.Collections.emptyListIterator[ConsumerRecord[K, V]]()
  // 下一个offset,初始化为-2
  protected var nextOffset = -2L
  /**
   * Get the record for the given offset, waiting up to timeout ms if IO is necessary.
   * Sequential forward access will use buffers, but random access will be horribly inefficient.
   */
  def get(offset: Long, timeout: Long): ConsumerRecord[K, V] = {
    logDebug(s"Get $groupId $topic $partition nextOffset $nextOffset requested $offset")
    // 判断传入的offset和consumer对象中记录的offset是否相同。
    // 这里不相同的原因是nextOffset初始化为-2,必然会不相等。
    if (offset != nextOffset) {
      logInfo(s"Initial fetch for $groupId $topic $partition $offset")
      // 消费到的offset定位到指定的offset,保证poll到的数据是从指定的offset开始的。
      seek(offset)
      // 拉取数据,更新buffer。具体逻辑见代码段中poll方法。
      poll(timeout)
    }

    if (!buffer.hasNext()) { poll(timeout) }
    require(buffer.hasNext(),
      s"Failed to get records for $groupId $topic $partition $offset after polling for $timeout")
    var record = buffer.next()
    // 防止缓存中数据的offset和期望数据的offset不一致,所以作一个判断。
    // 如果不一致这重新定位,并更新buffer,重新获取record。
    if (record.offset != offset) {
      logInfo(s"Buffer miss for $groupId $topic $partition $offset")
      seek(offset)
      poll(timeout)
      require(buffer.hasNext(),
        s"Failed to get records for $groupId $topic $partition $offset after polling for $timeout")
      record = buffer.next()
      require(record.offset == offset,
        s"Got wrong record for $groupId $topic $partition even after seeking to offset $offset " +
          s"got offset ${record.offset} instead. If this is a compacted topic, consider enabling " +
          "spark.streaming.kafka.allowNonConsecutiveOffsets"
      )
    }

    nextOffset = offset + 1
    record
  }

  // 定位offser,此方法的consumer对象是kafka的consumer。
  private def seek(offset: Long): Unit = {
    logDebug(s"Seeking to $topicPartition $offset")
    consumer.seek(topicPartition, offset)
  }

  // 从kafka拉取对应topic,partition的数据,并更新到buffer中。
  private def poll(timeout: Long): Unit = {
    // 拉取kafka中的数据
    val p = consumer.poll(timeout)
    // 过滤出指定topic和partition的数据
    val r = p.records(topicPartition)
    logDebug(s"Polled ${p.partitions()}  ${r.size}")
    // 数据更新到buffer中。
    buffer = r.listIterator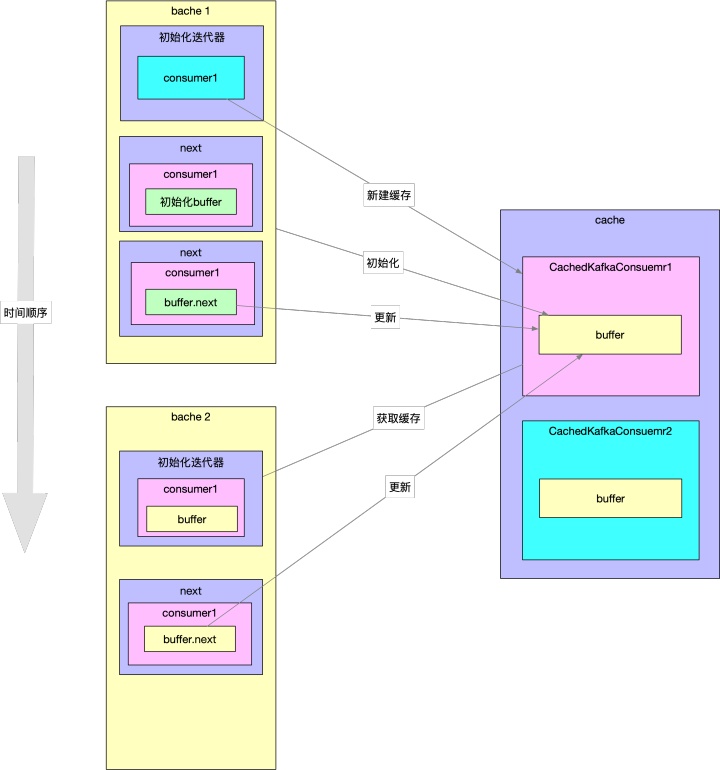
}到这里,KafkaRDDIterator的代码逻辑基本讲完了。这里关于缓存的逻辑会比较绕。这里有一张图解释了bache与bache之间consumer的共享,及next与next之间buffer的共享关系。
CompactedKafkaRDDIterator逻辑
当消费的kafka topic的删除逻辑是compact时才需要用到CompactedKafkaRDDIterator迭代器。并且要使用此迭代器需要把spark的spark.streaming.kafka.allowNonConsecutiveOffsets参数设置为true,此参数默认是false,默认用KafkaRDDIterator。
先来看下此迭代器的代码:
private class CompactedKafkaRDDIterator[K, V](
    part: KafkaRDDPartition,
    context: TaskContext,
    kafkaParams: ju.Map[String, Object],
    useConsumerCache: Boolean,
    pollTimeout: Long,
    cacheInitialCapacity: Int,
    cacheMaxCapacity: Int,
    cacheLoadFactor: Float
  ) extends KafkaRDDIterator[K, V](
    part,
    context,
    kafkaParams,
    useConsumerCache,
    pollTimeout,
    cacheInitialCapacity,
    cacheMaxCapacity,
    cacheLoadFactor
  ) {

  consumer.compactedStart(part.fromOffset, pollTimeout)
  // 在初始时直接获取下一个record
  private var nextRecord = consumer.compactedNext(pollTimeout)

  private var okNext: Boolean = true
  // 利用okNext决定是否还有下一个元素,初始为true
  override def hasNext(): Boolean = okNext

  override def next(): ConsumerRecord[K, V] = {
    if (!hasNext) {
      throw new ju.NoSuchElementException("Can't call getNext() once untilOffset has been reached")
    }
    // 获取下一个record
    val r = nextRecord

    if (r.offset + 1 >= part.untilOffset) {
      // 判断record的下一个offset大于等于截止offset,
      // 如果是的话就没有下一个元素,将okNext置为false
      okNext = false
    } else {
      // 更新下一个record,下一次执行next方法时可以省略获取nextRecord的时间,
      // 并且也可以提前知道是否还有下一个record。
      nextRecord = consumer.compactedNext(pollTimeout)
      if (nextRecord.offset >= part.untilOffset) {
        // 如果nextRecord的offset大于截止offset,则把oKNext置为false,意为hasNext为false
        okNext = false
        // 撤销本次的compactedNext逻辑。
        consumer.compactedPrevious()
      }
    }
    r
  }
}从上面可以看出,此类是继承的KafkaRDDIterator,所以是否用consuemr缓存的逻辑是一样的。这里就不会再说一次了。这里最主要逻辑是在consumer.compactedNext(pollTimeout)方法中,接下来我们看下此方法的实现:
/**
   * Get the next record in the batch from a compacted topic.
   * Assumes compactedStart has been called first, and ignores gaps.
   */
  def compactedNext(timeout: Long): ConsumerRecord[K, V] = {
    if (!buffer.hasNext()) {
      // 如果buffer没有next,则消费kafka数据,更新buffer。
      poll(timeout)
    }
    require(buffer.hasNext(),
      s"Failed to get records for compacted $groupId $topic $partition after polling for $timeout")
    // 获取buffer的下一个数据。
    val record = buffer.next()
    // offset + 1
    nextOffset = record.offset + 1
    record
}从上面可以看出compactedNext的实现逻辑相对于KafkaRDDIterator中的get方法实现逻辑简单很多。没有对buffer获取到的record的offset与nextOffset检验,直接就认为取到的数据是正确的。这样做的原因是因为topic设置为compact删除之后,offset就是不连续的了,因此无法判断record的offset是否合理。
总结
至此,KafkaUtils.createDirectStream的逻辑就讲解完了。核心思想和其他的算子是一样的,就是先实例化DStream,然后DStream实例化RDD,之后RDD实例化Iterator,最终通过Iterator的next方法来获取数据。


 5688
5688


 被折叠的 条评论
为什么被折叠?
被折叠的 条评论
为什么被折叠?
 到【灌水乐园】发言


