


shiro是现在非常普遍使用的java权限框架了,因为其使用非常的简便,适合快速的解决项目的权限需求问题。
现在我在自己项目中配置了shiro,项目前端是html静态界面,动态数据都是由ajax完成。shiro中使用框架提供的jsp标签完成页面的细粒化权限控制,在我这个情况下无法配合使用,所以自己稍微拓展了一下,可以便捷的控制html页面控件的权限。
在网上没有查询到类似的用法,所以这里分享一下自己的方法,顺便也简单记录一下项目实战中使用shiro快速的开发流程作为参考。
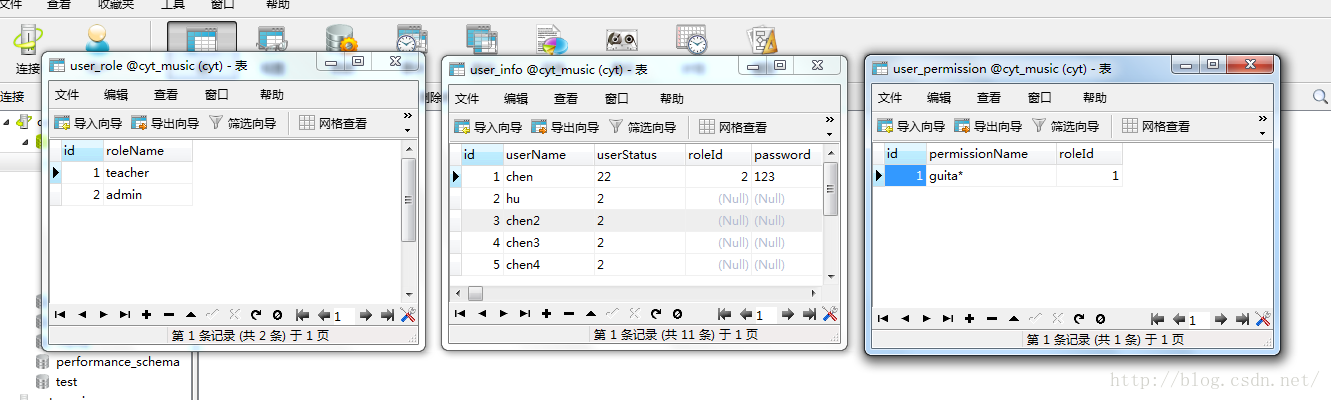
首先 数据库中三个基本的表和基本的字段 下面是最简化的建表
项目中使用的是mybatis与数据库交互 mapper的xml文件中这样写分别获取用户 角色 权限
select * from user_info where userName=#{userName}
select r.roleName from user_info u,user_role r where u.roleId=r.id and u.userName=#{userName}
select p.permissionName from user_info u,user_role r,user_permission p where u.roleId=r.id and p.roleId=r.id and u.userName=#{userName}
然后是shiro的核心 自定义realm 网上有很多教程都非常详细的讲解了realm 在这里也是非常简化的自定义
@Resource
private UserService userService;
/**
* 为当限前登录的用户授予角色和权
*/
@Override
protected AuthorizationInfo doGetAuthorizationInfo(PrincipalCollection principals) {
String userName=(String)principals.getPrimaryPrincipal();
SimpleAuthorizationInfo authorizationInfo=new SimpleAuthorizationInfo();
authorizationInfo.setRoles(userService.getRoles(userName));
authorizationInfo.setStringPermissions(userService.getPermissions(userName));
return authorizationInfo;
}
/**
* 验证当前登录的用户
*/
@Override
protected AuthenticationInfo doGetAuthenticationInfo(AuthenticationToken token) throws AuthenticationException {
String userName=(String)token.getPrincipal();
UserInfo user=userService.getByUserName(userName);
if(user!=null){
AuthenticationInfo authcInfo=new SimpleAuthenticationInfo(user.getUsername(),user.getPassword(),"xx");
return authcInfo;
}else{
return null;
}
}
如何整合springmvc去配置自定义realm 和配置过滤器这些在网上都有非常详细的配置说明
接下来就是自定义的html细粒化控制了
在前端每个页面加载的时候都要向后台发出一次请求去请求到当前登录用户的角色
$(document).ready(function () {
//判断角色
judgeAuthority();
});
function judgeAuthority(){
$.ajax({
type: "post",
url: "",
contentType: 'application/json;charset=utf-8',
success: function (data) {
for(var i=0;i
if(data[i]=="admin"){
$(".admin").css("display","block");
}
}
}
})
}
在你需要做隐藏的控件class中 加载你定义的角色名就可以了 在此处是admin 这两个按钮只有在拥有admin角色用户登陆的时候才会显示

最后controller层对角色进行控制,吧当前用户拥有的角色json形式返回给前端,前端自己处理
@RequestMapping("/session")
public @ResponseBody List session(HttpServletRequest request){
Subject subject= SecurityUtils.getSubject();
Session session=subject.getSession();
List roleList=new ArrayList();
if(subject.hasRole("admin")){
roleList.add("admin");
}
if(subject.hasRole("teacher")){
roleList.add("teacher");
}
return roleList;
}
至此即可以完成html页面对每个控件都能根据登陆 用户角色的不同进行权限控制了
方法是能走通 勉强实现自己的需求,感觉可以做一个好点的封装能把角色名暴露出来自定义,把前端操作暴露出来自定义不仅仅只是空间的显示或者隐藏.这些都可以在后续做思考和修改。


 1万+
1万+


 被折叠的 条评论
为什么被折叠?
被折叠的 条评论
为什么被折叠?
 到【灌水乐园】发言


