


code-server 是一个开源的在线 vscode 远端运行服务,本文从源码角度来解读他是如何把 vscode 搬到浏览器运行的
vscode 版本 1.39.2
node 版本 10.16.0
先预热一下 vscode 架构
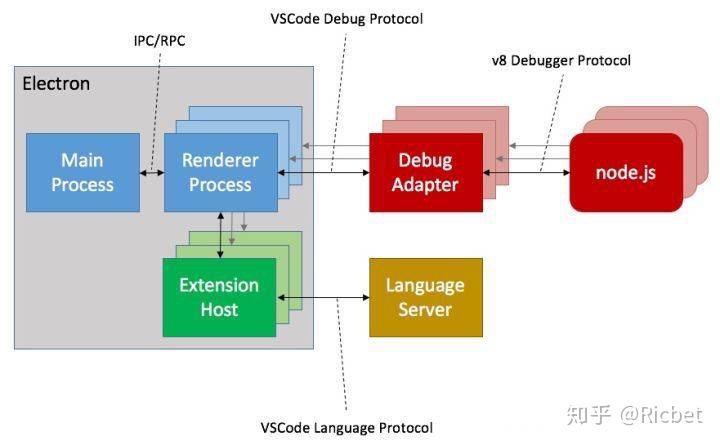
作为本地的 Electron 应用,他采用的是多进程架构;
主进程和很多子进程之间进行 IPC 通信或 RPC 远程过程调用,其中插件系统也作为了一个进程,所有的插件都会在这个进程下运行,包括语言服务协议等;
debug 协议与其他进程不同,每次执行 debug 都会新开一个子进程;
其中较为常见的文件读写都是在 main 主进程中完成;
coder 开发流程
在 coder-server 的 README 里有开发流程步骤,大抵上分为
git clone https://github.com/microsoft/vscode
cd vscode
git checkout ${vscodeVersion} # See travis.yml for the version to use.
yarn
git clone https://github.com/cdr/code-server src/vs/server
cd src/vs/server
yarn
yarn patch:apply
yarn watch
# Wait for the initial compilation to complete (it will say "Finished compilation").
# Run the next command in another shell.
yarn start
# Visit http://localhost:8080
- 先
clonevscode 项目并切换到某固定版本 - 把自己
clone到src/vs/server目录下 - 把魔改的部分通过补丁
patch打进vscode,执行watch将vscode项目里的 ts 代码编译成可执行的 js 文件并输出到out目录 - start 其实就是用 node 跑 out/vs/server/main.js 文件
所以我们可以认为他完全是充当了 vscode 的 server 端,为其 web 版提供支持能力,重点就是在 patch 补丁部分
目录
scripts
├── build.ts                        // 主要的 build 脚本文件,分为 build、binary、package 和 ensure-in-vscode 四种 task
├── ci.bash                         // 用于跑 CI 构建流程,分为 docker-build 和 local-build
├── ci.dockerfile
├── optimize.js
├── package.json
├── product.json
├── tsconfig.json
└── vscode.patch                    // 针对 vscode 1.39.2 版本打的 git patch 文件
src
├── browser                         // 主要是 client 端的实现
│   ├── api.ts                      // vscode 客户端的 api 实现
│   ├── client.ts                   // 客户端初始化执行
│   ├── extHostNodeProxy.ts         // 插件代理,通过补丁打在了 src/vs/workbench/services/extensions/worker/extHost.services.ts 目录作为单例服务,进行 rpc 远程过程调用
│   ├── login.html                  // 登陆授权
│   ├── mainThreadNodeProxy.ts      // 主线程代理
│   ├── upload.ts                   // 上载服务,拖动文件在文件树就执行该服务
│   ├── workbench-build.html
│   ├── workbench.html              // 入口 html 文件
│   └── worker.ts                   // 复写 src/vs/workbench/api/worker/extHostExtensionService.ts 目录下 _loadCommonJSModule 方法,其中关键用到 coder 自己封装的 node-browser 和 requirefs,为浏览器提供诸如 fs、net、require 的能力
├── common                          // server 端和 client 端都可使用的服务
│   ├── nodeProxy.ts                // 代理隧道服务
│   ├── telemetry.ts                // 遥测隧道服务
│   └── util.ts
├── media
│   ├── code-server.png
│   ├── favicon.ico
│   ├── login.css
│   └── manifest.json
└── node                            // 服务端 server 实现
    ├── channel.ts                  // 主要
    ├── cli.ts
    ├── connection.ts               // 主要用于 ipc 通道连接
    ├── insights.ts
    ├── ipc.ts
    ├── marketplace.ts
    ├── nls.ts
    ├── protocol.ts                 // 主要是 websocket 的协议
    ├── server.ts
    ├── update.ts
    ├── uriTransformer.js
    └── util.ts
typings
├── api.d.ts
├── httpolyglot.d.ts
└── package.json
启动顺序
在 server 目录下执行 start 命令其实就是用 node 跑 out/vs/server/main.js 文件
main 文件核心就一行
require("../../bootstrap-amd").load("vs/server/src/node/cli");
通过 amd 模块加载 cli 文件,而这个 cli 文件就是位于 server/node/cli;
该文件执行 main 函数
const main = async(): Promise<boolean | void | void[]> => {
    const args = getArgs();
    if (process.env.LAUNCH_VSCODE) {
        await ipcMain.handshake();
        return startVscode(args);
    }
    return startCli(args) || new WrapperProcess(args).start();
};
这一步开始其实 LAUNCH_VSCODE 环境变量初始为空,startCli 函数其实里面也是根据环境变量参数做一些判断处理,但初始都为空,关键是这个 WrapperProcess;
实例化 WrapperProcess 的时候便开始进行 ipc 的握手,用于进程之间的通信,完了之后执行 start 函数
if (!this.started) {
    const child = this.spawn();
    this.started = ipcMain.handshake(child).then(() => {
        child.once("exit", (code) => exit(code!));
    });
    this.process = child;
}
return this.started;
通过 spawn 创建子进程, 而其中 spawn 做了以下事情
//...
const isBinary = (global as any).NBIN_LOADED;
return cp.spawn(process.argv[0], process.argv.slice(isBinary ? 2 : 1), {
    env: {
        ...process.env,
        LAUNCH_VSCODE: "true",
        NBIN_BYPASS: undefined,
        VSCODE_PARENT_PID: process.pid.toString(),
        NODE_OPTIONS: nodeOptions,
    },
    stdio: ["inherit", "inherit", "inherit", "ipc"],
});NBIN_LOADED环境其实是coder自定义的,nbin 主要是通过给node的fs模块打补丁一顿魔改达到增强二进制编译的过程,这也是为啥会对node版本具有强约束性的原因(骚。。。
使用当前的所有参数重新创建了一个子进程并返回,其中 stdio 指定了 ipc 通道,LAUNCH_VSCODE 环境变量也设置为了 true,此时 main 函数被 重新执行 了;
回到 main 这里, 此时直接等待 ipc 握手之后运行 startVscode;
//...

const server = new MainServer({
    ...options,
    port: typeof args.port !== "undefined" ? parseInt(args.port, 10) : 8080,
    socket: args.socket,
}, args);

const [serverAddress, /* ignore */] = await Promise.all([
    server.listen(),
    unpackExecutables(),
]);

//...可以总结为,cli 其实就是建立 ipc 通道并预处理一大堆参数从而启动 server 的过程;
Server 端
来到 server 端的 MainServer 函数,它继承了抽象类 Server,并在构造函数里启动 http 服务
public constructor(options: ServerOptions) {
    this.options = {
        host: options.auth === "password" && options.cert ? "0.0.0.0" : "localhost",
        ...options,
        basePath: options.basePath ? options.basePath.replace(//+$/, "") : "",
        password: options.password ? hash(options.password) : undefined,
    };
    this.protocol = this.options.cert ? "https" : "http";
    if (this.protocol === "https") {
        const httpolyglot = localRequire<typeof import("httpolyglot")>("httpolyglot/lib/index");
        this.server = httpolyglot.createServer({
            cert: this.options.cert && fs.readFileSync(this.options.cert),
            key: this.options.certKey && fs.readFileSync(this.options.certKey),
        }, this.onRequest);
    } else {
        this.server = http.createServer(this.onRequest);
    }
}
其中 cert 参数做了自签名证书处理,我猜测是为了安全考虑吧。。
onRequest 方法里对请求头做了预处理
//...
const payload = await this.preHandleRequest(request, parsedUrl);
//...
preHandleRequest 方法里对请求的路径做了一通拦截处理,其中有一段
// Allow for a versioned static endpoint. This lets us cache every static
// resource underneath the path based on the version without any work and
// without adding query parameters which have their own issues.
// REVIEW: Discuss whether this is the best option; this is sort of a quick
// hack almost to get caching in the meantime but it does work pretty well.
if (/^/static-/.test(base)) {
    base = "/static";
}
通过正则匹配所有路径里开头含有 static- 的文件将 base 路径重置为 /static ,为了后面做缓存处理
//...
case "/static":
    const response = await this.getResource(this.rootPath, requestPath);
    response.cache = true;
    return response;
//...
其中 getResource 就是直接读文件内容并返回
protected async getResource(...parts: string[]): Promise<Response> {
    const filePath = this.ensureAuthorizedFilePath(...parts);
    return { content: await util.promisify(fs.readFile)(filePath), filePath };
}
除了 static 路径和特定的几个资源文件路径其余的文件都向下走 handleRequest 函数;
这里面就是处理各种文件资源请求的方式,譬如有对 tar 文件格式资源的处理和 webview 文件资源处理还有静态资源的处理等,当然里面还有 heartbeat 心跳;
对于根路径 / 返回的是 getRoot 函数
case "/": return this.getRoot(request, parsedUrl);getRoot 函数里对 src/vs/server/src/browser/workbench.html 做了一些文本替换处理;
private async getRoot(request: http.IncomingMessage, parsedUrl: url.UrlWithParsedQuery): Promise<Response> {
const filePath = path.join(this.serverRoot, "browser/workbench.html");
let [content, startPath] = await Promise.all([
util.promisify(fs.readFile)(filePath, "utf8"),
this.getFirstValidPath([
{ path: parsedUrl.query.workspace, workspace: true },
{ path: parsedUrl.query.folder, workspace: false },
(await this.readSettings()).lastVisited,
{ path: this.options.openUri }
]),
this.servicesPromise,
]);
if (startPath) {
this.writeSettings({
lastVisited: {
path: startPath.uri.fsPath,
workspace: startPath.workspace
},
});
}
const logger = this.services.get(ILogService) as ILogService;
logger.info("request.url", `"${request.url}"`);
const remoteAuthority = request.headers.host as string;
const transformer = getUriTransformer(remoteAuthority);
const environment = this.services.get(IEnvironmentService) as IEnvironmentService;
const options: Options = {
WORKBENCH_WEB_CONFIGURATION: {
workspaceUri: startPath && startPath.workspace ? transformer.transformOutgoing(startPath.uri) : undefined,
folderUri: startPath && !startPath.workspace ? transformer.transformOutgoing(startPath.uri) : undefined,
remoteAuthority,
logLevel: getLogLevel(environment),
},
REMOTE_USER_DATA_URI: transformer.transformOutgoing(URI.file(environment.userDataPath)),
PRODUCT_CONFIGURATION: {
extensionsGallery: product.extensionsGallery,
},
NLS_CONFIGURATION: await getNlsConfiguration(environment.args.locale || await getLocaleFromConfig(environment.userDataPath), environment.userDataPath),
};
content = content.replace(/{{COMMIT}}/g, product.commit || "");
for (const key in options) {
content = content.replace(`"{{${key}}}"`, `'${JSON.stringify(options[key as keyof Options])}'`);
}
return { content, filePath };
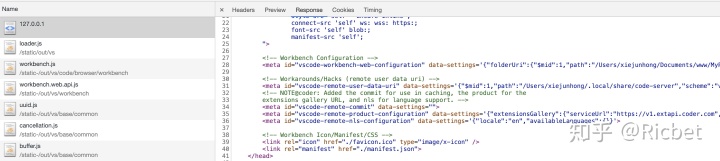
}首先它直接读取了 workbench.html 的内容,然后根据 options 的 key 替换掉 html 文件里的占位符,如 uri 的转换、nls 多语言的配置、workbench 配置等,然后返回文件内容和路径;
<!-- Workbench Configuration -->
<meta id="vscode-workbench-web-configuration" data-settings="{{WORKBENCH_WEB_CONFIGURATION}}">

<!-- Workarounds/Hacks (remote user data uri) -->
<meta id="vscode-remote-user-data-uri" data-settings="{{REMOTE_USER_DATA_URI}}">
<!-- NOTE@coder: Added the commit for use in caching, the product for the
extensions gallery URL, and nls for language support. -->
<meta id="vscode-remote-commit" data-settings="{{COMMIT}}">
<meta id="vscode-remote-product-configuration" data-settings="{{PRODUCT_CONFIGURATION}}">
<meta id="vscode-remote-nls-configuration" data-settings="{{NLS_CONFIGURATION}}">
其中 getFirstValidPath 方法是用于指定初始的时候要打开的工作区和文件;
此时 Server 抽象类的主要任务完成了,剩下的交给 MainServer,其构造函数里先执行 initializeServices 方法;
里面就是注册了一些 ipc 通道,如 logger 日志,插件 debug,telemetry 遥测,nodeProxy node 代理等等;
以及注册一些依赖注入项服务,如 ILogService 服务,IFileService 文件服务等等;
private async initializeServices(args: ParsedArgs): Promise<void> {
    const environmentService = new EnvironmentService(args, process.execPath);
    const logService = new SpdLogService(RemoteExtensionLogFileName, environmentService.logsPath, getLogLevel(environmentService));
    const fileService = new FileService(logService);
    fileService.registerProvider(Schemas.file, new DiskFileSystemProvider(logService));

    this.allowedRequestPaths.push(
        path.join(environmentService.userDataPath, "clp"), // Language packs.
        environmentService.extensionsPath,
        environmentService.builtinExtensionsPath,
        ...environmentService.extraExtensionPaths,
        ...environmentService.extraBuiltinExtensionPaths,
    );

    this.ipc.registerChannel("logger", new LoggerChannel(logService));
    this.ipc.registerChannel(ExtensionHostDebugBroadcastChannel.ChannelName, new ExtensionHostDebugBroadcastChannel());

    this.services.set(ILogService, logService);
    this.services.set(IEnvironmentService, environmentService);
    this.services.set(IConfigurationService, new SyncDescriptor(ConfigurationService, [environmentService.machineSettingsResource]));
    this.services.set(IRequestService, new SyncDescriptor(RequestService));
    this.services.set(IFileService, fileService);
    this.services.set(IProductService, { _serviceBrand: undefined, ...product });
    this.services.set(IExtensionGalleryService, new SyncDescriptor(ExtensionGalleryService));
    this.services.set(IExtensionManagementService, new SyncDescriptor(ExtensionManagementService));

    if (!environmentService.args["disable-telemetry"]) {
        this.services.set(ITelemetryService, new SyncDescriptor(TelemetryService, [{
            appender: combinedAppender(
                new AppInsightsAppender("code-server", null, () => new TelemetryClient(), logService),
                new LogAppender(logService),
            ),
            commonProperties: resolveCommonProperties(
                product.commit, product.codeServerVersion, await getMachineId(),
                [], environmentService.installSourcePath, "code-server",
            ),
            piiPaths: this.allowedRequestPaths,
        } as ITelemetryServiceConfig]));
    } else {
        this.services.set(ITelemetryService, NullTelemetryService);
    }

    await new Promise((resolve) => {
        const instantiationService = new InstantiationService(this.services);
        this.services.set(ILocalizationsService, instantiationService.createInstance(LocalizationsService));
        this.services.set(INodeProxyService, instantiationService.createInstance(NodeProxyService));

        instantiationService.invokeFunction(() => {
            instantiationService.createInstance(LogsDataCleaner);
            const telemetryService = this.services.get(ITelemetryService) as ITelemetryService;
            this.ipc.registerChannel("extensions", new ExtensionManagementChannel(
                this.services.get(IExtensionManagementService) as IExtensionManagementService,
                (context) => getUriTransformer(context.remoteAuthority),
            ));
            this.ipc.registerChannel("remoteextensionsenvironment", new ExtensionEnvironmentChannel(
                environmentService, logService, telemetryService, this.options.connectionToken || "",
            ));
            this.ipc.registerChannel("request", new RequestChannel(this.services.get(IRequestService) as IRequestService));
            this.ipc.registerChannel("telemetry", new TelemetryChannel(telemetryService));
            this.ipc.registerChannel("nodeProxy", new NodeProxyChannel(this.services.get(INodeProxyService) as INodeProxyService));
            this.ipc.registerChannel("localizations", createChannelReceiver(this.services.get(ILocalizationsService) as ILocalizationsService));
            this.ipc.registerChannel("update", new UpdateChannel(instantiationService.createInstance(UpdateService)));
            this.ipc.registerChannel(REMOTE_FILE_SYSTEM_CHANNEL_NAME, new FileProviderChannel(environmentService, logService));
            resolve(new ErrorTelemetry(telemetryService));
        });
    });
}
都实例化完了之后就被执行 listen 方法了
public async listen(): Promise<string> {
    const environment = (this.services.get(IEnvironmentService) as EnvironmentService);
    const [address] = await Promise.all<string>([
        super.listen(), ...[
            environment.extensionsPath,
        ].map((p) => mkdirp(p).then(() => p)),
    ]);
    return address;
}
其中 super.listen() 里的 listen 方法为
public listen(): Promise<string> {
    if (!this.listenPromise) {
        this.listenPromise = new Promise((resolve, reject) => {
            this.server.on("error", reject);
            this.server.on("upgrade", this.onUpgrade);
            const onListen = () => resolve(this.address());
            if (this.options.socket) {
                this.server.listen(this.options.socket, onListen);
            } else {
                this.server.listen(this.options.port, this.options.host, onListen);
            }
        });
    }
    return this.listenPromise;
}
原来 websocket 就是在 onUpgrade 这里开始建立的,完了之后开始监听端口,里面只有一段对 websocket 的预处理
await this.preHandleWebSocket(request, socket);里面都是对 ws 的基操,完了后返回 handleWebSocket;
const protocol = new Protocol(await this.createProxy(socket), {
    reconnectionToken: <string>parsedUrl.query.reconnectionToken,
    reconnection: parsedUrl.query.reconnection === "true",
    skipWebSocketFrames: parsedUrl.query.skipWebSocketFrames === "true",
});
try {
    await this.connect(await protocol.handshake(), protocol);
} catch (error) {
    protocol.sendMessage({ type: "error", reason: error.message });
    protocol.dispose();
    protocol.getSocket().dispose();
}
其中 createProxy 创建的代理只是处理 TLS 模块,如果 socket 属于 TLSSocket 类型,它是需要证书和密钥的,所以将其返回的都是非 TLSSocket;
Protocol 继承了 ipc.net (在 src/vs/base/parts/ipc/common/ipc.net.ts 目录) 里的 PersistentProtocol 类,该协议规定传递的消息必须为 VSBuffer (在 src/vs/base/common/buffer.ts 目录)
readonly onControlMessage: Event<VSBuffer>然后来看看 protocol 里的 handshake 方法
/**
* Perform a handshake to get a connection request.
*/
public handshake(): Promise<ConnectionTypeRequest> {
    return new Promise((resolve, reject) => {
        const handler = this.onControlMessage((rawMessage) => {
            try {
                const message = JSON.parse(rawMessage.toString());
                switch (message.type) {
                    case "auth": return this.authenticate(message);
                    case "connectionType":
                        handler.dispose();
                        return resolve(message);
                    default: throw new Error("Unrecognized message type");
                }
            } catch (error) {
                handler.dispose();
                reject(error);
            }
        });
    });
}
建立协议的握手之后直接返回的是 message 消息,然后与协议本身一起丢进了 connect 方法里;
其里面就是对所有所需的连接类型分别做处理,类型分为三种
export const enum ConnectionType {
    Management = 1,
    ExtensionHost = 2,
    Tunnel = 3,
}
然后分别对这三种连接类型都做了处理;
switch (message.desiredConnectionType) {
    case ConnectionType.ExtensionHost:
    case ConnectionType.Management:
        if (!this.connections.has(message.desiredConnectionType)) {
            this.connections.set(message.desiredConnectionType, new Map());
        }
        const connections = this.connections.get(message.desiredConnectionType)!;

        const ok = async () => {
            return message.desiredConnectionType === ConnectionType.ExtensionHost
                ? { debugPort: await this.getDebugPort() }
                : { type: "ok" };
        };

        const token = protocol.options.reconnectionToken;
        if (protocol.options.reconnection && connections.has(token)) {
            protocol.sendMessage(await ok());
            const buffer = protocol.readEntireBuffer();
            protocol.dispose();
            return connections.get(token)!.reconnect(protocol.getSocket(), buffer);
        } else if (protocol.options.reconnection || connections.has(token)) {
            throw new Error(protocol.options.reconnection
                ? "Unrecognized reconnection token"
                : "Duplicate reconnection token"
            );
        }

        protocol.sendMessage(await ok());

        let connection: Connection;
        if (message.desiredConnectionType === ConnectionType.Management) {
            connection = new ManagementConnection(protocol, token);
            this._onDidClientConnect.fire({
                protocol, onDidClientDisconnect: connection.onClose,
            });
            // TODO: Need a way to match clients with a connection. For now
            // dispose everything which only works because no extensions currently
            // utilize long-running proxies.
            (this.services.get(INodeProxyService) as NodeProxyService)._onUp.fire();
            connection.onClose(() => (this.services.get(INodeProxyService) as NodeProxyService)._onDown.fire());
        } else {
            const buffer = protocol.readEntireBuffer();
            connection = new ExtensionHostConnection(
                message.args ? message.args.language : "en",
                protocol, buffer, token,
                this.services.get(ILogService) as ILogService,
                this.services.get(IEnvironmentService) as IEnvironmentService,
            );
        }
        connections.set(token, connection);
        connection.onClose(() => connections.delete(token));
        this.disposeOldOfflineConnections(connections);
        break;
    case ConnectionType.Tunnel: return protocol.tunnel();
    default: throw new Error("Unrecognized connection type");
}
此时 server 端的主要任务也完成了,大抵上做了以下事情
- 启动
http服务 - 处理资源请求路径
- 注册
ipc通道和依赖注入 - 建立
websocket通信
当然还有 login 登陆和心跳等细节操作;
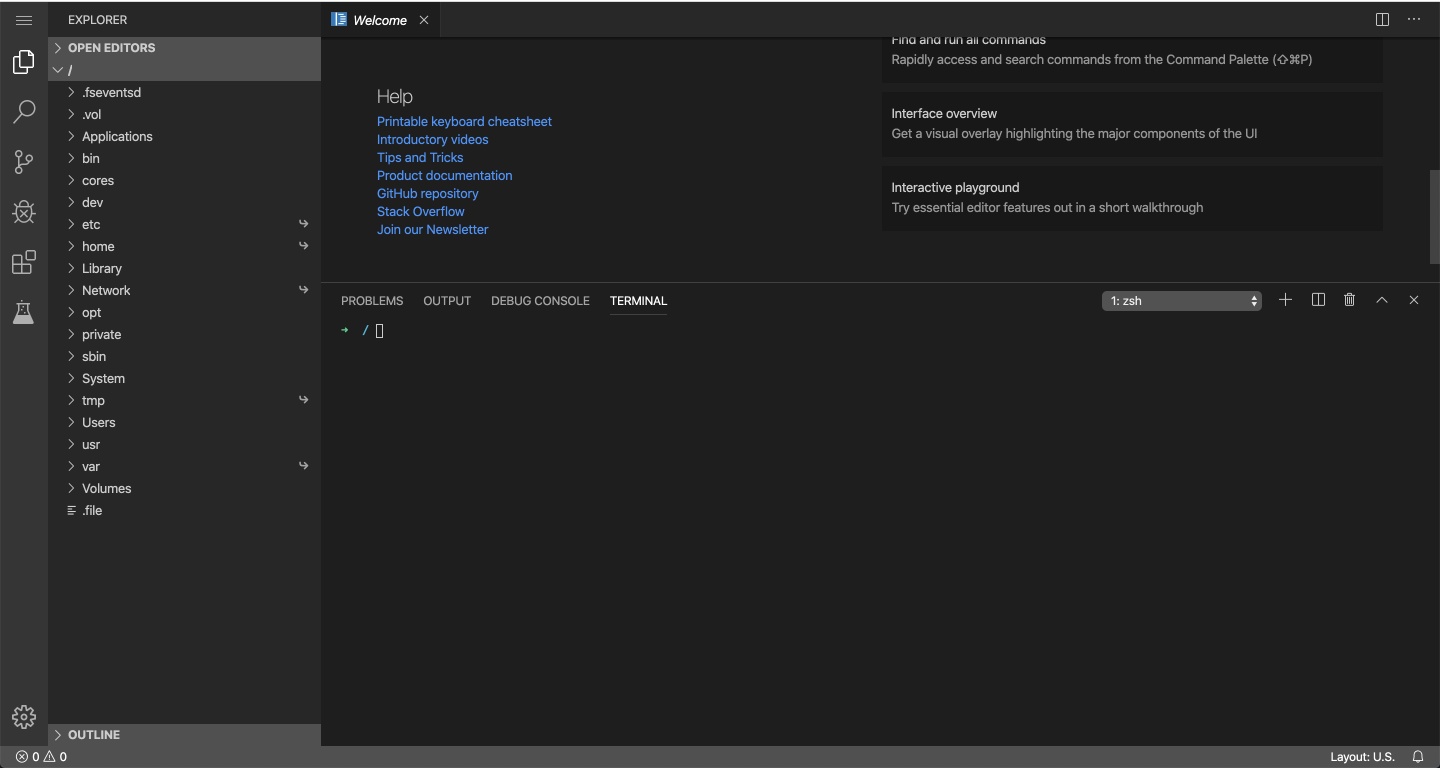
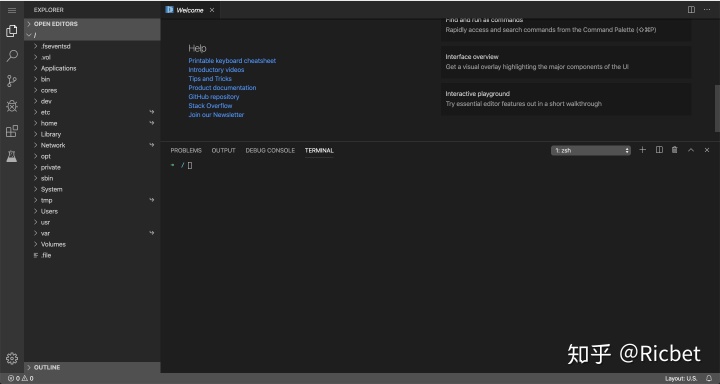
接下来我们进入到它启动的默认端口 8080 去看看
Workbench
启动的时候需要指定 auth 参数为 none, 这样就不会跳到 login 页面;
首先加载的根路径返回上文提到的 workbench.html 文件内容;
可以看到原来的占位符都被替换成了配置项,而且采用的是 require.js AMD 模块化模式;
配置了 baseUrl 和 paths 参数,指定各个模块的路径,由于都对这些模块加上了 staticBase 路径,而在上文提到过的 /static- 使得对这些文件做了缓存处理;
接下来的事情就是加载主模块 loader.js 了,剩下的就都是 vscode 本身的活了;
此时 code-server 的主要任务也完成了


 750
750


 被折叠的 条评论
为什么被折叠?
被折叠的 条评论
为什么被折叠?
 到【灌水乐园】发言


