


mysql-day08 部署MYSQL高可用集群
u 集群架构
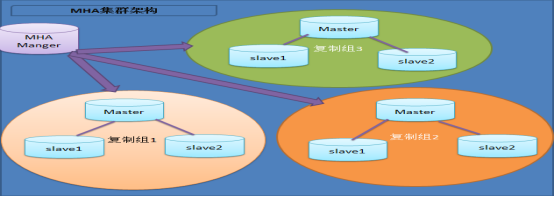
MHA 工作过程
• MHA Manager会定时探测集群中的master节点,
当 master 出现故障时,它可以自动将最新数据的sl
ave 提升为新的master ,然后将所有其他的slave
重新指向新的 master 。整个故障转移过程对应用程
序完全透明。
– ( 1 )从宕机崩溃的master保存二进制日志事件( binlog events)
– ( 2 )识别含有最新更新的slave
– ( 3 )应用差异的中继日志( relay log )到其他的slave
– ( 4 )应用从master保存的二进制日志事件( binlog events )
– ( 5 )提升一个slave为新的master ;
– ( 6 )使其他的slave连接新的master进行复制;
u 准备环境
一、集群定义:使用多台服务提供相同的服务
二、高可用集群定义:主备模式,被客户端访问的称作主,当主宕机时,备用
服务器自动接收客户端访问。
拓扑结构
client
|
| -->vip 192.168.4.100 《51,52,53》
_____________________________________________________
||| ||| ||| || || || ||
master51 master(备)52 master(备)53 slave54 slave55 mgm56 Manager
一、配置所有数据节点主机之间可以互相以ssh密钥对方式认证登陆
二、配置manager56主机无密码ssh登录所有数据节点主机
三、配置主从同步,要求如下:
51主库 开半同步复制
52从库(备用主库)开半同步复制
53从库(备用主库)开半同步复制
54从库不做备用主库所以不用开半同步复制
55从库不做备用主库所以不用开半同步复制
拓扑图
• 采用 5个数据库服务器节点
u 步骤
注意:安装mariadb,就有mysql命令
1.在所有主机上安装perl软件包(51~56)
]#cd mha-soft-student
]#yum -y install perl-*.rpm
2.在所有主机上安装mha_node软件包(51~56)
yum -y install perl-DBD-mysql
rpm -ivh mha4mysql-node-0.56-0.el6.noarch.rpm
2.只在管理"主机56"上安装mha_manager软件包
]#yum -y install perl-ExtUtils-* perl-CPAN*
]#tar -zxvf mha4mysql-manager-0.56.tar.gz
]#cd mha4mysql-manager-0.56
]#perl Makefile.PL
]#make
]#make install
3.2.4检查配置环境
在主机51 52 53检查是否有同步数据的用户repluser
mysql>show grants for repluser@"%";
u 在主机51~55做如下授权
mysql>grant all on *.* to root@"%" identified by "123456";
u 在主机51~55做如下设置
mysql>set global relay_log_purge=off;
3.2.5拷贝命令(56)
]#cp mha4mysql-manager-0.56/bin/* /usr/local/bin/
3.2.6创建工作目录和主配置文件(56)
]#mkdir /etc/mha_manager/
]#cp mha4mysql-manager-0.56/samples/conf/app1.cnf
/etc/mha_manager/
3.2.7创建故障切换脚本(56)
]#ls /usr/local/bin/master_ip_failover
]#cp mha4mysql-manager-0.56/samples/scripts/master_ip_failover /usr/local/bin/
3.2.8编辑主配置文件app1.cnf(56)
]#vim /etc/mha_manager/app1.cnf
[server default]
manager_workdir=/etc/mha_manager
manager_log=/etc/mha_manager/manager.log
master_ip_failover_script=/usr/local/bin/master_ip_failover
ssh_user=root
ssh_port=22
repl_user=repluser
repl_password=123456
user=root
password=123456
[server1]
hostname=192.168.4.51
port=3306
[server2]
hostname=192.168.4.52
port=3306
candidate_master=1
[server3]
hostname=192.168.4.53
port=3306
candidate_master=1
[server4]
hostname=192.168.4.54
no_master=1
[server5]
hostname=192.168.4.55
no_master=1
2.2.9验证配置
u 验证ssh免密码登录数据节点主机
]#masterha_check_ssh --conf=/etc/mha_manager/app1.cnf
Sun May 6 16:38:19 2018-[info]All SSH connection tests passed
successfully.
u 验证数据节点的主从同步配置(要不调用故障切换脚本)
masterha_check_repl --conf=/etc/mha_manager/app1.cnf
MySQL Replication Health is OK.
四、测试高可用集群配置
4.1在主库上手动部署vip地址192.168.4.100
[root@db51~]#ifconfig eth0:1 192.168.4.100/24
[root@db51~]#ifconfig eth0:1
eth0:1:flags=4163mtu 1500
inet 192.168.4.100 netmask 255.255.255.0 broadcast
192.168.4.255
ether 74:52:09:07:51:01 txqueuelen 1000(Ethernet)
4.2修改故障切换脚本指定vip地址的部署信息
]#vim/usr/local/bin/master_ip_failover
my$vip='192.168.4.100/24';#Virtual IP
my$key="1";
my$ssh_start_vip="/sbin/ifconfig eth0:$key$vip";
my$ssh_stop_vip="/sbin/ifconfig eth0:$key down";
......
##Update master ip on the catalog database,etc
#FIXME_xxx;//备注
:wq
#!/usr/bin/env perl
# Copyright (C) 2011 DeNA Co.,Ltd.
#
# This program is free software; you can
redistribute it and/or modify
# it under the terms of the GNU General
Public License as published by:
# the Free Software Foundation; either
version 2 of the License, or
# (at your option) any later
version.
#
# This program is distributed in the
hope that it will be useful,
# but WITHOUT ANY WARRANTY; without even
the implied warranty of
# MERCHANTABILITY or FITNESS FOR A
PARTICULAR PURPOSE. See the
# GNU General Public License for more
details.
#
# You should have received a copy of the
GNU General Public License
# along with this program; if not,
write to the Free Software
# Foundation, Inc.,
# 51 Franklin Street, Fifth Floor,
Boston, MA 02110-1301 USA
## Note: This is a sample script and is not complete. Modify the script based
on your environment.
use strict;
use warnings FATAL => 'all';
use Getopt::Long;
use MHA::DBHelper;
my (
$command, $ssh_user, $orig_master_host,
$orig_master_ip, $orig_master_port,
$new_master_host,
$new_master_ip, $new_master_port, $new_master_user,
$new_master_password
);
my $vip = '192.168.4.60/24'; # Virtual
IP
my $key = "1";
my $ssh_start_vip = "/sbin/ifconfig eth0:$key $vip";
my $ssh_stop_vip = "/sbin/ifconfig eth0:$key down";
GetOptions(
'command=s' => \$command,
'ssh_user=s' => \$ssh_user,
'orig_master_host=s' => \$orig_master_host,
'orig_master_ip=s' => \$orig_master_ip,
'orig_master_port=i' => \$orig_master_port,
'new_master_host=s' => \$new_master_host,
'new_master_ip=s' => \$new_master_ip,
'new_master_port=i' => \$new_master_port,
'new_master_user=s' => \$new_master_user,
'new_master_password=s' => \$new_master_password,
);
exit &main();
sub main {
if ( $command eq "stop" ||
$command eq "stopssh" ) {
# $orig_master_host, $orig_master_ip,
$orig_master_port are passed.
# If you manage master ip address at
global catalog database,
# invalidate orig_master_ip
here.
my $exit_code = 1;
eval {
# updating global catalog,
etc
&stop_vip();
$exit_code = 0;
};
if ($@) {
warn "Got Error:
$@\n";
exit $exit_code;
}
exit $exit_code;
}
elsif ( $command eq "start" )
{
# all arguments are passed.
# If you manage master ip address at
global catalog database,
# activate new_master_ip here.
# You can also grant write access
(create user, set read_only=0, etc) here.
my $exit_code = 10;
eval {
my $new_master_handler = new
MHA::DBHelper();
# args: hostname, port, user,
password, raise_error_or_not
$new_master_handler->connect(
$new_master_ip, $new_master_port,
$new_master_user,
$new_master_password, 1 );
## Set read_only=0 on the new master
$new_master_handler->disable_log_bin_local();
print "Set read_only=0 on the
new master.\n";
$new_master_handler->disable_read_only();
## Creating an app user on the new
master
print "Creating app user on
the new master..\n";
$new_master_handler->enable_log_bin_local();
$new_master_handler->disconnect();
## Update master ip on the catalog
database, etc
&start_vip();
$exit_code = 0;
};
if ($@) {
warn $@;
# If you want to continue failover,
exit 10.
exit $exit_code;
}
exit $exit_code;
}
elsif ( $command eq "status"
) {
# do nothing
exit 0;
}
else {
&usage();
exit 1;
}
}
sub start_vip() {
`ssh $ssh_user\@$new_master_host
\" $ssh_start_vip \"`;
}
sub stop_vip() {
return 0 unless ($ssh_user);
`ssh $ssh_user\@$orig_master_host
\" $ssh_stop_vip \"`;
}
sub usage {
"Usage: master_ip_failover --command=start|stop|stopssh|status --orig_master_host=host
--orig_master_ip=ip --orig_master_port=port --new_master_host=host
--new_master_ip=ip --new_master_port=port\n";
}
4.3启动管理服务,并查看服务状态
]#masterha_manager--conf=/etc/mha/app1.cnf
--remove_dead_master_conf--ignore_last_failover
[root@host56~]#masterha_check_status--conf=/etc/mha_manager/app1.cnf
app1(pid:16944)is running(0:PING_OK),master:192.168.4.51
[root@host56~]#
+++++++++++++++++++++++++++++++++++++++++++
4.4测试故障转移
在主库51上执行]#shutdown-h now
4.5在管理主机上查看服务状态(如果服务停止了,手动启动一下服务,再查看状态)
[root@host56~]#masterha_check_status --conf=/etc/mha_manager/app1.cnf
app1(pid:17507)is running(0:PING_OK),master:192.168.4.52
4.6在52本机查看是否获取vip地址
[root@db52~]#ip addr show|grep 192.168.4 inet 192.168.4.52/24 brd 192.168.4.255 scope global eth0
inet 192.168.4.100/24 brd 192.168.4.255 scope global secondary
4.7客户端连接vip地址,访问数据服务
]#mysql-h192.168.4.100-uwebadmin-p123456
4.8重置主库
Smysql>stop slave;
Mysql>change master to
master_host="192.168.4.51",master_user="repluser", master_password="123456",
master_log_file="master51.000014",
master_log_pos=154;
Mysql>start slave;
Mysql>show slave status\G;//查看主库信息
mysql>show variables like'log_bin%';//查看log设置
##############################################
还原成独立数据库
root@host55~]#systemctl stop mysqld
[root@host55~]#cd /var/lib/mysql
[root@host55 mysql]#rm -rf master.info relay-log.info
[root@host55 mysql]#ls
[root@host55 mysql]#rm -rf host55-relay-bin.*
[root@host55 mysql]#systemctl start mysqld
[root@host55 mysql]#mysql -uroot -p123456 -e "show slave status\G"


 3357
3357


 被折叠的 条评论
为什么被折叠?
被折叠的 条评论
为什么被折叠?
 到【灌水乐园】发言


