


什么是聊天机器人?

聊天机器人是一款智能软件,能够传达和执行类似于人类的动作。聊天机器人可以直接与客户互动,在社交网站上进行营销以及即时向客户发送消息等方面被广泛使用。根据聊天机器人的构建方式,它有两种基本类型:基于检索和基于生成的模型。
1.基于检索的聊天机器人
基于检索的聊天机器人使用预定义的输入模式和响应。然后,使用某种启发式方法来选择适当的响应。它在行业中广泛应用于制造目标导向的聊天机器人,我们可以在其中自定义聊天机器人的方式和流程,以带给我们客户的最佳体验。
2.基于生成的聊天机器人
生成模型不是基于某些预定义的响应。它是基于seq2seq神经网络。它与机器翻译的想法相同。在机器翻译中,我们将源代码从一种语言翻译为另一种语言,但是在这里,我们将把输入转换为输出。它需要大量数据,并且基于深度神经网络。
在这个项目中,我们将使用深度学习技术构建一个聊天机器人。聊天机器人将在包含类别(意图),模式和响应的数据集上进行训练。我们使用特殊的循环神经网络(LSTM)对用户消息所属的类别进行分类,然后从响应列表中给出随机响应。
数据集
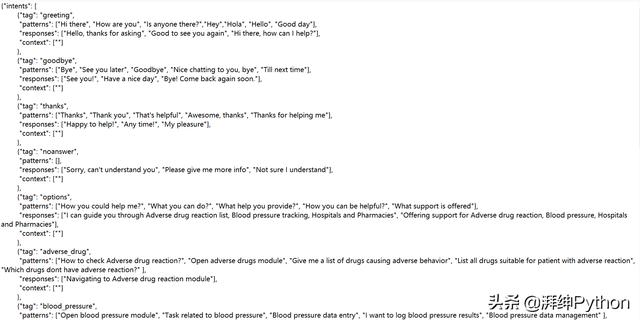
我们将使用的数据集是“ intents.json”。这是一个JSON文件,其中包含我们需要查找的模式以及我们想要返回给用户的响应。
如何制作聊天机器人
我们将使用Python构建聊天机器人,但首先,让我们看一下将要创建的文件结构和文件类型:
Intents.json –具有预定义模式和响应的数据文件。 train_chatbot.py –在此Python文件中,我们编写了一个脚本来构建模型并训练我们的聊天机器人。 Words.pkl –这是一个pickle文件,我们将包含词汇表列表的单词Python对象存储在其中。 Classes.pkl –这也是一个pickle文件,这里是包含类别列表。 Chatbot_model.h5 –这是经过训练的模型,其中包含有关模型的信息并具有神经元的权重。 Chatgui.py –这是我们为聊天机器人实现GUI的Python脚本。用户可以轻松地与机器人互动。创建聊天机器人的5个步骤:
导入并加载数据文件预处理数据创建训练和测试数据建立模型预测响应1、导入必要的库并加载数据文件
首先,将文件名命名为train_chatbot.py。我们为聊天机器人导入必要的库,并初始化将在Python项目中使用的变量。
数据文件为JSON格式,因此我们使用json库将JSON文件解析为Python。
import nltkfrom nltk.stem import WordNetLemmatizerlemmatizer = WordNetLemmatizer()import jsonimport pickleimport numpy as npfrom keras.models import Sequentialfrom keras.layers import Dense, Activation, Dropoutfrom keras.optimizers import SGDimport randomwords=[]classes = []documents = []ignore_words = ['?', '!']data_file = open('intents.json').read()intents = json.loads(data_file)
2、预处理数据
处理文本数据时,我们需要先对数据进行各种预处理,然后再进行机器学习或深度学习模型。标记化是您可以对文本数据进行的最基本的第一件事。标记化是将整个文本分成单词之类的小部分的过程。
在这里,我们遍历模式并使用nltk.word_tokenize()函数对句子进行标记化,然后将每个单词附加在单词列表中。我们还为标签创建了一个类列表。
for intent in intents['intents']: for pattern in intent['patterns']: #tokenize each word w = nltk.word_tokenize(pattern) words.extend(w) #add documents in the corpus documents.append((w, intent['tag'])) # add to our classes list if intent['tag'] not in classes: classes.append(intent['tag'])现在,我们将对每个单词进行词法去除,并从列表中删除重复的单词。Lemmatizing是将单词转换成引理形式,然后创建一个pickle文件来存储我们将在预测时使用的Python对象的过程。
# lemmatize, lower each word and remove duplicateswords = [lemmatizer.lemmatize(w.lower()) for w in words if w not in ignore_words]words = sorted(list(set(words)))# sort classesclasses = sorted(list(set(classes)))# documents = combination between patterns and intentsprint (len(documents), "documents")# classes = intentsprint (len(classes), "classes", classes)# words = all words, vocabularyprint (len(words), "unique lemmatized words", words)pickle.dump(words,open('words.pkl','wb'))pickle.dump(classes,open('classes.pkl','wb'))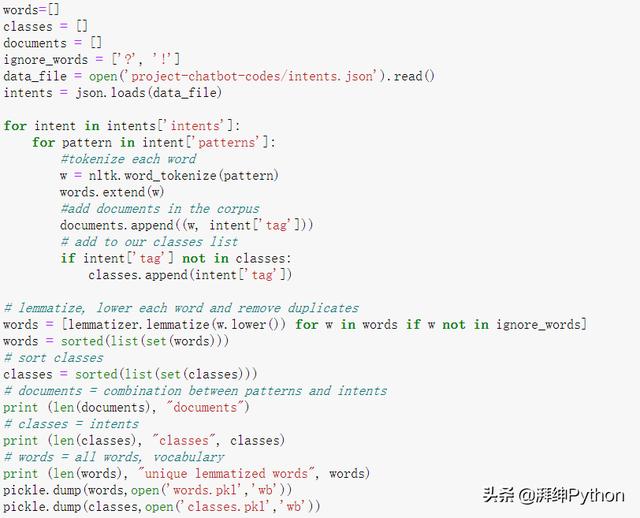
3、创建训练和测试数据
现在,我们将创建训练数据,在其中将提供输入和输出。我们的输入将是模式,输出将是我们的输入模式所属的类。但是计算机不理解文本,因此我们会将文本转换为数字。
# create our training datatraining = []# create an empty array for our outputoutput_empty = [0] * len(classes)# training set, bag of words for each sentencefor doc in documents: # initialize our bag of words bag = [] # list of tokenized words for the pattern pattern_words = doc[0] # lemmatize each word - create base word, in attempt to represent related words pattern_words = [lemmatizer.lemmatize(word.lower()) for word in pattern_words] # create our bag of words array with 1, if word match found in current patternfor w in words:bag.append(1) if w in pattern_words else bag.append(0) # output is a '0' for each tag and '1' for current tag (for each pattern) output_row = list(output_empty) output_row[classes.index(doc[1])] = 1 training.append([bag, output_row])# shuffle our features and turn into np.arrayrandom.shuffle(training)training = np.array(training)# create train and test lists. X - patterns, Y - intentstrain_x = list(training[:,0])train_y = list(training[:,1])print("Training data created")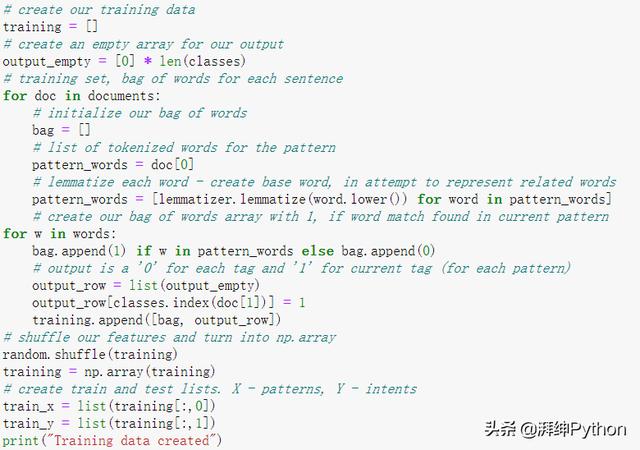
4、构建模型
我们已经准备好训练数据,现在我们将构建一个具有3层的深度神经网络。在训练模型200个周期后,我们在模型上达到了100%的准确性。让我们将模型另存为“ chatbot_model.h5”。
# Create model - 3 layers. First layer 128 neurons, second layer 64 neurons and 3rd output layer contains number of neurons# equal to number of intents to predict output intent with softmaxmodel = Sequential()model.add(Dense(128, input_shape=(len(train_x[0]),), activation='relu'))model.add(Dropout(0.5))model.add(Dense(64, activation='relu'))model.add(Dropout(0.5))model.add(Dense(len(train_y[0]), activation='softmax'))# Compile model. Stochastic gradient descent with Nesterov accelerated gradient gives good results for this modelsgd = SGD(lr=0.01, decay=1e-6, momentum=0.9, nesterov=True)model.compile(loss='categorical_crossentropy', optimizer=sgd, metrics=['accuracy'])#fitting and saving the model hist = model.fit(np.array(train_x), np.array(train_y), epochs=200, batch_size=5, verbose=1)model.save('chatbot_model.h5', hist)print("model created")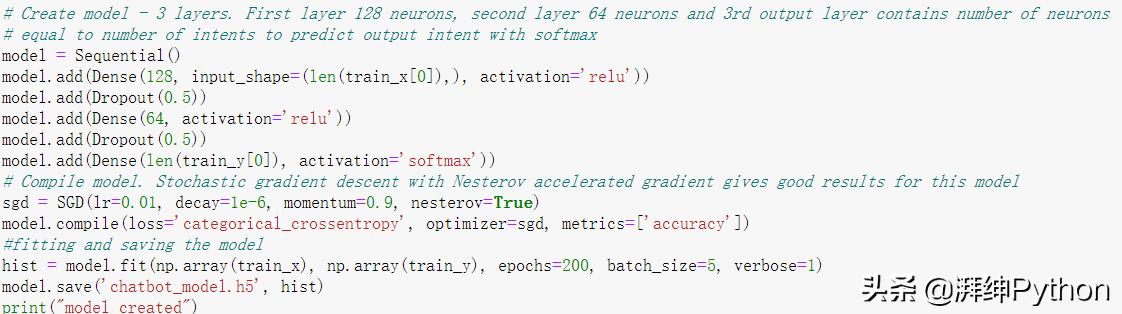
5、预测响应
现在来预测句子并从用户那里得到答复,让我们创建一个新文件“ chatapp.py”。
我们将加载经过训练的模型,然后使用图形用户界面来预测机器人的响应。该模型只会告诉我们它所属的类,因此我们将实现一些函数,这些函数将识别该类,然后从响应列表中检索一个随机响应。
我们导入必要的库并加载在训练模型时创建的picks文件“ words.pkl”和“ classes.pkl”:
import nltkfrom nltk.stem import WordNetLemmatizerlemmatizer = WordNetLemmatizer()import pickleimport numpy as npfrom keras.models import load_modelmodel = load_model('chatbot_model.h5')import jsonimport randomintents = json.loads(open('intents.json').read())words = pickle.load(open('words.pkl','rb'))classes = pickle.load(open('classes.pkl','rb'))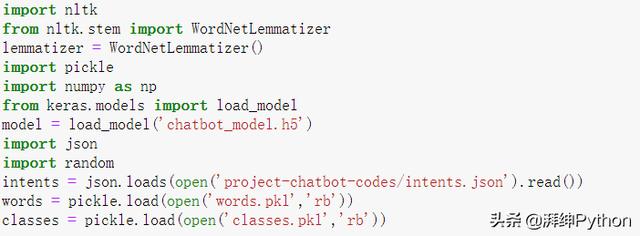
要预测类,我们需要提供与训练时相同的输入方式。因此,我们将创建一些函数来执行文本预处理,然后预测类。
def clean_up_sentence(sentence): # tokenize the pattern - split words into array sentence_words = nltk.word_tokenize(sentence) # stem each word - create short form for word sentence_words = [lemmatizer.lemmatize(word.lower()) for word in sentence_words] return sentence_words# return bag of words array: 0 or 1 for each word in the bag that exists in the sentencedef bow(sentence, words, show_details=True): # tokenize the pattern sentence_words = clean_up_sentence(sentence) # bag of words - matrix of N words, vocabulary matrix bag = [0]*len(words) for s in sentence_words: for i,w in enumerate(words): if w == s: # assign 1 if current word is in the vocabulary position bag[i] = 1 if show_details: print ("found in bag: %s" % w) return(np.array(bag))def predict_class(sentence, model): # filter out predictions below a threshold p = bow(sentence, words,show_details=False) res = model.predict(np.array([p]))[0] ERROR_THRESHOLD = 0.25 results = [[i,r] for i,r in enumerate(res) if r>ERROR_THRESHOLD] # sort by strength of probability results.sort(key=lambda x: x[1], reverse=True) return_list = [] for r in results: return_list.append({"intent": classes[r[0]], "probability": str(r[1])}) return return_list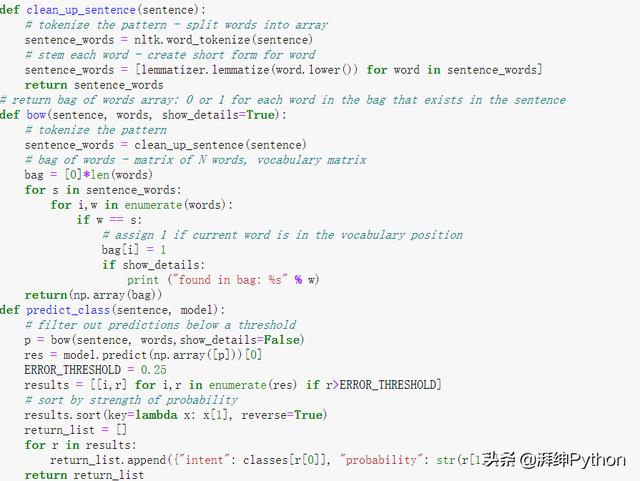
预测完类后,我们将从意图列表中获得随机响应
def getResponse(ints, intents_json): tag = ints[0]['intent'] list_of_intents = intents_json['intents'] for i in list_of_intents: if(i['tag']== tag): result = random.choice(i['responses']) break return resultdef chatbot_response(text): ints = predict_class(text, model) res = getResponse(ints, intents) return res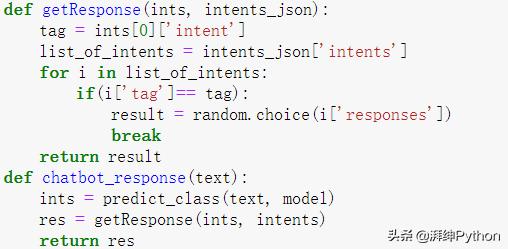
现在,我们将对图形用户界面进行编码。为此,我们使用python中已经提供的Tkinter库。我们将接收来自用户的输入消息,然后使用我们创建的机器人来响应并将其显示在GUI上。这是GUI的完整源代码。
#Creating GUI with tkinterimport tkinterfrom tkinter import *def send(): msg = EntryBox.get("1.0",'end-1c').strip() EntryBox.delete("0.0",END)if msg != '': ChatLog.config(state=NORMAL) ChatLog.insert(END, "You: " + msg + '') ChatLog.config(foreground="#442265", font=("Verdana", 12 )) res = chatbot_response(msg) ChatLog.insert(END, "Bot: " + res + '') ChatLog.config(state=DISABLED) ChatLog.yview(END)base = Tk()base.title("Hello")base.geometry("400x500")base.resizable(width=FALSE, height=FALSE)#Create Chat windowChatLog = Text(base, bd=0, bg="white", , , font="Arial",)ChatLog.config(state=DISABLED)#Bind scrollbar to Chat windowscrollbar = Scrollbar(base, command=ChatLog.yview, cursor="heart")ChatLog['yscrollcommand'] = scrollbar.set#Create Button to send messageSendButton = Button(base, font=("Verdana",12,'bold'), text="Send", , height=5, bd=0, bg="#32de97", activebackground="#3c9d9b",fg='#ffffff', command= send )#Create the box to enter messageEntryBox = Text(base, bd=0, bg="white",, , font="Arial")#EntryBox.bind("", send)#Place all components on the screenscrollbar.place(x=376,y=6, height=386)ChatLog.place(x=6,y=6, height=386, width=370)EntryBox.place(x=128, y=401, height=90, width=265)SendButton.place(x=6, y=401, height=90)base.mainloop()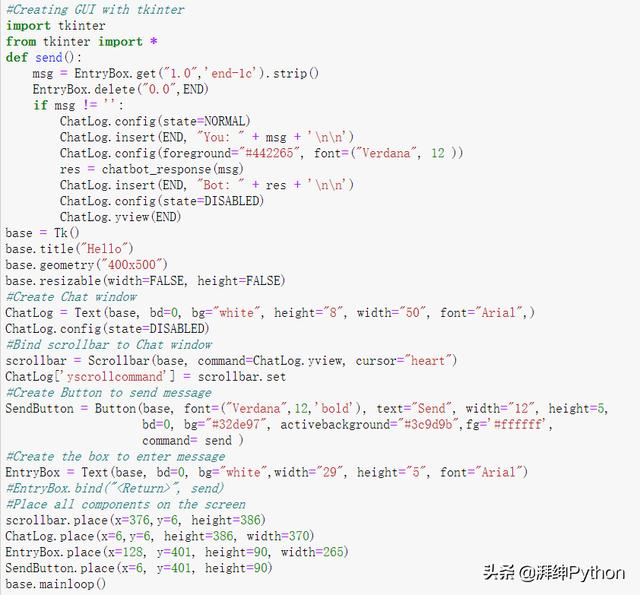
6、运行聊天机器人
要运行chatbot,我们有两个主要文件:train_chatbot.py和chatapp.py。
首先,我们使用终端中的命令训练模型:
python train_chatbot.py如果我们在训练过程中没有看到任何错误,则说明我们已经成功创建了模型。
然后运行该应用程序,我们运行第二个文件。
python chatgui.py该程序将在几秒钟内打开一个GUI窗口。使用GUI,您可以轻松地与机器人聊天。
在这个简单项目中,我们了解了聊天机器人,并在Python中实现了聊天机器人的深度学习版本。您可以根据业务需求自定义数据,并以很高的准确性训练聊天机器人。聊天机器人无处不在,所有企业都希望在其工作流程中实施机器人。


 1万+
1万+


 被折叠的 条评论
为什么被折叠?
被折叠的 条评论
为什么被折叠?
 到【灌水乐园】发言


