前言
本节仅介绍怎么快速使用Mybatis,以及所需要的关键点,访问数据也是简单的CRUD,对应复杂的一对多、多对多不做介绍,可自行学习。相关知识点:动态sql、事务管理、缓存等也不做深入介绍。
https://www.cnblogs.com/best/p/9711215.html
https://www.cnblogs.com/best/p/9723085.html
ORM
ORM(Object Relational Mapping)对象关系映射用于实现面向对象编程语言里不同类型系统的数据之间的转换。简单的说,ORM是通过使用描述对象和数据库之间映射的元数据,将程序中的对象与关系数据库相互映射。
ORM可以解决数据库与程序间的异构性,比如在Java中我们使用String表示字符串,而Oracle中可使用varchar2,MySQL中可使用varchar,SQLServer可使用nvarchar。
ORM提供了实现持久化层的另一种模式,采用映射元数据(XML)来描述对象-关系的映射细节,使得ORM中间件能在任何一个Java应用的业务逻辑层和数据库之间充当桥梁。一般情况下,一个持久化类和一个表对应,类的每个实例对应表中的一条记录,类的每个属性对应表的每个字段。
将关系数据库中表中的记录映射成为对象,以对象的形式展现,程序员可以把对数据库的操作转化为对对象的操作。因此ORM的目的是为了方便开发人员以面向对象的思想来实现对数据库的操作。
MyBatis概述
MyBatis是一款优秀的持久层框架。包括SQL Maps(Mapper)和Data Access Objects(DAO),它支持定制化SQL、存储过程以及高级映射。MyBatis可以1、使用简单的XML或者注解进行映射和配置,通过2、将参数映射到配置的SQL最终解析为执行的SQL语句,3、查询后将SQl结果集映射成java对象返回。
MyBatis避免了几乎所有的JDBC代码和手动设置参数以及获取结果集。
特点:
- 简单易学:本身就很小且简单。没有任何第三方依赖,最简单安装只要两个jar文件+配置几个sql映射文件易于学习。
- 灵活:mybatis不会对应用程序或者数据库的现有设计强加任何影响。 sql写在xml里,便于统一管理和优化。
- 解除sql与程序代码的耦合:通过提供DAO层,将业务逻辑和数据访问逻辑分离,使系统的设计更清晰,更易维护,更易单元测试。sql和代码的分离,提高了可维护性。
- 提供XML标签,支持编写动态sql。
MyBatis工作流程
加载配置并初始化
触发条件:加载配置文件
配置来源于两个地方,一处是配置文件,一处是Java代码的注解,将SQL的配置信息加载成为一个个MappedStatement对象(包括了传入参数映射配置、执行的SQL语句、结果映射配置),存储在内存中。
接收调用请求
触发条件:调用Mybatis提供的API
传入参数:为SQL的ID和传入参数对象
处理过程:将请求传递给下层的请求处理层进行处理。
处理操作请求
触发条件:API接口层传递请求过来
传入参数:为SQL的ID和传入参数对象
处理过程:
- 根据SQL的ID查找对应的MappedStatement对象。
- 根据传入参数对象解析MappedStatement对象,得到最终要执行的SQL和执行传入参数。
- 获取数据库连接,根据得到的最终SQL语句和执行传入参数到数据库执行,并得到执行结果。
- 根据MappedStatement对象中的结果映射配置对得到的执行结果进行转换处理,并得到最终的处理结果。
- 释放连接资源。
返回处理结果将最终的处理结果返回
将最终的处理结果(对象)返回调用。
MyBatis使用小结:
- 配置java对象和数据库映射配置文件(通常是xml 文件)。
- 从配置文件得到 SqlSessionFactory。
- 由SqlSessionFactory 产生 SqlSession。
- 在SqlSession中完成对数据的增删改查和事务提交等。
- 用完之后关闭SqlSession。
MyBatis快速入门示例
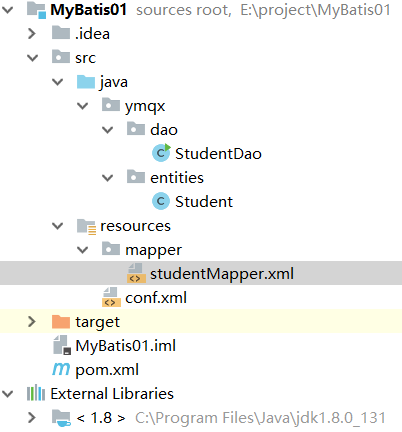
1.1 在IDEA中创建项目
创建Maven项目:

pom.xml
<?xml version="1.0" encoding="UTF-8"?>

<project xmlns="http://maven.apache.org/POM/4.0.0" xmlns:xsi="http://www.w3.org/2001/XMLSchema-instance"
  xsi:schemaLocation="http://maven.apache.org/POM/4.0.0 http://maven.apache.org/xsd/maven-4.0.0.xsd">
  <modelVersion>4.0.0</modelVersion>

  <groupId>ymqx</groupId>
  <artifactId>MyBatis01</artifactId>
  <version>1.0-SNAPSHOT</version>
  <name>MyBatis01</name>

  <properties>
    <project.build.sourceEncoding>UTF-8</project.build.sourceEncoding>
    <maven.compiler.source>1.7</maven.compiler.source>
    <maven.compiler.target>1.7</maven.compiler.target>
  </properties>

  <dependencies>
    <!--MyBatis -->
    <dependency>
      <groupId>org.mybatis</groupId>
      <artifactId>mybatis</artifactId>
      <version>3.4.6</version>
    </dependency>
    <!--MySql数据库驱动 -->
    <dependency>
      <groupId>mysql</groupId>
      <artifactId>mysql-connector-java</artifactId>
      <version>5.1.38</version>
    </dependency>
    <!-- JUnit单元测试工具 -->
    <dependency>
      <groupId>junit</groupId>
      <artifactId>junit</artifactId>
      <version>4.10</version>
    </dependency>
  </dependencies>
</project>
1.2 添加依赖
【MyBatis】
mybatis-3.4.6.jar
【MYSQL驱动包】
mysql-connector-java-5.1.38-bin.jar
1.3 创建数据库和表
CREATE TABLE `student` (
  `id` int(11) NOT NULL AUTO_INCREMENT,
  `name` varchar(10) NOT NULL,
  `sex` enum('boy','girl','secret') DEFAULT 'secret',
  PRIMARY KEY (`id`)
) ENGINE=InnoDB AUTO_INCREMENT=5 DEFAULT CHARSET=utf8;
1.4 添加Mybatis配置文件
在Resources目录下创建一个conf.xml文件
<?xml version="1.0" encoding="UTF-8" ?>
<!DOCTYPE configuration
        PUBLIC "-//mybatis.org//DTD Config 3.0//EN"
        "http://mybatis.org/dtd/mybatis-3-config.dtd">
<configuration>
    <!-- 别名 使得在后续配置文件studentMapper.xml中使用resultType的时候,可以直接使用Student,而不必写全mqx.entities.Student-->
    <typeAliases>
        <package name="ymqx.entities"/>
    </typeAliases>

    <environments default="development">
        <environment id="development">
            <transactionManager type="JDBC"/>
            <dataSource type="POOLED">
                <property name="driver" value="com.mysql.jdbc.Driver"/>
                <property name="url" value="jdbc:mysql://localhost:3306/how2java"/>
                <property name="username" value="root"/>
                <property name="password" value="admin"/>
            </dataSource>
        </environment>
    </environments>
    <mappers>
        <mapper resource="mapper/studentMapper.xml"/>
    </mappers>
</configuration>
- properties 属性
- settings 设置
- typeAliases 类型命名
- objectFactory 对象工厂
- plugins 插件
- environments 环境
- environment 环境变量
- transactionManager 事务管理器
- dataSource 数据源
- environment 环境变量
- mappers 映射器
<mapper resource="mapper/studentMapper.xml"/>
resource 指定映射文件。
1.5 定义表所对应的实体类
Student实体类:
package ymqx.entities;

public class Student {
    private int id;
    private String name;
    private String sex;

    public int getId() {return id;}
    public void setId(int id) {this.id = id;}
    public String getName() {return name;}

    public void setName(String name) {this.name = name;}
    public String getSex() {return sex;}
    public void setSex(String sex) {this.sex = sex;}

    @Override
    public String toString() {
        return "Student{" +
                "id=" + id +
                ", name='" + name + '\'' +
                ", sex='" + sex + '\'' +
                '}';
    }
}
1.6 创建映射文件
在resources目录下创建一个mapper目录,专门用于存放sql映射文件。studentMapper.xml:
<?xml version="1.0" encoding="UTF-8" ?>
<!DOCTYPE mapper
        PUBLIC "-//mybatis.org//DTD Mapper 3.0//EN"
        "http://mybatis.org/dtd/mybatis-3-mapper.dtd">

   <!-- 为这个mapper指定一个唯一的namespace,namespace的值习惯上设置成包名+sql映射文件名,
        这样就能够保证namespace的值是唯一的-->
    <mapper namespace="ymqx.dao.studentMapper">

    <select id="selectStudentById" resultType="ymqx.entities.Student">
        select * from student where id = #{id}
    </select>
</mapper>
在select标签中编写查询的SQL语句, 设置select标签的id属性为selectStudentById,id属性值必须是唯一的,不能够重复。
parameterType属性指明查询时使用的参数类型,resultType属性指明查询返回的结果集类型。
conf.xml配置文件中注册映射文件。
<mappers>
    <!-- 注册studentMapper.xml文件studentMapper.xml位于mapper这个目录下,所以resource写成mapper/studentMapper.xml-->
    <mapper resource="mapper/studentMapper.xml"/>
</mappers>
1.7 编写数据访问类
StudentDao.java,执行定义的select语句:
package ymqx.dao;

import org.apache.ibatis.io.Resources;
import org.apache.ibatis.session.SqlSession;
import org.apache.ibatis.session.SqlSessionFactory;
import org.apache.ibatis.session.SqlSessionFactoryBuilder;
import ymqx.entities.Student;

import java.io.IOException;
import java.io.InputStream;

public class StudentDao {
    public Student getStudentById(int id) throws IOException {

        //使用MyBatis提供的Resources类加载mybatis的配置文件(它也加载关联的映射文件)
        String resource = "conf.xml";
        InputStream inputStream = Resources.getResourceAsStream(resource);

        //构建sqlSession的工厂
        SqlSessionFactory sqlSessionFactory = new SqlSessionFactoryBuilder().build(inputStream);

        //创建能执行映射文件中sql的sqlSession
        SqlSession session=sqlSessionFactory.openSession();

        /**
         * 映射sql的标识字符串,
         * selectStudentById是select标签的id属性值,通过select标签的id属性值就可以找到要执行的SQL
         */
        Student student=session.selectOne("selectStudentById",id);
        return student;
    }

    public static void main(String[] args) throws IOException {
        StudentDao dao=new StudentDao();
        Student student=dao.getStudentById(1001);
        System.out.println(student);
    }
}
运行结果:
Student{id=1001, name=‘lili’, sex=‘girl’}
基于注解映射
项目结构:

2.1 新增接口StudentMapper
package ymqx.mapper;

import org.apache.ibatis.annotations.Select;
import ymqx.entities.Student;

public interface StudentMapper {
    /**
     * 根据学生编号获得学生对象
     */
    @Select("select id,name,sex from student where id=#{id}")
    Student selectStudentByIdAnno(int id);
}
2.2 Mybatis配置文件修改
修改Mybatis配置文件conf.xml中mapper映射:
<?xml version="1.0" encoding="UTF-8" ?>
<!DOCTYPE configuration
        PUBLIC "-//mybatis.org//DTD Config 3.0//EN"
        "http://mybatis.org/dtd/mybatis-3-config.dtd">
<configuration>
    <!-- 别名 使得在后续配置文件studentMapper.xml中使用resultType的时候,可以直接使用Student,而不必写全mqx.entities.Student-->
    <typeAliases>
        <package name="ymqx.entities"/>
    </typeAliases>

    <environments default="development">
        <environment id="development">
            <transactionManager type="JDBC"/>
            <dataSource type="POOLED">
                <property name="driver" value="com.mysql.jdbc.Driver"/>
                <property name="url" value="jdbc:mysql://localhost:3306/how2java"/>
                <property name="username" value="root"/>
                <property name="password" value="admin"/>
            </dataSource>
        </environment>
    </environments>
    <mappers>
        <!-- <mapper resource="mapper/studentMapper.xml"/> -->
        <mapper class="ymqx.mapper.StudentMapper"></mapper>
    </mappers>
</configuration>
将conf.xml中mapper映射修改为 <mapper class=“ymqx.mapper.StudentMapper”></mapper>
<mapper class="ymqx.mapper.StudentMapper"></mapper>
class 指定映射类。
2.3 数据访问类
package ymqx.dao;

import org.apache.ibatis.io.Resources;
import org.apache.ibatis.session.SqlSession;
import org.apache.ibatis.session.SqlSessionFactory;
import org.apache.ibatis.session.SqlSessionFactoryBuilder;
import ymqx.entities.Student;
import ymqx.mapper.StudentMapper;

import java.io.IOException;
import java.io.InputStream;

public class StudentDao {
    public Student selectStudentByIdAnno(int id) throws IOException {
        //使用MyBatis提供的Resources类加载mybatis的配置文件(它也加载关联的映射文件)
        String resource = "conf.xml";
        InputStream inputStream = Resources.getResourceAsStream(resource);

        //构建sqlSession的工厂
        SqlSessionFactory sqlSessionFactory = new SqlSessionFactoryBuilder().build(inputStream);

        //创建能执行映射文件中sql的sqlSession
        SqlSession session=sqlSessionFactory.openSession();

        /* 方法一:使用接口方法名selectStudentByIdAnno指定*/
        /* Student student=session.selectOne("selectStudentByIdAnno",id);*/

        /* 方法二:通过获取接口StudentMapper,使用其方法*/
        StudentMapper mapper = session.getMapper(StudentMapper.class);
        Student student = mapper.selectStudentByIdAnno(id);
        return student;
    }

    public static void main(String[] args) throws IOException {
        StudentDao dao=new StudentDao();
        Student student=dao.selectStudentByIdAnno(1002);
        System.out.println(student);
    }
}
两种方式调用:1、使用接口方法名selectStudentByIdAnno调用。2、通过获取接口StudentMapper,使用其方法。
因为接口StudentMapper会有多个方法,比如:增删查改,为了访问类StudentDao可以同步接口StudentMapper的方法,一般会让StudentDao实现接口StudentMapper。这样接口StudentMapper增删方法时,访问类StudentDao需要同步修改。
StudentDao:
package ymqx.dao;

import org.apache.ibatis.io.Resources;
import org.apache.ibatis.session.SqlSession;
import org.apache.ibatis.session.SqlSessionFactory;
import org.apache.ibatis.session.SqlSessionFactoryBuilder;
import ymqx.entities.Student;
import ymqx.mapper.StudentMapper;

import java.io.IOException;
import java.io.InputStream;

public class StudentDao implements StudentMapper {
    @Override
    public Student selectStudentByIdAnno(int id){
        //使用MyBatis提供的Resources类加载mybatis的配置文件(它也加载关联的映射文件)
        String resource = "conf.xml";
        InputStream inputStream = null;
        try {
            inputStream = Resources.getResourceAsStream(resource);
        } catch (IOException e) {
            e.printStackTrace();
        }

        //构建sqlSession的工厂
        SqlSessionFactory sqlSessionFactory = new SqlSessionFactoryBuilder().build(inputStream);

        //创建能执行映射文件中sql的sqlSession
        SqlSession session=sqlSessionFactory.openSession();

        /* 方法一:使用接口方法名selectStudentByIdAnno指定*/
        /* Student student=session.selectOne("selectStudentByIdAnno",id);*/

        /* 方法二:通过获取接口StudentMapper,使用其方法*/
        StudentMapper mapper = session.getMapper(StudentMapper.class);
        Student student = mapper.selectStudentByIdAnno(id);
        return student;
    }

    public static void main(String[] args) {
        StudentDao dao=new StudentDao();
        Student student=dao.selectStudentByIdAnno(1002);
        System.out.println(student);
    }
}


 3920
3920


 被折叠的 条评论
为什么被折叠?


