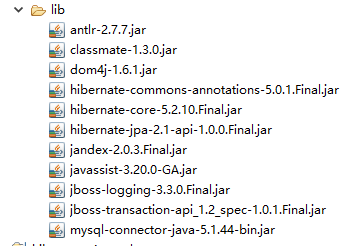
第一步:导jar包
hibernate5.2.10 的 jar 包和连接 MySQL 的 jar包

第二步:创建 hibernate 配置文件 hibernate.cfg.xml
<?xml version="1.0" encoding="UTF-8"?>
<!DOCTYPE hibernate-configuration PUBLIC
		"-//Hibernate/Hibernate Configuration DTD 3.0//EN"
		"http://www.hibernate.org/dtd/hibernate-configuration-3.0.dtd">
<hibernate-configuration>
    <session-factory>

    	<!-- 配置连接数据库的基本信息 -->
    	<property name="connection.username">root</property>
    	<property name="connection.password">1230</property>
    	<property name="connection.driver_class">com.mysql.jdbc.Driver</property>
    	<property name="connection.url">jdbc:mysql:///hibernate5</property>

    	<!-- 配置 hibernate 的基本信息 -->
    	<!-- hibernate 所使用的数据库方言 -->
    	<property name="dialect">org.hibernate.dialect.MySQL5InnoDBDialect</property>

    	<!-- 执行操作时是否在控制台打印SQL -->
    	<property name="show_sql">true</property>

    	<!-- 是否对 SQL 进行格式化 -->
    	<property name="hibernate.format_sql">true</property>

    	<!-- 指定自动生成数据表的策略 -->
    	<property name="hbm2ddl.auto">update</property>

    	<!-- 指定关联的 .hbm.xml文件 -->
        <mapping resource="com/loveyiyi/hibernate/hello/News.hbm.xml"/>

    </session-factory>
</hibernate-configuration>
url中的hibernate5为表空间名,需要特别注意的是,MySQL5以上版本的数据库方言都要改成org.hibernate.dialect.MySQL5InnoDBDialect
第三步:创建持久化类
import java.sql.Date;

public class News {

	private Integer id;
	private String title;
	private String author;

	private Date datetime;

	public Integer getId() {
		return id;
	}

	public void setId(Integer id) {
		this.id = id;
	}

	public String getTitle() {
		return title;
	}

	public void setTitle(String title) {
		this.title = title;
	}

	public String getAuthor() {
		return author;
	}

	public void setAuthor(String author) {
		this.author = author;
	}


	public Date getDatetime() {
		return datetime;
	}

	public void setDatetime(Date datetime) {
		this.datetime = datetime;
	}

	public News(String title, String author, Date datetime) {
		super();
		this.title = title;
		this.author = author;
		this.datetime = datetime;
	}

	public News() {
		super();
		// TODO Auto-generated constructor stub
	}

	@Override
	public String toString() {
		return "News [id=" + id + ", title=" + title + ", author=" + author + ", datetime=" + datetime + "]";
	}
}
第四步:创建对象-关系映射文件(用hibernate tools插件可自动导入)
<?xml version="1.0"?>
<!DOCTYPE hibernate-mapping PUBLIC "-//Hibernate/Hibernate Mapping DTD 3.0//EN"
"http://hibernate.sourceforge.net/hibernate-mapping-3.0.dtd">
<!-- Generated 2017-9-13 11:55:55 by Hibernate Tools 3.5.0.Final -->
<hibernate-mapping>
    <class name="com.loveyiyi.hibernate.hello.News" table="NEWS">
        <id name="id" type="java.lang.Integer">
            <column name="ID" />
            <generator class="native" />
        </id>
        <property name="title" type="java.lang.String">
            <column name="TITLE" />
        </property>
        <property name="author" type="java.lang.String">
            <column name="AUTHOR" />
        </property>
        <property name="datetime" type="java.sql.Date">
            <column name="DATETIME" />
        </property>
    </class>
</hibernate-mapping>
第五步:编写访问数据库的代码
import static org.junit.Assert.*;

import java.sql.Date;

import org.hibernate.Session;
import org.hibernate.SessionFactory;
import org.hibernate.Transaction;
import org.hibernate.cfg.Configuration;
import org.junit.Test;

import com.loveyiyi.hibernate.hello.News;

public class HibernateTest {

	@Test
	public void test() {
		SessionFactory sessionFactory;
		Session session;
		Transaction transaction;

		//创建 Configuration 对象:对应 hibernate 的基本配置信息和 对象关系映射信息
		Configuration configuration = new Configuration().configure();

		//调用Configuration的buildSessionFactory()方法返回一个SessionFactory对象
		sessionFactory = configuration.buildSessionFactory();

		//从SessionFactory 中获取 Session 对象
		session = sessionFactory.openSession();

		//开启事务
		transaction = session.beginTransaction();

		//执行保存操作
		News news = new News("java","javaweb",new Date(new java.util.Date().getTime()));
		session.save(news);

		//提交事务
		transaction.commit();

		//关闭 Session
		session.close();

		//关闭 SessionFactory
		sessionFactory.close();
	}

}
此时代码运行会报错,需要在src下新建一个hibernate.properties,里面写入 hibernate.temp.use_jdbc_metadata_defaults=false,或者在配置文件里设置。因为hibernate默认使用jdbc进行数据传输,而使用数据连接池的话需要声明一下。更新补充:隔了一天,在写hibernate映射单向一对多的时候忘记声明了,但是工程运行正常,在发现没写声明后,把之前写的工程中的声明删掉,发现都运行正常,不知所以
最后在JUit4下测试,即可在MySQL数据库中显示新建的表


 121
121

 被折叠的 条评论
为什么被折叠?


