


【应用场景】:
在很多网站注册页面中,我们都能看到网站实现了一个自动发送邮件的功能,给你发送验证码。那么这个过程是如何实现的呢?本次实验采用SpringBoot框架。
【解决步骤】:
实现这个功能大致就是以下5个步骤:
- 导入支持邮件发送功能的依赖
- 对邮箱进行一些设置,使其具有自动发送功能
- 在application.properties文件下进行相应的配置
- 编写邮件服务的核心类(重点)
- 测试
【导入依赖】:
在pom.xml中导入spring-boot-starter-mail依赖:
<dependency>
	<groupId>org.springframework.boot</groupId>
	<artifactId>spring-boot-starter-mail</artifactId>
</dependency>
【开启邮箱支持】:
我用的是腾讯邮箱。
登陆邮箱之后,点击设置->账户,拉到比较下面的位置来,看到以下设置:
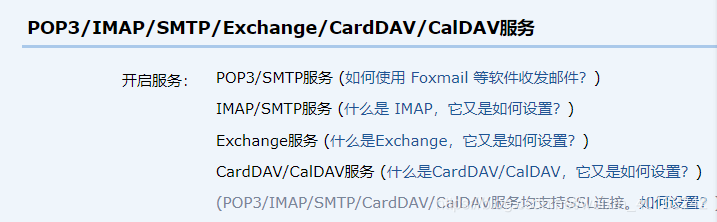
前两个随便开启一个就行了,我两个都开启了。
然后根据它的指引操作,你会获得一个授权码 。这个授权码记录下来,很重要,后面要使用。你的邮箱之所以能完成自动发送,就是因为有这个授权码授权。
【配置文件】:
在application.properties中进行相应的主配置。
#这里指明发送方的邮箱
spring.mail.username=XXX@qq.com

#password填我们刚刚说的授权码
spring.mail.password=填写你的授权码
spring.mail.protocol=smtp
spring.mail.default-encoding=utf-8

#下面几句是必须
spring.mail.properties.mail.smtp.auth=true
spring.mail.properties.mail.smtp.starttls.enable=true
spring.mail.properties.mail.smtp.starttls.required=true

spring.application.name=spirng-boot-mail
spring.mail.host=smtp.qq.com

#这个是非必须,我自己自定义的,可以便于程序中取值
mail.fromMail.addr=XXX@qq.com
配置文件就这样写,除了发送方和授权码那里自己设置以下,其他地方不动即可。
【实现发送功能】:
终于可以开始编写Service类了,这是最关键的一步。
为了贯彻SpringBoot中的面向接口编程思想,我们先定义一个接口:
package com.example.demo.serviceInterface;

public interface MailService {

    /**
     * 发送简单邮件
     * @param to
     * @param subject
     * @param content
     */
    void sendMail(String to,String subject,String content);
}
接下来就是把这个接口实现掉
定义一个MailServiceImpl类来实现
package com.example.demo.service;

import org.springframework.beans.factory.annotation.Autowired;
import org.springframework.beans.factory.annotation.Value;
import org.springframework.mail.SimpleMailMessage;
import org.springframework.mail.javamail.JavaMailSender;
import org.springframework.stereotype.Service;

import com.example.demo.serviceInterface.MailService;

@Service
public class MailServiceImpl implements MailService{
	@Autowired
	private JavaMailSender javaMailSender;
	@Value("${mail.fromMail.addr}")
	private String from;

	 /**
	 * 发送简单邮件
	 * @param to 接受者。邮件的接受方
	 * @param subject 主题。邮箱标题
	 * @param content 内容。是邮箱的Text
	 */
	 public void sendMail(String to, String subject, String content) {
	        SimpleMailMessage mailMessage=new SimpleMailMessage();
	        mailMessage.setFrom(from);//发起者
	        mailMessage.setTo(to);//接受者
	        //多人mailMessage.setTo("1xx.com","2xx.com","3xx.com");
	        mailMessage.setSubject(subject);
	        mailMessage.setText(content);
	        try {
	        	javaMailSender.send(mailMessage);
	            System.out.println("发送简单邮件");
	        }catch (Exception e){
	            System.out.println("发送简单邮件失败");
	        }
	    }
}
详细解释一下实现过程:
- JavaMailSender是mail依赖包中的一个类,我们需要它来send邮件,因此注入进来
- form的值直接通过properties文件中的配置注入进来了
- SimpleMailMessage这个类也是mail依赖中的一个消息类,我们需要用它来包装我们发送的邮件信息
- 通过JavaMailSender发送SimpleMailMessage
【测试代码】:
package com.example.demo.service;

import static org.junit.Assert.assertEquals;

import java.util.List;

import org.junit.Test;
import org.junit.runner.RunWith;
import org.springframework.beans.factory.annotation.Autowired;
import org.springframework.beans.factory.annotation.Value;
import org.springframework.boot.test.context.SpringBootTest;
import org.springframework.test.context.junit4.SpringRunner;

import com.example.demo.serviceInterface.MailService;

@RunWith(SpringRunner.class)
@SpringBootTest
public class TestMailServiceImpl {
	@Autowired
	MailServiceImpl mailServiceImpl;

	@Test
	public void testSendMail() throws Exception{
		//设置你想要将邮件发送到哪个邮箱
		String to = "XXX@qq.com";
		//后面两个参数,设置邮件的主题、邮件的文本内容
		mailServiceImpl.sendMail(to, "简单邮件", "SpringBoot的邮件实现");
	}
}
【测试结果】:
确实发送了

控制台也有打印:

【总结】:
整个过程走下来,可能会遇到一些bug,细心调试,要学会查看错误信息中的Cause By,都可以成功的,实际上并没有什么特别难的地方。像这些小功能的学习,如果找到一篇对的参考博客,给出一个简单的demo,那么将事半功倍!
我的参考博客:https://blog.csdn.net/weixin_39220472/article/details/80208125#commentBox


 502
502


 被折叠的 条评论
为什么被折叠?
被折叠的 条评论
为什么被折叠?
 到【灌水乐园】发言


