


一、查看确保RKE与Docker版本对应。
centos 7 系列,基本已支持Docker 18.06.3, 18.09.x, 19.03.x, 20.10.x
国内常用下载工具地址:Rancher Releases Mirror![]() http://mirror.cnrancher.com/
http://mirror.cnrancher.com/
二、服务器基础环境初始化及内核调优
#关闭Selinux及防火墙
> sed -i 's/SELINUX=enforcing/SELINUX=disabled/g' /etc/selinux/config
> systemctl stop firewalld.service && systemctl disable firewalld.service
#配置基础环境yum源
> yum install wget -y
#设置代理,一般使用有EIP的服务器,并用squid做代理,若服务器能直接上网就可不配代理
> echo 'proxy=http://10.60.214.116:3128' >> /etc/yum.conf"
#备份服务器自带yum源配置
> mkdir -p /etc/yum.repos.d/backup && mv /etc/yum.repos.d/*.repo /etc/yum.repos.d/backup/"
#下载阿里yun源,若服务器能直接上网就不需要 -e 'http_proxy=http://XX.XX.XX.XX:3128'
> wget -e 'http_proxy=http://XX.XX.XX.XX:3128' http://mirrors.aliyun.com/repo/Centos-7.repo -O /etc/yum.repos.d/Centos-7.repo"
> wget -e 'http_proxy=http://XX.XX.XX.XX:3128' http://mirrors.aliyun.com/repo/epel-7.repo -O /etc/yum.repos.d/epel-7.repo"

#磁盘格式化,是具体情况使用,若有k8s节点,建议将磁盘挂载到/var/lib/docker
> mkdir -p /var/lib/docker && mkfs.ext4 /dev/vdb
> echo '/dev/vdb /var/lib/docker                   ext4    defaults        1 1' >> /etc/fstab"
#K8s内核调优,
> echo 'fs.file-max = 2000000' >> /etc/sysctl.conf && sed -i 's/root soft nofile 65535/root soft nofile 1000000/g' /etc/security/limits.conf && sed -i 's/root hard nofile 65535/root hard nofile 1000000/g' /etc/security/limits.conf && sed -i 's/* soft nofile 65535/* soft nofile 1000000/g' /etc/security/limits.conf && sed -i 's/* hard nofile 65535/* hard nofile 1000000/g' /etc/security/limits.conf"
> echo "DefaultLimitNOFILE=1000000" >> /etc/systemd/system.conf && echo "DefaultLimitNPROC=1000000" >> /etc/systemd/system.conf'

更新yum源缓存及更新系统内核,并安装服务器常用服务
> yum install epel-release -y
> yum clean all && yum makecache && yum update -y
> yum install vim telnet iftop net-tools -y
三、Dokcer环境基础搭建
#设置全局代理
> echo 'export http_proxy=XX.XX.XX.XX:3128' >> /etc/profile && echo 'export https_proxy=XX.XX.XX.XX:3128' >> /etc/profile && source /etc/profile"
#内核调优
> modprobe br_netfilter && echo 'net.ipv4.ip_forward=1' >> /etc/sysctl.conf && echo 'net.bridge.bridge-nf-call-iptables=1' >> /etc/sysctl.conf && echo 'net.ipv4.neigh.default.gc_thresh1=4096' >> /etc/sysctl.conf && echo 'net.ipv4.neigh.default.gc_thresh2=6144' >> /etc/sysctl.conf && echo 'net.ipv4.neigh.default.gc_thresh3=8192' >> /etc/sysctl.conf && sysctl -p
#添加docker用户
> adduser docker && (echo \"r3XvweiFLf2Agudd\" && echo \"r3XvweiFLf2Agudd\") | sudo passwd docker && echo 'docker ALL=(ALL) ALL' >> /etc/sudoers
#安装docker,此步骤为安装docker,docker版本为19.03.8 docker客户端版本可能不是19.03.8不影响,也可自行安装其他docker版本
> export docker_version=19.03.8 && yum install -y yum-utils device-mapper-persistent-data lvm2 bash-completion && yum-config-manager --add-repo http://mirrors.aliyun.com/docker-ce/linux/centos/docker-ce.repo && yum makecache all && version=$(yum list docker-ce.x86_64 --showduplicates | sort -r|grep ${docker_version}|awk '{print $2}'|cut -d ':' -f 2) && yum -y install --setopt=obsoletes=0 docker-ce-${version} docker-ce-selinux-${version} && usermod -aG docker docker && systemctl enable docker && systemctl start docker
#修改docker加速镜像源
> echo '{"registry-mirrors":["https://7bezldxe.mirror.aliyuncs.com/"],"max-concurrent-downloads":10,"max-concurrent-uploads":5,"storage-driver":"overlay2","storage-opts":["overlay2.override_kernel_check=true"],"log-driver":"json-file","log-opts":{"max-size":"100m","max-file":"3"}}' > /etc/docker/daemon.json && systemctl restart docker

#切换docker用户,在后续需要使用rke节点设置免秘钥登陆
> su - docker
> cd
> ssh-keygen
> ssh-copy-id -i .ssh/id_rsa.pub docker@XX.XX.XX.XX  #若本机也是k8s集群中一节点,本机也需要设置免秘钥登陆
#设置docker的代理
> sed -i '31iEnvironment=\"HTTP_PROXY=http://XX.XX.XX.XX:3128/\" \"HTTPS_PROXY=http://XX.XX.XX.XX:3128/\"' /usr/lib/systemd/system/docker.service
> systemctl daemon-reload && systemctl restart docker
四、RKE安装k8s环境
rke 下载地址:Releases · rancher/rke · GitHub![]() https://github.com/rancher/rke/releases
https://github.com/rancher/rke/releases
#切换docker用户,注意,此后步骤均使用docker用户执行,且需要保证之后的文件及文件夹权限均是docker的
#切换docker用户,创建k8s文件夹,关于k8s的相关文件均放在此文件夹下
> su - docker
> mkdir /home/docker/k8s
> cd /home/docker/k8s
#下载rke 并给以执行权限
> wget https://github.com/rancher/rke/releases/download/v1.3.3/rke_linux-amd64
> mv rke_linux-amd64 rke
> chmox +x rke
#创建k8s集群文件夹,此文件夹保存集群证书、配置文件等
> mkdir development
> cd development
#编写rke\k8s配置文件
> vim rancher-cluster_development.yml
nodes:
- address: x.x.x.1
user: docker
role: [controlplane,etcd]
- address: x.x.x.2
user: docker
role: [controlplane,etcd]
- address: x.x.x.3
user: docker
role: [controlplane,etcd]
- address: x.x.x.4
user: docker
role: [worker]
- address: x.x.x.5
user: docker
role: [worker]
services:
etcd:
snapshot: true
creation: 6h
retention: 24h
ingress:
provider: nginx
options:
use-forwarded-headers: "true"
services:
kubelet:
extra_args:
system-reserved: cpu=0.5,memory=1Gi
kube-reserved: cpu=1,memory=2Gi
enforce-node-allocatable: pods
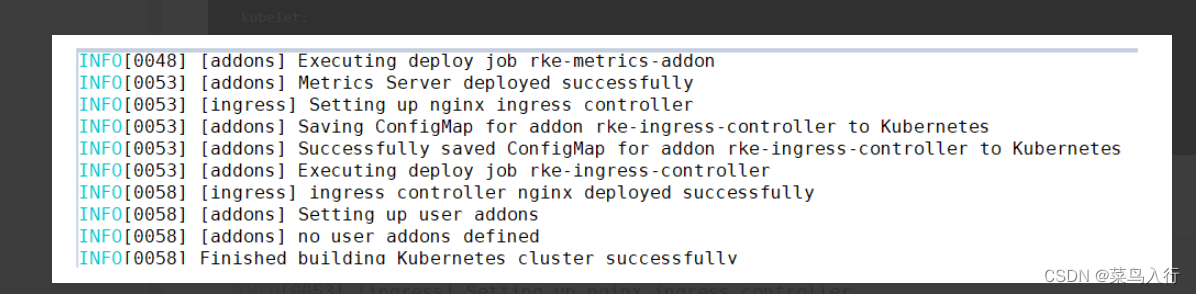
eviction-hard: memory.available<500Mi#使用rke安装k8s,此步骤不一定会一次成功,可多次执行,视报错信息处理;显示以下信息表示为安装成功 /home/docker/k8s/rke up --config /home/docker/k8s/development/rancher-cluster_development.yml
正在上传…重新上传取消
#安装完成后,在development下会自动生成两个文件
> ll /home/docker/k8s/development
     kube_config_rancher-cluster_development.yml #系统生成的rke\k8s API证书文件
     rancher-cluster_development.rkestate #系统生成的rke\k8s节点详细文件
     rancher-cluster_development.yml  #rke\k8s节点文件


#kubectl 下载
> cd /home/docker/k8s
> wget http://rancher-mirror.cnrancher.com/kubectl/v1.19.11/linux-amd64-v1.19.11-kubectl
> mv linux-amd64-v1.19.11-kubectl kubectl
> chmox +x kubectl
#配置KUBECONFIG后,即可使用kubectl 连通集群(当前目录 /home/docker/k8s )
> export KUBECONFIG=$(pwd)/development/kube_config_rancher-cluster_development.yml
> ./kubectl get node
#常见错误信息,ETCD健康检查异常,建议清理掉docker\etcd等,重新安装 #节点清理http://docs.rancher.cn/docs/rancher2/trending-topics/cleaning-cluster-nodes/_index/#%E6%B8%85%E7%90%86%E8%84%9A%E6%9C%AC
五、Helm安装rancher https://github.com/helm/helm/releases
#下载helm
wget https://get.helm.sh/helm-v3.7.2-linux-amd64.tar.gz
tar zxvf helm-v3.7.2-linux-amd64.tar.gz
mv linux-amd64/ heml
#安装rancher前,需要配置k8s环境变量,确保k8s集群正常通信


#配置KUBECONFIG后,即可使用kubectl 连通集群(当前目录 /home/docker/k8s )
> export KUBECONFIG=$(pwd)/development/kube_config_rancher-cluster_development.yml
> ./kubectl get node
#创建cattle-system 安装rancher
> ./kubectl create  namespace cattle-system


#helm安装rancher 若不能直接通外网的情况下,需要配置代理--set proxy="http://x.x.x.x:3128"   --set noProxy="127.0.0.0/8\,10.0.0.0/8\,172.16.0.0/12\,192.168.0.0/16"
> /home/docker/k8s/heml/helm   install rancher   --namespace cattle-system    --set rancherImageTag=v2.5.6   --set tls=external    --set hostname=rancher.xxx.xx rancher-stable/rancher


[docker@localhost k8s]$ ./kubectl  get pod -A
NAMESPACE                 NAME                                      READY   STATUS      RESTARTS   AGE
cattle-system             rancher-67d75c65c5-c56p6                  1/1     Running     0          2d19h
cattle-system             rancher-67d75c65c5-rvt6w                  1/1     Running     1          2d19h
cattle-system             rancher-67d75c65c5-rwl6d                  1/1     Running     0          62m
cattle-system             rancher-webhook-5c6fcb875-fbkvb           1/1     Running     0          2d19h


#外部nginx 配置域名,解析到该rancher
> vim /etc/nginx/conf.d/rancher.xxx.xx.conf
upstream rancher-server {
        server x.x.x.1:80 fail_timeout=30s;   #k8s 节点
        server x.x.x.2:80 fail_timeout=30s;
        server x.x.x.3:80 fail_timeout=30s;
    }

server {
    listen 443 ssl;
    server_name rancher.xx.xx;

    ssl_certificate     openssl/xx.crt;
    ssl_certificate_key openssl/xx.key;
    ssl_protocols       TLSv1 TLSv1.1 TLSv1.2;
    ssl_ciphers         HIGH:!aNULL:!MD5:!DH;
    underscores_in_headers on;
    client_max_body_size 5M;


    location / {
        proxy_set_header Host $host;
        proxy_set_header X-Forwarded-Proto $scheme;
        proxy_set_header X-Forwarded-Port $server_port;
        proxy_set_header X-Forwarded-For $proxy_add_x_forwarded_for;
        proxy_http_version 1.1;
        proxy_set_header Upgrade $http_upgrade;
        proxy_set_header Connection $connection_upgrade;
        # This allows the ability for the execute shell window to remain open for up to 15 minutes.
        ## Without this parameter, the default is 1 minute and will automatically close.
        proxy_read_timeout 900s;
        proxy_buffering off;
        proxy_pass http://rancher-server;
    }


}

server {
    listen 80;
    server_name rancher.xx.xx;
    return 301 https://$server_name$request_uri;
}
六、Rancher的加入
(1)、在已有rancher集群【rancher.xxx.xx】,创建新集群【选择导入】、输入集群名称
(2)、获取到yaml文件,可以在公网先wget保存为yaml文件,然后拿去新集群导入

(3)、如果是跨VPC网络的,无法直接访问,则需要在yaml中增加代理
- name: CATTLE_SERVER
  value: "https://rancher.xx.xx"     # 原yaml中有的地址
- name: HTTP_PROXY                       #以下部分为需要配置的代理
  value: "http://x.x.x.x:3128"
- name: HTTPS_PROXY
  value: "http://x.x.x.x:3128"
- name: NO_PROXY
  value: "127.0.0.0/8,10.0.0.0/8,172.16.0.0/12,192.168.0.0/16,10.61.164.0/24"
(4)、加入rancher,注意事项:SLB开放安全控制、安全组开放安全控制
su - docker
cd k8s
export KUBECONFIG=$(pwd)/cluster-gsy/kube_config_rancher-cluster_gsy.yml
wget https://xxxxxx/xxxx/rancher.yaml
vim rancher.yaml
kubectl apply -f rancher.yaml
#之后可使用kubectl查看pod情况
cattle-system  cattle-cluster-agent    为主deployment
cattle-system  cattle-node-agent       为pod


 1627
1627


 被折叠的 条评论
为什么被折叠?
被折叠的 条评论
为什么被折叠?
 到【灌水乐园】发言


