


一、十大滤波算法
一)、限幅滤波法
1、方法:
- 根据经验判断两次采样允许的最大偏差值(设为A)
- 每次检测到新值时判断:
a. 如果本次值与上次值之差<=A,则本次值有效
b. 如果本次值与上次值之差>A,则本次值无效,放弃本次值,用上次值代替本次值
2、优点:
- 能有效克服因偶然因素引起的脉冲干扰
3、缺点
- 无法抑制那种周期性的干扰
- 平滑度差
二)、中位值滤波法
1、方法:
- 连续采样N次(N取奇数),把N次采样值按大小排列
- 取中间值为本次有效值
2、优点:
- 能有效克服因偶然因素引起的波动干扰
- 对温度、液位的变化缓慢的被测参数有良好的滤波效果
3、缺点:
- 对流量、速度等快速变化的参数不宜
三)、算术平均滤波法
1、方法:
- 连续取N个采样值进行算术平均运算
- N值较大时:信号平滑度较高,但灵敏度较低
- N值较小时:信号平滑度较低,但灵敏度较高
- N值的选取:一般流量,N=12;压力:N=4
2、优点:
- 适用于对一般具有随机干扰的信号进行滤波
- 这样信号的特点是有一个平均值,信号在某一数值范围附近上下波动
3、缺点:
- 对于测量速度较慢或要求数据计算速度较快的实时控制不适用
- 比较浪费RAM
四)、递推平均滤波法
1、方法:
- 把连续取N个采样值看成一个队列
- 队列的长度固定为N
- 每次采样到一个新数据放入队尾,并扔掉原来队首的一次数据.(先进先出原则)
- 把队列中的N个数据进行算术平均运算,就可获得新的滤波结果
- N值的选取:流量,N=12;压力:N=4;液面,N=4 ~ 12;温度,N=1 ~ 4
2、优点:
- 对周期性干扰有良好的抑制作用,平滑度高
- 适用于高频振荡的系统
3、缺点:
- 灵敏度低
- 对偶然出现的脉冲性干扰的抑制作用较差
- 不易消除由于脉冲干扰所引起的采样值偏差
- 不适用于脉冲干扰比较严重的场合
- 比较浪费RAM
五)、中位值平均滤波法
1、方法:
- 相当
于“
中位值滤波法
”+“算术
平均滤波法” - 连续采样N个数据,去掉一个最大值和一个最小值
- 然后计算N-2个数据的算术平均值
- N值的选取:3~14
2、优点:
- 融合了两种滤波法的优点
- 对于偶然出现的脉冲性干扰,可消除由于脉冲干扰所引起的采样值偏差
3、缺点:
- 测量速度较慢,和算术平均滤波法一样
- 比较浪费RAM
六)、限幅平均滤波法
1、方法:
- 相当于“限幅滤波法”+“递推平均滤波法”
- 每次采样到的新数据先进行限幅处理,
- 再送入队列进行递推平均滤波处理
2、优点:
- 融合了两种滤波法的优点
- 对于偶然出现的脉冲性干扰,可消除由于脉冲干扰所引起的采样值偏差
3、缺点:
- 比较浪费RAM
七)、一阶滞后滤波法
1、方法:
- 取a=0~1
- 本次滤波结果=(1-a)本次采样值+a上次滤波结果
2、优点:
- 对周期性干扰具有良好的抑制作用
- 适用于波动频率较高的场合
3、缺点:
- 相位滞后,灵敏度低
- 滞后程度取决于a值大小
- 不能消除滤波频率高于采样频率的1/2的干扰信号
八)、加权递推平均滤波法
1、方法:
- 是对递推平均滤波法的改进,即不同时刻的数据加以不同的权
- 通常是,越接近现时刻的数据,权取得越大。
- 给予新采样值的权系数越大,则灵敏度越高,但信号平滑度越低
2、优点:
- 适用于有较大纯滞后时间常数的对象
- 和采样周期较短的系统
3、缺点:
- 对于纯滞后时间常数较小,采样周期较长,变化缓慢的信号
- 不能迅速反应交易系统当前所受干扰的严重程度,滤波效果差
九)、消抖滤波法
1、方法:
- 设置一个滤波计数器
- 将每次采样值与当前有效值比较:
- 如果采样值=当前有效值,则计数器清零
- 如果采样值>或<当前有效值,则计数器+1,并判断计数器是否>=上限N(溢出)
- 如果计数器溢出,则将本次值替换当前有效值,并清计数器
2、优点:
- 对于变化缓慢的被测参数有较好的滤波效果,
- 可避免在临界值附近控制器的反复开/关跳动或显示器上数值抖动
3、缺点:
- 对于快速变化的参数不宜
- 如果在计数器溢出的那一次采样到的值恰好是干扰值,则会将干扰值当作有效值导入交易系统
十)、限幅消抖滤波法
1、方法:
- 相当于“限幅滤波法”+“消抖滤波法”
- 先限幅,后消抖
2、优点:
- 继承了“限幅”和“消抖”的优点
- 改进了“消抖滤波法”中的某些缺陷,避免将干扰值导入系统
3、缺点:
- 对于快速变化的参数不宜
二、嵌入式C语言程序调试和宏使用技巧
1. 调试相关的宏
在Linux使用gcc编译程序的时候,对于调试的语句还具有一些特殊的语法。gcc编译的过程中,会生成一些宏,可以使用这些宏分别打印当前源文件的信息,主要内容是当前的文件、当前运行的函数和当前的程序行。
具体宏如下:
这些宏不是程序代码定义的,而是有编译器产生的。这些信息都是在编译器处理文件的时候动态产生的。
测试示例:
2. # 字符串化操作符
在gcc的编译系统中,可以使用#将当前的内容转换成字符串。
程序示例:
执行结果:
#expr表示根据宏中的参数(即表达式的内容),生成一个字符串。该过程同样是有编译器产生的,编译器在编译源文件的时候,如果遇到了类似的宏,会自动根据程序中表达式的内容,生成一个字符串的宏。
这种方式的优点是可以用统一的方法打印表达式的内容,在程序的调试过程中可以方便直观的看到转换字符串之后的表达式。具体的表达式的内容是什么,有编译器自动写入程序中,这样使用相同的宏打印所有表达式的字符串。
由于#expr本质上市一个表示字符串的宏,因此在程序中也可以不适用%s打印它的内容,而是可以将其直接与其它的字符串连接。因此,上述宏可以等价以下形式:
总结
#是C语言预处理阶段的字符串化操作符,可将宏中的内容转换成字符串。
3. ## 连接操作符
在gcc的编译系统中,##是C语言中的连接操作符,可以在编译的预处理阶段实现字符串连接的操作。
程序示例:
上述程序中,test(x)宏被定义为test##x, 他表示test字符串和x字符串的连接。
在程序的调试语句中,##常用的方式如下:
替换的方式是将参数的两个部分以##连接。##表示连接变量代表前面的参数列表。使用这种形式可以将宏的参数传递给一个参数。args…是宏的参数,表示可变的参数列表,使用##args将其传给printf函数。
总结
##是C语言预处理阶段的连接操作符,可实现宏参数的连接。
4. 调试宏第一种形式
一种定义的方式:
程序示例:
总结
上面的DEBUG定义的方式是两条语句的组合,不可能在产生返回值,因此不能使用它的返回值。
5. 调试宏的第二种定义方式
调试宏的第二种定义方式。
程序示例:
总结
fmt必须是一个字符串,不能使用指针,只有这样才可以实现字符串的功能。
6. 对调试语句进行分级审查
即使定义了调试的宏,在工程足够大的情况下,也会导致在打开宏开关的时候在终端出现大量的信息。而无法区分哪些是有用的。这个时候就要加入分级检查机制,可以定义不同的调试级别,这样就可以对不同重要程序和不同的模块进行区分,需要调试哪一个模块就可以打开那一个模块的调试级别。
一般可以利用配置文件的方式显示,其实Linux内核也是这么做的,它把调试的等级分成了7个不同重要程度的级别,只有设定某个级别可以显示,对应的调试信息才会打印到终端上。
可以写出一下配置文件。
解析配置文件使用标准的字符串操作库函数就可以获取XXX_MODULE这个数值。
7. 条件编译调试语句
在实际的开发中,一般会维护两种源程序,一种是带有调试语句的调试版本程序,另外一种是不带有调试语句的发布版本程序。然后根据不同的条件编译选项,编译出不同的调试版本和发布版本的程序。
在实现过程中,可以使用一个调试宏来控制调试语句的开关。
如果USE_DEBUG被定义,那么有调试信息,否则DEBUG就为空。
如果需要调试信息,就只需要在程序中更改一行就可以了。
定义条件编译的方式使用一个带有值的宏。
可以使用如下方式进行条件编译。
8. 使用do…while的宏定义
使用宏定义可以将一些较为短小的功能封装,方便使用。宏的形式和函数类似,但是可以节省函数跳转的开销。如何将一个语句封装成一个宏,在程序中常常使用do…while(0)的形式。
程序示例:
9. 代码剖析
对于比较大的程序,可以借助一些工具来首先把需要优化的点清理出来。接下来我们来看看在程序执行过程中获取数据并进行分析的工具:代码剖析程序。
测试程序:
编译的时候加入-pg选项。
执行完成后,在当前文件中生成了一个gmon.out文件。
使用gprof剖析主程序。
其中主要的信息有两个,一个是每个函数执行的时间占程序总时间的百分比,另外一个就是函数被调用的次数。通过这些信息,可以优化核心程序的实现方式来提高效率。
当然这个剖析程序由于它自身特性有一些限制,比较适用于运行时间比较长的程序,因为统计的时间是基于间隔计数这种机制,所以还需要考虑函数执行的相对时间,如果程序执行时间过短,那得到的信息是没有任何参考意义的。
将上述程序时间缩短。
剖析结果如下。
因此该剖析程序对于越复杂、执行时间越长的函数也适用。
那么是不是每个函数执行的绝对时间越长,剖析显示的时间就真的越长呢?可以再看如下的例子。
剖析结果如下。
总结
在使用gprof工具的时候,对于一个函数进行gprof方式的剖析,实质上的时间是指除去库函数调用和系统调用之外,纯碎应用部分开发的实际代码运行的时间,也就是说time一项描述的时间值不包括库函数printf、系统调用system等运行的时间。这些实用库函数的程序虽然运行的时候将比最初的程序实用更多的时间,但是对于剖析函数来说并没有影响。
三、 C的封装、继承、多态
1、为什么用C实现OOP
阅读文本之前肯定有读者会问这样的问题:我们有C++面向对象的语言,为什么还要用C语言实现面向对象呢?
面向对象编程(OOP)并不是一种特定的语言或者工具,它只是一种设计方法、设计思想。它表现出来的三个最基本的特性就是封装、继承与多态。很多面向对象的编程语言已经包含这三个特性了,例如 Smalltalk、C++、Java。但是你也可以用几乎所有的编程语言来实现面向对象编程,例如 ANSI-C。要记住,面向对象是一种思想,一种方法,不要太拘泥于编程语言。
2、所具备的条件
要想使用C语言实现面向对象,首先需要具备一些基础知识。比如:(C语言中的)结构体、函数、指针,以及函数指针等,(C++中的)基类、派生、多态、继承等。
首先,不仅仅是了解这些基础知识,而是有一定的编程经验,因为上面说了“面向对象是一种设计方法、设计思想”,如果只是停留在字面意思的理解,没有这种设计思想肯定不行。
因此,不建议初学者使用C语言实现面向对象,特别是在真正项目中。建议把基本功练好,再使用。
利用C语言实现面向对象的方法很多,下面就来描述最基本的封装、继承和多态。
3、封装
封装就是把数据和函数打包到一个类里面,其实大部分C语言编程者都已近接触过了。
C 标准库中的 fopen(), fclose(), fread(), fwrite()等函数的操作对象就是 FILE。数据内容就是 FILE,数据的读写操作就是 fread()、fwrite(),fopen() 类比于构造函数,fclose() 就是析构函数。
这个看起来似乎很好理解,那下面我们实现一下基本的封装特性。
这是 Shape 类的声明,非常简单,很好理解。一般会把声明放到头文件里面 “Shape.h”。来看下 Shape 类相关的定义,当然是在 “Shape.c” 里面。
再看下 main.c
编译之后,看看执行结果:
整个例子,非常简单,非常好理解。以后写代码时候,要多去想想标准库的文件IO操作,这样也有意识的去培养面向对象编程的思维。
4、继承
继承就是基于现有的一个类去定义一个新类,这样有助于重用代码,更好的组织代码。在 C 语言里面,去实现单继承也非常简单,只要把基类放到继承类的第一个数据成员的位置就行了。
例如,我们现在要创建一个 Rectangle 类,我们只要继承 Shape 类已经存在的属性和操作,再添加不同于 Shape 的属性和操作到 Rectangle 中。
下面是 Rectangle 的声明与定义:
我们来看一下 Rectangle 的继承关系和内存布局:
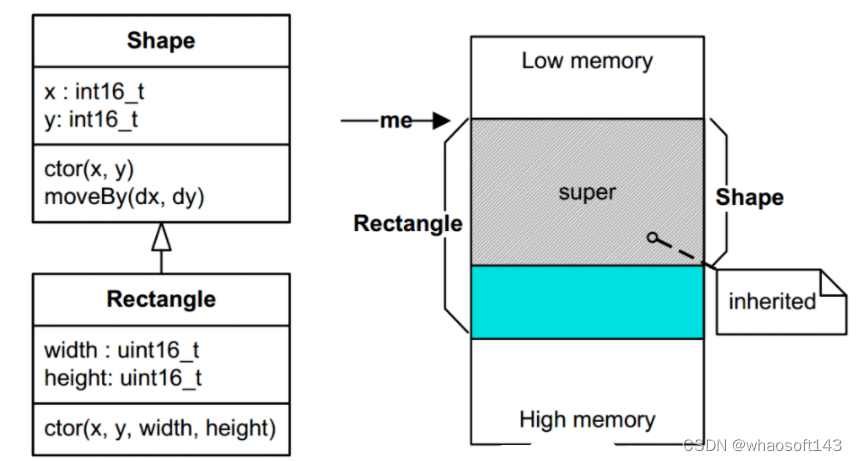
因为有这样的内存布局,所以你可以很安全的传一个指向 Rectangle 对象的指针到一个期望传入 Shape 对象的指针的函数中,就是一个函数的参数是 “Shape *”,你可以传入 “Rectangle *”,并且这是非常安全的。这样的话,基类的所有属性和方法都可以被继承类继承!
输出结果:
5、多态
C++ 语言实现多态就是使用虚函数。在 C 语言里面,也可以实现多态。
现在,我们又要增加一个圆形,并且在 Shape 要扩展功能,我们要增加 area() 和 draw() 函数。但是 Shape 相当于抽象类,不知道怎么去计算自己的面积,更不知道怎么去画出来自己。而且,矩形和圆形的面积计算方式和几何图像也是不一样的。
下面让我们重新声明一下 Shape 类:
看下加上虚函数之后的类关系图:

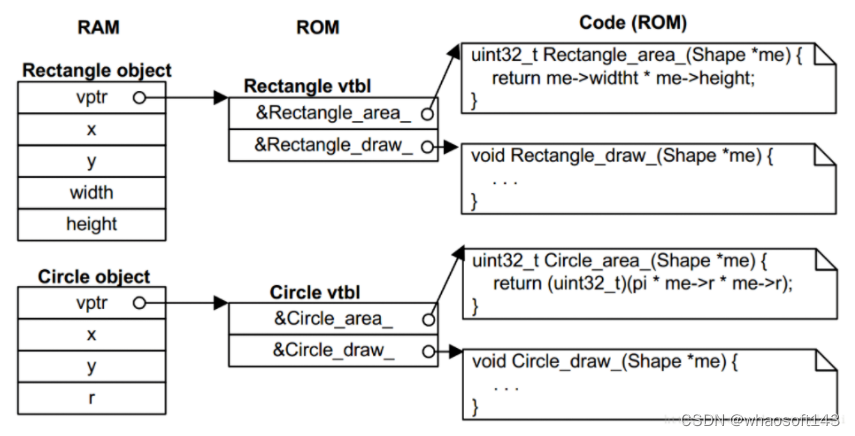
5.1 虚表和虚指针
虚表(Virtual Table)是这个类所有虚函数的函数指针的集合。
虚指针(Virtual Pointer)是一个指向虚表的指针。这个虚指针必须存在于每个对象实例中,会被所有子类继承。
在《Inside The C++ Object Model》的第一章内容中,有这些介绍。
5.2 在构造函数中设置vptr
在每一个对象实例中,vptr 必须被初始化指向其 vtbl。最好的初始化位置就是在类的构造函数中。事实上,在构造函数中, C++ 编译器隐式的创建了一个初始化的vptr。在 C 语言里面, 我们必须显示的初始化vptr。
下面就展示一下,在 Shape 的构造函数里面,如何去初始化这个 vptr。
5.3 继承 vtbl 和 重载 vptr
上面已经提到过,基类包含 vptr,子类会自动继承。但是,vptr 需要被子类的虚表重新赋值。并且,这也必须发生在子类的构造函数中。下面是 Rectangle 的构造函数。
5.4 虚函数调用
有了前面虚表(Virtual Tables)和虚指针(Virtual Pointers)的基础实现,虚拟调用(后期绑定)就可以用下面代码实现了。
这个函数可以放到.c文件里面,但是会带来一个缺点就是每个虚拟调用都有额外的调用开销。为了避免这个缺点,如果编译器支持内联函数(C99)。我们可以把定义放到头文件里面,类似下面:
如果是老一点的编译器(C89),我们可以用宏函数来实现,类似下面这样:
看一下例子中的调用机制:
5.5 main.c
输出结果:
6、总结
还是那句话,面向对象编程是一种方法,并不局限于某一种编程语言。用 C 语言实现封装、单继承,理解和实现起来比较简单,多态反而会稍微复杂一点,如果打算广泛
的使用多态,还是推荐转到 C++ 语言上,毕竟这层复杂性被这个语言给封装了,你只需要简单的使用就行了。但并不代表,C 语言实现不了多态这个特性。


 2629
2629

 被折叠的 条评论
为什么被折叠?
被折叠的 条评论
为什么被折叠?
 到【灌水乐园】发言


