


elementui的表格和表单没有内置的拖拽排序的方法,我使用了sortablejs和vue-draggable-next两种方式分别实现了表格和表单的拖拽排序。
1. 拖拽实现效果
表格:
表单:
2. sortablejs实现表格拖拽
2.1 安装sortablejs
npm install sortablejs --save
我的项目是使用yarn进行了多个包的管理的,所以安装命令为:
yarn workspace <package名称> add sortablejs
2.2 在需要的页面中引入
import Sortable from "sortablejs";
2.3 具体使用
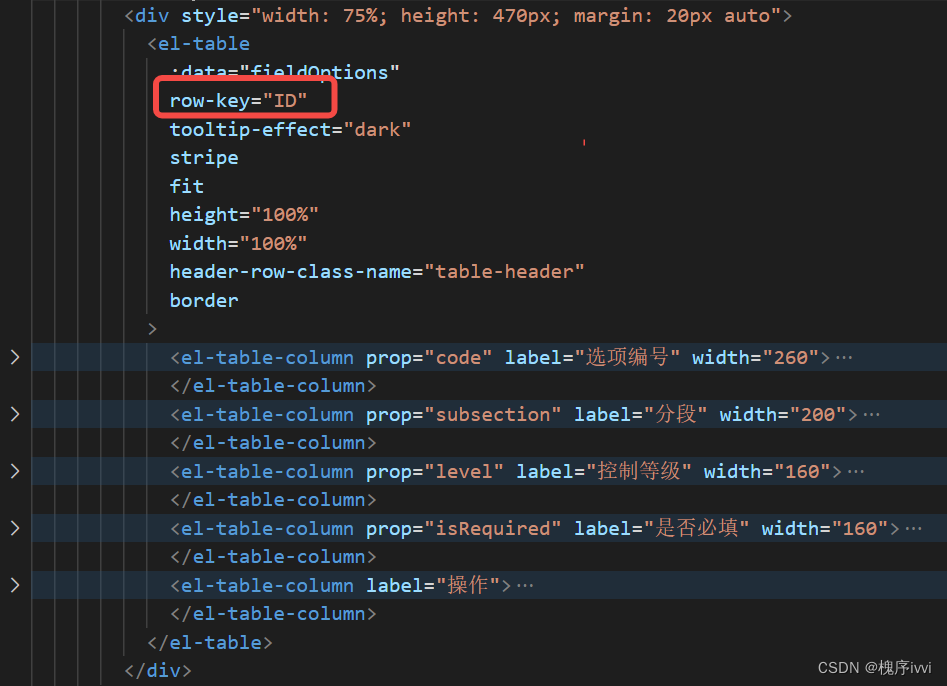
需要注意的是,row-key必填,且必须是唯一的,比如ID,否则会出现排序不对的情况
2.3.1 el-table中配置
2.3.2 拖拽实现方法
在setup()中编写行拖拽的实现方法,具体逻辑是创建一个Sortable的实例,将需要拖拽的元素给到Sortable实例,进行需要的配置,然后在拖拽结束的方法onEnd()中实现改变排序的逻辑。
// 表格行拖拽
    const rowDrop = () => {
      let tbody = document.querySelector(".el-table__body-wrapper tbody");
      Sortable.create(tbody, {
        // or { name: "...", pull: [true, false, 'clone', array], put: [true, false, array] }
        group: {
          name: "words",
          pull: true,
          put: true,
        },
        animation: 150, // ms, number 单位:ms,定义排序动画的时间
        onAdd: function (evt: any) {
          // 拖拽时候添加有新的节点的时候发生该事件
          console.log("onAdd.foo:", [evt.item, evt.from]);
        },
        onUpdate: function (evt: any) {
          // 拖拽更新节点位置发生该事件
          console.log("onUpdate.foo:", [evt.item, evt.from]);
        },
        onRemove: function (evt: any) {
          // 删除拖拽节点的时候促发该事件
          console.log("onRemove.foo:", [evt.item, evt.from]);
        },
        onStart: function (evt: any) {
          // 开始拖拽出发该函数
          console.log("onStart.foo:", [evt.item, evt.from]);
        },
        onSort: function (evt: any) {
          // 发生排序发生该事件
          console.log("onUpdate.foo:", [evt.item, evt.from]);
        },
        onEnd(evt: any) {
          // 结束拖拽
          console.log("结束表格拖拽", evt);
          // 如果拖拽结束后顺序发生了变化,则对数据进行修改
          if (evt.oldIndex !== evt.newIndex) {
            let currRow = fieldOptions.value.splice(evt.oldIndex, 1)[0];
            fieldOptions.value.splice(evt.newIndex, 0, currRow);
            // 将排序后的ID抽离成数组传给后端
            let optIDs: string[] = [];
            fieldOptions.value.forEach((item) => {
              optIDs.push(item.ID);
            });
            const params = {
              Params: {
                SpaceID: spaceID.value,
                LaunchID: launchID.value,
                OptIDs: optIDs,
              },
              Options: {
                APIServer: apiServer,
              },
            };
            // 发送改变顺序的请求
            store.commit("doRequest");
            spaceService.OrderOptions(params).then((res: any) => {
              store.commit("deResponse");
              if (res.Status === 0) {
                console.log("表格顺序修改成功");
              } else {
                ElMessage({
                  showClose: true,
                  message: res.ErrorMessage,
                  type: "error",
                  duration: 10000,
                });
              }
            });
          }
        },
      });
    };
3. vue-draggable-next实现表单拖拽
vue.draggable.next是一款vue3的拖拽插件,是基于Sortable.js实现的,你可以用它来拖拽列表、菜单、工作台、选项卡等常见的工作场景。
官网地址
中文文档
3.1 安装依赖
npm install vue-draggable-next
// or
yarn add vue-draggable-next
3.2 在需要的页面中引入
import { VueDraggableNext } from "vue-draggable-next";
components: {
    draggable: VueDraggableNext,
  },
3.2 使用
<div style="width: 80%; margin: auto">
	<div class="action-form-title">
		<span class="action-form-span-300 first-span">ID:</span>
		<span class="action-form-span-300">名称:</span>
	</div>
	<el-form
		ref="widgetEnumsRef"
		:model="widgetConfigInfo"
		:rules="enumsRules"
	>
		<draggable
			v-model="widgetConfigInfo.StaticConfig.Enums"
			handle=".icon-bar"
		>
			<transition-group>
				<div
					class="action-form-row"
					v-for="(item, index) in widgetConfigInfo.StaticConfig.Enums"
					:key="index"
				>
					<span
						class="icon-delete"
						@click="deleteFieldRaw(index, 'input')"
					><i class="fas fa-trash" style="cursor: pointer"></i
					></span>
					<span class="icon-bar"><i class="fas fa-bars"></i></span>
					<el-form-item
						:prop="`StaticConfig.Enums.${index}.ID`"
						:rules="enumsRules.ID"
					>
						<el-input
							v-model="item.ID"
							style="width: 300px; margin-right: 5px"
							placeholder="请输入内容"
							maxlength="300"
						/>
					</el-form-item>
					<el-form-item
						:prop="`StaticConfig.Enums.${index}.Name`"
						:rules="enumsRules.Name"
					>
						<el-input
							v-model="item.Name"
							style="width: 300px; margin-right: 5px"
							placeholder="请输入内容"
							maxlength="1000"
						/>
					</el-form-item>
				</div>
			</transition-group>
		</draggable>
	</el-form>
<div class="action-form-button">
	<el-button
		type="primary"
		plain
		size="large"
		style="width: 100%"
		@click="addFieldRaw('input')"
	><i class="fas fa-plus" style="margin-right: 5px"></i
		>新增</el-button>
	</div>
</div>
3.3 其他
draggable组件的handle=".icon-bar"配置是仅在点击类名为icon-bar的icon时才会进行拖动


 1758
1758


 被折叠的 条评论
为什么被折叠?
被折叠的 条评论
为什么被折叠?
 到【灌水乐园】发言


