


前言
现在已经2020年,相信大家都经常看到进停车场前对汽车车牌的自动识别,方便、速度快、又精确。也不太清楚这个的原理到底是利用深度学习识别还是使用传统的图像处理、识别 。最近,我这里就写了一小段代码来实现对车牌框的位置进行定位。当然这里还有很多BUG了,比如说只识别了蓝色的车牌,黄色、绿色的就没有涉及到。至于识别车牌号码后续继续学习以及更新!这里先占坑了。
预处理
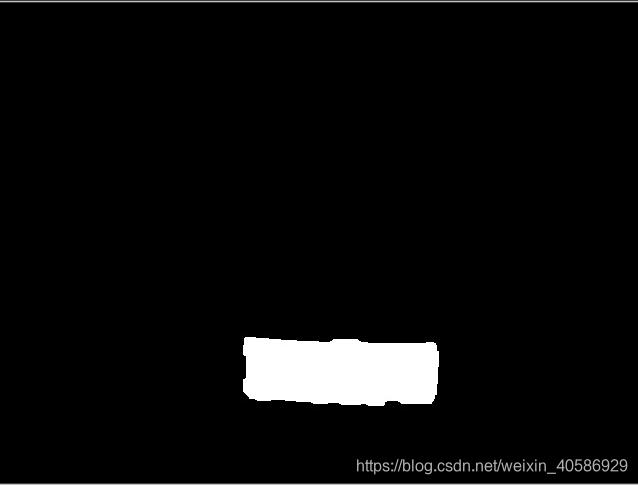
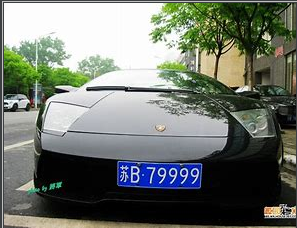
当摄像头拍摄的时候,不会自动定位到框的位置,而是整辆车的前身或者尾部都拍进去。那么这里就可以使用传统的图像处理进行定位了。具体步骤就是先去噪,然后进行腐蚀、膨胀等形态学操作,得出二值化的图片,之后就用这二值化的图片来检测轮廓了。至于为什么使用二值化的图片呢,因为彩色图、灰度图的图片都包含了其他复杂的信息,这些不相关信息,也就是噪点就可能会对识别造成影响。
def img_process(path):
    img = cv2.imread(path)
    img = cv2.resize(img, (640, 480))
    img_gas = cv2.GaussianBlur(img, (3, 3), 1)

    img_b = cv2.split(img_gas)[0]
    img_r = cv2.split(img_gas)[2]

    img_gray = cv2.cvtColor(img_gas, cv2.COLOR_BGR2GRAY)
    img_hsv = cv2.cvtColor(img_gas, cv2.COLOR_BGR2HSV)
    return img, img_b, img_r, img_gray, img_hsv


def preIdentification(img, img_gray, img_hsv, img_b, img_r):
    for i in range(img.shape[0]):
        for j in range(img.shape[1]):
            # 普通蓝色车牌,同时排除透明反光物质的干扰
            if ((img_hsv[:, :, 0][i, j] - 115) ** 2 < 15 ** 2) and (img_b[i, j] > 70) and (img_r[i, j] < 40):
                img_gray[i, j] = 255
            else:
                img_gray[i, j] = 0
    # 定义核
    kernel_small = np.ones((3, 3))
    kernel_big = np.ones((7, 7))

    img_gray = cv2.GaussianBlur(img_gray, (3, 3), 1)
    img_di = cv2.dilate(img_gray, kernel_small, iterations=5)
    img_close = cv2.morphologyEx(img_di, cv2.MORPH_CLOSE, kernel_big)
    img_close = cv2.GaussianBlur(img_close, (5, 5), 0)
    _, img_bin = cv2.threshold(img_close, 100, 255, cv2.THRESH_BINARY)

    return img_bin
高斯模糊以及其他的形态学操作
-
高斯模糊
高斯模糊可以处理单通道的图片,也可以处理多个通道的图片如彩色图,但是处理彩色图的时候只能分别处理其中一个通道。其实高斯卷积核的算子是可以分离的,所以对图像进行高斯平滑的时候,可以先进行一维水平方向上进行处理,再对其垂直方向进行处理,或者反过来。随着高斯平滑参数中的卷积核、标准差的增大,平滑的效果也越来越明显。当参数大到一定程度,就只能显示物体大概的轮廓了。 -
腐蚀
在进行腐蚀、膨胀这些形态学操作的时候,我们经常会看到先定义结构元,也就是getStructingElement这个函数。其中可以是椭圆型结构,也可以是矩形,十字型,之后根据不同的形状对这些区域内的像素进行运算。腐蚀操作就是缩小亮度区域的面积,随着结构元尺寸地增大,较暗的区域面积也逐渐增大,并且处理后可以隐约看出结构元的形状,椭圆型、矩形或者十字型。 -
膨胀
和腐蚀的原理差不多,只不过膨胀是与腐蚀相反,缩小较暗的区域,增大较亮的区域。 -
闭运算与开运算
腐蚀与膨胀是进行开闭运算的基础。闭运算具有填充白色区域内夹杂细小黑洞的区域,可以连接临近的物体,可以实现不明显改变区域面积的时候,来平滑其边界。闭运算是先进行膨胀,再进行腐蚀。而开运算则相反,先进行腐蚀,再进行膨胀。它是消除亮度较高的小区域,可以分离相连的物体。
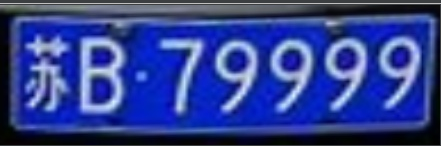
投影变换
检测出车牌矩形的外轮廓后,可以获得外轮廓的最小外接矩形的四个点。识别出来四个点后,我们就只需要保留这四个点组成区域,也就是我们常说的感兴趣的区域,英文上叫做ROI。我们拍摄出的图片很可能不是完完全全地处于水平方向,那么这里就需要进行纠正了,也就是使用投影变换。投影变换的原理就是使用一个矩阵,与之前的坐标进行运算,就可以了。相当于,在这个基准的坐标系中,这个矩形不是水平方向的,那么经过变换后处于另外一个基准坐标系里,就成为了水平方向。
# 定位
def fix_position(img, img_bin):
    contours, _ = cv2.findContours(img_bin, cv2.RETR_LIST, cv2.CHAIN_APPROX_SIMPLE)
    # 形状及大小筛选校验
    det_x_max = 0
    det_y_max = 0
    num = 0
    for i in range(len(contours)):
        x_min = np.min(contours[i][:, :, 0])
        x_max = np.max(contours[i][:, :, 0])
        y_min = np.min(contours[i][:, :, 1])
        y_max = np.max(contours[i][:, :, 1])
        det_x = x_max - x_min
        det_y = y_max - y_min
        if (det_x / det_y > 1.8) and (det_x > det_x_max) and (det_y > det_y_max):
            det_y_max = det_y
            det_x_max = det_x
            num = i

    # 获取最可疑区域轮廓点集
    points = np.array(contours[num][:, 0])
    return points

def find_vertices(points):
    # 获取最小外接矩阵,中心点坐标,宽高,旋转角度
    rect = cv2.minAreaRect(points)
    box = cv2.boxPoints(rect)
    # 因为四个顶点是浮点型的,所以这里要取整
    box = np.int0(box)

    left_point_x = np.min(box[:, 0])
    right_point_x = np.max(box[:, 0])
    top_point_y = np.min(box[:, 1])
    bottom_point_y = np.max(box[:, 1])

    left_point_y = box[:, 1][np.where(box[:, 0] == left_point_x)][0]
    right_point_y = box[:, 1][np.where(box[:, 0] == right_point_x)][0]
    top_point_x = box[:, 0][np.where(box[:, 1] == top_point_y)][0]
    bottom_point_x = box[:, 0][np.where(box[:, 1] == bottom_point_y)][0]

    vertices = np.array([[top_point_x, top_point_y], [bottom_point_x, bottom_point_y], [left_point_x, left_point_y],
                         [right_point_x, right_point_y]])
    return vertices, rect


def correction(vertices, rect):
    # 畸变情况1
    if rect[2] > -45:
        new_right_point_x = vertices[0, 0]
        new_right_point_y = int(
            vertices[1, 1] - (vertices[0, 0] - vertices[1, 0]) / (vertices[3, 0] - vertices[1, 0]) * (
                        vertices[1, 1] - vertices[3, 1]))
        new_left_point_x = vertices[1, 0]
        new_left_point_y = int(
            vertices[0, 1] + (vertices[0, 0] - vertices[1, 0]) / (vertices[0, 0] - vertices[2, 0]) * (
                        vertices[2, 1] - vertices[0, 1]))

        point_set_1 = np.float32([[440, 0], [0, 0], [0, 140], [440, 140]])
    # 畸变情况2
    elif rect[2] < -45:
        new_right_point_x = vertices[1, 0]
        new_right_point_y = int(
            vertices[0, 1] + (vertices[1, 0] - vertices[0, 0]) / (vertices[3, 0] - vertices[0, 0]) * (
                        vertices[3, 1] - vertices[0, 1]))
        new_left_point_x = vertices[0, 0]
        new_left_point_y = int(
            vertices[1, 1] - (vertices[1, 0] - vertices[0, 0]) / (vertices[1, 0] - vertices[2, 0]) * (
                        vertices[1, 1] - vertices[2, 1]))

        point_set_1 = np.float32([[0, 0], [0, 140], [440, 140], [440, 0]])

    new_box = np.array(
        [(vertices[0, 0], vertices[0, 1]), (new_left_point_x, new_left_point_y), (vertices[1, 0], vertices[1, 1]),
         (new_right_point_x, new_right_point_y)])
    point_set_0 = np.float32(new_box)
    return point_set_0, point_set_1, new_box


def transform(img, point_set_0, point_set_1):
    # 变换矩阵
    mat = cv2.getPerspectiveTransform(point_set_0, point_set_1)
    # 投影变换
    lic = cv2.warpPerspective(img, mat, (440, 140))
    return lic
投影变换的原理
因为摄像头拍摄的画面是在二维平面展示的,而车牌实际上是在三维空间中,所以这里就涉及到了二维平面与三维空间的转换。这里的转换就是依靠一个变换矩阵来实现,该矩阵是三维的(x,y,z),而不同于投影变换的仿射变换是在二维空间中进行变换,所以其变换矩阵是二维的。
投影变换可以使位于二维平面的物体在三维空间内进行平移、旋转,经过变换后就对其最小外接矩形进行纠正,并且变换后可以保持线与线之间的平行性。
完整代码
import cv2
import numpy as np
import time


# 预处理
def img_process(path):
    img = cv2.imread(path)
    # 统一规定大小
    img = cv2.resize(img, (640, 480))
    # 高斯模糊
    img_gas = cv2.GaussianBlur(img, (3, 3), 1)
    # RGB通道分离
    img_b = cv2.split(img_gas)[0]
    img_r = cv2.split(img_gas)[2]
    # 读取灰度图和HSV空间图
    img_gray = cv2.cvtColor(img_gas, cv2.COLOR_BGR2GRAY)
    img_hsv = cv2.cvtColor(img_gas, cv2.COLOR_BGR2HSV)
    return img, img_b, img_r, img_gray, img_hsv


# 初步识别
def preIdentification(img, img_gray, img_hsv, img_b, img_r):
    for i in range(img.shape[0]):
        for j in range(img.shape[1]):
            # 普通蓝色车牌,同时排除透明反光物质的干扰
            if ((img_hsv[:, :, 0][i, j] - 115) ** 2 < 15 ** 2) and (img_b[i, j] > 70) and (img_r[i, j] < 40):
                img_gray[i, j] = 255
            else:
                img_gray[i, j] = 0
    # 定义核
    kernel_small = np.ones((3, 3))
    kernel_big = np.ones((7, 7))

    img_gray = cv2.GaussianBlur(img_gray, (3, 3), 1)  # 高斯平滑
    img_di = cv2.dilate(img_gray, kernel_small, iterations=5)  # 腐蚀5次
    img_close = cv2.morphologyEx(img_di, cv2.MORPH_CLOSE, kernel_big)  # 闭操作
    img_close = cv2.GaussianBlur(img_close, (5, 5), 0)  # 高斯平滑
    _, img_bin = cv2.threshold(img_close, 100, 255, cv2.THRESH_BINARY)  # 二值化

    return img_bin


# 定位
def fix_position(img, img_bin):
    # 检测所有外轮廓,只留矩形的四个顶点
    contours, _ = cv2.findContours(img_bin, cv2.RETR_LIST, cv2.CHAIN_APPROX_SIMPLE)
    # 形状及大小筛选校验
    det_x_max = 0
    det_y_max = 0
    num = 0
    for i in range(len(contours)):
        x_min = np.min(contours[i][:, :, 0])
        x_max = np.max(contours[i][:, :, 0])
        y_min = np.min(contours[i][:, :, 1])
        y_max = np.max(contours[i][:, :, 1])
        det_x = x_max - x_min
        det_y = y_max - y_min
        if (det_x / det_y > 1.8) and (det_x > det_x_max) and (det_y > det_y_max):
            det_y_max = det_y
            det_x_max = det_x
            num = i
    # 获取最可疑区域轮廓点集
    points = np.array(contours[num][:, 0])
    return points


def find_vertices(points):
    # 获取最小外接矩阵,中心点坐标,宽高,旋转角度
    rect = cv2.minAreaRect(points)
    # 获取矩形四个顶点,浮点型
    box = cv2.boxPoints(rect)
    # 取整
    box = np.int0(box)
    # 获取四个顶点坐标
    left_point_x = np.min(box[:, 0])
    right_point_x = np.max(box[:, 0])
    top_point_y = np.min(box[:, 1])
    bottom_point_y = np.max(box[:, 1])

    left_point_y = box[:, 1][np.where(box[:, 0] == left_point_x)][0]
    right_point_y = box[:, 1][np.where(box[:, 0] == right_point_x)][0]
    top_point_x = box[:, 0][np.where(box[:, 1] == top_point_y)][0]
    bottom_point_x = box[:, 0][np.where(box[:, 1] == bottom_point_y)][0]
    # 上下左右四个点坐标
    vertices = np.array([[top_point_x, top_point_y], [bottom_point_x, bottom_point_y], [left_point_x, left_point_y],
                         [right_point_x, right_point_y]])
    return vertices, rect


def correction(vertices, rect):
    # 畸变情况1
    if rect[2] > -45:
        new_right_point_x = vertices[0, 0]
        new_right_point_y = int(
            vertices[1, 1] - (vertices[0, 0] - vertices[1, 0]) / (vertices[3, 0] - vertices[1, 0]) * (
                        vertices[1, 1] - vertices[3, 1]))
        new_left_point_x = vertices[1, 0]
        new_left_point_y = int(
            vertices[0, 1] + (vertices[0, 0] - vertices[1, 0]) / (vertices[0, 0] - vertices[2, 0]) * (
                        vertices[2, 1] - vertices[0, 1]))
        # 校正后的四个顶点坐标
        point_set_1 = np.float32([[440, 0], [0, 0], [0, 140], [440, 140]])
    # 畸变情况2
    elif rect[2] < -45:
        new_right_point_x = vertices[1, 0]
        new_right_point_y = int(
            vertices[0, 1] + (vertices[1, 0] - vertices[0, 0]) / (vertices[3, 0] - vertices[0, 0]) * (
                        vertices[3, 1] - vertices[0, 1]))
        new_left_point_x = vertices[0, 0]
        new_left_point_y = int(
            vertices[1, 1] - (vertices[1, 0] - vertices[0, 0]) / (vertices[1, 0] - vertices[2, 0]) * (
                        vertices[1, 1] - vertices[2, 1]))
        # 校正后的四个顶点坐标
        point_set_1 = np.float32([[0, 0], [0, 140], [440, 140], [440, 0]])

    # 校正前平行四边形四个顶点坐标
    new_box = np.array(
        [(vertices[0, 0], vertices[0, 1]), (new_left_point_x, new_left_point_y), (vertices[1, 0], vertices[1, 1]),
         (new_right_point_x, new_right_point_y)])
    point_set_0 = np.float32(new_box)
    return point_set_0, point_set_1, new_box


def transform(img, point_set_0, point_set_1):
    # 变换矩阵
    mat = cv2.getPerspectiveTransform(point_set_0, point_set_1)
    # 投影变换
    lic = cv2.warpPerspective(img, mat, (440, 140))
    return lic


def main():
    start = time.time()
    path = 'OIP.jpg'
    # 图像预处理
    img, img_b, img_r, img_gray, img_hsv = img_process(path)
    # 初步识别
    img_bin = preIdentification(img, img_gray, img_hsv, img_b, img_r)
    points = fix_position(img, img_bin)
    vertices, rect = find_vertices(points)
    point_set_0, point_set_1, new_box = correction(vertices, rect)
    img_draw = cv2.drawContours(img.copy(), [new_box], -1, (0, 0, 255), 3)
    lic = transform(img, point_set_0, point_set_1)
    print(time.time() - start)


if __name__ == '__main__':
    main()
完成后的效果图


 被折叠的 条评论
为什么被折叠?
被折叠的 条评论
为什么被折叠?
 到【灌水乐园】发言


