


目录
Apache的unbuntu20.4安装之前的文章已经写过,读者可自行翻阅,下面主要介绍部署node.
1.安装Node
apt install nodejs npm2.开启Apache反向代理必须模块
a2enmod proxy proxy_http rewrite headers expires3.创建开启反向代理配置文件
配置文件命令:
cd /etc/apache2/sites-available
vim nodeExample.conf
nodeExample.conf内容
 <VirtualHost *:80>
    ServerName zouzouzou.com
    ServerAlias www.zouzouzou.com

    ProxyRequests Off
    ProxyPreserveHost On
    ProxyVia Full

    <Proxy *>
        Require all granted
    </Proxy>
    ProxyPass / http://127.0.0.1:3000/
    ProxyPassReverse / http://127.0.0.1:30000/
    #ProxyPass / http://127.0.0.1:3000/dist/index.html
    #ProxyPassReverse / http://127.0.0.1:30000/dist/index.html
</VirtualHost>
开启配置命令
a2dissite 000-default
a2ensite nodeExample.conf
systemctl reload apache2
4.运行node,开启端口
创建nodeRun.js
vim /var/www/html/nodeTest/nodeRun.jsnodeRun.js内容
const http = require("http");
const fs = require("fs");
const url = require("url");

const hostname = "localhost";
const port = 3000;

// 创建服务器
const server = http.createServer(function (request, response) {
  // 解析请求,包括文件名
  const pathname = url.parse(request.url).pathname;

  // 输出请求的文件名
  console.log("Request for " + pathname + " received.");

  // 从文件系统中读取请求的文件内容
  fs.readFile(pathname.substr(1), function (err, data) {
    if (err) {
      console.log(err);
      // HTTP 状态码: 404 : NOT FOUND
      // Content Type: text/html
      response.writeHead(404, { "Content-Type": "text/html" });
    } else {
  // HTTP 状态码: 200 : OK
      // Content Type: text/html
      response.writeHead(200, { "Content-Type": "text/html" });

      // 响应文件内容
      response.write(data);
    }
    //  发送响应数据
    response.end();
  });
});


server.listen(port, hostname, () => {
  console.log(`Server running at http://${hostname}:${port}/`);
});
在/var/www/html/nodeTest目录下创建index.html(也可以是你打包出的项目),并node运行nodeRun.js
node nodeRun.js至此,你可通过浏览器访问(你的公网IP/yourWebName.html)了。
——————————————华丽的分割线————————————————
5.PM2
这是Node.js应用程序的流程管理器。PM2可以监听应用程序,以便它们作为服务在后台运行。
安装
npm install pm2@latest -g开启
pm2 start nodeRun.jsoutput:
┌────┬────────────────────┬──────────┬──────┬───────────┬──────────┬──────────┐
│ id │ name │ mode │ ↺ │ status │ cpu │ memory │
├────┼────────────────────┼──────────┼──────┼───────────┼──────────┼──────────┤
│ 0 │ nodeRun │ fork │ 0 │ online │ 0% │ 45.1mb │
└────┴────────────────────┴──────────┴──────┴───────────┴──────────┴──────────┘
如上所述,PM2自动分配一个App name(基于文件名,不带.js扩展名)和一个PM2 id。PM2还维护其他信息,例如PID进程的状态,其当前状态和内存使用情况。
PM2子命令
使用以下命令停止应用程序(指定PM2App name或id)
pm2 stop app_name_or_id重新启动应用程序:
pm2 restart app_name_or_id列出当前由PM2管理的应用程序:
pm2 list使用以下命令获取有关特定应用程序的信息App name
pm2 info app_name可以使用monit子命令拉起PM2过程监视器。这将显示应用程序状态,CPU和内存使用情况
pm2 monitPM2的一些额外配置(官网转译)
如果PM2下运行的应用程序崩溃或被杀死,它将自动重新启动,但是我们可以采取额外的步骤,使该应用程序使用startup子命令在系统启动时启动。此子命令生成并配置启动脚本,以在服务器启动时启动PM2及其托管进程:
pm2 startup systemd
结果输出的最后一行将包含一个以超级用户特权运行的命令,以便将PM2设置为在启动时启动:
Output
[PM2] Init System found: systemd sammy [PM2] To setup the Startup Script, copy/paste the following command: sudo env PATH=$PATH:/usr/bin /usr/lib/node_modules/pm2/bin/pm2 startup systemd -u sammy --hp /home/sammy
从输出中运行命令,并使用您的用户名代替sammy:
sudo env PATH=$PATH:/usr/bin /usr/lib/node_modules/pm2/bin/pm2 startup systemd -u sammy --hp /home/sammy
作为额外的步骤,我们可以保存PM2流程列表和相应的环境:
pm2 save
现在,您已经创建了一个systemd单元,该单元pm2在引导时为您的用户运行。pm2反过来,此实例运行hello.js。
通过以下方式启动服务systemctl:
sudo systemctl start pm2-sammy
如果此时遇到错误,则可能需要重新启动,这可以通过完成sudo reboot。
检查系统单元的状态:
systemctl status pm2-sammy
6.apache2多端口发布
1.在/etc/apache2/ports.conf增加:
Listen 你即将监听的端口
2.在你将配置的site.conf增加:
<VirtualHost *:你即将监听的端口>
# ServerName zouzouzou.com
# ServerAlias www.zouzouzou.com
ServerAdmin webmaster@localhost
DocumentRoot /var/www/html/nodeTest
</VirtualHost>
3.重新覆盖配置,并重新启动apache
4.可以事先检查一下防火墙
ufw status
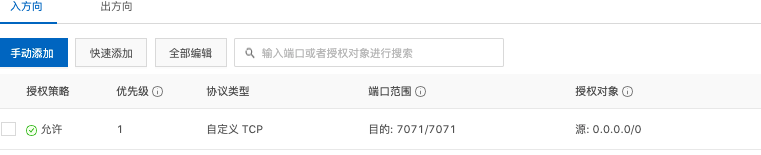
5.IP访问端口,记得查看是否添加端口号到安全策略中(如果是阿里云就是安全组中)
如图添加7071端口
7.开启json GZIP压缩
cd /etc/apache2/mods-enabled
code code deflate.conf
deflate.conf添加
# 支持json gzip压缩
AddOutputFilterByType DEFLATE application/json
重启
systemctl restart apache2.service


 846
846


 被折叠的 条评论
为什么被折叠?
被折叠的 条评论
为什么被折叠?
 到【灌水乐园】发言


