


一、lua脚本调用
旧版本的wireshark需要手动引入,而新的会自动加载。
先找到wireshark的安装目录: 帮助–>关于Wireshark –>文件夹 可以查看所有的路径,重新加载各种lua脚本快捷键是: ctrl+shift+L
自动加载:
将自定义的lua脚本放到 xxx \ Wireshark \ plugins 下
手动加载:
在安装目录下找到 init.lua文件,这是脚本的入口。在文件的最后引入你的文件

二、创建解析自定义数据的lua脚本
主要分为四个部分:
1、创建解析器对象
2、声明协议字段
3、定义解释器函数
4、把解析器注册到Wireshark解析表
完整脚本如下:
–[[
11.6.7.2. ProtoField.uint8(abbr, [name], [base], [valuestring], [mask], [desc])
Creates a ProtoField of an unsigned 8-bit integer (i.e., a byte).
Arguments
abbr
Abbreviated name of the field (the string used in filters).
name (optional)
Actual name of the field (the string that appears in the tree).
base (optional)
One of base.DEC, base.HEX or base.OCT.
valuestring (optional)
A table containing the text that corresponds to the values.
mask (optional)
Integer mask of this field.
desc (optional)
Description of the field.
Returns
A ProtoField object to be added to a table set to the Proto.fields attribute.
]]
–[[
0000 00 00 5e 01 01 01 00 24 ac ff fc 02 08 00 45 00
0010 00 48 00 00 00 00 01 11 d6 dc 01 01 01 01 e0 00
0020 00 c7 2d 1e 27 10 00 34 5e 65 01 00 1c 00 00 00
0030 00 00 00 00 00 00 00 00 00 00 01 00 00 24 ac ff
0040 fc 02 fa 00 00 00 00 00 00 00 00 00 00 00 5b 01
0050 4e 00 00 00 00 00
udp头后面是shrp头(16字节,4个u32)
u32 vesion:16:    01 00

     length:16; 1c 00

u32 module:16,  00 00

    msg_type:16;  00 00

u32 seq_id;         00 00 00 00

u32 err_id;          00 00 00 00
shrp头后面是数据(28字节)
u16 status:8,     01

    nextheader:8; 00

u8    mac[6];       (本机心跳口mac)  00 24 ac ff   fc 02

s32 priority;       优先级fa  fa 00 00 00

s32 interval;      00 00 00 00

s32 hold_time;  00 00 00 00

s32 jiffies;         5b 01   4e 00

s32 switch_state;  00 00 00 00 00
]]
第一步:定义一个新协议
local NAME = “heartbeatProto”
local heartbeatProto = Proto(NAME, “hotb PROTOCOL”)
第二步: 声明协议的字段
vesion = ProtoField.uint16(NAME … “vesion”, “vesion”, base.HEX)
length = ProtoField.uint16(NAME … “length”, “length”, base.HEX)
module = ProtoField.uint16(NAME … “module”, “module”, base.HEX)
msg_type = ProtoField.uint16(NAME … “msg_type”, “msg_type”, base.HEX)
seq_id = ProtoField.uint32(NAME … “seq_id”, “seq_id”, base.DEC)
err_id = ProtoField.uint32(NAME … “err_id”, “err_id”, base.DEC)
status = ProtoField.uint8(NAME … “status”, “status”, base.DEC)
nextheader = ProtoField.uint8(NAME … “nextheader”, “nextheader”, base.DEC)
mac = ProtoField.ether(NAME … “mac”, “mac”)
priority = ProtoField.uint32(NAME … “priority”, “priority”, base.HEX_DEC)
interval = ProtoField.uint32(NAME … “interval”, “interval”, base.DEC)
hold_time = ProtoField.uint32(NAME … “hold_time”, “hold_time”, base.DEC)
jiffies = ProtoField.uint32(NAME … “jiffies”, “jiffies”, base.DEC)
switch_state = ProtoField.uint32(NAME … “switch_state”, “switch_state”, base.DEC)
heartbeatProto.fields = { vesion,length ,module,msg_type,seq_id,err_id,status,nextheader,mac,priority,interval,hold_time,jiffies,switch_state}
–local data_dis = Dissector.get(“data”)
– 解析器函数
–[[
下面定义VniProto解析器的主函数,这个函数由wireshark调用
第一个参数是 tvb 类型,表示的是需要此解析器解析的数据;
第二个参数是 Pinfo 类型,是协议解析树上的信息,包括 UI 上的显示;
第三个参数是 TreeItem 类型,表示上一级解析树;
–]]
第三步:定义解释器函数
function heartbeatProto.dissector(buffer, pinfo, tree)
if buffer:len() == 0 then return end
pinfo.cols.protocol = heartbeatProto.name --显示在wireshark界面的protocol列的名字
local subtree = tree:add(heartbeatProto, buffer(), "heartbeat Proto") --显示在数据查看

-- 把udp的负载数据解析成两个分支在wireshark上显示,分别是shrp和payload
local shrp = subtree:add(heartbeatProto, buffer(0,16), "shrp Proto")
local payload = subtree:add(heartbeatProto, buffer(16,28), "payload Proto")

      --id_tree:append_text(", id: 0x" .. buffer(0,4))
	  shrp:add(vesion, buffer(0,2))--字段信息添加到shrp分支
	  shrp:add(length, buffer(2,2))
	  shrp:add(module, buffer(4,2))
	  shrp:add(msg_type, buffer(6,2))
	  shrp:add(seq_id, buffer(8,4))
	  shrp:add(err_id, buffer(12,4))
	  payload:add(status, buffer(16,1))---字段信息添加到payload分支
	  payload:add(nextheader, buffer(17,1))
	  payload:add(mac, buffer(18,6))
	  payload:add_le(priority, buffer(24,4))--little-endian,从0位置解析4个字节;big endian use add.
	  payload:add(interval, buffer(28,4))
	  payload:add(hold_time, buffer(32,4))
	  payload:add(jiffies, buffer(36,4))
	  payload:add(switch_state, buffer(40,4))
--subtree:add(fields.seq, buffer(4, 2)):append_text(" (0x"..buffer(4,2)..")")

--local raw_data = buffer(6, buffer:len() - 6)
--Dissector.get("ip"):call(raw_data:tvb(), pinfo, tree)
-- 后续内容交给ip解析器继续解析,这里只进行vni头部解析
end
第四步:把解析器注册到Wireshark解析表
local udp_encap_table = DissectorTable.get(“udp.port”)
udp_encap_table:add(10000,heartbeatProto)
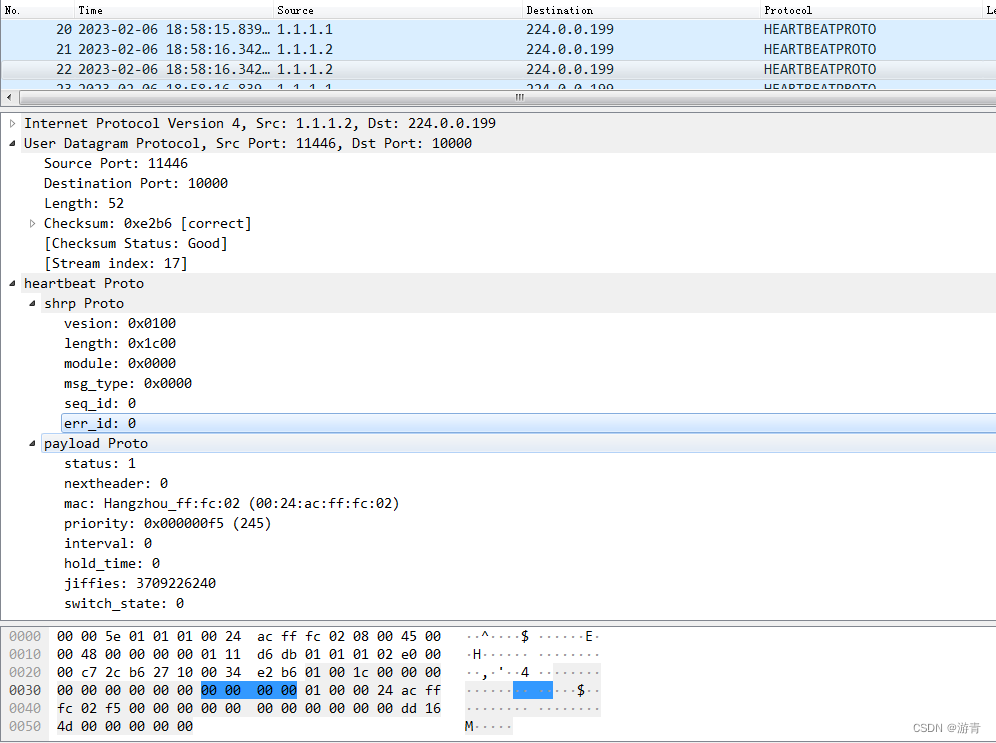
解析后效果如下图:
了解更多信息请参考:
https://www.wireshark.org/docs/wsdg_html_chunked/wsluarm.html
https://mika-s.github.io/wireshark/lua/dissector/2017/11/04/creating-a-wireshark-dissector-in-lua-1.html


 4625
4625


 被折叠的 条评论
为什么被折叠?
被折叠的 条评论
为什么被折叠?
 到【灌水乐园】发言


