一、项目准备工作
1、什么是在线OJ
Online Judge系统(简称OJ)是一个在线的判题系统。用户可以在线提交程序源代码,系统对源代码进行编译和执行,并通过预先设计的测试用例来检验程序源代码的正确性。
2、所用技术
- C++ STL标准库。
- cpp-httplib第三方开源网络库。
- ctemplate第三方开源前端网页渲染库。
- jsoncpp第三方开源序列化、反序列化库。
- Boost准标准库(字符串切割)。
- 均衡负载设计。
- 多进程、多线程。
- Ace前端在线编辑器(了解)。
- html/css/js/jquery/ajax(了解)。
3、开发环境
- Ubuntu。
- vscode。
4、项目宏观结构
项目的核心是三个模块:
- comm:公共模块,存放一些各个模块都可能使用的工具。
- compile_server:编译与运行模块,负责将用户提交的代码编译与运行。
- oj_server:获取题目列表,查看题目与编写题目,负载均衡等功能模块。
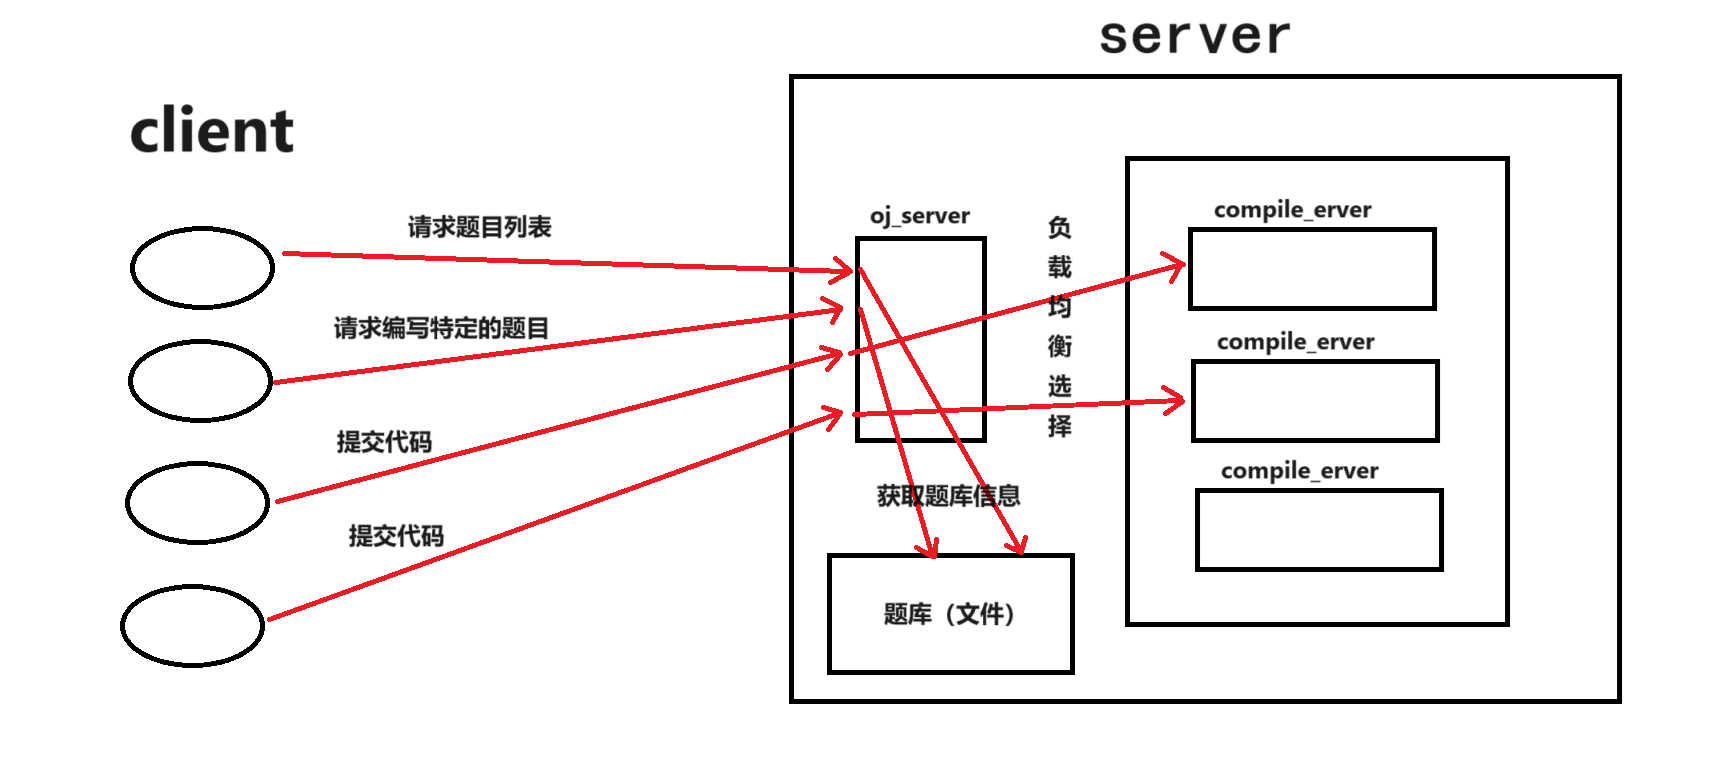
5、编写思路
- 先编写compile_server。
- 再编写oj_server。
- 前端页面设计。
二、编写compile_server模块
compile_server也可以分为三个部分来写:
- compiler.hpp:仅负责代码的编译。
- runner.hpp:仅负责代码的运行。
- compile_run.hpp:整合编译与运行模块。

1、实现compiler.hpp
现在假设我们已经拿到源文件了,要如何对源文件进行编译呢?
可以用进程替换,将子进程替换为g++来编译源文件。
编译源文件是有可能会出错的,我们希望能够把出错的信息反馈给用户,因此,我们需要把编译错误的信息保存到文件里,如何实现呢?
可以用文件描述符重定向,编译错误的信息本来是打印到标准错误文件(屏幕),我们可以用重定向让信息打印到指定的文件中。
compiler.hpp中的编译功能大致结构如下
//compiler.hpp
#pragma ocne
//只负责代码编译
namespace ns_compiler
{
    using namespace ns_util;
    using namespace ns_log;
    class Compiler
    {
    public:
        Compiler(){}
        ~Compiler(){}
        //file_name就是要编译的文件名,不包含前驱路径和后缀
        //大致思路就是创建子进程,让子进程程序替换,编译代码,父进程等待子进程
        static bool Compile(const std::string& file_name)//编译功能
        {}
    };
}- 1.
- 2.
- 3.
- 4.
- 5.
- 6.
- 7.
- 8.
- 9.
- 10.
- 11.
- 12.
- 13.
- 14.
- 15.
- 16.
- 17.
- 18.
Compile中需要传入参数file_name,这个参数是文件名称,这个文件名称是没有前驱路径与后缀的。
例如Test/abc/code.cpp,传入的file_name就是code。
因为只知道文件名称,我们需要一个固定位置的文件夹来存放这些文件。
要编译的源文件、编译后生成的可执行程序、编译失败后生成的错误信息文件都会放在这个文件夹里,同一份代码生成的各种文件同名但是不同后缀。
例如code.cpp,code.exe,code.compile_err。
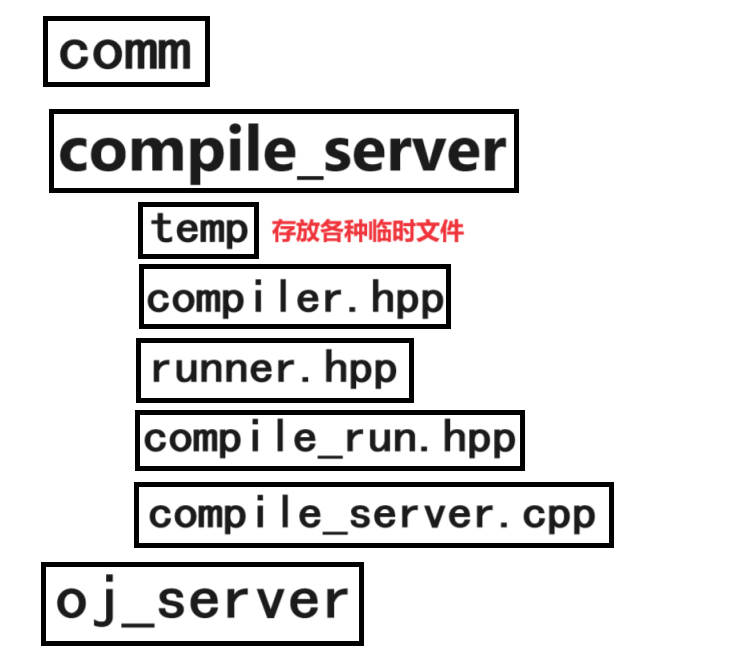
我们在实际编写代码过程中,需要依靠文件名称来拼接出各种类型文件的路径,所以写一个路径工具方便后面使用
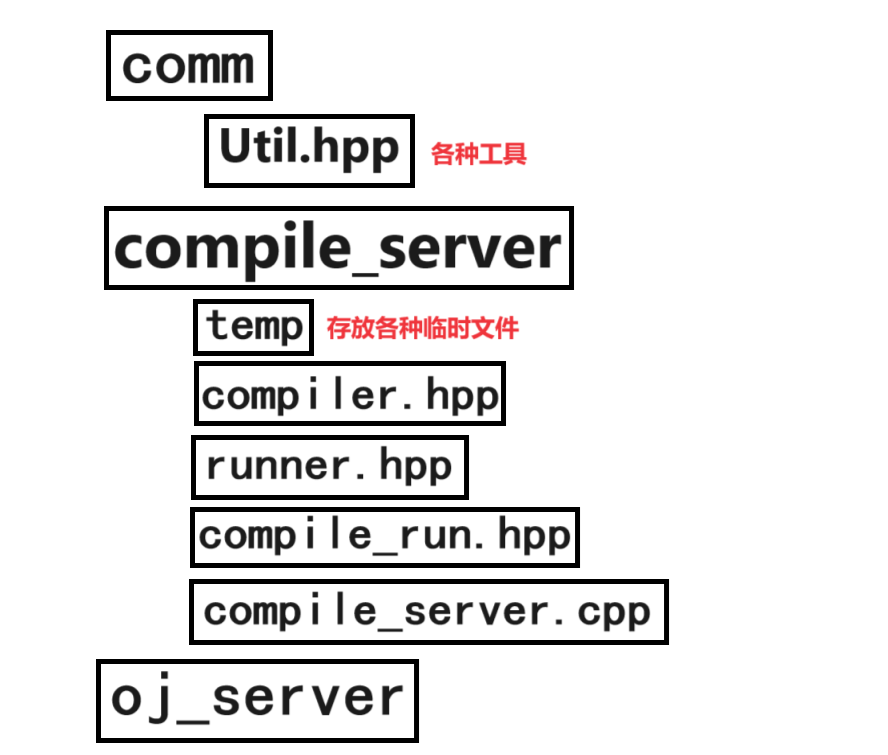
//Util.hpp
namespace ns_util
{
    std::string TempPath="./temp/";//临时文件存放路径
    class PathUtil//路径工具
    {
    public:
        //编译过程中需要用到的路径拼接
        static std::string Src(const std::string& file_name)//获取源文件路径
        {
            return SplicingPath(file_name,".cpp");
        }
        static std::string Exe(const std::string& file_name)//获取可执行程序路径
        {
            return SplicingPath(file_name,".exe");
        }
        static std::string Compile_err(const std::string& file_name)//获取编译错误文件路径
        {
            return SplicingPath(file_name,".compile_err");
        }
    private:
        static std::string SplicingPath(const std::string& file_name,const std::string& suffix)//拼接路径
        {
            //临时文件路径+文件名+后缀
            std::string path=TempPath;
            path+=file_name;
            path+=suffix;
            return path;
        }
    };
}- 1.
- 2.
- 3.
- 4.
- 5.
- 6.
- 7.
- 8.
- 9.
- 10.
- 11.
- 12.
- 13.
- 14.
- 15.
- 16.
- 17.
- 18.
- 19.
- 20.
- 21.
- 22.
- 23.
- 24.
- 25.
- 26.
- 27.
- 28.
- 29.
- 30.
- 31.
目前我们只需要拼接三种文件路径,分别是源文件(.cpp)、可执行程序(.exe)、编译错误文件(.compile_err)。
我们最后判断编译是否成功的依据就是是否生成了可执行程序,所以再添加一个文件工具:
现在就可以编写完整的编译功能了:
//compiler.hpp
#pragma ocne
//只负责代码编译
namespace ns_compiler
{
    using namespace ns_util;
    using namespace ns_log;
    class Compiler
    {
    public:
        Compiler(){}
        ~Compiler(){}
        //file_name就是要编译的文件名,不包含前驱路径和后缀
        //大致思路就是创建子进程,让子进程程序替换,编译代码,父进程等待子进程
        static bool Compile(const std::string& file_name)//编译功能
        {
            int rid=fork();
            if(rid<0)
            {
                return false;
            }
            else if(rid==0)//子进程
            {
                //打开错误文件,如果没有就创建
                umask(0);//小细节
                int errfd=open(PathUtil::Compile_err(file_name).c_str(),O_CREAT|O_WRONLY,0644);
                if(errfd<0)
                {
                    exit(1);
                }
                //重定向,让错误信息打印到错误文件里
                int n=dup2(errfd,2);
                if(n<0)
                {
                    exit(1);
                }
                //g++ -o target src -std=c++11
                //进行进程替换
                //g++ -o code.exe code.cpp -std=c++11 -D COMPILER_ONLINE
                execlp("g++","g++","-o",PathUtil::Exe(file_name).c_str(),
                PathUtil::Src(file_name).c_str(),"-std=c++11","-D","COMPILER_ONLINE",nullptr);
                //为什么要有-D COMPILER_ONLINE,后面讲原因
                exit(0);
            }
            else//父进程
            {
                waitpid(rid,nullptr,0);//等待子进程
                //如何判断源文件是否编译成功?看是否生成了对应的可执行程序即可
                if(FileUtil::TheFileExists(PathUtil::Exe(file_name)))
                {
                    return true;
                }
            }
            return false;
        }
    };
}- 1.
- 2.
- 3.
- 4.
- 5.
- 6.
- 7.
- 8.
- 9.
- 10.
- 11.
- 12.
- 13.
- 14.
- 15.
- 16.
- 17.
- 18.
- 19.
- 20.
- 21.
- 22.
- 23.
- 24.
- 25.
- 26.
- 27.
- 28.
- 29.
- 30.
- 31.
- 32.
- 33.
- 34.
- 35.
- 36.
- 37.
- 38.
- 39.
- 40.
- 41.
- 42.
- 43.
- 44.
- 45.
- 46.
- 47.
- 48.
- 49.
- 50.
- 51.
- 52.
- 53.
- 54.
- 55.
- 56.
- 57.
2、实现Log.hpp
在代码的运行运行过程中,为了方便我们了解代码运行的状况,日志功能是不可缺少的。
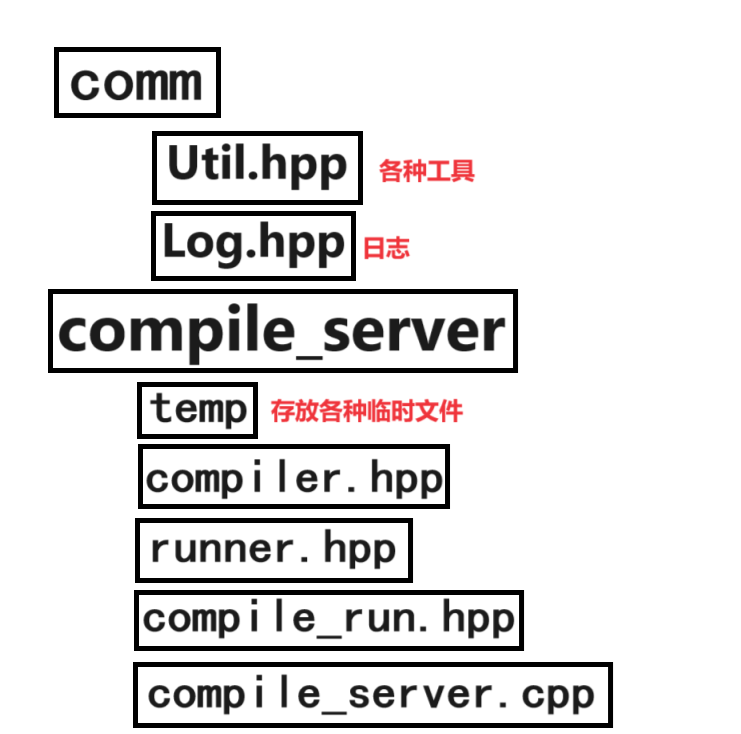
//Log.hpp
#pragma once
//日志
namespace ns_log
{
    using namespace ns_util;
    enum//日志等级
    {
        Info,
        Debug,
        Warning,
        Error,
        Fatal
    };
    //LOG() << "Message"
    inline std::ostream& Log(const std::string& level,const std::string& file,int line)
    {
        //添加日志等级
        std::string message="[";
        message+=level;
        message+="]";
        //添加出错的文件
        message+="[";
        message+=file;
        message+="]";
        //添加出错的行数
        message+="[";
        message+=std::to_string(line);
        message+="]";
        //添加时间戳
        message+="[";
        message+=TimeUtil::GetTimeStamp();
        message+="]";

        std::cout<<message;
        return std::cout;
    }
    //开放式日志
    #define LOG(level) Log(#level,__FILE__,__LINE__)
}- 1.
- 2.
- 3.
- 4.
- 5.
- 6.
- 7.
- 8.
- 9.
- 10.
- 11.
- 12.
- 13.
- 14.
- 15.
- 16.
- 17.
- 18.
- 19.
- 20.
- 21.
- 22.
- 23.
- 24.
- 25.
- 26.
- 27.
- 28.
- 29.
- 30.
- 31.
- 32.
- 33.
- 34.
- 35.
- 36.
- 37.
- 38.
- 39.
- 40.
日志功能中需要用到时间戳,所以添加一个时间工具:
//Util.hpp
class TimeUtil // 时间工具
{
public:
    static std::string GetTimeStamp() // 获取时间戳(秒级)
    {
        struct timeval tv;
        gettimeofday(&tv, nullptr);
        return std::to_string(tv.tv_sec);
    }
    static std::string GetTimeMStamp() // 获取时间戳(毫秒级)
    {
        struct timeval tv;
        gettimeofday(&tv, nullptr);
        return std::to_string(tv.tv_sec * 1000 + tv.tv_usec / 1000);
    }
private:
};- 1.
- 2.
- 3.
- 4.
- 5.
- 6.
- 7.
- 8.
- 9.
- 10.
- 11.
- 12.
- 13.
- 14.
- 15.
- 16.
- 17.
- 18.
在之前写的代码中添加日志:
static bool Compile(const std::string &file_name) // 编译功能
{
    int rid = fork();
    if (rid < 0)
    {
        LOG(Error) << "创建子进程失败" << std::endl;
        return false;
    }
    else if (rid == 0) // 子进程
    {
        LOG(Info) << "创建子进程成功" << std::endl;
        // 打开错误文件,如果没有就创建
        umask(0); // 小细节
        int errfd = open(PathUtil::Compile_err(file_name).c_str(), O_CREAT | O_WRONLY, 0644);
        if (errfd < 0)
        {
            LOG(Error) << "打开错误文件失败" << std::endl;
            exit(1);
        }
        // 重定向,让错误信息打印到错误文件里
        int n = dup2(errfd, 2);
        if (n < 0)
        {
            LOG(Error) << "重定向失败" << std::endl;
            exit(1);
        }
        // g++ -o target src -std=c++11
        // 进行进程替换
        execlp("g++", "g++", "-o", PathUtil::Exe(file_name).c_str(),
               PathUtil::Src(file_name).c_str(), "-std=c++11", "-D", "COMPILER_ONLINE", nullptr);
        LOG(Error) << "进程替换失败" << std::endl;
        exit(0);
    }
    else // 父进程
    {
        waitpid(rid, nullptr, 0); // 等待子进程
        // 如何判断源文件是否编译成功?看是否生成了对应的可执行程序即可
        if (FileUtil::TheFileExists(PathUtil::Exe(file_name)))
        {
            LOG(Info) << "编译成功" << std::endl;
            return true;
        }
    }
    LOG(Error) << "编译失败,没有生成可执行程序" << std::endl;
    return false;
}- 1.
- 2.
- 3.
- 4.
- 5.
- 6.
- 7.
- 8.
- 9.
- 10.
- 11.
- 12.
- 13.
- 14.
- 15.
- 16.
- 17.
- 18.
- 19.
- 20.
- 21.
- 22.
- 23.
- 24.
- 25.
- 26.
- 27.
- 28.
- 29.
- 30.
- 31.
- 32.
- 33.
- 34.
- 35.
- 36.
- 37.
- 38.
- 39.
- 40.
- 41.
- 42.
- 43.
- 44.
- 45.
- 46.
3、实现runner.hpp
我们想要知道用户提交的代码运行结果是否正确,那就需要运行该代码,如何运行呢?
还是用进程替换即可,前面我们实现了编译功能,将源文件编译后,生成的可执行程序会被放到指定的路径下。
代码在运行后有三种情况:
- 代码运行成功,结果正确。
- 代码运行成功,结果不正确。
- 代码运行异常。
代码运行成功,结果正确与否是需要通过测试用例来判断的,运行模块只负责代码的运行。我们在实现运行模块时,最后只需要生成三个文件,分别是标准输入文件(file_name.stdin)、标准输出文件(file_name.stdout)、标准错误文件(file_name.stderr)。将用户提交的代码运行过程中显示的信息都重定向保存到文件里。(用文件描述符重定向实现)
所以路径工具需要新增三种路径拼接方式:
std::string TempPath = "./temp/"; // 临时文件存放路径
class PathUtil// 路径工具
{
public:
    // 编译过程中需要用到的路径拼接
    static std::string Src(const std::string &file_name) // 获取源文件路径
    {
        return SplicingPath(file_name, ".cpp");
    }
    static std::string Exe(const std::string &file_name) // 获取可执行程序路径
    {
        return SplicingPath(file_name, ".exe");
    }
    static std::string Compile_err(const std::string &file_name) // 获取编译错误文件路径
    {
        return SplicingPath(file_name, ".compile_err");
    }
    // 运行过程中需要用到的路径拼接
    static std::string Stdin(const std::string &file_name) // 获取标准输入文件路径
    {
        return SplicingPath(file_name, ".stdin");
    }
    static std::string Stdout(const std::string &file_name) // 获取标准输出文件路径
    {
        return SplicingPath(file_name, ".stdout");
    }
    static std::string Stderr(const std::string &file_name) // 获取标准错误文件路径
    {
        return SplicingPath(file_name, ".stderr");
    }

private:
    static std::string SplicingPath(const std::string &file_name, const std::string &suffix) // 拼接路径
    {
        // 临时文件路径+文件名+后缀
        std::string path = TempPath;
        path += file_name;
        path += suffix;
        return path;
    }
};- 1.
- 2.
- 3.
- 4.
- 5.
- 6.
- 7.
- 8.
- 9.
- 10.
- 11.
- 12.
- 13.
- 14.
- 15.
- 16.
- 17.
- 18.
- 19.
- 20.
- 21.
- 22.
- 23.
- 24.
- 25.
- 26.
- 27.
- 28.
- 29.
- 30.
- 31.
- 32.
- 33.
- 34.
- 35.
- 36.
- 37.
- 38.
- 39.
- 40.
- 41.
用户提交给我们的代码可能是恶意的代码,会侵占大量资源。所以当我们创建子进程后需要先对子进程可使用的资源进行限制,再进程替换为用户提交代码生成的可执行程序。如何进行资源限制呢?
使用下面这个接口即可:
resource是要限制的资源种类。
rlim_cur是软限制,根据限制的资源的不同单位不同,例如限制cpu资源就是以s为单位,限制内存资源就是以byte为单位。
rlimi_max是硬限制,硬限制是软限制的上限,一般将其设置为无限(RLIM_INFINITY)。
我们自己对这个接口进行封装:
我实现的接口能够对cpu资源与内存资源进行限制,单位分别为s与kb。
// 设置进程资源限制
static void SetProcessLimit(int cpu_limit, int mem_limit)
{
    // 设置cpu资源上限
    struct rlimit cpu_rl;
    cpu_rl.rlim_max = RLIM_INFINITY;
    cpu_rl.rlim_cur = cpu_limit;
    setrlimit(RLIMIT_CPU, &cpu_rl);

    // 设置内存资源上限
    struct rlimit mem_rl;
    mem_rl.rlim_max = RLIM_INFINITY;
    mem_rl.rlim_cur = mem_limit * 1024; // 转换为kb
    setrlimit(RLIMIT_AS, &mem_rl);
}- 1.
- 2.
- 3.
- 4.
- 5.
- 6.
- 7.
- 8.
- 9.
- 10.
- 11.
- 12.
- 13.
- 14.
- 15.
现在准备工作已经完成,我们可以编写运行功能了。
首先,想要使用运行函数,必须传入三个参数:file_name(文件名称),cpu_limit(cpu资源限制),mem_limit(内存资源限制)。运行函数会根据file_name去找可执行程序,根据cpu_limit和mem_limit对子进程进行资源限制。
接下来我们创建子进程,首先让子进程重定向文件描述符,让子进程标准输入、标准输出、标准错误的内容都打印到指定文件中(file_name.stdin、file_name.stdout、file_name.stderr文件)。然后设置子进程的资源限制,最后通过进程替换来运行之前编译模块编译生成的可执行程序。
父进程需要等待子进程,获取子进程运行结束后的信息。子进程如果正常结束,父进程会收到0。而如果子进程运行出现了异常,则会收到信号被被杀死,父进程会收到对应的信号码。
信号码都是大于0的:
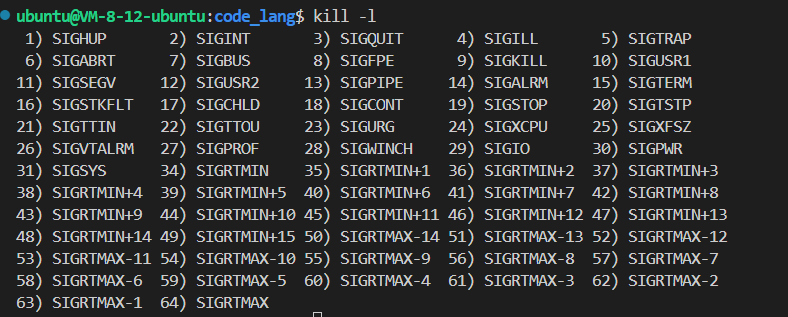
对于运行函数的返回值,Run的返回值有三种:
- 大于0,代码运行错误,返回值为对应的信号。
- 等于0,代码运行正确。
- 小于0,Run函数内部错误。
下面是运行函数的具体实现:
//runner.hpp
#pragma cone;
// 只负责代码运行
namespace ns_runner
{
    using namespace ns_util;
    using namespace ns_log;
    class Runner
    {
    public:
        Runner() {}
        ~Runner() {}
        // 指明文件名即可,不需要前驱路径与后缀
        /****************************************
         * Run的返回值有三种
         * 1、大于0,代码运行错误,返回值为对应的信号。
         * 2、等于0,代码运行正确。
         * 2、小于0,Run函数内部错误。
         *
         * cpu_limit:程序运行时占用的cpu资源上限(单位s)
         * mem_limit:程序运行时占用的内存上限(单位kb)
         */
        static int Run(const std::string &file_name, int cpu_limit, int mem_limit)
        {
            /***********************************
             * 程序运行一共有三种结果
             * 1、运行结束,结果正确
             * 2、运行结束,结果不正确
             * 3、运行异常
             * Run需要考虑代码运行结束后,结果是否正确吗?不需要
             * 结果是否正确由测试用例决定
             * 我们只考虑代码是否正常运行结束
             *************************************/
            std::string _excute = PathUtil::Exe(file_name);    // 可执行程序路径
            std::string _stdin = PathUtil::Stdin(file_name);   // 标准输入文件路径
            std::string _stdout = PathUtil::Stdout(file_name); // 标准输出文件路径
            std::string _stderr = PathUtil::Stderr(file_name); // 标准错误文件路径

            // 在父进程就把文件打开,处理错误比较方便
            umask(0);
            int _stdin_fd = open(_stdin.c_str(), O_CREAT | O_WRONLY, 0644);
            int _stdout_fd = open(_stdout.c_str(), O_CREAT | O_WRONLY, 0644);
            int _stderr_fd = open(_stderr.c_str(), O_CREAT | O_WRONLY, 0644);
            if (_stdin_fd < 0 || _stdout_fd < 0 || _stderr_fd < 0) // 文件打开失败
            {
                LOG(Error) << "标准文件打开失败" << std::endl;
                return -1;
            }

            pid_t rid = fork();
            if (rid < 0) // 创建子进程失败
            {
                // 打开的文件记得要关闭
                close(_stdin_fd);
                close(_stdout_fd);
                close(_stderr_fd);
                LOG(Error) << "创建子进程失败" << std::endl;
                return -2;
            }
            else if (rid == 0) // 子进程
            {
                // 重定向
                dup2(_stdin_fd, 0);
                dup2(_stdout_fd, 1);
                dup2(_stderr_fd, 2);
                // 设置资源子进程上限
                SetProcessLimit(cpu_limit, mem_limit);
                execl(_excute.c_str(), _excute.c_str(), nullptr); // 程序替换
                LOG(Error) << "进程替换失败" << "\n";
                exit(1);
            }
            else // 父进程
            {
                // 父进程不需要这些文件
                close(_stdin_fd);
                close(_stdout_fd);
                close(_stderr_fd);
                int status = 0;// 获取子进程信息
                waitpid(rid, &status, 0); // 等待子进程
                LOG(Debug) << "sig=" << (status & 0x7F) << "\n";
                return (status & 0x7F); // 返回信号
                // 如果子进程正常结束,返回值为0,
                // 如果子进程异常结束,返回对应的信号。
            }
        }

    private:
        // 设置进程资源限制
        static void SetProcessLimit(int cpu_limit, int mem_limit)
        {
            // 设置cpu资源上限
            struct rlimit cpu_rl;
            cpu_rl.rlim_max = RLIM_INFINITY;
            cpu_rl.rlim_cur = cpu_limit;
            setrlimit(RLIMIT_CPU, &cpu_rl);

            // 设置内存资源上限
            struct rlimit mem_rl;
            mem_rl.rlim_max = RLIM_INFINITY;
            mem_rl.rlim_cur = mem_limit * 1024; // 转换为kb
            setrlimit(RLIMIT_AS, &mem_rl);
        }
    };
}- 1.
- 2.
- 3.
- 4.
- 5.
- 6.
- 7.
- 8.
- 9.
- 10.
- 11.
- 12.
- 13.
- 14.
- 15.
- 16.
- 17.
- 18.
- 19.
- 20.
- 21.
- 22.
- 23.
- 24.
- 25.
- 26.
- 27.
- 28.
- 29.
- 30.
- 31.
- 32.
- 33.
- 34.
- 35.
- 36.
- 37.
- 38.
- 39.
- 40.
- 41.
- 42.
- 43.
- 44.
- 45.
- 46.
- 47.
- 48.
- 49.
- 50.
- 51.
- 52.
- 53.
- 54.
- 55.
- 56.
- 57.
- 58.
- 59.
- 60.
- 61.
- 62.
- 63.
- 64.
- 65.
- 66.
- 67.
- 68.
- 69.
- 70.
- 71.
- 72.
- 73.
- 74.
- 75.
- 76.
- 77.
- 78.
- 79.
- 80.
- 81.
- 82.
- 83.
- 84.
- 85.
- 86.
- 87.
- 88.
- 89.
- 90.
- 91.
- 92.
- 93.
- 94.
- 95.
- 96.
- 97.
- 98.
- 99.
- 100.
- 101.
- 102.
- 103.
- 104.
4、实现compile_run.hpp
我们实现的compile_server模块是要实现网络功能的,所以在写compile_run.hpp时就需要考虑序列化与反序列化的问题,关于序列化与反序列化,直接用json来实现即可。
关于json字符串的设计,输入的json字符串有两个四个参数:
- code:客户端提交的代码
- input:客户端的输入(不做实现,用于扩展)
- cpu_limit:代码可用的cpu资源上限
- mem_limit:代码可用的内存资源上限
输出的json字符串有两个或四个参数:
- status:状态码
- reason:产生状态码的原因
- stderr:标准错误信息(选填)
- stdout:标准输出信息(选填)
关于stderr和stdout为什么是选填?如果客户端提交的代码编译都没成功,自然是不会去运行的,也就不会产生file_name.stderr和file_name.stdout,这两个参数就不用填。如果代码运行出现异常了,也不需要填stderr和stdout,让用户知道出现异常的原因就行可以。
现在我们来简述一下compile_run.hpp的实现流程:
首先,我们需要从输入json串中提取code、input、cpu_limit、mem_limit,四个参数。
然后,生成一个独一无二的文件名(file_name),通过文件名,我们可以把code写入到file_name.cpp中。
接下来开始编译代码,直接调用上面编写的编译模块。
如果编译没出现问题,接下来就开始调用运行模块运行代码。
我们会根据用户代码在编译与运行过程中出现的各种状况生成status,并且生成与status对应的reason。如果代码编译与运行都成功,那么就会有file_name.stderr和file_anme.stdout,把这两个文件的内容分别写入stderr和stdout中。最后进行序列化生成输出json字符串。
当一切任务完成后,还需要把代码运行与编译过程中生成的临时文件清理掉。
生成唯一文件名方法,以及后面需要实现读取文件与写入文件功能,这些功能一块儿添加到文件工具中:
class FileUtil // 文件工具
{
public:
    static bool TheFileExists(const std::string &path) // 文件是否存在
    {
        struct stat statbuf; // 以后可能用得到,获取文件信息
        int n = stat(path.c_str(), &statbuf);
        if (n == 0) // 返回值为0则代表文件存在
        {
            return true;
        }
        return false;
    }
    // 通过毫秒级时间戳+原子操作自增变量
    // 在网络服务中,两个代码可能在同一时间到达,所以必须加上自增变量
    static std::string UniqueFileName() // 获取唯一文件名
    {
        static std::atomic_uint id(0); // 自增变量
        id++;
        std::string file_name = TimeUtil::GetTimeMStamp(); // 获取毫秒级时间戳
        file_name += "_";
        file_name += std::to_string(id);
        return file_name;
    }
    static bool WriteFile(const std::string &path, const std::string &content) // 向文件写入内容
    {
        std::ofstream ofs(path.c_str()); // 打开文件,如果文件不存在就创建
        if (!ofs.is_open())// 如果文件打开失败
        {
            return false;
        }
        // ofs<<content;//向文件写入内容
        ofs.write(content.c_str(), content.size()); // 向文件写入内容
        ofs.close();// 随手关闭文件
        return true;
    }
    static bool ReadFile(const std::string &path, std::string *content, bool keep = false) // 从文件读取内容
    {
        std::ifstream ifs(path.c_str());
        if (!ifs.is_open())
        {
            return false;
        }
        // 用getline来获取内容
        // getline不会保存行分隔符,但我们有时希望保留行分隔符,有时希望不保留
        // keep参数就是让用户选择是否保留行分隔符
        std::string line;
        while (getline(ifs, line))
        {
            *content += line;
            if (keep)
            {
                *content += "\n";
            }
        }
        ifs.close();
        return true;
    }
};- 1.
- 2.
- 3.
- 4.
- 5.
- 6.
- 7.
- 8.
- 9.
- 10.
- 11.
- 12.
- 13.
- 14.
- 15.
- 16.
- 17.
- 18.
- 19.
- 20.
- 21.
- 22.
- 23.
- 24.
- 25.
- 26.
- 27.
- 28.
- 29.
- 30.
- 31.
- 32.
- 33.
- 34.
- 35.
- 36.
- 37.
- 38.
- 39.
- 40.
- 41.
- 42.
- 43.
- 44.
- 45.
- 46.
- 47.
- 48.
- 49.
- 50.
- 51.
- 52.
- 53.
- 54.
- 55.
- 56.
- 57.
- 58.
- 59.
然后实现通过status生成对应的reason的方法:
static std::string CodeToDesc(int code, const std::string &file_name)
{
    std::string desc;
    switch (code)
    {
    case 0:
        desc = "编译运行成功";
        break;
    case -1:
        desc = "提交代码为空";
        break;
    case -2:
        desc = "发生未知错误";
        break;
    case -3: //-3代表代码编译出错,我们希望把错误信息写入
        FileUtil::ReadFile(PathUtil::Compile_err(file_name), &desc, true);
        break;
    case SIGFPE: // 8
        desc = "浮点数溢出";
        break;
    case SIGABRT: // 6
        desc = "内存使用超过限制";
        break;
    case SIGXCPU: // 24
        desc = "CPU使用超过限制";
        break;
    case SIGSEGV: // 11
        desc = "发生段错误";
        break;
    default: // 还没写全,以后实际运行中需要什么再添加
        desc = "未知:" + std::to_string(code);
        break;
    }
    return desc;
}- 1.
- 2.
- 3.
- 4.
- 5.
- 6.
- 7.
- 8.
- 9.
- 10.
- 11.
- 12.
- 13.
- 14.
- 15.
- 16.
- 17.
- 18.
- 19.
- 20.
- 21.
- 22.
- 23.
- 24.
- 25.
- 26.
- 27.
- 28.
- 29.
- 30.
- 31.
- 32.
- 33.
- 34.
- 35.
实现清理临时文件方法:
static void CleanTempFile(const std::string &file_name) // 清理产生的临时文件
{
    // 我们需要清理的文件的个数是不确定的

    // 清理源文件
    std::string _src = PathUtil::Src(file_name);
    if (FileUtil::TheFileExists(_src))
    {
        unlink(_src.c_str());
    }

    // 清理编译错误文件
    std::string _compile_err = PathUtil::Compile_err(file_name);
    if (FileUtil::TheFileExists(_compile_err))
    {
        unlink(_compile_err.c_str());
    }

    // 清理可执行程序
    std::string _exe = PathUtil::Exe(file_name);
    if (FileUtil::TheFileExists(_exe))
    {
        unlink(_exe.c_str());

        // 清理标准输入文件
        std::string _stdin = PathUtil::Stdin(file_name);
        if (FileUtil::TheFileExists(_stdin))
        {
            unlink(_stdin.c_str());
        }

        // 清理标准输出文件
        std::string _stdout = PathUtil::Stdout(file_name);
        if (FileUtil::TheFileExists(_stdout))
        {
            unlink(_stdout.c_str());
        }

        // 清理标准错误文件
        std::string _stderr = PathUtil::Stderr(file_name);
        if (FileUtil::TheFileExists(_stderr))
        {
            unlink(_stderr.c_str());
        }
    }
}- 1.
- 2.
- 3.
- 4.
- 5.
- 6.
- 7.
- 8.
- 9.
- 10.
- 11.
- 12.
- 13.
- 14.
- 15.
- 16.
- 17.
- 18.
- 19.
- 20.
- 21.
- 22.
- 23.
- 24.
- 25.
- 26.
- 27.
- 28.
- 29.
- 30.
- 31.
- 32.
- 33.
- 34.
- 35.
- 36.
- 37.
- 38.
- 39.
- 40.
- 41.
- 42.
- 43.
- 44.
- 45.
- 46.
下面是最终的代码:
namespace ns_compile_and_run
{
    using namespace ns_log;
    using namespace ns_util;
    using namespace ns_compiler;
    using namespace ns_runner;
    class Compile_And_Run
    {
    public:
        Compile_And_Run() {}
        ~Compile_And_Run() {}
        /***********************************
         * 输入输出参数皆为json字符串
         * 输入:
         * code:客户端提交的代码
         * input:客户端的输入(不做实现,用于扩展)
         * cpu_limit:代码可用的cpu资源上限
         * mem_limit:代码可用的内存资源上限
         * 输出:
         * status:状态码
         * reason:产生状态码的原因
         * stderr:标准错误信息(选填)
         * stdout:标准输出信息(选填)
         **************************************/
        static void Start(const std::string &in_json, std::string *out_json)
        {
            LOG(Debug) << "开始编译与运行" << "\n";
            // 首先要从in_json里提取信息
            Json::Value in_value;
            Json::Reader reader;
            reader.parse(in_json, in_value);
            std::string code = in_value["code"].asString();
            std::string input = in_value["input"].asString();
            int cpu_limit = in_value["cpu_limit"].asInt();
            int mem_limit = in_value["mem_limit"].asInt();

            int status_code = 0;   // 状态码
            std::string file_name; // 唯一文件名
            int res = 0;           // 运行返回值

            if (code.size() == 0) // 用户提交的代码为空
            {
                LOG(Error) << "提交代码为空" << "\n";
                status_code = -1; // 表示代码为空
                goto END;
            }

            // 产生一个独一无二的文件名
            file_name = FileUtil::UniqueFileName();

            // 把代码写入到源文件中
            if (!FileUtil::WriteFile(PathUtil::Src(file_name), code))
            {
                // 写入文件失败
                LOG(Error) << "写入源文件失败" << "\n";
                status_code = -2; // 表示未知错误
                goto END;
            }

            // 编译代码
            LOG(Denug) << "开始编译代码" << "\n";
            if (!Compiler::Compile(file_name))
            {
                // 编译代码错误
                LOG(Error) << "编译失败" << "\n";
                status_code = -3; // 表示编译错误
                goto END;
            }

            // 运行代码
            LOG(Denug) << "开始运行代码" << "\n";
            res = Runner::Run(file_name, cpu_limit, mem_limit);
            if (res < 0)
            {
                // Run内部错误
                LOG(Error) << "Run内部错误" << "\n";
                status_code = -2; // 表示未知错误
            }
            else if (res > 0)
            {
                // 代码运行发生错误
                LOG(Error) << "代码运行错误" << "\n";
                status_code = res; // 表示运行错误对应的信号
            }
            else
            {
                // 代码正常运行成功
                status_code = 0; // 表示代码编译运行都正常通过
            }
        END:

            // 准备输出json串
            Json::Value out_value;
            Json::StyledWriter writer;
            out_value["status"] = status_code;
            std::string desc = CodeToDesc(status_code, file_name);
            LOG(DeBug) << "desc=" << desc << "\n";
            out_value["reason"] = desc;
            if (status_code == 0) // 代码成功编译与运行,就把stdout和stderr的内容加上
            {
                // 读取标准输出文件
                std::string stdout_connect;
                FileUtil::ReadFile(PathUtil::Stdout(file_name), &stdout_connect, true);
                out_value["stdout"] = stdout_connect;

                // 读取标准错误文件
                std::string stderr_content;
                FileUtil::ReadFile(PathUtil::Stderr(file_name), &stderr_content, true);
                out_value["stderr"] = stderr_content;
            }
            *out_json = writer.write(out_value);

            // 最后再把编译与运行时产生的临时文件
            CleanTempFile(file_name);
            LOG(Infor) << "编译与运行结束" << "\n";
        }

    private:
        static std::string CodeToDesc(int code, const std::string &file_name)
        {
            std::string desc;
            switch (code)
            {
            case 0:
                desc = "编译运行成功";
                break;
            case -1:
                desc = "提交代码为空";
                break;
            case -2:
                desc = "发生未知错误";
                break;
            case -3: //-3代表代码编译出错,我们希望把错误信息写入
                FileUtil::ReadFile(PathUtil::Compile_err(file_name), &desc, true);
                break;
            case SIGFPE: // 8
                desc = "浮点数溢出";
                break;
            case SIGABRT: // 6
                desc = "内存使用超过限制";
                break;
            case SIGXCPU: // 24
                desc = "CPU使用超过限制";
                break;
            case SIGSEGV: // 11
                desc = "发生段错误";
                break;
            default: // 以后实际运行中有什么再添加
                desc = "未知:" + std::to_string(code);
                break;
            }
            return desc;
        }
        static void CleanTempFile(const std::string &file_name) // 清理产生的临时文件
        {
            // 我们需要清理的文件的个数是不确定的

            // 清理源文件
            std::string _src = PathUtil::Src(file_name);
            if (FileUtil::TheFileExists(_src))
            {
                unlink(_src.c_str());
            }

            // 清理编译错误文件
            std::string _compile_err = PathUtil::Compile_err(file_name);
            if (FileUtil::TheFileExists(_compile_err))
            {
                unlink(_compile_err.c_str());
            }

            // 清理可执行程序
            std::string _exe = PathUtil::Exe(file_name);
            if (FileUtil::TheFileExists(_exe))
            {
                unlink(_exe.c_str());

                // 清理标准输入文件
                std::string _stdin = PathUtil::Stdin(file_name);
                if (FileUtil::TheFileExists(_stdin))
                {
                    unlink(_stdin.c_str());
                }

                // 清理标准输出文件
                std::string _stdout = PathUtil::Stdout(file_name);
                if (FileUtil::TheFileExists(_stdout))
                {
                    unlink(_stdout.c_str());
                }

                // 清理标准错误文件
                std::string _stderr = PathUtil::Stderr(file_name);
                if (FileUtil::TheFileExists(_stderr))
                {
                    unlink(_stderr.c_str());
                }
            }
        }
    };
}- 1.
- 2.
- 3.
- 4.
- 5.
- 6.
- 7.
- 8.
- 9.
- 10.
- 11.
- 12.
- 13.
- 14.
- 15.
- 16.
- 17.
- 18.
- 19.
- 20.
- 21.
- 22.
- 23.
- 24.
- 25.
- 26.
- 27.
- 28.
- 29.
- 30.
- 31.
- 32.
- 33.
- 34.
- 35.
- 36.
- 37.
- 38.
- 39.
- 40.
- 41.
- 42.
- 43.
- 44.
- 45.
- 46.
- 47.
- 48.
- 49.
- 50.
- 51.
- 52.
- 53.
- 54.
- 55.
- 56.
- 57.
- 58.
- 59.
- 60.
- 61.
- 62.
- 63.
- 64.
- 65.
- 66.
- 67.
- 68.
- 69.
- 70.
- 71.
- 72.
- 73.
- 74.
- 75.
- 76.
- 77.
- 78.
- 79.
- 80.
- 81.
- 82.
- 83.
- 84.
- 85.
- 86.
- 87.
- 88.
- 89.
- 90.
- 91.
- 92.
- 93.
- 94.
- 95.
- 96.
- 97.
- 98.
- 99.
- 100.
- 101.
- 102.
- 103.
- 104.
- 105.
- 106.
- 107.
- 108.
- 109.
- 110.
- 111.
- 112.
- 113.
- 114.
- 115.
- 116.
- 117.
- 118.
- 119.
- 120.
- 121.
- 122.
- 123.
- 124.
- 125.
- 126.
- 127.
- 128.
- 129.
- 130.
- 131.
- 132.
- 133.
- 134.
- 135.
- 136.
- 137.
- 138.
- 139.
- 140.
- 141.
- 142.
- 143.
- 144.
- 145.
- 146.
- 147.
- 148.
- 149.
- 150.
- 151.
- 152.
- 153.
- 154.
- 155.
- 156.
- 157.
- 158.
- 159.
- 160.
- 161.
- 162.
- 163.
- 164.
- 165.
- 166.
- 167.
- 168.
- 169.
- 170.
- 171.
- 172.
- 173.
- 174.
- 175.
- 176.
- 177.
- 178.
- 179.
- 180.
- 181.
- 182.
- 183.
- 184.
- 185.
- 186.
- 187.
- 188.
- 189.
- 190.
- 191.
- 192.
- 193.
- 194.
- 195.
- 196.
- 197.
- 198.
- 199.
- 200.
- 201.
5、实现compile_serer.cpp
我们在compile_server.cpp中要正式接入网络功能,利用cpp-httplib第三方库来实现。
using namespace ns_compile_and_run;
using namespace httplib;
void Usage(char* proc)
{
    std::cerr<<"请按照格式使用:"<<proc<<" Port"<<std::endl;
}
int main(int args,char* argc[])
{
    if(args!=2)
    {
        Usage(argc[0]);
        return 1;
    }
    int port=std::atoi(argc[1]);
    Server svr;

    //注册服务
    svr.Post("/compile_and_run",[](const Request& req,Response& res){
        //request的正文里就是我们要的json字符串
        std::string in_json=req.body;
        std::string out_json;
        if(!in_json.empty())
        {
            Compile_And_Run::Start(in_json,&out_json);//调用编译与运行功能
            res.set_content(out_json,"application/json;charset=utf-8");
        }
    });
    svr.listen("0.0.0.0",port);//启动http服务
    return 0;
}- 1.
- 2.
- 3.
- 4.
- 5.
- 6.
- 7.
- 8.
- 9.
- 10.
- 11.
- 12.
- 13.
- 14.
- 15.
- 16.
- 17.
- 18.
- 19.
- 20.
- 21.
- 22.
- 23.
- 24.
- 25.
- 26.
- 27.
- 28.
- 29.
- 30.
至此,compile_server模块完工。
三、编写oj_server模块
我们的oj模块是基于MVC结构来设计的:
- M(model):通常是和数据交互的模块,比如:对题库进行增删查改。
- V(view):通常是拿到数据后,要进行构建网页,渲染网页内容,展示给用户的。
- C(control):控制器,这是业务的核心逻辑。
1、设计题库
设计文件版的题库。
在oj_server下添加question

题库放在questions文件夹中。
questions/question.list:是所有题目列表,陈列了所有题目的信息,每一行是一个题目的信息。
每一行的格式:题目标号 题目名称 题目难度 限定时间(s) 限定空间(kb)
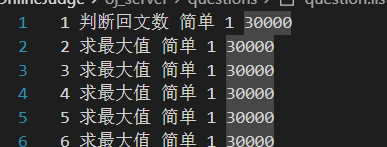
questions/题目编号:是题目编号对应题目的具体信息。
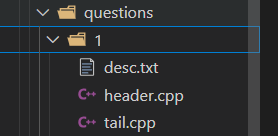
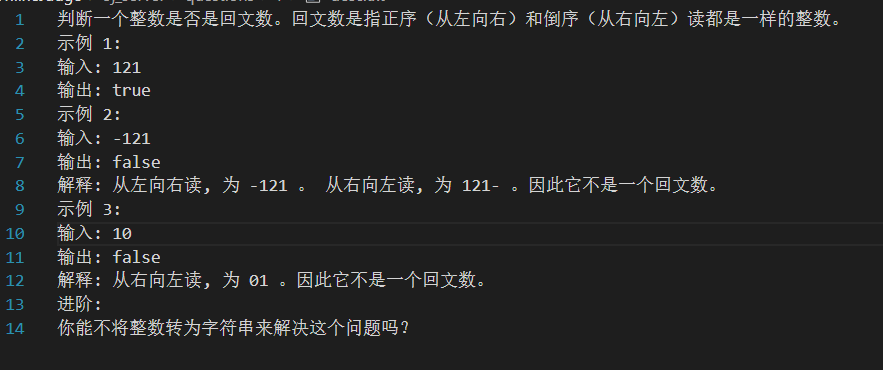
questions/题目编号/desc.txt:本题目的描述。
questions/题目编号/header.cpp:交给用户补充的代码(接口形式)。
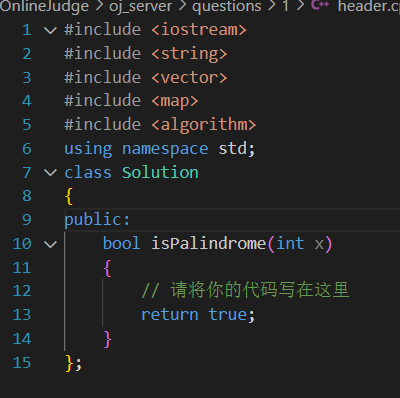
questions/题目编号/tail.cpp:测试用例。
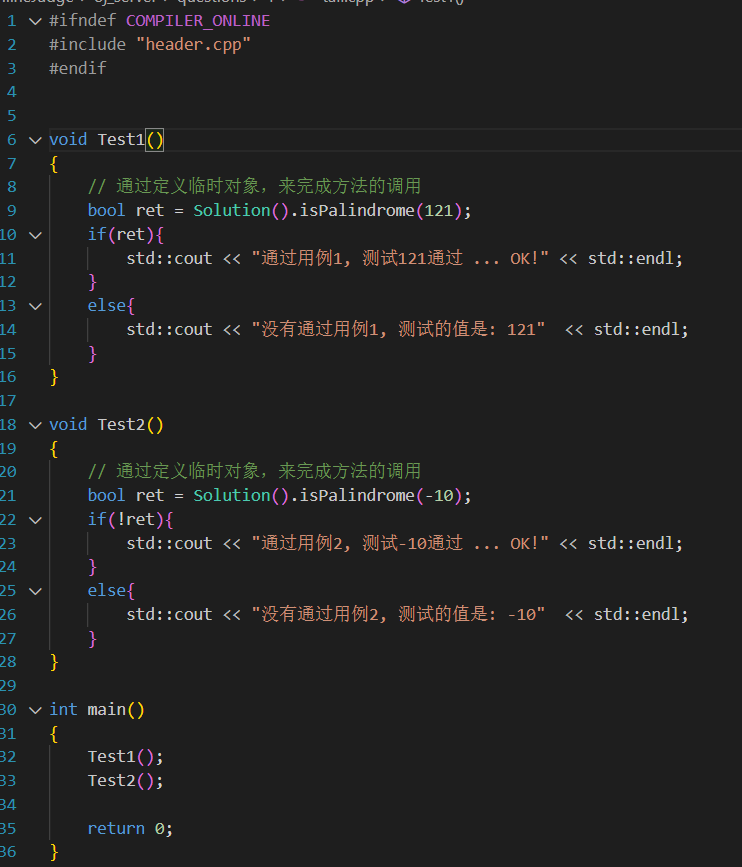
oj_server要提交给compile_server的代码其实是header.cpp拼接上tail.cpp的代码。
有一个问题,测试用例中这一块是干嘛用的:

其实这是为了方便设计测试用例,如果不引入header.cpp在写测试用例时会报一堆错误,影响代码编写。我们在拼接header.cpp和tail.cpp后形成代码后,编译时是不希望引入header.cpp的。
要如何在编译时去掉#include "header.cpp"呢?
我们在设计是就采用了条件编译,只需要在编译代码时加上-D COMPILER_ONLINE即可。
2、实现oj_model.hpp
首先设计一个题目结构体:
我们设计的model模块首先在初始化时就会把题库从文件加载到内存中,这个过程中需要用到字符串切割。然后实现两个方法,一个是获取所有题目,一个是根据题号获取指定题目。
新增字符串工具:
利用Boost准标准库来实现
//Util.hpp
class StringUtil // 字符串工具
{
public:
static void SplitString(const std::string &str, std::vector<std::string> *target, std::string sep = " ") // 分割字符串
{
// 第一个参数是放分割后的字符串,第二个参数是要分割的字符串,第三个参数是设置分割符
// 第四个参数是是否压缩,指的是否保存连续的分隔符中的空白部分,例如"abc:::cde:::::e",":"为分割符,分隔符之间可能没有内容
// token_compress_on是要压缩,即不保存空白部分,token_compress_on是不压缩
boost::split(*target, str, boost::is_any_of(sep), boost::algorithm::token_compress_on);
}
};- 1.
- 2.
- 3.
- 4.
- 5.
- 6.
- 7.
- 8.
- 9.
- 10.
- 11.
- 12.
model模块完整代码:
//oj_model.hpp
#pragma once
// 负责数据交互
namespace ns_model
{
using namespace ns_util;
using namespace ns_log;
// 1023 判断大小 简单 1 40960
struct Question // 题目
{
    std::string number; // 题目编号
    std::string title;  // 题目标题
    std::string star;   // 题目难度
    int cpu_limit;      // 时间限制
    int mem_limit;      // 空间限制
    std::string desc;   // 题目描述
    std::string header; // 题目头部(待填写接口)
    std::string tail;   // 题目尾部(测试用例)
};
const std::string question_list = "questions/question.list";
const std::string question_path = "questions/";
class Model
{
public:
Model()
{
assert(LoadQuestions(question_list));//加载题库
}
~Model() {}
bool GetAllQuestions(std::vector<Question> *out) // 获取所有题目的信息
{
if (_questions.size() == 0)
{
LOG(Error) << "获取题目列表失败" << "\n";
return false;
}
for (auto &it : _questions)
{
(*out).push_back(it.second);
}
return true;
}
bool GetOneQuestion(const std::string &number, Question *q) // 获取指定一道题目的信息
{
auto it = _questions.find(number);
if (it == _questions.end())
{
LOG(Error) << "获取指定题目失败" << "\n";
return false;
}
*q = it->second;
return true;
}
private:
bool LoadQuestions(const std::string &ql_path) // 从文件加载题目到内存
{
std::ifstream ifs(ql_path.c_str());
if (!ifs.is_open())//打开文件失败
{
LOG(Fatal) << "题库加载到内存失败" << "\n";
return false;
}
std::string line;
while (getline(ifs, line))
{
// line里面是一行,需要字符串切割
std::vector<std::string> tokens;
StringUtil::SplitString(line, &tokens, " ");
if (tokens.size() != 5)
{
continue;
}
Question q;
// 1023 判断大小 简单 1 40960
q.number = tokens[0];
q.title = tokens[1];
q.star = tokens[2];
q.cpu_limit = std::stoi(tokens[3]);
q.mem_limit = std::stoi(tokens[4]);
std::string qpath = question_path + q.number + R"(/)";
FileUtil::ReadFile(qpath + "desc.txt", &(q.desc), true);
FileUtil::ReadFile(qpath + "header.cpp", &(q.header), true);
FileUtil::ReadFile(qpath + "tail.cpp", &(q.tail), true);
_questions.insert(std::make_pair(q.number, q));
}
ifs.close();
return true;
}
private:
// key:value=题目编号:题目信息
std::unordered_map<std::string, Question> _questions;
};
}- 1.
- 2.
- 3.
- 4.
- 5.
- 6.
- 7.
- 8.
- 9.
- 10.
- 11.
- 12.
- 13.
- 14.
- 15.
- 16.
- 17.
- 18.
- 19.
- 20.
- 21.
- 22.
- 23.
- 24.
- 25.
- 26.
- 27.
- 28.
- 29.
- 30.
- 31.
- 32.
- 33.
- 34.
- 35.
- 36.
- 37.
- 38.
- 39.
- 40.
- 41.
- 42.
- 43.
- 44.
- 45.
- 46.
- 47.
- 48.
- 49.
- 50.
- 51.
- 52.
- 53.
- 54.
- 55.
- 56.
- 57.
- 58.
- 59.
- 60.
- 61.
- 62.
- 63.
- 64.
- 65.
- 66.
- 67.
- 68.
- 69.
- 70.
- 71.
- 72.
- 73.
- 74.
- 75.
- 76.
- 77.
- 78.
- 79.
- 80.
- 81.
- 82.
- 83.
- 84.
- 85.
- 86.
- 87.
- 88.
- 89.
- 90.
- 91.
- 92.
- 93.
- 94.
- 95.
- 96.
3、实现oj_view.hpp
oj_view.hpp只需要渲染两个网页,分别是显示所有题目列表的网页,另一个是显示指定题目与编写指定题目的网页。
在oj_server下创建一个template_html文件夹用来存放需要被渲染的两种网页:


因为我不会前端知识,所以前端的代码都是Ctrl+c+Ctrl+v。我把代码贴在下面:
all_questions.html:
<!DOCTYPE html>
<html lang="en">

<head>
    <meta charset="UTF-8">
    <meta http-equiv="X-UA-Compatible" content="IE=edge">
    <meta name="viewport" content="width=device-width, initial-scale=1.0">
    <title>在线OJ-题目列表</title>
    <style>
        /* 起手式, 100%保证我们的样式设置可以不受默认影响 */
        * {
            /* 消除网页的默认外边距 */
            margin: 0px;
            /* 消除网页的默认内边距 */
            padding: 0px;
        }

        html,
        body {
            width: 100%;
            height: 100%;
        }

        .container .navbar {
            width: 100%;
            height: 50px;
            background-color: black;
            /* 给父级标签设置overflow,取消后续float带来的影响 */
            overflow: hidden;
        }

        .container .navbar a {
            /* 设置a标签是行内块元素,允许你设置宽度 */
            display: inline-block;
            /* 设置a标签的宽度,a标签默认行内元素,无法设置宽度 */
            width: 80px;
            /* 设置字体颜色 */
            color: white;
            /* 设置字体的大小 */
            font-size: large;
            /* 设置文字的高度和导航栏一样的高度 */
            line-height: 50px;
            /* 去掉a标签的下划线 */
            text-decoration: none;
            /* 设置a标签中的文字居中 */
            text-align: center;
        }

        /* 设置鼠标事件 */
        .container .navbar a:hover {
            background-color: green;
        }

        .container .navbar .login {
            float: right;
        }

        .container .question_list {
            padding-top: 50px;
            width: 800px;
            height: 100%;
            margin: 0px auto;
            /* background-color: #ccc; */
            text-align: center;
        }

        .container .question_list table {
            width: 100%;
            font-size: large;
            font-family: 'Lucida Sans', 'Lucida Sans Regular', 'Lucida Grande', 'Lucida Sans Unicode', Geneva, Verdana, sans-serif;
            margin-top: 50px;
            background-color: rgb(243, 248, 246);
        }

        .container .question_list h1 {
            color: green;
        }
        .container .question_list table .item {
            width: 100px;
            height: 40px;
            font-size: large;
            font-family:'Times New Roman', Times, serif;
        }
        .container .question_list table .item a {
            text-decoration: none;
            color: black;
        }
        .container .question_list table .item a:hover {
            color: blue;
            text-decoration:underline;
        }
        .container .footer {
            width: 100%;
            height: 50px;
            text-align: center;
            line-height: 50px;
            color: #ccc;
            margin-top: 15px;
        }
    </style>
</head>

<body>
    <div class="container">
        <!-- 导航栏, 功能不实现-->
        <div class="navbar">
            <a href="/">首页</a>
            <a href="/all_questions">题库</a>
            <a href="#">竞赛</a>
            <a href="#">讨论</a>
            <a href="#">求职</a>
            <a class="login" href="#">登录</a>
        </div>
        <div class="question_list">
            <h1>OnlineJuge题目列表</h1>
            <table>
                <tr>
                    <th class="item">编号</th>
                    <th class="item">标题</th>
                    <th class="item">难度</th>
                </tr>
                {{#question_list}}
                <tr>
                    <td class="item">{{number}}</td>
                    <td class="item"><a href="/question/{{number}}">{{title}}</a></td>
                    <td class="item">{{star}}</td>
                </tr>
                {{/question_list}}
            </table>
        </div>
        <div class="footer">
            <!-- <hr> -->
            <h4>@内斯塔的朋友</h4>
        </div>
    </div>

</body>

</html>- 1.
- 2.
- 3.
- 4.
- 5.
- 6.
- 7.
- 8.
- 9.
- 10.
- 11.
- 12.
- 13.
- 14.
- 15.
- 16.
- 17.
- 18.
- 19.
- 20.
- 21.
- 22.
- 23.
- 24.
- 25.
- 26.
- 27.
- 28.
- 29.
- 30.
- 31.
- 32.
- 33.
- 34.
- 35.
- 36.
- 37.
- 38.
- 39.
- 40.
- 41.
- 42.
- 43.
- 44.
- 45.
- 46.
- 47.
- 48.
- 49.
- 50.
- 51.
- 52.
- 53.
- 54.
- 55.
- 56.
- 57.
- 58.
- 59.
- 60.
- 61.
- 62.
- 63.
- 64.
- 65.
- 66.
- 67.
- 68.
- 69.
- 70.
- 71.
- 72.
- 73.
- 74.
- 75.
- 76.
- 77.
- 78.
- 79.
- 80.
- 81.
- 82.
- 83.
- 84.
- 85.
- 86.
- 87.
- 88.
- 89.
- 90.
- 91.
- 92.
- 93.
- 94.
- 95.
- 96.
- 97.
- 98.
- 99.
- 100.
- 101.
- 102.
- 103.
- 104.
- 105.
- 106.
- 107.
- 108.
- 109.
- 110.
- 111.
- 112.
- 113.
- 114.
- 115.
- 116.
- 117.
- 118.
- 119.
- 120.
- 121.
- 122.
- 123.
- 124.
- 125.
- 126.
- 127.
- 128.
- 129.
- 130.
- 131.
- 132.
- 133.
- 134.
- 135.
- 136.
- 137.
- 138.
- 139.
one_question.html:
<!DOCTYPE html>
<html lang="en">

<head>
    <meta charset="UTF-8">
    <meta http-equiv="X-UA-Compatible" content="IE=edge">
    <meta name="viewport" content="width=device-width, initial-scale=1.0">
    <title>{{number}}.{{title}}</title>
    <!-- 引入ACE插件 -->
    <!-- 官网链接:https://ace.c9.io/ -->
    <!-- CDN链接:https://cdnjs.com/libraries/ace -->
    <!-- 使用介绍:https://www.iteye.com/blog/ybc77107-2296261 -->
    <!-- https://justcode.ikeepstudying.com/2016/05/ace-editor-%E5%9C%A8%E7%BA%BF%E4%BB%A3%E7%A0%81%E7%BC%96%E8%BE%91%E6%9E%81%E5%85%B6%E9%AB%98%E4%BA%AE/ -->
    <!-- 引入ACE CDN -->
    <script src="https://cdnjs.cloudflare.com/ajax/libs/ace/1.2.6/ace.js" type="text/javascript"
        charset="utf-8"></script>
    <script src="https://cdnjs.cloudflare.com/ajax/libs/ace/1.2.6/ext-language_tools.js" type="text/javascript"
        charset="utf-8"></script>
    <!-- 引入jquery CDN -->
    <script src="http://code.jquery.com/jquery-2.1.1.min.js"></script>

    <style>
        * {
            margin: 0;
            padding: 0;
        }

        html,
        body {
            width: 100%;
            height: 100%;
        }

        .container .navbar {
            width: 100%;
            height: 50px;
            background-color: black;
            /* 给父级标签设置overflow,取消后续float带来的影响 */
            overflow: hidden;
        }

        .container .navbar a {
            /* 设置a标签是行内块元素,允许你设置宽度 */
            display: inline-block;
            /* 设置a标签的宽度,a标签默认行内元素,无法设置宽度 */
            width: 80px;
            /* 设置字体颜色 */
            color: white;
            /* 设置字体的大小 */
            font-size: large;
            /* 设置文字的高度和导航栏一样的高度 */
            line-height: 50px;
            /* 去掉a标签的下划线 */
            text-decoration: none;
            /* 设置a标签中的文字居中 */
            text-align: center;
        }

        /* 设置鼠标事件 */
        .container .navbar a:hover {
            background-color: green;
        }

        .container .navbar .login {
            float: right;
        }

        .container .part1 {
            width: 100%;
            height: 600px;
            overflow: hidden;
        }

        .container .part1 .left_desc {
            width: 50%;
            height: 600px;
            float: left;
            overflow: scroll;
        }

        .container .part1 .left_desc h3 {
            padding-top: 10px;
            padding-left: 10px;
        }

        .container .part1 .left_desc pre {
            padding-top: 10px;
            padding-left: 10px;
            font-size: medium;
            font-family:'Gill Sans', 'Gill Sans MT', Calibri, 'Trebuchet MS', sans-serif;
        }

        .container .part1 .right_code {
            width: 50%;
            float: right;
        }

        .container .part1 .right_code .ace_editor {
            height: 600px;
        }
        .container .part2 {
            width: 100%;
            overflow: hidden;
        }

        .container .part2 .result {
            width: 300px;
            float: left;
        }

        .container .part2 .btn-submit {
            width: 120px;
            height: 50px;
            font-size: large;
            float: right;
            background-color: #26bb9c;
            color: #FFF;
            /* 给按钮带上圆角 */
            /* border-radius: 1ch; */
            border: 0px;
            margin-top: 10px;
            margin-right: 10px;
        }
        .container .part2 button:hover {
            color:green;
        }

        .container .part2 .result {
            margin-top: 15px;
            margin-left: 15px;
        }

        .container .part2 .result pre {
            font-size: large;
        }
    </style>
</head>

<body>
    <div class="container">
        <!-- 导航栏, 功能不实现-->
        <div class="navbar">
            <a href="/">首页</a>
            <a href="/all_questions">题库</a>
            <a href="#">竞赛</a>
            <a href="#">讨论</a>
            <a href="#">求职</a>
            <a class="login" href="#">登录</a>
        </div>
        <!-- 左右呈现,题目描述和预设代码 -->
        <div class="part1">
            <div class="left_desc">
                <h3><span id="number">{{number}}</span>.{{title}}_{{star}}</h3>
                <pre>{{desc}}</pre>
            </div>
            <div class="right_code">
                <pre id="code" class="ace_editor"><textarea class="ace_text-input">{{pre_code}}</textarea></pre>
            </div>
        </div>
        <!-- 提交并且得到结果,并显示 -->
        <div class="part2">
            <div class="result"></div>
            <button class="btn-submit" onclick="submit()">提交代码</button>
        </div>
    </div>
    <script>
        //初始化对象
        editor = ace.edit("code");

        //设置风格和语言(更多风格和语言,请到github上相应目录查看)
        // 主题大全:http://www.manongjc.com/detail/25-cfpdrwkkivkikmk.html
        editor.setTheme("ace/theme/monokai");
        editor.session.setMode("ace/mode/c_cpp");

        // 字体大小
        editor.setFontSize(16);
        // 设置默认制表符的大小:
        editor.getSession().setTabSize(4);

        // 设置只读(true时只读,用于展示代码)
        editor.setReadOnly(false);

        // 启用提示菜单
        ace.require("ace/ext/language_tools");
        editor.setOptions({
            enableBasicAutocompletion: true,
            enableSnippets: true,
            enableLiveAutocompletion: true
        });

        function submit(){
            // alert("嘿嘿!");
            // 1. 收集当前页面的有关数据, 1. 题号 2.代码
            var code = editor.getSession().getValue();
            // console.log(code);
            var number = $(".container .part1 .left_desc h3 #number").text();
            // console.log(number);
            var judge_url = "/Judge/" + number;
            // console.log(judge_url);
            // 2. 构建json,并通过ajax向后台发起基于http的json请求
            $.ajax({
                method: 'Post',   // 向后端发起请求的方式
                url: judge_url,   // 向后端指定的url发起请求
                dataType: 'json', // 告知server,我需要什么格式
                contentType: 'application/json;charset=utf-8',  // 告知server,我给你的是什么格式
                data: JSON.stringify({
                    'code':code,
                    'input': ''
                }),
                success: function(data){
                    //成功得到结果
                    // console.log(data);
                    show_result(data);
                }
            });
            // 3. 得到结果,解析并显示到 result中
            function show_result(data)
            {
                // console.log(data.status);
                // console.log(data.reason);
                // 拿到result结果标签
                var result_div = $(".container .part2 .result");
                // 清空上一次的运行结果
                result_div.empty();

                // 首先拿到结果的状态码和原因结果
                var _status = data.status;
                var _reason = data.reason;

                var reason_lable = $( "<p>",{
                       text: _reason
                });
                reason_lable.appendTo(result_div);

                if(status == 0){
                    // 请求是成功的,编译运行过程没出问题,但是结果是否通过看测试用例的结果
                    var _stdout = data.stdout;
                    var _stderr = data.stderr;

                    var stdout_lable = $("<pre>", {
                        text: _stdout
                    });

                    var stderr_lable = $("<pre>", {
                        text: _stderr
                    })

                    stdout_lable.appendTo(result_div);
                    stderr_lable.appendTo(result_div);
                }
                else{
                    // 编译运行出错,do nothing
                }
            }
        }
    </script>
</body>

</html>- 1.
- 2.
- 3.
- 4.
- 5.
- 6.
- 7.
- 8.
- 9.
- 10.
- 11.
- 12.
- 13.
- 14.
- 15.
- 16.
- 17.
- 18.
- 19.
- 20.
- 21.
- 22.
- 23.
- 24.
- 25.
- 26.
- 27.
- 28.
- 29.
- 30.
- 31.
- 32.
- 33.
- 34.
- 35.
- 36.
- 37.
- 38.
- 39.
- 40.
- 41.
- 42.
- 43.
- 44.
- 45.
- 46.
- 47.
- 48.
- 49.
- 50.
- 51.
- 52.
- 53.
- 54.
- 55.
- 56.
- 57.
- 58.
- 59.
- 60.
- 61.
- 62.
- 63.
- 64.
- 65.
- 66.
- 67.
- 68.
- 69.
- 70.
- 71.
- 72.
- 73.
- 74.
- 75.
- 76.
- 77.
- 78.
- 79.
- 80.
- 81.
- 82.
- 83.
- 84.
- 85.
- 86.
- 87.
- 88.
- 89.
- 90.
- 91.
- 92.
- 93.
- 94.
- 95.
- 96.
- 97.
- 98.
- 99.
- 100.
- 101.
- 102.
- 103.
- 104.
- 105.
- 106.
- 107.
- 108.
- 109.
- 110.
- 111.
- 112.
- 113.
- 114.
- 115.
- 116.
- 117.
- 118.
- 119.
- 120.
- 121.
- 122.
- 123.
- 124.
- 125.
- 126.
- 127.
- 128.
- 129.
- 130.
- 131.
- 132.
- 133.
- 134.
- 135.
- 136.
- 137.
- 138.
- 139.
- 140.
- 141.
- 142.
- 143.
- 144.
- 145.
- 146.
- 147.
- 148.
- 149.
- 150.
- 151.
- 152.
- 153.
- 154.
- 155.
- 156.
- 157.
- 158.
- 159.
- 160.
- 161.
- 162.
- 163.
- 164.
- 165.
- 166.
- 167.
- 168.
- 169.
- 170.
- 171.
- 172.
- 173.
- 174.
- 175.
- 176.
- 177.
- 178.
- 179.
- 180.
- 181.
- 182.
- 183.
- 184.
- 185.
- 186.
- 187.
- 188.
- 189.
- 190.
- 191.
- 192.
- 193.
- 194.
- 195.
- 196.
- 197.
- 198.
- 199.
- 200.
- 201.
- 202.
- 203.
- 204.
- 205.
- 206.
- 207.
- 208.
- 209.
- 210.
- 211.
- 212.
- 213.
- 214.
- 215.
- 216.
- 217.
- 218.
- 219.
- 220.
- 221.
- 222.
- 223.
- 224.
- 225.
- 226.
- 227.
- 228.
- 229.
- 230.
- 231.
- 232.
- 233.
- 234.
- 235.
- 236.
- 237.
- 238.
- 239.
- 240.
- 241.
- 242.
- 243.
- 244.
- 245.
- 246.
- 247.
- 248.
- 249.
- 250.
- 251.
- 252.
- 253.
- 254.
- 255.
- 256.
- 257.
- 258.
- 259.
渲染网页用ctemplate第三方库来实现。
//oj_view.hpp
#pragma once
//构建网页内容
namespace ns_view
{
    using namespace ns_model;
    using namespace ctemplate;
    const std::string template_path="template_html/";
    class View
    {
    public:
        View(){}
        ~View(){}
        void AllExpandHtml(const std::vector<Question>& vq,std::string* html)//渲染全部题目网页
        {
            std::string src_html=template_path+"all_questions.html";
            //创建字典
            ctemplate::TemplateDictionary root("all_questions");//相当于unordered_map<string,string> all_questions;
            for(const auto& q : vq)
            {
                //形成子字典
                ctemplate::TemplateDictionary* sub=root.AddSectionDictionary("question_list");

                //添加映射关系
                sub->SetValue("number",q.number);
                sub->SetValue("title",q.title);
                sub->SetValue("star",q.star);
            }
            //获取要被渲染的网页
            ctemplate::Template* tpl=ctemplate::Template::GetTemplate(src_html,ctemplate::DO_NOT_STRIP);//第二个参数是保持网页原貌的意思

            //渲染网页
            tpl->Expand(html,&root);
        }
        void OneExpandHtml(const Question& q,std::string* html)//渲染指定题目网页
        {
            std::string src_html=template_path+"one_question.html";
            //创建字典
            ctemplate::TemplateDictionary root("question");
            //添加映射关系
            root.SetValue("number",q.number);
            root.SetValue("title",q.title);
            root.SetValue("star",q.star);
            root.SetValue("desc",q.desc);
            root.SetValue("pre_code",q.header);
            //获取要被渲染的网页
            ctemplate::Template* tpl=ctemplate::Template::GetTemplate(src_html,DO_NOT_STRIP);
            //渲染网页
            tpl->Expand(html,&root);
        }
    private:
    };
}- 1.
- 2.
- 3.
- 4.
- 5.
- 6.
- 7.
- 8.
- 9.
- 10.
- 11.
- 12.
- 13.
- 14.
- 15.
- 16.
- 17.
- 18.
- 19.
- 20.
- 21.
- 22.
- 23.
- 24.
- 25.
- 26.
- 27.
- 28.
- 29.
- 30.
- 31.
- 32.
- 33.
- 34.
- 35.
- 36.
- 37.
- 38.
- 39.
- 40.
- 41.
- 42.
- 43.
- 44.
- 45.
- 46.
- 47.
- 48.
- 49.
- 50.
- 51.
- 52.
- 53.
4、实现负载均衡功能
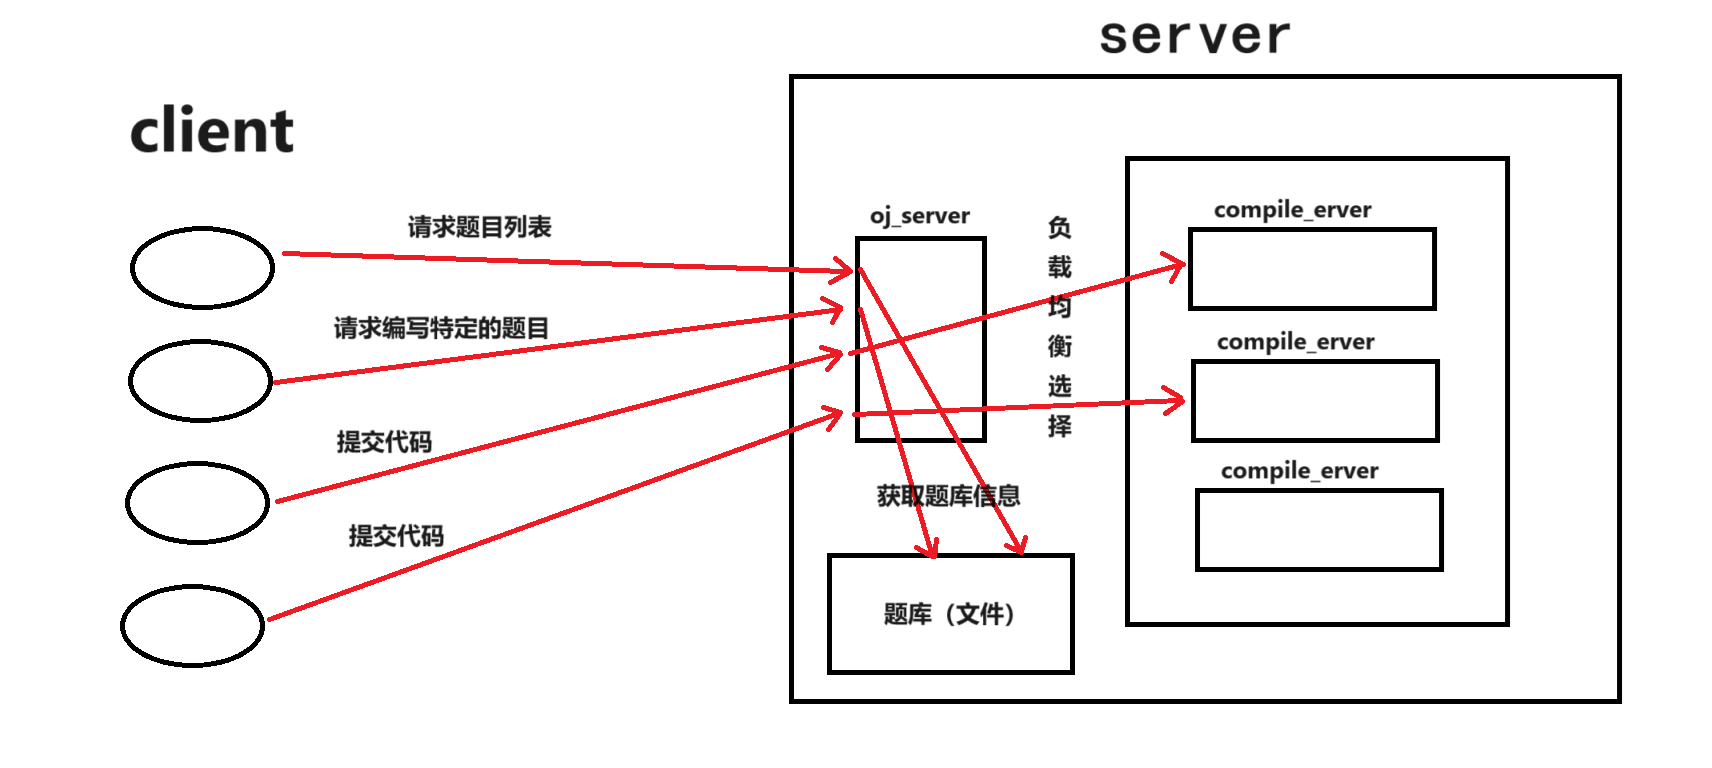
在我们宏观结构的视角中,compile_server是有多个的,我们在给这些compile_server派发任务时,需要考虑到负载均衡的问题,不然如果所以的任务都交给同一台compile_server完成,效率就太低了。
所以我们需要实现负载均衡功能,这个功能是属于oj_control.hpp里的。
先定义服务主机类:
//oj_control.hpp
class Machine // 服务主机
{
public:
    std::string ip;  // 主机的ip地址
    uint16_t port;   // 主机的端口号
    uint64_t load;   // 主机的负载
    std::mutex *mtx; // mutex是禁止拷贝的,所以这里定义成指针
public:
    Machine()
        : ip(""), port(0), load(0), mtx(nullptr)
    {
    }
    ~Machine()
    {
        // if(mtx) delete mtx;引发错误
    }
    // 可能同时有多个执行流对load进行修改或查看,所以必须要加锁
    void IncLoad() // 增加负载
    {
        if (mtx)
            mtx->lock(); // 上锁
        ++load;
        if (mtx)
            mtx->unlock(); // 解锁
    }
    void DecLoad() // 减少负载
    {
        if (mtx)
            mtx->lock(); // 上锁
        --load;
        if (mtx)
            mtx->unlock(); // 解锁
    }
    void ReSetLoad() // 重置负载数
    {
        if (mtx)
            mtx->lock(); // 上锁
        load = 0;
        if (mtx)
            mtx->unlock(); // 解锁
    }
    uint64_t Load() // 获取负载数
    {
        if (mtx)
            mtx->lock(); // 上锁
        uint64_t tmp = load;
        if (mtx)
            mtx->unlock(); // 解锁
        return tmp;
    }
};- 1.
- 2.
- 3.
- 4.
- 5.
- 6.
- 7.
- 8.
- 9.
- 10.
- 11.
- 12.
- 13.
- 14.
- 15.
- 16.
- 17.
- 18.
- 19.
- 20.
- 21.
- 22.
- 23.
- 24.
- 25.
- 26.
- 27.
- 28.
- 29.
- 30.
- 31.
- 32.
- 33.
- 34.
- 35.
- 36.
- 37.
- 38.
- 39.
- 40.
- 41.
- 42.
- 43.
- 44.
- 45.
- 46.
- 47.
- 48.
- 49.
- 50.
- 51.
- 52.
接下来我们需要一个文件用于存储主机信息:


现在可以实现负载均衡控制器了:
//oj_control.hpp
const std::string service_machine = "./conf/service_machine.conf";
class LoadBalance // 负载均衡控制器
{
public:
    LoadBalance()
    {
        assert(LoadConf()); // 加载主机
    }
    ~LoadBalance() {}
    bool SmartChoice(int *id, Machine **ppm) // 智能选择一台负载最小的主机
    {
        _mtx.lock(); // 可能有多个执行流访问machines等资源,所以要加锁
        // 如果没有在线主机
        int oline_num = _online.size();
        if (oline_num == 0)
        {
            LOG(Fatal) << "在线主机数为0,请尽快进行维护" << "\n";
            _mtx.unlock();
            return false;
        }
        uint64_t MinLoad = _machines[_online[0]].Load();
        *id = _online[0];
        *ppm = &_machines[_online[0]];
        for (const auto &i : _online) // 选出负载最小的主机
        {
            if (_machines[i].Load() < MinLoad)
            {
                MinLoad = _machines[i].Load();
                *id = i;
                *ppm = &_machines[i];
            }
        }
        _mtx.unlock();
        return true;
    }
    void OffLineMachine(int id) // 离线一台主机
    {
        _mtx.lock();
        auto iter = _online.begin();
        for (; iter != _online.end(); ++iter) // 找到要离线的主机
        {
            if (*iter == id) // 找到了
            {
                _machines[id].ReSetLoad(); // 离线主机时把主机负载置零
                _online.erase(iter);
                _offline.push_back(id);
                break; // 直接跳出去,不担心迭代器失效
            }
        }
        _mtx.unlock();
    }
    void OnLineMachine() // 将离线的主机全部上线
    {
        _mtx.lock();
        _online.insert(_online.end(), _offline.begin(), _offline.end());
        _offline.erase(_offline.begin(), _offline.end());
        LOG(Info) << "主机已经全部上线啦" << "\n";
        _mtx.unlock();
    }
    void ShowMachines() // 测试用
    {
        std::cout << "在线主机有:";
        for (int i = 0; i < _online.size(); ++i)
        {
            std::cout << _online[i] << " ";
        }
        std::cout << std::endl;
        std::cout << "离线主机有:";
        for (int i = 0; i < _offline.size(); ++i)
        {
            std::cout << _offline[i] << " ";
        }
        std::cout << std::endl;
    }

private:
    bool LoadConf() // 加载主机
    {
        LOG("Info") << "开始加载主机列表" << "\n";
        // 我们需要从指定路径获取主机列表文件
        std::ifstream ifs(service_machine.c_str());
        if (!ifs.is_open())
        {
            LOG(Fatal) << "获取主机列表失败" << "\n";
            return false;
        }
        std::string line;
        while (getline(ifs, line))
        {
            // 127.0.0.1:8081
            std::vector<std::string> tokens;
            StringUtil::SplitString(line, &tokens, ":"); // 切割字符串
            // 生成主机类
            Machine m;
            m.ip = tokens[0];
            m.port = std::stoi(tokens[1]);
            m.load = 0;
            m.mtx = new std::mutex;

            _online.push_back(_machines.size()); // 把主机添加到在线主机列表
            _machines.push_back(m);              // 把主机添加到所有主机列表
        }
        ifs.close();
        LOG(Info) << "加载主机列表成功" << "\n";
        ShowMachines();
        return true;
    }

    std::vector<Machine> _machines; // 所有主机列表
    std::vector<int> _online;       // 在线主机列表,存的主机id
    std::vector<int> _offline;      // 离线主机列表,存的主机id
    std::mutex _mtx;
};- 1.
- 2.
- 3.
- 4.
- 5.
- 6.
- 7.
- 8.
- 9.
- 10.
- 11.
- 12.
- 13.
- 14.
- 15.
- 16.
- 17.
- 18.
- 19.
- 20.
- 21.
- 22.
- 23.
- 24.
- 25.
- 26.
- 27.
- 28.
- 29.
- 30.
- 31.
- 32.
- 33.
- 34.
- 35.
- 36.
- 37.
- 38.
- 39.
- 40.
- 41.
- 42.
- 43.
- 44.
- 45.
- 46.
- 47.
- 48.
- 49.
- 50.
- 51.
- 52.
- 53.
- 54.
- 55.
- 56.
- 57.
- 58.
- 59.
- 60.
- 61.
- 62.
- 63.
- 64.
- 65.
- 66.
- 67.
- 68.
- 69.
- 70.
- 71.
- 72.
- 73.
- 74.
- 75.
- 76.
- 77.
- 78.
- 79.
- 80.
- 81.
- 82.
- 83.
- 84.
- 85.
- 86.
- 87.
- 88.
- 89.
- 90.
- 91.
- 92.
- 93.
- 94.
- 95.
- 96.
- 97.
- 98.
- 99.
- 100.
- 101.
- 102.
- 103.
- 104.
- 105.
- 106.
- 107.
- 108.
- 109.
- 110.
- 111.
- 112.
- 113.
- 114.
5、实现主控制器
主控制器实现四个功能:返回题目列表网页、返回指定题目列表网页、上线所有主机、判题功能。其中最复杂的就是判题功能。
oj_control.hpp完整代码:
//oj_control.hpp
#pragma once
// 控制器
namespace ns_control
{
    using namespace ns_log;
    using namespace ns_util;
    using namespace ns_model;
    using namespace ns_view;
    using namespace httplib;
    class Machine // 服务主机
    {
    public:
        std::string ip;  // 主机的ip地址
        uint16_t port;   // 主机的端口号
        uint64_t load;   // 主机的负载
        std::mutex *mtx; // mutex是禁止拷贝的,所以这里定义成指针
    public:
        Machine()
            : ip(""), port(0), load(0), mtx(nullptr)
        {
        }
        ~Machine()
        {
            // if(mtx) delete mtx;引发错误
        }
        // 可能同时有多个执行流对load进行修改或查看,所以必须要加锁
        void IncLoad() // 增加负载
        {
            if (mtx)
                mtx->lock(); // 上锁
            ++load;
            if (mtx)
                mtx->unlock(); // 解锁
        }
        void DecLoad() // 减少负载
        {
            if (mtx)
                mtx->lock(); // 上锁
            --load;
            if (mtx)
                mtx->unlock(); // 解锁
        }
        void ReSetLoad() // 重置负载数
        {
            if (mtx)
                mtx->lock(); // 上锁
            load = 0;
            if (mtx)
                mtx->unlock(); // 解锁
        }
        uint64_t Load() // 获取负载数
        {
            if (mtx)
                mtx->lock(); // 上锁
            uint64_t tmp = load;
            if (mtx)
                mtx->unlock(); // 解锁
            return tmp;
        }
    };

    const std::string service_machine = "./conf/service_machine.conf";
    class LoadBalance // 负载均衡控制器
    {
    public:
        LoadBalance()
        {
            assert(LoadConf()); // 加载主机
        }
        ~LoadBalance() {}
        bool SmartChoice(int *id, Machine **ppm) // 智能选择一台负载最小的主机
        {
            _mtx.lock(); // 可能有多个执行流访问machines等资源,所以要加锁
            // 如果没有在线主机
            int oline_num = _online.size();
            if (oline_num == 0)
            {
                LOG(Fatal) << "在线主机数为0,请尽快进行维护" << "\n";
                _mtx.unlock();
                return false;
            }
            uint64_t MinLoad = _machines[_online[0]].Load();
            *id = _online[0];
            *ppm = &_machines[_online[0]];
            for (const auto &i : _online) // 选出负载最小的主机
            {
                if (_machines[i].Load() < MinLoad)
                {
                    MinLoad = _machines[i].Load();
                    *id = i;
                    *ppm = &_machines[i];
                }
            }
            _mtx.unlock();
            return true;
        }
        void OffLineMachine(int id) // 离线一台主机
        {
            _mtx.lock();
            auto iter = _online.begin();
            for (; iter != _online.end(); ++iter) // 找到要离线的主机
            {
                if (*iter == id) // 找到了
                {
                    _machines[id].ReSetLoad(); // 离线主机时把主机负载置零
                    _online.erase(iter);
                    _offline.push_back(id);
                    break; // 直接跳出去,不担心迭代器失效
                }
            }
            _mtx.unlock();
        }
        void OnLineMachine() // 将离线的主机全部上线
        {
            _mtx.lock();
            _online.insert(_online.end(), _offline.begin(), _offline.end());
            _offline.erase(_offline.begin(), _offline.end());
            LOG(Info) << "主机已经全部上线啦" << "\n";
            _mtx.unlock();
        }
        void ShowMachines() // 测试用
        {
            std::cout << "在线主机有:";
            for (int i = 0; i < _online.size(); ++i)
            {
                std::cout << _online[i] << " ";
            }
            std::cout << std::endl;
            std::cout << "离线主机有:";
            for (int i = 0; i < _offline.size(); ++i)
            {
                std::cout << _offline[i] << " ";
            }
            std::cout << std::endl;
        }

    private:
        bool LoadConf() // 加载主机
        {
            LOG("Info") << "开始加载主机列表" << "\n";
            // 我们需要从指定路径获取主机列表文件
            std::ifstream ifs(service_machine.c_str());
            if (!ifs.is_open())
            {
                LOG(Fatal) << "获取主机列表失败" << "\n";
                return false;
            }
            std::string line;
            while (getline(ifs, line))
            {
                // 127.0.0.1:8081
                std::vector<std::string> tokens;
                StringUtil::SplitString(line, &tokens, ":"); // 切割字符串
                // 生成主机类
                Machine m;
                m.ip = tokens[0];
                m.port = std::stoi(tokens[1]);
                m.load = 0;
                m.mtx = new std::mutex;

                _online.push_back(_machines.size()); // 把主机添加到在线主机列表
                _machines.push_back(m);              // 把主机添加到所有主机列表
            }
            ifs.close();
            LOG(Info) << "加载主机列表成功" << "\n";
            ShowMachines();
            return true;
        }

        std::vector<Machine> _machines; // 所有主机列表
        std::vector<int> _online;       // 在线主机列表,存的主机id
        std::vector<int> _offline;      // 离线主机列表,存的主机id
        std::mutex _mtx;
    };

    class Control // 主控制器
    {
    public:
        Control() {}
        ~Control() {}
        bool AllQuestions(std::string *html) // 返回所有题目列表
        {
            // 1.获取所有题目
            std::vector<Question> vq;
            if (!_model.GetAllQuestions(&vq))
            {
                return false;
            }
            // 此时的题目列表是乱序的,我们需要对其进行排序
            std::sort(vq.begin(), vq.end(), [](const Question &q1, const Question &q2) -> bool
                      { return stoi(q1.number) < stoi(q2.number); });
            // 2.获取所有题目网页
            _view.AllExpandHtml(vq, html);
            return true;
        }
        bool OneQuestion(const std::string &number, std::string *html) // 返回指定题目
        {
            // 1.获取指定题目
            Question q;
            if (!_model.GetOneQuestion(number, &q))
            {
                return false;
            }

            // 2.获取指定题目网页
            _view.OneExpandHtml(q, html);
            return true;
        }
        /*******************************
         * number:题目编号
         * in_json:用户输入的json string,其中有用户提交的代码
         * out_json:返回给用户的json string
         */
        bool Judge(const std::string &number, const std::string &in_json, std::string *out_json) // 判题功能
        {
            // 1.获取题目信息
            Question q;
            _model.GetOneQuestion(number, &q);

            // 2.提取in_json中的信息
            Json::Value in_value;
            Json::Reader reader;
            reader.parse(in_json, in_value);
            std::string code = in_value["code"].asString();

            // 3.将用户提交的代码和测试用例拼接在一起形成源代码,并形成交给compile_server的json串
            Json::Value compile_value;
            compile_value["code"] = code + q.tail;
            compile_value["input"] = "";
            compile_value["cpu_limit"] = q.cpu_limit;
            compile_value["mem_limit"] = q.mem_limit;
            Json::FastWriter writer;
            std::string compile_json = writer.write(compile_value);

            // 4.均衡选择一台compile_server
            // 策略:一直找,直到找到一台能用的主机,或者找完所有主机(都不能用)
            while (true)
            {
                Machine *m = nullptr;                    // 指向被选中的主机
                int id;                                  // 被选中主机的id
                if (!_load_balance.SmartChoice(&id, &m)) // 所有主机都离线了
                {
                    break;
                }
                // 选到了主机
                LOG(Info) << "选到了主机:id=" << id << ",ip=" << m->ip << ",port=" << m->port << ",load=" << m->Load() << "\n";
                m->IncLoad(); // 应该增加负载

                Client cli(m->ip, m->port);
                // 5.向compile_server发起请求
                // 第一个参数要访问的服务器的服务,第二个参数是Request的body,第三个参数是内容的类型
                if (auto res = cli.Post("/compile_and_run", compile_json, "application/json;charset=utf-8"))
                {
                    // 获得了结果
                    if (res->status == 200) // 即使获得了结果,也不一定正确
                    {
                        // 6.将结果赋值给out_json
                        *out_json = res->body;
                        m->DecLoad(); // 减少负载
                        LOG(Info) << "编译与运行服务请求成功" << "\n";
                        break;
                    }
                    m->DecLoad(); // 减少负载,继续选择别的主机
                }
                else // 没获得结果,服务器可能挂掉了
                {
                    _load_balance.OffLineMachine(id); // 离线这台主机
                    LOG(Error) << "获取结果失败,当前主机可能已经离线,ip=" << m->ip << ",port=" << m->port << "\n";
                    _load_balance.ShowMachines(); // 测试用
                }
            }
            return true;
        }
        void RecoverAllMachine() // 恢复所有机器
        {
            _load_balance.OnLineMachine();
        }

    private:
        Model _model;
        View _view;
        LoadBalance _load_balance;
    };
}- 1.
- 2.
- 3.
- 4.
- 5.
- 6.
- 7.
- 8.
- 9.
- 10.
- 11.
- 12.
- 13.
- 14.
- 15.
- 16.
- 17.
- 18.
- 19.
- 20.
- 21.
- 22.
- 23.
- 24.
- 25.
- 26.
- 27.
- 28.
- 29.
- 30.
- 31.
- 32.
- 33.
- 34.
- 35.
- 36.
- 37.
- 38.
- 39.
- 40.
- 41.
- 42.
- 43.
- 44.
- 45.
- 46.
- 47.
- 48.
- 49.
- 50.
- 51.
- 52.
- 53.
- 54.
- 55.
- 56.
- 57.
- 58.
- 59.
- 60.
- 61.
- 62.
- 63.
- 64.
- 65.
- 66.
- 67.
- 68.
- 69.
- 70.
- 71.
- 72.
- 73.
- 74.
- 75.
- 76.
- 77.
- 78.
- 79.
- 80.
- 81.
- 82.
- 83.
- 84.
- 85.
- 86.
- 87.
- 88.
- 89.
- 90.
- 91.
- 92.
- 93.
- 94.
- 95.
- 96.
- 97.
- 98.
- 99.
- 100.
- 101.
- 102.
- 103.
- 104.
- 105.
- 106.
- 107.
- 108.
- 109.
- 110.
- 111.
- 112.
- 113.
- 114.
- 115.
- 116.
- 117.
- 118.
- 119.
- 120.
- 121.
- 122.
- 123.
- 124.
- 125.
- 126.
- 127.
- 128.
- 129.
- 130.
- 131.
- 132.
- 133.
- 134.
- 135.
- 136.
- 137.
- 138.
- 139.
- 140.
- 141.
- 142.
- 143.
- 144.
- 145.
- 146.
- 147.
- 148.
- 149.
- 150.
- 151.
- 152.
- 153.
- 154.
- 155.
- 156.
- 157.
- 158.
- 159.
- 160.
- 161.
- 162.
- 163.
- 164.
- 165.
- 166.
- 167.
- 168.
- 169.
- 170.
- 171.
- 172.
- 173.
- 174.
- 175.
- 176.
- 177.
- 178.
- 179.
- 180.
- 181.
- 182.
- 183.
- 184.
- 185.
- 186.
- 187.
- 188.
- 189.
- 190.
- 191.
- 192.
- 193.
- 194.
- 195.
- 196.
- 197.
- 198.
- 199.
- 200.
- 201.
- 202.
- 203.
- 204.
- 205.
- 206.
- 207.
- 208.
- 209.
- 210.
- 211.
- 212.
- 213.
- 214.
- 215.
- 216.
- 217.
- 218.
- 219.
- 220.
- 221.
- 222.
- 223.
- 224.
- 225.
- 226.
- 227.
- 228.
- 229.
- 230.
- 231.
- 232.
- 233.
- 234.
- 235.
- 236.
- 237.
- 238.
- 239.
- 240.
- 241.
- 242.
- 243.
- 244.
- 245.
- 246.
- 247.
- 248.
- 249.
- 250.
- 251.
- 252.
- 253.
- 254.
- 255.
- 256.
- 257.
- 258.
- 259.
- 260.
- 261.
- 262.
- 263.
- 264.
- 265.
- 266.
- 267.
- 268.
- 269.
- 270.
- 271.
- 272.
- 273.
- 274.
- 275.
- 276.
- 277.
- 278.
- 279.
- 280.
- 281.
- 282.
- 283.
- 284.
- 285.
6、实现oj_server.cpp
//oj_server.cpp
using namespace httplib;
using namespace ns_control;

static Control* con_ptr;
void Usage(char *proc)
{
    std::cerr << "请按照格式使用:" << proc << " Port" << std::endl;
}
void Recover(int sig)
{
    con_ptr->RecoverAllMachine();
}
int main(int args, char *argc[])
{
    Control con;//控制器
    con_ptr=&con;

    signal(SIGQUIT,Recover);//收到对应信号后,上线所有主机
    if (args != 2)
    {
        Usage(argc[0]);
        return 1;
    }
    int port = atoi(argc[1]);

    //构建服务路由功能
    Server svr;//服务器

    svr.set_base_dir("wwwroot/index.html");//注册根目录服务

    //获取题目列表网页
    svr.Get("/all_questions",[&con](const Request& req,Response& res){
        std::string html;
        con.AllQuestions(&html);//获取所有题目列表的网页
        res.set_content(html,"text/html;charset=utf-8");
    });

    //获取指定题目列表网页
                    //正则表达式
    svr.Get(R"(/question/(\d+))",[&con](const Request& req,Response& res){
        std::string number=req.matches[1];//从正则表达式的匹配串里拿到题目编号
        std::string html;
        con.OneQuestion(number,&html);
        res.set_content(html,"text/html;charset=utf-8");
    });

    //判题功能
    svr.Post(R"(/Judge/(\d+))",[&con](const Request& req,Response& res){
        std::string number=req.matches[1];
        std::string in_json=req.body;
        std::string out_json;
        con.Judge(number,in_json,&out_json);
        res.set_content(out_json,"application/json;charset=utf-8");
    });
    svr.set_base_dir("./wwwroot");//注册首页
    svr.listen("0.0.0.0",port);
    return 0;
}- 1.
- 2.
- 3.
- 4.
- 5.
- 6.
- 7.
- 8.
- 9.
- 10.
- 11.
- 12.
- 13.
- 14.
- 15.
- 16.
- 17.
- 18.
- 19.
- 20.
- 21.
- 22.
- 23.
- 24.
- 25.
- 26.
- 27.
- 28.
- 29.
- 30.
- 31.
- 32.
- 33.
- 34.
- 35.
- 36.
- 37.
- 38.
- 39.
- 40.
- 41.
- 42.
- 43.
- 44.
- 45.
- 46.
- 47.
- 48.
- 49.
- 50.
- 51.
- 52.
- 53.
- 54.
- 55.
- 56.
- 57.
- 58.
- 59.
index.html:
<!DOCTYPE html>
<html lang="en">

<head>
    <meta charset="UTF-8">
    <meta http-equiv="X-UA-Compatible" content="IE=edge">
    <meta name="viewport" content="width=device-width, initial-scale=1.0">
    <title>这是我的个人OJ系统</title>
    <style>
        /* 起手式, 100%保证我们的样式设置可以不受默认影响 */
        * {
            /* 消除网页的默认外边距 */
            margin: 0px;
            /* 消除网页的默认内边距 */
            padding: 0px;
        }

        html,
        body {
            width: 100%;
            height: 100%;
        }

        .container .navbar {
            width: 100%;
            height: 50px;
            background-color: black;
            /* 给父级标签设置overflow,取消后续float带来的影响 */
            overflow: hidden;
        }

        .container .navbar a {
            /* 设置a标签是行内块元素,允许你设置宽度 */
            display: inline-block;
            /* 设置a标签的宽度,a标签默认行内元素,无法设置宽度 */
            width: 80px;
            /* 设置字体颜色 */
            color: white;
            /* 设置字体的大小 */
            font-size: large;
            /* 设置文字的高度和导航栏一样的高度 */
            line-height: 50px;
            /* 去掉a标签的下划线 */
            text-decoration: none;
            /* 设置a标签中的文字居中 */
            text-align: center;
        }
        /* 设置鼠标事件 */
        .container .navbar a:hover {
            background-color: green;
        }
        .container .navbar .login {
            float: right;
        }

        .container .content {
            /* 设置标签的宽度 */
            width: 800px;
            /* 用来调试 */
            /* background-color: #ccc; */
            /* 整体居中 */
            margin: 0px auto;
            /* 设置文字居中 */
            text-align: center;
            /* 设置上外边距 */
            margin-top: 200px;
        }

        .container .content .font_ {
            /* 设置标签为块级元素,独占一行,可以设置高度宽度等属性 */
            display: block;
            /* 设置每个文字的上外边距 */
            margin-top: 20px;
            /* 去掉a标签的下划线 */
            text-decoration: none;
            /* 设置字体大小
            font-size: larger; */
        }
    </style>
</head>

<body>
    <div class="container">
        <!-- 导航栏, 功能不实现-->
        <div class="navbar">
            <a href="/">首页</a>
            <a href="/all_questions">题库</a>
            <a href="#">竞赛</a>
            <a href="#">讨论</a>
            <a href="#">求职</a>
            <a class="login" href="#">登录</a>
        </div>
        <!-- 网页的内容 -->
        <div class="content">
            <h1 class="font_">欢迎来到我的OnlineJudge平台</h1>
            <p class="font_">这个我个人独立开发的一个在线OJ平台</p>
            <a class="font_" href="/all_questions">点击我开始编程啦!</a>
        </div>
    </div>
</body>

</html>- 1.
- 2.
- 3.
- 4.
- 5.
- 6.
- 7.
- 8.
- 9.
- 10.
- 11.
- 12.
- 13.
- 14.
- 15.
- 16.
- 17.
- 18.
- 19.
- 20.
- 21.
- 22.
- 23.
- 24.
- 25.
- 26.
- 27.
- 28.
- 29.
- 30.
- 31.
- 32.
- 33.
- 34.
- 35.
- 36.
- 37.
- 38.
- 39.
- 40.
- 41.
- 42.
- 43.
- 44.
- 45.
- 46.
- 47.
- 48.
- 49.
- 50.
- 51.
- 52.
- 53.
- 54.
- 55.
- 56.
- 57.
- 58.
- 59.
- 60.
- 61.
- 62.
- 63.
- 64.
- 65.
- 66.
- 67.
- 68.
- 69.
- 70.
- 71.
- 72.
- 73.
- 74.
- 75.
- 76.
- 77.
- 78.
- 79.
- 80.
- 81.
- 82.
- 83.
- 84.
- 85.
- 86.
- 87.
- 88.
- 89.
- 90.
- 91.
- 92.
- 93.
- 94.
- 95.
- 96.
- 97.
- 98.
- 99.
- 100.
- 101.
- 102.
四、流程演示图
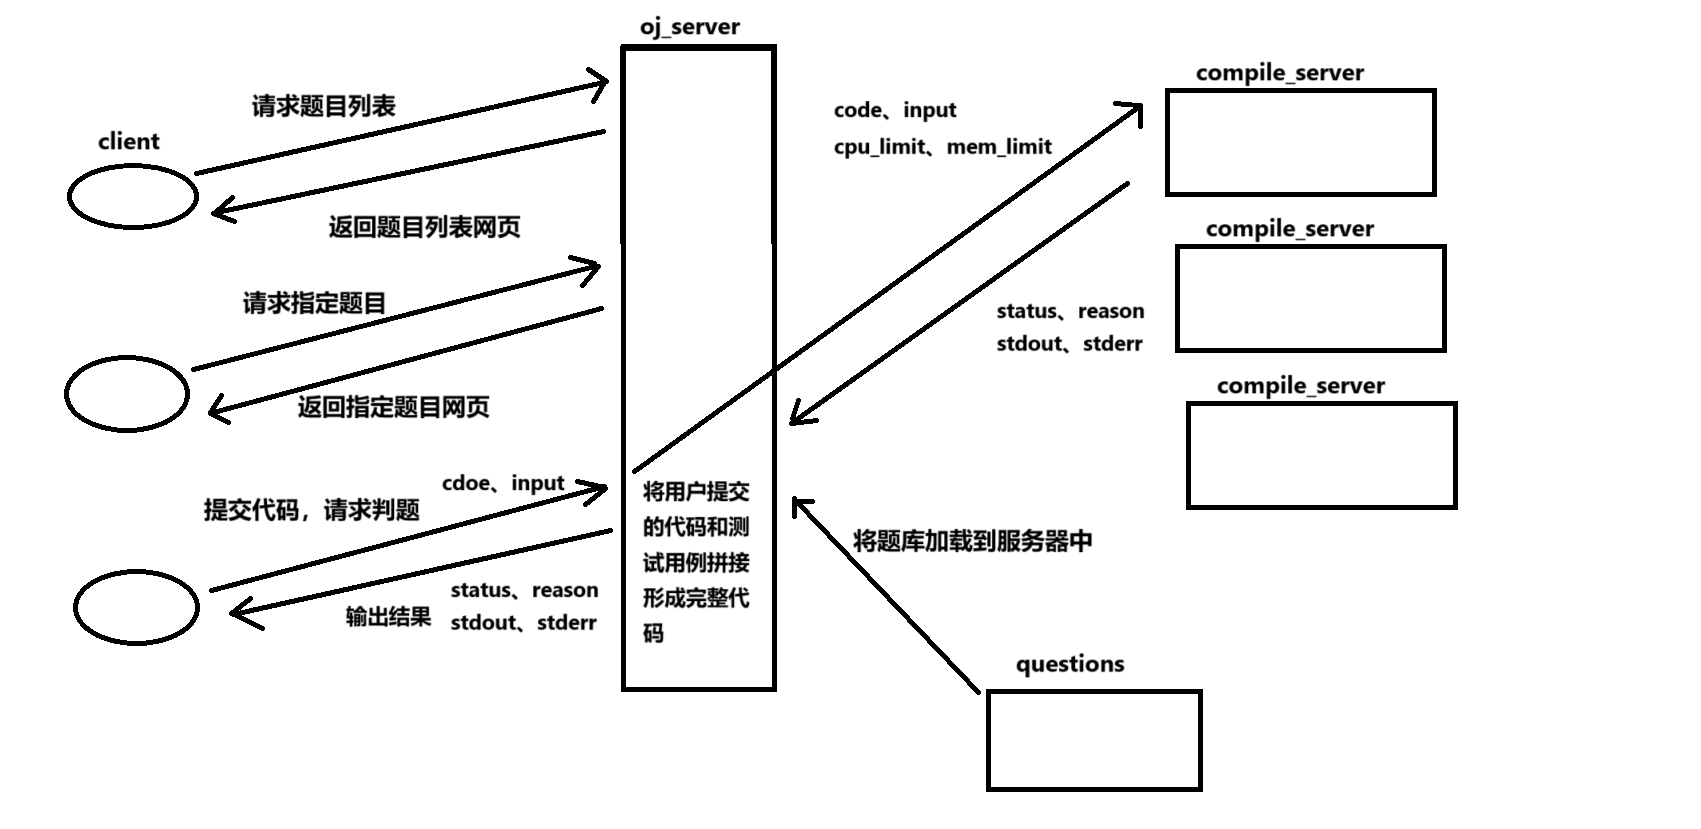
完整代码: OnlineJudge


 466
466

 被折叠的 条评论
为什么被折叠?


