


在线OJ系统
1. 需求
- 在线的网页版的编程平台
- 打开一个网站, 上面可以看到很多题目
- 在线做题, 在线提交, 立即就能看到运行结果, 是否通过
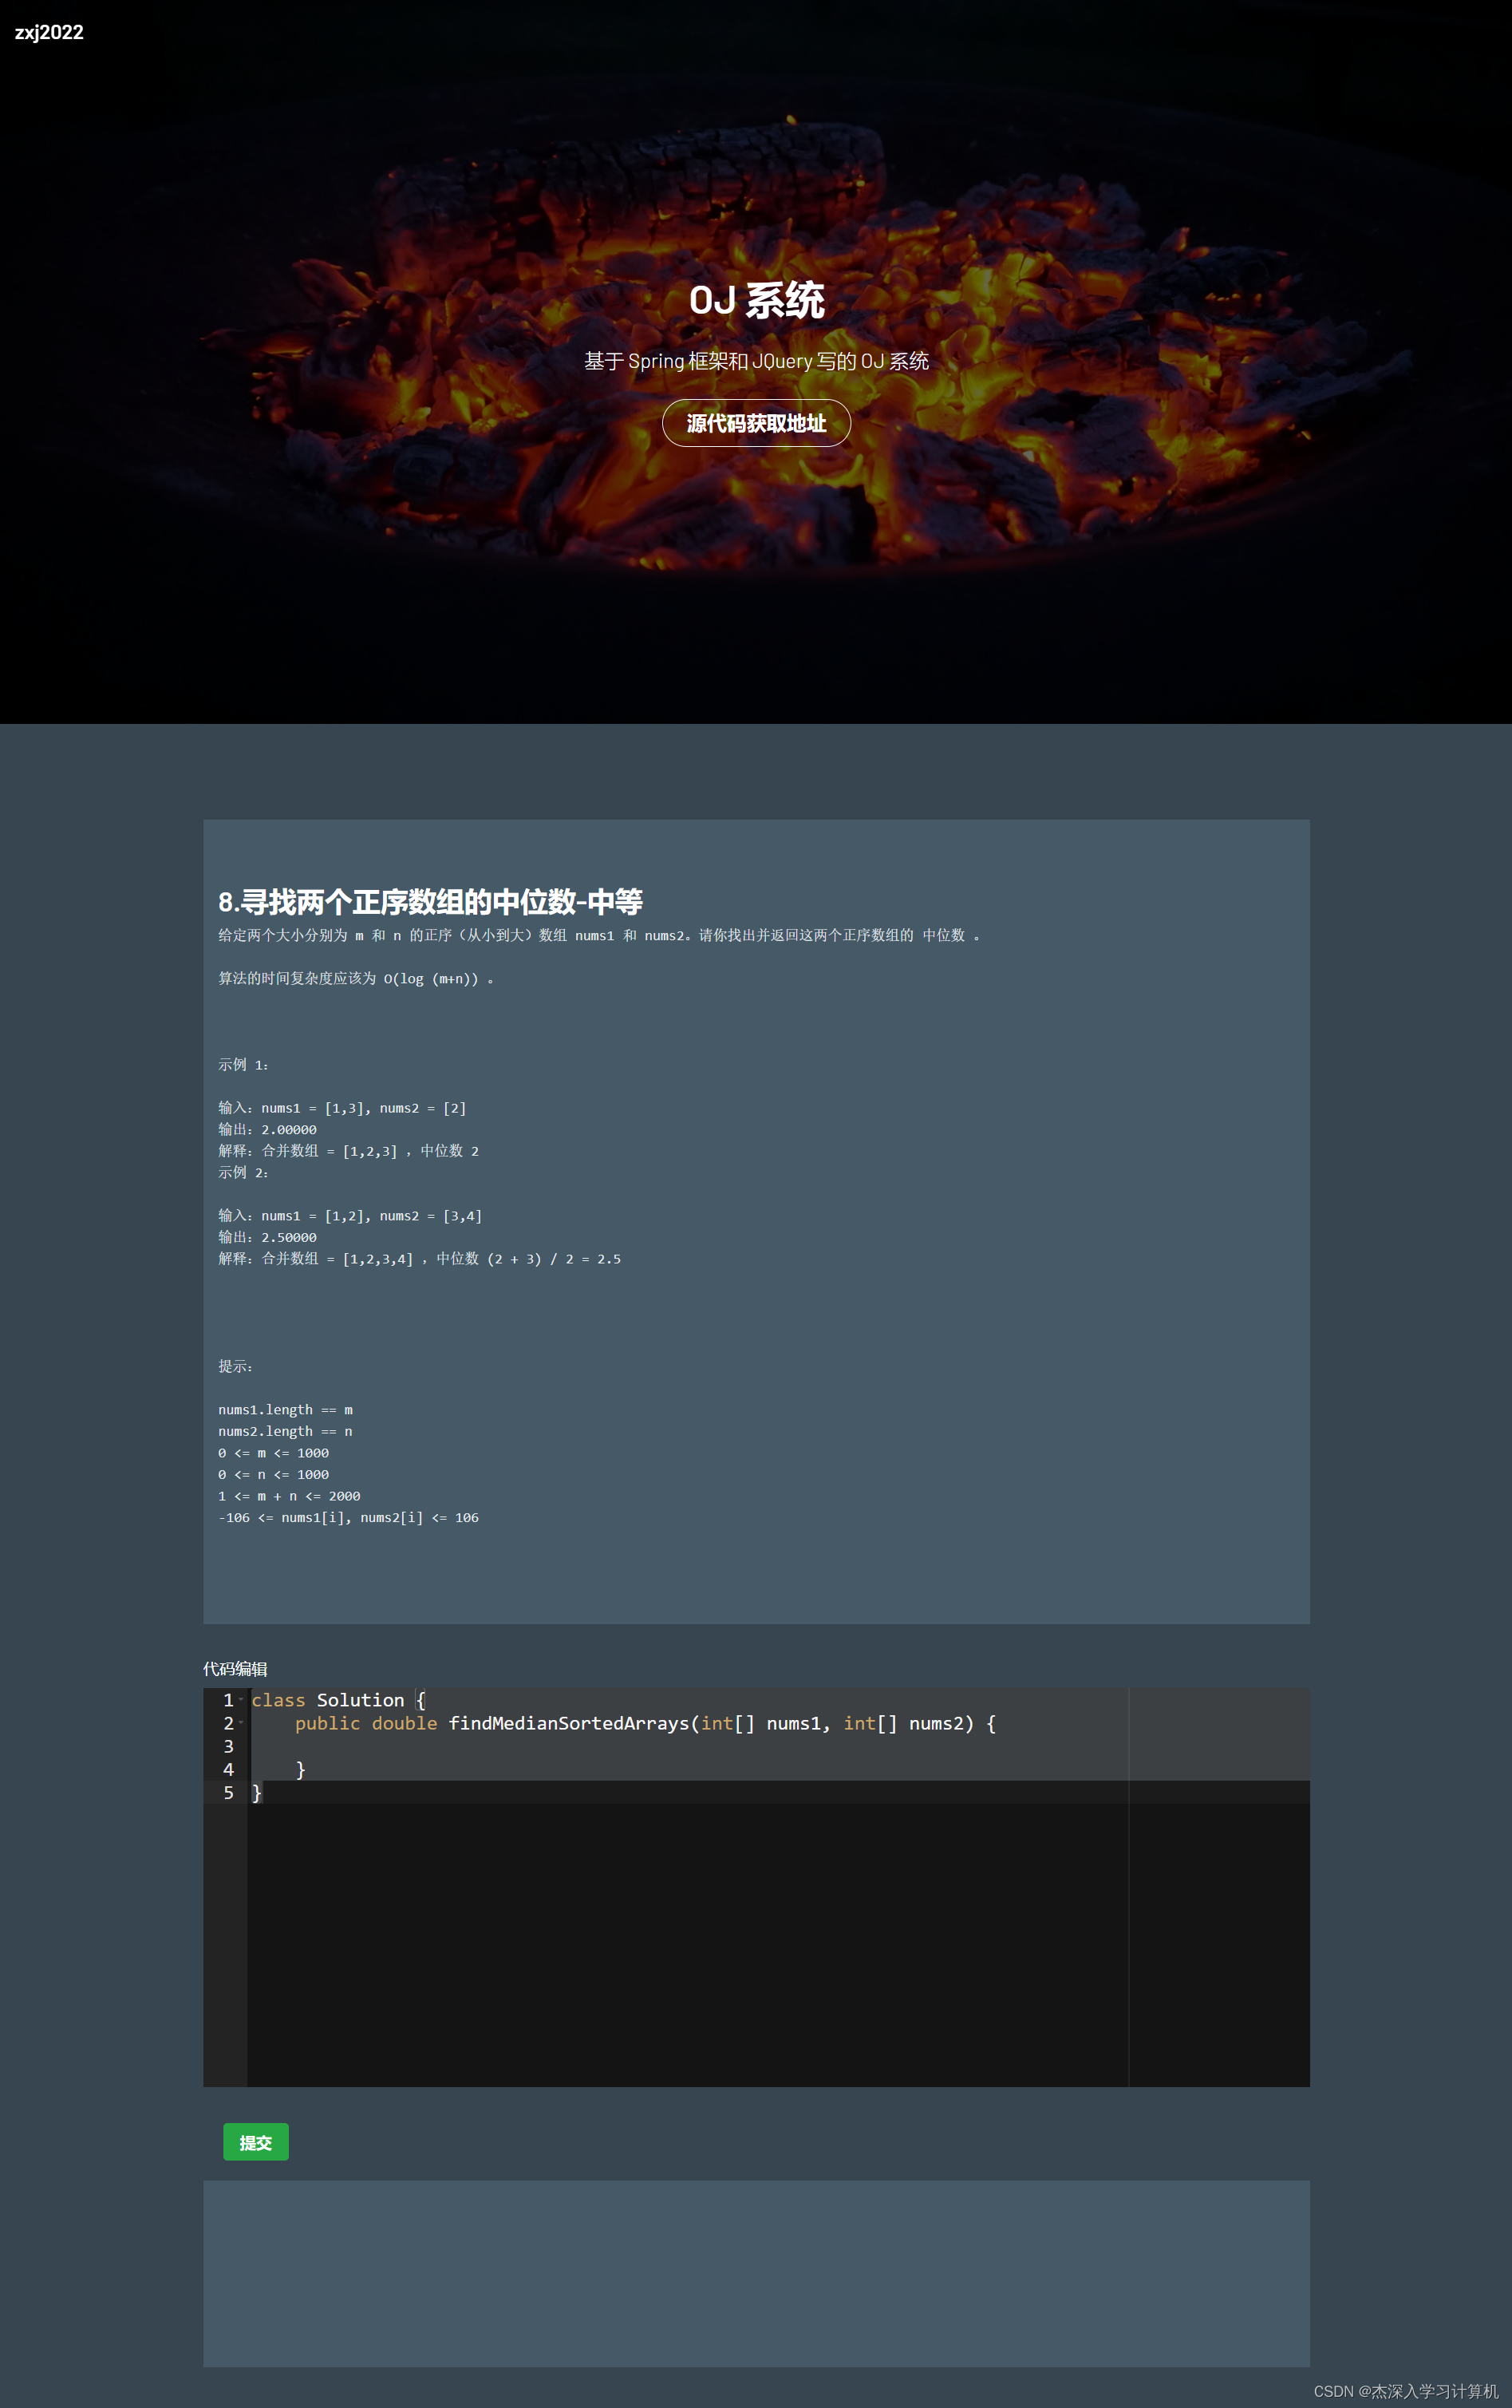
2. 最终页面展示
题目列表信息页

做题详情页
3. 需求分析
一个在线OJ的核心功能(参考 leetCode):
- 需要能够管理题目(保存很多的题目信息: 如标题, 题目难易程度, 题目描述, 测试用例, 编写代码模板等等)
- 题目列表页: 能够列举所有题目的信息
- 题目详情页: 能够展示某个题目的详细信息, 代码编辑框, 运行结果等.
- 提交并运行题目: 能够提交编辑好的代码, 并知道是否编译运行通过, 运行结果是否正确, 通过了几个测试用例.
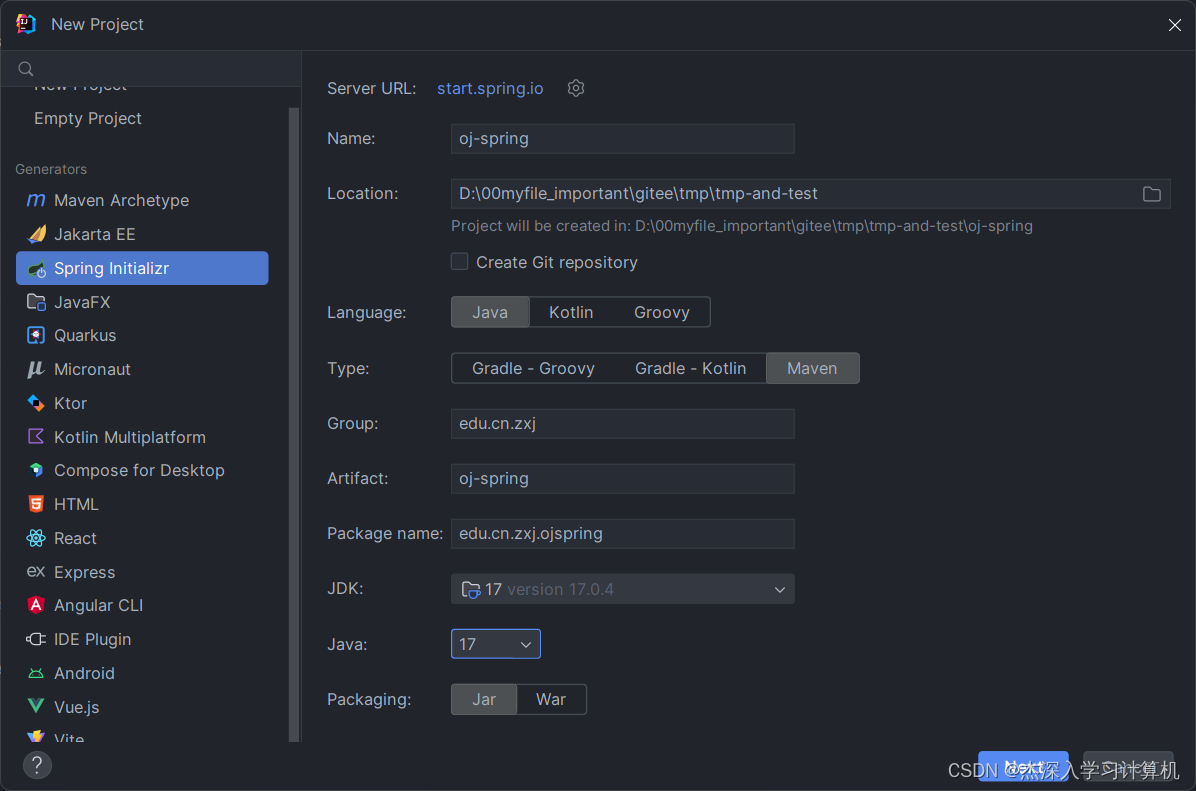
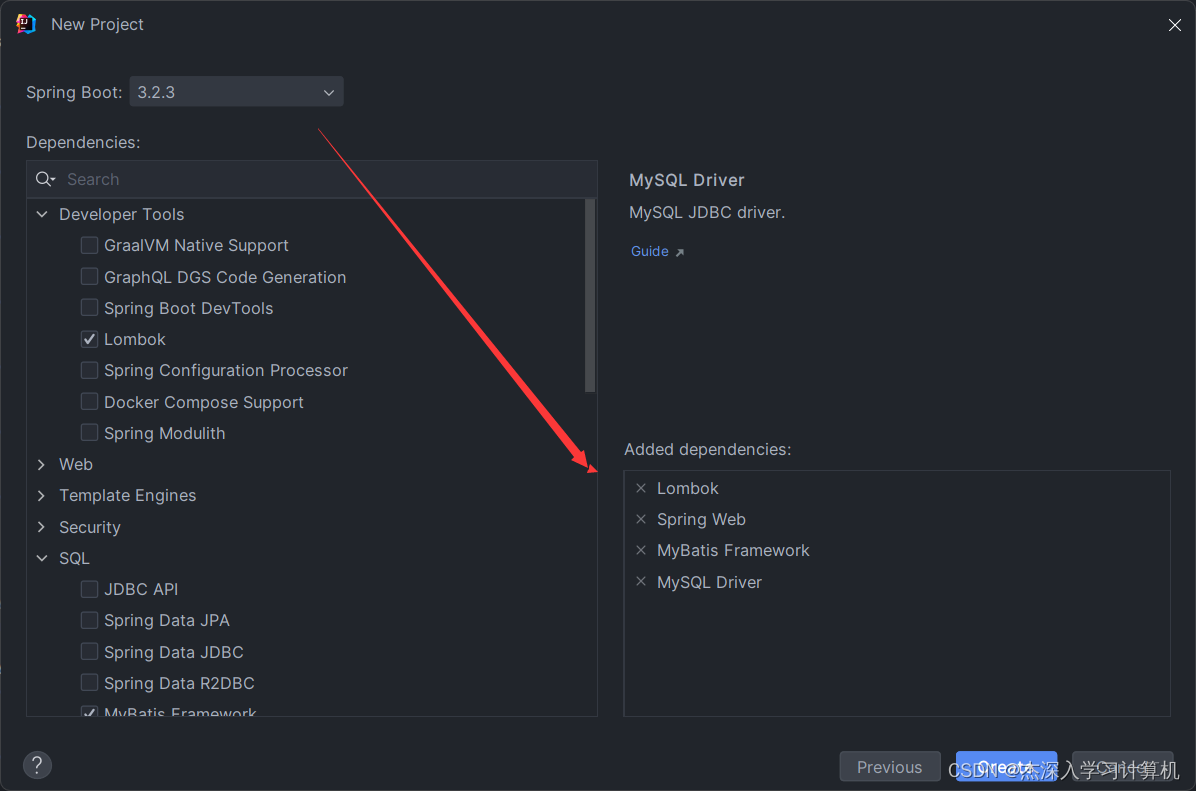
4. 创建 Spring 项目
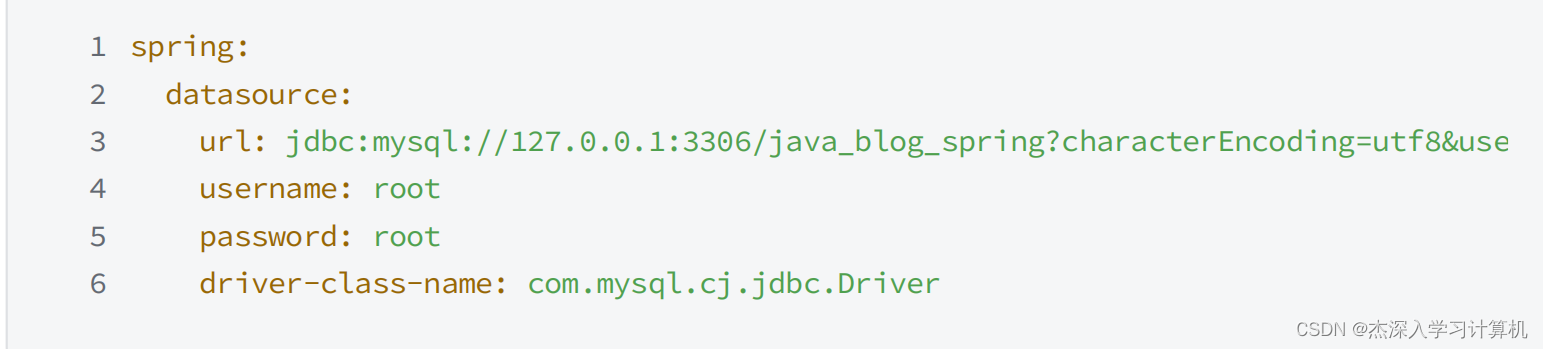
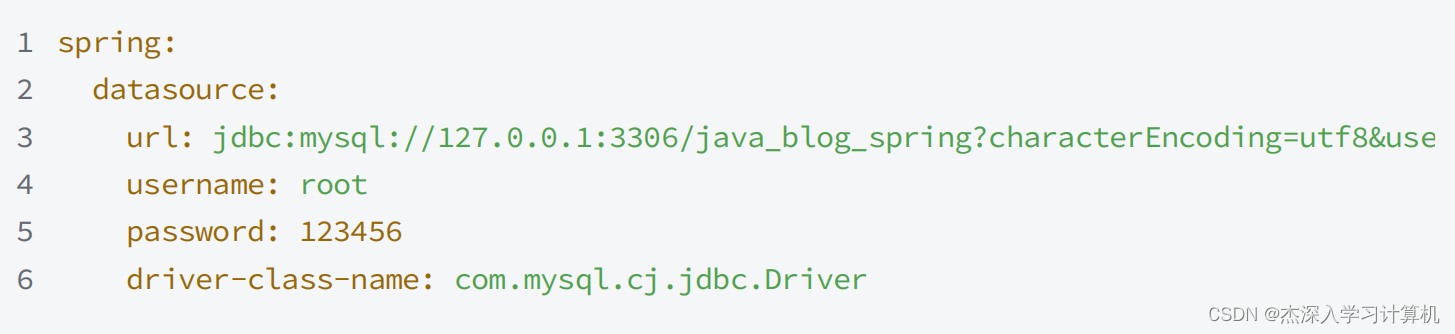
application.yml 配置文件
spring:
  datasource:
    url: jdbc:mysql://127.0.0.1:3306/oj_spring_database?characterEncoding=utf8&useSSL=false
    username: root
    password: 123456
    driver-class-name: com.mysql.cj.jdbc.Driver
mybatis:
  configuration:
    map-underscore-to-camel-case: true #配置驼峰自动转换
    log-impl: org.apache.ibatis.logging.stdout.StdOutImpl #打印sql语句
  mapper-locations: classpath:mapper/**Mapper.xml
# 设置日志文件的文件名
logging:
  file:
    name: logger/spring-blog.log
5. 前后端交互接口约定
- 获取题目列表
请求:
get /oj/getAllProblem HTTP/1.1

响应:
{
	code: 200,
	errMessage: "",
	data: {
		{
		id: 1,
		title: 两数相加,
		level: 简单,
		},
		{
			id: 2,
			title: 合并链表,
			level: 简单,
		},
		...
	}
}
- 获取题目详细信息页
请求:
get /oj/getProblemDetail?id=1 HTTP/1.1

响应:
{
	code: 200,
	errMessage: "",
	data: {
		id: 1,
		title: '两数相加',
		level: '简单',
		description: "给你两个 非空 的链表,表示两个非负的整数。它们每位数字都是按照 逆序 的方式存储的,并且每个节点只能存储 一位 数字。
请你将两个数相加,并以相同形式返回一个表示和的链表。
你可以假设除了数字 0 之外,这两个数都不会以 0 开头。',
		templateCode: '/**
 * Definition for singly-linked list.
 * public class ListNode {
 *     int val;
 *     ListNode next;
 *     ListNode() {}
 *     ListNode(int val) { this.val = val; }
 *     ListNode(int val, ListNode next) { this.val = val; this.next = next; }
 * }
 */
class Solution {
    public ListNode addTwoNumbers(ListNode l1, ListNode l2) {

    }
}",
	testCode: null
	...
	}
}
- 代码提交编译
请求:
post /compile
{
	id: 1,
	userCode: ''...."
}

响应:
{
	code: 200,
	errMessage: "",
	data: {
		error: 0 (0 表示编译和运行都正确, 非0表示错误),
		errorMessage: "",
		stdout: "testcase1 OK \n testcase2 OK"
	}
}
后续功能待开发 …
6. 后端功能实现
6.1 编译运行模块
6.1.1 进程和线程的相关知识
- 在Java中, 编译 .java 文件的指令是 javac, .java 文件经过编译之后生成 .class文件, 经过 java 命令就可以 .class 文件了;
- 指令其实也是一个程序, 一个程序运行起来后就是一个进程;
进程 和 线程
- 进程可以称为是 “任务”, 操作系统想要执行一个具体的 “动作”, 就需要创建出一个对应的进程
- 一个程序没有运行的时候, 仅仅是一个 “可执行文件”, 一个程序跑起来了, 就变成一个进程了
- 为了实现 “并发编程” (同时执行多个任务), 就引入了 “多进程编程”, 把一个很大的任务, 拆分成若干个很小的任务, 创建多个进程, 每个进程分别负责其中的一部分任务
- 但是也带来一个问题: 创建/销毁进程, 比较重量(比较低效)
- 所以就引入了线程, 每个线程都是一个独立的执行流, 一个进程包含了一个或者多个线程, 创建线程/销毁线程比创建进程/销毁进程更高效
- 因此, Java 圈中, 大部分的并发编程都是通过多线程的方式来实现的
- 线程相比于进程的优势就是轻量, 而进程相比于线程的优势: 进程的独立性
- 操作系统上, 同一个时刻运行着很多个进程, 如果某个进程挂了, 不会影响到其他进程. (每个进程都有各自的地址空间)
- 相比之下, 由于多个线程之间, 共用着同一个进程的地址空间, 某个线程挂了, 就很可能会把整个进程带走.
问: 对于在线OJ的编译和运行模块的功能来说, 是使用多线程编程呢? 还是使用多进程编程呢?
答: 采用多进程编程; 因为我们不知道用户的代码是怎么样的, 用户的代码中可能会存在错误, 如果是创建一个线程来编译和运行用户的代码, 其中如果出现报错, 该线程就会导致整个服务进程挂掉; 因此就需要一个新的进程来编译运行用户的代码.
6.1.2 Java 中的多进程编程
Java 的 RunTime 类
public class TestRuntime {
    public static void main(String[] args) throws IOException {
        // exec 的参数就是相当于直接终端中输入的指令, process 中存储着该指令执行的结果
        Process process = Runtime.getRuntime().exec("javac");
        // 标准输入, 标准输出, 标准错误 -- 可以从这些流中获取命令执行相关的结果
        InputStream inputStream = process.getInputStream();
        OutputStream outputStream = process.getOutputStream();
        InputStream errorStream = process.getErrorStream();
    }
}
6.1.3 进程间通信 – 文件
- 由于各个进程直接是独自拥有一个进程地址空间的, 是相对独立的, 而独立带来的问题就是不如线程之间通信容易;
- java命令需要知道 javac 命令编译 .java 文件后的结果, 而这两个命令是两个独立的进程, 为了这两个独立的进程之间进行通信, 则就需要"中间商", 也就是文件.
- javac 将编译后的结果写到一个公共的文件中, java 命令在从公共的文件中读取结果;
6.1.4 Java中的 IO 知识
- 在 Java 中, 操作文件(读写) 通过 IO 流相关的类来实现的
- Java 标准库中, 对于 IO的操作提供了很多现成的类, 这些类放在 java.io 这个包里
- 标准库中的这些类, 大概可以分成两大类
- 一大类是操作字节的(以字节为单位进行读写的)
- 一大类是操作字符的(以字符为单位进行读写的)
- 字节是 8 个 bit 位 (表示存储空间的基本单位)
- 字符表示一个"文字符号", 一个字符可能是由多个字节构成的.
- 因此就需要根据文件类型来决定按照字节操作还是字符操作
- 有的文件是二进制文件(这种就需要按照字节来操作)
- 有的文件是文本文件(这种就需要按照字符来操作)
- 怎么去区分一个文件是文本还是二进制呢?
- 简单的方法, 就是使用记事本打开, 看看是不是乱码, 如果是乱码, 就是二进制文件; 如果不是乱码, 就是文本文件
- 这是因为记事本是默认按照文本的方式来打开解析文件的
- 针对字节为单位进行读写的类, 统称为 “字节流”
- 字节流: InputStream, FileInputStream, OutputStream, FileOutputSteam
- 针对字符为单位进行读写的类, 统称为 “字符流”
- 字符流: Reader, FileReader, Writer, FileWriter
封装文件相关读写操作为一个类
package com.example.ojspring.util;

import java.io.*;

/**
 * Created with IntelliJ IDEA.
 * Description:封装文件读写相关的方法
 *
 * @author: zxj
 * @date: 2024-02-23
 * @time: 18:35:26
 */
public class FileUtils {
    /**
     * @description: 从指定的文件目录中读取文件内容到 String
     * @param: [fromFilePath 需要读取的文件目录]
     * @return: 返回一个字符串, 记录文件里面的内容
     **/
    public static String readFile(String fromFilePath) {
        try (Reader reader = new FileReader(fromFilePath)) {
            StringBuilder tmp = new StringBuilder();
            while (true) {
                int ch = reader.read();
                if (ch == -1) break;
                tmp.append((char)ch);
            }
            return tmp.toString();
        } catch (FileNotFoundException e) {
            e.printStackTrace();
        } catch (IOException e) {
            throw new RuntimeException(e);
        }
        return null;
    }

    /**
     * @description: 将content写入toFilePath
     * @param: [toFilePath 写入文件所在的目录, content 需要写的内容]
     **/
    public static void writeFile(String toFilePath,String content) {
        try (Writer writer = new FileWriter(toFilePath)){
            writer.write(content);
        } catch (IOException e) {
            e.printStackTrace();
        }
    }
}
6.1.5 封装创建进程执行命令工具类
package com.example.ojspring.util;

import java.io.FileOutputStream;
import java.io.IOException;
import java.io.InputStream;
import java.io.OutputStream;

/**
 * Created with IntelliJ IDEA.
 * Description:
 *
 * @author: zxj
 * @date: 2024-02-23
 * @time: 20:20:16
 */
public class CommandUtils {

    /**
     * @description: 执行 cmd 命令, 将信息存储到对应的文件中
     * @param: [cmd 执行指令, stdoutFilePath 存储标准输出内容, stderrFilePath 存储标准错误的内容]
     * @return:
     **/
    public static void run(String cmd,String stdoutFilePath,String stderrFilePath) {
        try {
            Process process = Runtime.getRuntime().exec(cmd);
            if (stdoutFilePath != null) {
                InputStream inputStream = process.getInputStream();
                try (OutputStream outputStream = new FileOutputStream(stdoutFilePath)){
                    while (true) {
                        int ch = inputStream.read();
                        if (ch == -1) break;
                        outputStream.write(ch);
                    }
                } finally {
                    inputStream.close();
                }
            }

            if (stderrFilePath != null) {
                InputStream inputStream = process.getErrorStream();
                try (OutputStream outputStream = new FileOutputStream(stderrFilePath)){
                    while (true) {
                        int ch = inputStream.read();
                        if (ch == -1) break;
                        outputStream.write(ch);
                    }
                } finally {
                    inputStream.close();
                }
            }
        } catch (IOException e) {
            e.printStackTrace();
        }
    }


    public static void main(String[] args) {
        run("javac","./stdout.txt","./stderr.txt");
    }
}
6.1.6 实现编译运行的核心方法
- Java 中编译要求文件名和类名相同, 参考 leetCode中的OJ题目, 我们可以规定类名统一为Solution
- 创建 CompileTask 类, 里面提供核心方法 compileAndRun 方法, 创建Question 类作为 CompileTask 的输入类, Answer 类作为返回结果的实体类
【Question 类】
/**
 * Created with IntelliJ IDEA.
 * Description:向编译运行提供的实体类
 *
 * @author: zxj
 * @date: 2024-02-23
 * @time: 20:44:57
 */
@Data
public class Question {
    // 需要编译运行的代码
    private String code;
    // ...
}
【Answer 类】
/**
 * Created with IntelliJ IDEA.
 * Description:
 *
 * @author: zxj
 * @date: 2024-02-23
 * @time: 20:44:50
 */
@Data
public class Answer {
    // 错误码: 0 表示编译运行都成功, 1 表示编译失败, 2 表示运行失败 ...
    private Integer errorCode;
    // 错误信息
    private String errorMessage;
    // 记录成功时的标准输出信息
    private String stdoutMessage;
}
【CompileTask】
/**
 * Created with IntelliJ IDEA.
 * Description:
 *
 * @author: zxj
 * @date: 2024-02-23
 * @time: 20:31:52
 */
@Data
@Slf4j
public class CompileTask {

    // 约定相关的文件名称
    // 工作目录
    private String wordDir;
    // 类名
    private String className;
    // .java 源文件
    private String codeFilename;
    // 标准输出 -- 记录的是测试用例的输出结果
    private String stdoutFilePath;
    // 标准错误, 运行是抛异常的记录
    private String stderrFilePath;
    // 编译时出现的错误
    private String compileErrFillPath;

    public CompileTask() {
        // 使用 UUID, 防止同时多个进程同时编译运行的时候, 出现进程安全的问题, 也就是为每一次执行编译运行时的进程提供自己的工作目录
        wordDir = "./tmp/" + UUID.randomUUID().toString() + "/";
        className = "Solution";
        codeFilename = wordDir + className + ".java";
        stdoutFilePath = wordDir + "stdout.txt";
        stderrFilePath = wordDir + "stderr.txt";
        compileErrFillPath = wordDir + "compile_err.txt";
    }

    /**
     * @description: 核心方法
     **/
    public Answer compileAndRun(Question question) {
        // 0. 判断工作目录是否存在, 不存在就创建
        File file = new File(wordDir);
        if (!file.exists()) {
            // 不存在, 创建
            file.mkdirs();
        }


        Answer answer = new Answer();
        // 1. 编译
        String code = question.getCode();
        // 1.1 将 code 写入 .java 文件中
        FileUtils.writeFile(codeFilename, code);
        // 1.2 构造编译指令 -d 选项表示将生成的.class文件放在哪一个目录下
        String compileCmd = String.format(
                "javac -encoding utf8 %s -d %s",
                codeFilename, wordDir);
        log.info("编译命令: {}", compileCmd);
        // 1.3 创建新进程执行javac编译命令
        CommandUtils.run(compileCmd, null, compileErrFillPath);
        // 1.4 判断编译是否出现错误, 即 判断 compileErrFillPath 所对应的文件中是否有内容
        String compileErrMessage = FileUtils.readFile(compileErrFillPath);
        if (StringUtils.hasLength(compileErrMessage)) {
            answer.setErrorCode(1);
            answer.setErrorMessage(compileErrMessage);
            return answer;
        }

        // 走到这里说明编译成功

        // 2. 运行
        // 2.1. 构造运行指令,     -classpath <目录和 zip/jar 文件的类搜索路径>
        String runCmd = String.format(
                "java -classpath %s %s",
                wordDir, className);
        log.info("运行指令: ", runCmd);
        // 2.2. 创建新进程执行 java 运行命令
        CommandUtils.run(runCmd, stdoutFilePath, stderrFilePath);
        // 2.4 判断运行是否出现错误, 即 判断 stderrFilePath 所对应的文件中是否有内容
        String stderrMessage = FileUtils.readFile(stderrFilePath);
        if (StringUtils.hasLength(stderrMessage)) {
            answer.setErrorCode(2);
            answer.setErrorMessage(stderrMessage);
            return answer;
        }

        // 走到这里, 说明编译和运行都正确

        // 3. 返回结果
        answer.setErrorCode(0);
        answer.setStdoutMessage(FileUtils.readFile(stdoutFilePath));
        return answer;
    }

}
6.2 数据库管理模块
6.2.1 题目管理
数据库设计
题目建表字段分析
- 题目标题
- 题目难度等级
- 题目描述
- 代码模板
- 测试用例
- …
题目数据创建sql
建表 sql
create database if not exists oj_spring_database charset utf8mb4;

use oj_spring_database;

SET FOREIGN_KEY_CHECKS = 0;

-- ----------------------------
-- Table structure for oj_table
-- ----------------------------
DROP TABLE IF EXISTS `oj_table`;
CREATE TABLE `oj_table`
(
    `id`           int(11)       NOT NULL AUTO_INCREMENT,
    `title`        varchar(64)   not null,
    `level`        varchar(32)   not null,
    `description`  varchar(4096) not null,
    `templateCode` varchar(4096) not null,
    `testCode`     varchar(4096) not null,
    `delete_flag`  tinyint(4) DEFAULT '0',
    `create_time`  datetime   DEFAULT CURRENT_TIMESTAMP,
    `update_time`  datetime   DEFAULT CURRENT_TIMESTAMP,
    PRIMARY KEY (`id`)
) ENGINE = InnoDB COMMENT ='题目表';
题目对应的 Java 对象
package com.example.ojspring.model.info;

import lombok.Data;
import org.springframework.stereotype.Component;

import java.util.Date;

/**
 * Created with IntelliJ IDEA.
 * Description:题目对应的信息实体类
 *
 * @author: zxj
 * @date: 2024-02-20
 * @time: 20:43:56
 */
@Data
@Component
public class OJInfo {
    private Integer id;
    private String title;
    private String level;
    private String description;
    private String templateCode;
    private String testCode;
    private Integer deleteFlag;
    private Date createTime;
    private Date updateTime;
}
OJMapper 编写
题目相关的增删改查操作 OJMapper
package com.example.ojspring.mapper;

import com.example.ojspring.model.info.OJInfo;
import org.apache.ibatis.annotations.Insert;
import org.apache.ibatis.annotations.Mapper;
import org.apache.ibatis.annotations.Select;
import org.apache.ibatis.annotations.Update;

import java.util.List;

/**
 * Created with IntelliJ IDEA.
 * Description:实现增删改查操作
 *
 * @author: zxj
 * @date: 2024-02-20
 * @time: 20:48:17
 */
@Mapper
public interface OJMapper {
    /**
     * @description: 查询所有的题目
     **/
    @Select("select id,title,level from oj_table where delete_flag = 0")
    List<OJInfo> selectAllOJ();

    /**
     * @description: 依据 ID 查询题目
     **/
    @Select("select id,title,level,description,template_code,test_code from oj_table where delete_flag = 0 and id = #{id}")
    OJInfo selectOJById(Integer id);

    /**
     * @description: 插入题目信息
     **/
    @Insert("insert into oj_table (title, level, description, template_code, test_code) values (#{title},#{level},#{description},#{templateCode},#{testCode})")
    Integer insert(OJInfo ojInfo);

    /**
     * @description: 逻辑删除题目
     **/
    @Update("update oj_table set delete_flag = 1 where id = #{id}")
    Integer delete(Integer id);
}
增删改查接口的测试
- 增添题目接口
@Test
    void insert() {
        OJInfo ojInfo = new OJInfo();
        ojInfo.setTitle("两数之和");
        ojInfo.setLevel("简单");
        ojInfo.setDescription("给定一个整数数组 nums 和一个整数目标值 target,请你在该数组中找出 和为目标值 target  的那 两个 整数,并返回它们的数组下标。\n" +
                "\n" +
                "你可以假设每种输入只会对应一个答案。但是,数组中同一个元素在答案里不能重复出现。\n" +
                "\n" +
                "你可以按任意顺序返回答案。\n" +
                "\n" +
                " \n" +
                "\n" +
                "示例 1:\n" +
                "\n" +
                "输入:nums = [2,7,11,15], target = 9\n" +
                "输出:[0,1]\n" +
                "解释:因为 nums[0] + nums[1] == 9 ,返回 [0, 1] 。\n" +
                "示例 2:\n" +
                "\n" +
                "输入:nums = [3,2,4], target = 6\n" +
                "输出:[1,2]\n" +
                "示例 3:\n" +
                "\n" +
                "输入:nums = [3,3], target = 6\n" +
                "输出:[0,1]\n" +
                " \n" +
                "\n" +
                "提示:\n" +
                "\n" +
                "2 <= nums.length <= 104\n" +
                "-109 <= nums[i] <= 109\n" +
                "-109 <= target <= 109\n" +
                "只会存在一个有效答案\n" +
                " \n" +
                "\n" +
                "进阶:你可以想出一个时间复杂度小于 O(n2) 的算法吗?");
        ojInfo.setTemplateCode("class Solution {\n" +
                "    public int[] twoSum(int[] nums, int target) {\n" +
                "\n" +
                "    }\n" +
                "}");
        ojInfo.setTestCode("public static void main(String[] args) {\n" +
                "        Solution solution = new Solution();\n" +
                "        // case1\n" +
                "        int[] nums1 = {2,7,11,15};\n" +
                "        int target1 = 9;\n" +
                "        int[] result1 = solution.twoSum(nums1,target1);\n" +
                "        if (result1 != null && result1.length == 2 && result1[0] == 0 && result1[1] == 1) {\n" +
                "            System.out.println(\"testcase1 ok\");\n" +
                "        } else {\n" +
                "            System.out.println(\"testcase1 ok fail\");\n" +
                "        }\n" +
                "\n" +
                "\n" +
                "        // case2\n" +
                "        int[] nums2 = {3,2,4};\n" +
                "        int target2 = 6;\n" +
                "        int[] result2 = solution.twoSum(nums1,target1);\n" +
                "        if (result2 != null && result2.length == 2 && result2[0] == 1 && result2[1] == 2) {\n" +
                "            System.out.println(\"testcase2 ok\");\n" +
                "        } else {\n" +
                "            System.out.println(\"testcase2 ok fail\");\n" +
                "        }\n" +
                "\n" +
                "\n" +
                "        // case3\n" +
                "        int[] nums3 = {3,3};\n" +
                "        int target3 = 6;\n" +
                "        int[] result3 = solution.twoSum(nums1,target1);\n" +
                "        if (result3 != null && result3.length == 2 && result3[0] == 0 && result3[1] == 1) {\n" +
                "            System.out.println(\"testcase3 ok\");\n" +
                "        } else {\n" +
                "            System.out.println(\"testcase3 ok fail\");\n" +
                "        }\n" +
                "    }");
        ojMapper.insert(ojInfo);
    }
测试用例的解决方法:
- 题目标题, 题目难度, 题目描述, 代码模板都可以在 力扣上获取, 但是测试用例无法拿到;
- 直接手搓一两个测试用例 如下
public static void main(String[] args) {
        Solution solution = new Solution();
        // case1
        int[] nums1 = {2,7,11,15};
        int target1 = 9;
        int[] result1 = solution.twoSum(nums1,target1);
        if (result1 != null && result1.length == 2 && result1[0] == 0 && result1[1] == 1) {
            System.out.println("testcase1 ok");
        } else {
            System.out.println("testcase1 ok fail");
        }


        // case2
        int[] nums2 = {3,2,4};
        int target2 = 6;
        int[] result2 = solution.twoSum(nums1,target1);
        if (result2 != null && result2.length == 2 && result2[0] == 1 && result2[1] == 2) {
            System.out.println("testcase2 ok");
        } else {
            System.out.println("testcase2 ok fail");
        }


        // case3
        int[] nums3 = {3,3};
        int target3 = 6;
        int[] result3 = solution.twoSum(nums1,target1);
        if (result3 != null && result3.length == 2 && result3[0] == 0 && result3[1] == 1) {
            System.out.println("testcase3 ok");
        } else {
            System.out.println("testcase3 ok fail");
        }
    }
- 查询
    @Test
    void selectAllOJ() {
        System.out.println(ojMapper.selectAllOJ());
    }

    @Test
    void selectOJBy() {
        System.out.println(ojMapper.selectOJById(1));
    }
6.3 前后端交互模块
6.3.1 OJ 题目数据交互
OJController 类
package cn.edu.zxj.ojspring.controller;

import cn.edu.zxj.ojspring.model.Result;
import cn.edu.zxj.ojspring.model.info.OJInfo;
import cn.edu.zxj.ojspring.service.OJService;
import lombok.extern.slf4j.Slf4j;
import org.springframework.beans.factory.annotation.Autowired;
import org.springframework.web.bind.annotation.RequestMapping;
import org.springframework.web.bind.annotation.RestController;

import java.util.List;

/**
 * Created with IntelliJ IDEA.
 * Description:
 *
 * @author: zxj
 * @date: 2024-02-21
 * @time: 17:02:26
 */
@RestController
@RequestMapping("/oj")
@Slf4j
public class OJController {

    @Autowired
    private OJService ojService;

    @RequestMapping("/getProblem")
    public List<OJInfo> getProblem() {
        log.info("接收到获取所有题目信息请求...");

        return ojService.getProblem();
    }

    @RequestMapping("/getProblemDetail")
    public Result getProblemDetail(Integer id) {
        log.info("接收到获取题目{} 详细信息请求...", id);

        // 参数校验
        if (id == null || id < 1) {
            return Result.fail("参数传入错误~");
        }

        OJInfo ojInfo = ojService.getProblemDetail(id);

        if (ojInfo == null) {
            return Result.fail("内部出现错误, 请联系管理员~");
        }

        return Result.success(ojInfo);

    }


}
OJService 类
package cn.edu.zxj.ojspring.service;

import cn.edu.zxj.ojspring.mapper.OJMapper;
import cn.edu.zxj.ojspring.model.info.OJInfo;
import lombok.extern.slf4j.Slf4j;
import org.springframework.beans.factory.annotation.Autowired;
import org.springframework.stereotype.Service;

import java.util.List;

/**
 * Created with IntelliJ IDEA.
 * Description:
 *
 * @author: zxj
 * @date: 2024-02-21
 * @time: 17:04:17
 */
@Service
@Slf4j
public class OJService {
    @Autowired
    private OJMapper ojMapper;

    public List<OJInfo> getProblem() {
        try {
            return ojMapper.selectAllOJ();
        } catch (Exception e) {
            log.error("数据库查询题目信息出错, e: {}", e);
        }
        return null;
    }

    public OJInfo getProblemDetail(Integer id) {
        try {
            OJInfo ojInfo = ojMapper.selectOJBy(id);
            ojInfo.setTestCode("");
            return ojInfo;
        } catch (Exception e) {
            log.error("数据库查询题目信息出错, e: {}", e);
        }
        return null;
    }
}
6.3.2 代码提交编译运行模块
CompileRequest 类
package cn.edu.zxj.ojspring.model.compile;

import lombok.Data;

/**
 * Created with IntelliJ IDEA.
 * Description:
 *
 * @author: zxj
 * @date: 2024-02-21
 * @time: 18:10:09
 */
@Data
public class CompileRequest {
    private Integer id;
    private String code;
}
package cn.edu.zxj.ojspring.model.compile;

import lombok.Data;

/**
 * Created with IntelliJ IDEA.
 * Description:
 *
 * @author: zxj
 * @date: 2024-02-21
 * @time: 18:10:26
 */
@Data
public class CompileResponse {
    // 约定 error 为 0 表示编译运行 ok, error 为 1 表示编译出错, error 为 2 表示运行异常(用户提交的代码异常了), 3 表示其他错误
    public Integer error;
    // 错误信息
    public String reason;
    // 测试用例通过情况
    public String stdout;
}
CompileController 类
package cn.edu.zxj.ojspring.controller;

import cn.edu.zxj.ojspring.model.Result;
import cn.edu.zxj.ojspring.model.compile.CompileRequest;
import cn.edu.zxj.ojspring.model.compile.CompileResponse;
import cn.edu.zxj.ojspring.service.CompileService;
import lombok.Data;
import lombok.extern.slf4j.Slf4j;
import org.springframework.beans.factory.annotation.Autowired;
import org.springframework.web.bind.annotation.RequestBody;
import org.springframework.web.bind.annotation.RequestMapping;
import org.springframework.web.bind.annotation.RestController;

/**
 * Created with IntelliJ IDEA.
 * Description:编译管理
 *
 * @author: zxj
 * @date: 2024-02-21
 * @time: 17:46:41
 */
@RestController
@Slf4j
public class CompileController {

    @Autowired
    private CompileService compileService;

    @RequestMapping("/compile")
    public Result compile(@RequestBody CompileRequest compileRequest) {
        log.info("接收到用户提交代码的请求, compileRequest: {}", compileRequest);

        CompileResponse compileResponse = compileService.compileAndRun(compileRequest);
        if (compileResponse == null) {
            return Result.fail("内部出现错误, 请联系管理员~");
        }

        return Result.success(compileResponse);
    }
}
CompileService 类
package cn.edu.zxj.ojspring.service;

import cn.edu.zxj.ojspring.controller.CompileController;
import cn.edu.zxj.ojspring.mapper.OJMapper;
import cn.edu.zxj.ojspring.model.compile.*;
import cn.edu.zxj.ojspring.model.info.OJInfo;
import cn.edu.zxj.ojspring.util.FileUtils;
import lombok.extern.slf4j.Slf4j;
import org.springframework.beans.factory.annotation.Autowired;
import org.springframework.stereotype.Service;

/**
 * Created with IntelliJ IDEA.
 * Description:
 *
 * @author: zxj
 * @date: 2024-02-21
 * @time: 18:04:35
 */
@Service
@Slf4j
public class CompileService {
    @Autowired
    private OJMapper ojMapper;


    public CompileResponse compileAndRun(CompileRequest compileRequest) {
        // 1. 查询数据, 获取测试用例的代码
        OJInfo ojInfo = ojMapper.selectOJBy(compileRequest.getId());

        if (ojInfo == null) {
            log.warn("查询数据库无结果, 题目 id: {}", compileRequest.getId());
            return null;
        }

        // 测试用例的代码 -- 里面包含 main 方法 形式如下
        /*
          public static void main(String[] args) {
          	Solution solution = new Solution();
              // testcase1
              if (solution.addDigits(38) == 2) {
              	System.out.println("Test OK");
              } else {
                  System.out.println("Test failed");
              }
              // testcase2
              if (solution.addDigits(111) == 3) {
              	System.out.println("Test OK");
              } else {
                  System.out.println("Test failed");
              }
          }
         */
        String testCode = ojInfo.getTestCode();

        log.info("testCode: {}", testCode);


        // 2. 获取用户的代码
        // 用户的代码
        /*
          class Solution {
              public double findMedianSortedArrays(int[] nums1, int[] nums2) {

              }
          }
         */
        String requestCode = compileRequest.getCode();
        log.info("requestCode: {}", requestCode);


        // 3. 合并代码
        String finalCode = mergeCode(testCode, requestCode);

        log.info("最终的代码: finalCode: {}", finalCode);

        // 4. 构造 compile.Task 来实现编译运行逻辑
        Task task = new Task();
        Question question = new Question();
        question.setCode(finalCode);
        Answer answer = task.compileAndRun(question);
        if (answer == null) {
            return null;
        }

        // 5. 依据 answer 构造 CompileResponse
        CompileResponse compileResponse = new CompileResponse();
        compileResponse.setError(answer.getError());
        compileResponse.setStdout(answer.getStdoutMessage());
        compileResponse.setReason(answer.getErrorMessage());

        return compileResponse;
    }

    private static String mergeCode(String testCode, String requestCode) {
        StringBuilder tmp = new StringBuilder();
        int pos = requestCode.lastIndexOf('}');
        if (pos == -1) {
            return null;
        }
        tmp.append(requestCode, 0, pos);
        tmp.append(testCode);
        tmp.append("\n}");
        return tmp.toString();
    }


    // public static void main(String[] args) {
    //     String testCode = "          public static void main(String[] args) {\n" +
    //             "          \tSolution solution = new Solution();\n" +
    //             "              // testcase1\n" +
    //             "              if (solution.addDigits(38) == 2) {\n" +
    //             "              \tSystem.out.println(\"Test OK\");\n" +
    //             "              } else {\n" +
    //             "                  System.out.println(\"Test failed\");\n" +
    //             "              }\n" +
    //             "              // testcase2\n" +
    //             "              if (solution.addDigits(111) == 3) {\n" +
    //             "              \tSystem.out.println(\"Test OK\");\n" +
    //             "              } else {\n" +
    //             "                  System.out.println(\"Test failed\");\n" +
    //             "              }\n" +
    //             "          }";
    //     String code = "          class Solution {\n" +
    //             "              public double findMedianSortedArrays(int[] nums1, int[] nums2) {\n" +
    //             "         \n" +
    //             "              }\n" +
    //             "          }";
    //     System.out.println(mergeCode(testCode,code));
    //     FileUtils.writeContentToFile("./tmp/Solution.java",mergeCode(testCode,code));
    // }

}
处理编译运行的逻辑:
- 用户传来CompileRequest实体类, 里面字段有 对应题目的Id, 还要用户编写的代码;
- 通过 id 查询数据库中对应的题目信息, 从题目信息中提取对应的测试代码;
- 从 CompileRequest 实体类中提取用户代码
- 使用 mergeCode 方法, 将测试方法拼接到用户代码最后的 } 之前
- 接着将 finalCode 构造成一个 Question 类, 交给 CompileTask 中的compileAndRun方法进行处理得到 answer结果
- 利用answer中的字段填充 CompileResponse中的字段进行返回
- 这里不把 answer 作为结果返回给前端, 是为了符合一个类只用于一个功能的原则
6.4 统一功能处理
6.4.1 统一结果返回
Result 类
package cn.edu.zxj.ojspring.model;

import lombok.Data;

/**
 * Created with IntelliJ IDEA.
 * Description:
 *
 * @author: zxj
 * @date: 2024-02-21
 * @time: 17:09:50
 */
@Data
public class Result {
    // 业务处理逻辑代码, 200 表示成功, -1 表示出现错误
    private Integer code;
    // 错误信息
    private String errMessage;
    // 返回的数据
    private Object data;


    public static Result success(Object data) {
        Result result = new Result();
        result.setCode(200);
        result.setErrMessage("");
        result.setData(data);
        return result;
    }


    public static Result fail(Object data,String errMessage) {
        Result result = new Result();
        result.setCode(-1);
        result.setErrMessage(errMessage);
        result.setData(data);
        return result;
    }

    public static Result fail(String errMessage) {
        Result result = new Result();
        result.setCode(-1);
        result.setErrMessage(errMessage);
        return result;
    }
}
ResponseAdvice 类 – 启用统一结果返回功能
package cn.edu.zxj.ojspring.config;

import cn.edu.zxj.ojspring.model.Result;
import com.fasterxml.jackson.databind.ObjectMapper;
import lombok.SneakyThrows;
import org.springframework.core.MethodParameter;
import org.springframework.http.MediaType;
import org.springframework.http.server.ServerHttpRequest;
import org.springframework.http.server.ServerHttpResponse;
import org.springframework.web.bind.annotation.ControllerAdvice;
import org.springframework.web.servlet.mvc.method.annotation.ResponseBodyAdvice;

/**
 * Created with IntelliJ IDEA.
 * Description:
 *
 * @author: zxj
 * @date: 2024-02-21
 * @time: 17:08:41
 */
@ControllerAdvice
public class ResponseAdvice implements ResponseBodyAdvice {

    @Override
    public boolean supports(MethodParameter returnType, Class converterType) {
        return true;
    }

    @SneakyThrows
    @Override
    public Object beforeBodyWrite(Object body, MethodParameter returnType, MediaType selectedContentType, Class selectedConverterType, ServerHttpRequest request, ServerHttpResponse response) {
        if (body instanceof Result) {
            return body;
        }

        if (body instanceof String) {
            ObjectMapper objectMapper = new ObjectMapper();
            return objectMapper.writeValueAsString(Result.success(body));
        }

        return Result.success(body);
    }
}
6.4.2 统一异常处理
package cn.edu.zxj.ojspring.config;

import cn.edu.zxj.ojspring.model.Result;
import lombok.extern.slf4j.Slf4j;
import org.springframework.web.bind.annotation.ControllerAdvice;
import org.springframework.web.bind.annotation.ExceptionHandler;
import org.springframework.web.bind.annotation.ResponseBody;

/**
 * Created with IntelliJ IDEA.
 * Description:
 *
 * @author: zxj
 * @date: 2024-02-21
 * @time: 17:29:42
 */
@ControllerAdvice
@Slf4j
@ResponseBody
public class ErrorAdvice {
    @ExceptionHandler
    public Result exceptionAdvice(Exception e) {
        log.error("发生错误, e: {}",e);

        return Result.fail("内部发生错误, 请联系管理员");
    }
}
7. 前端功能实现
一共需要两个页面:
- 题目列表页: 展示当前有哪些题目
- 题目详情页: 展示当前题目的细节, 包括提供一个代码编辑框, 让同学们编写代码.
使用网页模板
直接在百度上搜索 “免费网页模板”, 能找到很多免费模板网站. 可以直接基于现成的漂亮的页面进行修改.
tips: 做减法比做加法更容易.
将网页模板解压缩, 拷贝到项目的 static 目录中.
制作题目列表页
根据网页模板进行裁剪, 保留自己需要的部分.
主要是保留表格, 来作为展示题目列表的组件.
核心代码:
<div class="row mb-5" id="tables">
    <div class="col-sm-12">
        <div class="mt-3 mb-5">
            <h3>题目列表</h3>
            <table class="table table-striped">
                <thead>
                    <tr>
                        <th>编号</th>
                        <th>标题</th>
                        <th>难度</th>
                    </tr>
                </thead>
                <tbody id="problemTable">
                    <!-- <tr>
                        <td>1</td>
                        <td>
                        <a href="#">两数之和</a>
                        </td>
                        <td>简单</td>
                        </tr> -->
                </tbody>
            </table>
        </div>
    </div>
</div>
通过 ajax 获取后端数据
通过 ajax 的方式和后端交互, 获取到数据
在 methods 中创建 getProblems 方法
注意 url 的路径要用相对路径.
function getProblemList() {
        $.ajax({
            type: "get",
            url: "/oj/getProblem",
            success: function (result) {
                if (result != null && result.code == 200 && result.data != null) {
                    makeProblemTable(result.data);
                }
            }
        });

    }

    function makeProblemTable(problemList) {
        let problemTable = document.querySelector("#problemTable");
        for (let problem of problemList) {
            let tr = document.createElement("tr");

            // 序号
            let tdId = document.createElement("td");
            tdId.innerHTML = problem.id;
            tr.appendChild(tdId);

            // 题目
            let tdTitle = document.createElement("td");
            let aTitle = document.createElement("a");
            aTitle.innerHTML = problem.title;
            aTitle.href = "/oj/getProblemDetail?id=" + problem.id;
            aTitle.target = "_blank";
            tdTitle.appendChild(aTitle);
            tr.appendChild(tdTitle);

            // 难度
            let tdLevel = document.createElement("td");
            tdLevel.innerHTML = problem.level;
            tr.appendChild(tdLevel);

            problemTable.appendChild(tr);
        }

    }


    getProblemList();
制作题目详情页
先把题目列表页拷贝一份, 修改名字为 problemDetail.html
调整页面内容. 去掉表格了.
- 使用一个 jumbotron 表示题目详情
- 使用一个 textarea 表示代码编辑框
- 使用 button 表示提交按钮.
- 再使用一个 jumbotron 表示题目运行结果.
<div class="container">
    <div class="row mt-4">
        <div class="col-sm-12 pb-4">
            <div class="jumbotron jumbotron-fluid">
                <div class="container" id="problemDesc">
                    <!-- <h1>Container fluid size jumbotron</h1>
<p>Think BIG with a Bootstrap Jumbotron!</p> -->
                </div>
            </div>
        </div>
    </div>

    <div class="row mt-4">
        <div class="col-sm-12 pb-4">
            <div class="form-group">
                <label for="codeEditor">代码编辑框</label>
                    <textarea class="form-control" id="codeEditor" style="width: 100%; height: 400px;"></textarea>
            </div>
        </div>
    </div>

    <button type="button" class="btn btn-primary" id="submitButton">提交</button>

    <div class="row mt-4">
        <div class="col-sm-12 pb-4">
            <div class="jumbotron jumbotron-fluid">
                <div class="container">
                    <pre id="problemResult">

                                </pre>
                    <!-- <h1>Container fluid size jumbotron</h1>
<p>Think BIG with a Bootstrap Jumbotron!</p> -->
                </div>
            </div>
        </div>
    </div>
</div>
注意
- 页面的基本结构为 .container -> .row -> .col -> 组件元素
- 在这个页面模板中, 一行被分成了 12 份.
.col-sm-12表示这一列的宽度占据了 12 份(相当于 100%), 如果是.col-sm.6则表示占据 6 份(相当于 50%)- mt-4 表示 margin-top, pb-4 表示 padding-bottom
- 使用 pre 标签, 可以使填充的内容保留换行.
从服务器上获取题目详情
在跳转到题目详情页中, 首先会把题目列表页的题目编号带过来.
题目详情页获取到编号, 通过 ajax 来获取题目详情.
function getProblemDetail() {
$.ajax({
type: "get",
url: "/oj/getProblemDetail" + location.search,
success: function (result) {
if (result != null && result.code == 200 && result.data != null) {
makeProblemDetail(result.data);
}
}
});
}
function makeProblemDetail(problem) {
let problemDetail = document.querySelector("#problemDetail");
let firstRow = problem.id + "." + problem.title + '-' + problem.level;
let h3 = document.createElement("h3");
h3.innerHTML = firstRow;
problemDetail.appendChild(h3);
let pDescription = document.createElement("p");
let preDescription = document.createElement("pre");
preDescription.innerHTML = problem.description;
pDescription.appendChild(preDescription);
problemDetail.appendChild(pDescription);
let codeEditor = document.querySelector("#codeEditor");
codeEditor.innerHTML = problem.templateCode;
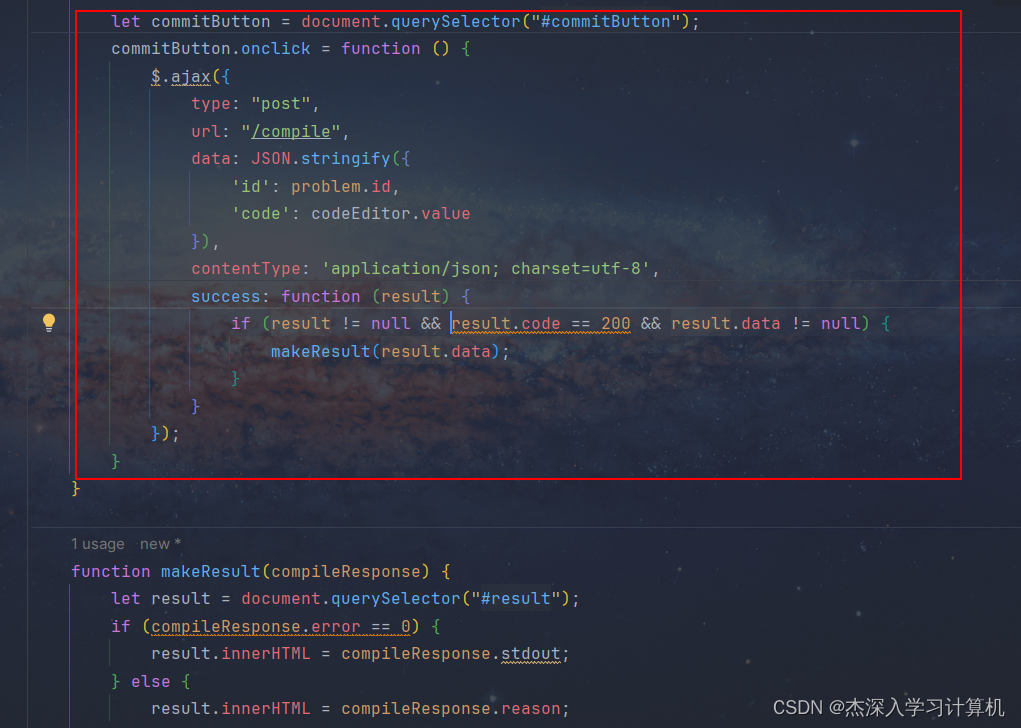
let commitButton = document.querySelector("#commitButton");
commitButton.onclick = function () {
$.ajax({
type: "post",
url: "/compile",
data: JSON.stringify({
'id': problem.id,
'code': codeEditor.value
}),
contentType: 'application/json; charset=utf-8',
success: function (result) {
if (result != null && result.code == 200 && result.data != null) {
makeResult(result.data);
}
}
});
}
}
function makeResult(compileResponse) {
let result = document.querySelector("#result");
if (compileResponse.error == 0) {
result.innerHTML = compileResponse.stdout;
} else {
result.innerHTML = compileResponse.reason;
}
}
getProblemDetail();
实现提交代码
在刚才的 makeProblemDetail 函数中, 新增一个逻辑来实现提交代码.
引入代码编辑器组件
引入 ace.js
<script src="https://cdn.bootcss.com/ace/1.2.9/ace.js"></script>
<script src="https://cdn.bootcss.com/ace/1.2.9/ext-language_tools.js"></script>
初始化编辑器
function initAce() {
    // 参数 editor 就对应到刚才在 html 里加的那个 div 的 id
    let editor = ace.edit("editor");
    editor.setOptions({
        enableBasicAutocompletion: true,
        enableSnippets: true,
        enableLiveAutocompletion: true
    });
    editor.setTheme("ace/theme/twilight");
    editor.session.setMode("ace/mode/java");
    editor.resize();
    document.getElementById('editor').style.fontSize = '20px';

    return editor;
}

let editor = initAce();
并且将页面编辑框外面套一层 div, id 设为 editor, 并且一定要设置 min-height 属性.
<div id="editor" style="min-height:400px">
    <textarea style="width: 100%; height: 200px"></textarea>
</div>
修改 makeProblemDetail 方法
把显示模板代码的逻辑改为
// let codeEditor = document.querySelector("#codeEditor");
// codeEditor.innerHTML = problem.templateCode;
editor.setValue(this.problem.templateCode);
修改提交代码
把请求中的获取编辑器代码的逻辑进行修改.
submitButton.onclick = function () {
    // 点击这个按钮, 就要进行提交. (把编辑框的内容给提交到服务器上)
    let body = {
        id: problem.id,
        // code: codeEditor.value,
        code: editor.getValue(),
    }
    // ..... 其他代码略
}
8. 拓展功能
加入安全性控制
为了避免用户提交的代码包含恶意代码, 此处通过黑名单的方式, 对提交代码进行扫描限制. 如果发现用户提交代码中包含了黑名单中的关键词, 则直接报错.
在 Task 类中新增逻辑
public Answer compileAndRun(Question question) {
    Answer answer = new Answer();
    // 0. 准备好用来存放临时文件的目录
    File workDir = new File(WORK_DIR);
    if (!workDir.exists()) {
        // 创建多级目录.
        workDir.mkdirs();
    }
    // [新增代码] 进行安全性判定
    if (!checkCodeSafe(question.getCode())) {
        System.out.println("用户提交了不安全的代码!");
        answer.setError(3);
        answer.setReason("您提交的代码可能会危害到服务器, 禁止运行!");
        return answer;
    }
    // .... 其他代码略
}
checkCodeSafe 方法实现
private boolean checkCodeSafe(String code) {
    List<String> blackList = new ArrayList<>();
    // 防止提交的代码运行恶意程序
    blackList.add("Runtime");
    blackList.add("exec");
    // 禁止提交的代码读写文件
    blackList.add("java.io");
    // 禁止提交的代码访问网络
    blackList.add("java.net");

    for (String target : blackList) {
        int pos = code.indexOf(target);
        if (pos >= 0) {
            // 找到任意的恶意代码特征, 返回 false 表示不安全
            return false;
        }
    }
    return true;
}
9. 将项目部署到 Linux 服务器上面
9.1 在Linux上执行建库建表操作
执行以下 sql 语句
create database if not exists oj_spring_database charset utf8mb4;

use oj_spring_database;
/*
Navicat MySQL Data Transfer

Source Server         : localhost_3306
Source Server Version : 80017
Source Host           : localhost:3306
Source Database       : oj_spring_database

Target Server Type    : MYSQL
Target Server Version : 80017
File Encoding         : 65001

Date: 2024-02-22 15:20:07
*/

SET FOREIGN_KEY_CHECKS=0;

-- ----------------------------
-- Table structure for oj_table
-- ----------------------------
DROP TABLE IF EXISTS `oj_table`;
CREATE TABLE `oj_table` (
                            `id` int(11) NOT NULL AUTO_INCREMENT,
                            `title` varchar(50) NOT NULL COMMENT '文章标题',
                            `level` varchar(50) NOT NULL COMMENT '题目难度',
                            `description` varchar(4096) NOT NULL COMMENT '题目描述',
                            `template_code` varchar(4096) NOT NULL COMMENT '代码初始化',
                            `test_code` varchar(4096) NOT NULL COMMENT '测试代码',
                            `delete_flag` tinyint(4) DEFAULT '0',
                            `create_time` datetime DEFAULT CURRENT_TIMESTAMP,
                            `update_time` datetime DEFAULT CURRENT_TIMESTAMP,
                            PRIMARY KEY (`id`)
) ENGINE=InnoDB COMMENT='题目表';

-- ----------------------------
-- Records of oj_table
-- ----------------------------
INSERT INTO `oj_table` VALUES ('8', '寻找两个正序数组的中位数', '中等', '给定两个大小分别为 m 和 n 的正序(从小到大)数组 nums1 和 nums2。请你找出并返回这两个正序数组的 中位数 。\r\n\r\n算法的时间复杂度应该为 O(log (m+n)) 。\r\n\r\n \r\n\r\n示例 1:\r\n\r\n输入:nums1 = [1,3], nums2 = [2]\r\n输出:2.00000\r\n解释:合并数组 = [1,2,3] ,中位数 2\r\n示例 2:\r\n\r\n输入:nums1 = [1,2], nums2 = [3,4]\r\n输出:2.50000\r\n解释:合并数组 = [1,2,3,4] ,中位数 (2 + 3) / 2 = 2.5\r\n \r\n\r\n \r\n\r\n提示:\r\n\r\nnums1.length == m\r\nnums2.length == n\r\n0 <= m <= 1000\r\n0 <= n <= 1000\r\n1 <= m + n <= 2000\r\n-106 <= nums1[i], nums2[i] <= 106', 'class Solution {\r\n    public double findMedianSortedArrays(int[] nums1, int[] nums2) {\r\n\r\n    }\r\n}', 'public static void main(String[] args) {\r\n        Solution solution = new Solution();\r\n\r\n\r\n        // testcase1\r\n        if (solution.findMedianSortedArrays(new int[]{1, 3}, new int[]{2}) == 2.00000) {\r\n            System.out.println(\"Test1 OK\");\r\n        } else {\r\n            System.out.println(\"Test1 failed\");\r\n        }\r\n        // testcase2\r\n        if (solution.findMedianSortedArrays(new int[]{1, 3}, new int[]{2, 4}) == 2.50000) {\r\n            System.out.println(\"Test2 OK\");\r\n        } else {\r\n            System.out.println(\"Test2 failed\");\r\n        }\r\n    }', '0', '2024-02-21 20:22:57', '2024-02-21 20:22:57');
9.2 多平台⽂件配置
针对不同平台创建不同的配置⽂件, 要求名字为application-XXX.yml或者application-XXX.properties
application-dev.yml
application-prod.yml
在主配置⽂件 application.yml 中指定配置⽂件, 并删除数据库相关配置

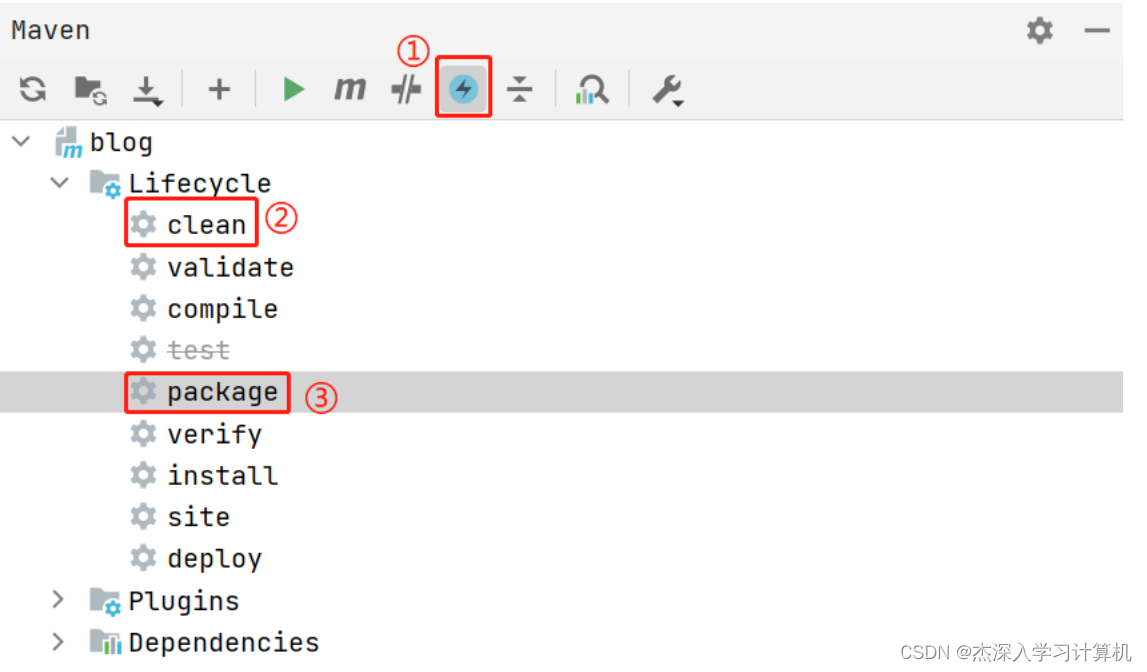
9.3 使用 Maven 打包成 jar
- 如果Test代码中有与环境配置相关的操作(⽐如数据库相关的操作), 打包会失败, 点击下图①处的图标, 可以跳过测试
- 点击clean->package
9.4 上传Jar包到服务器, 并运⾏
- 上传Jar包
直接拖动打好的jar包到xshell窗⼝即可完成⽂件的上传 - 运⾏程序
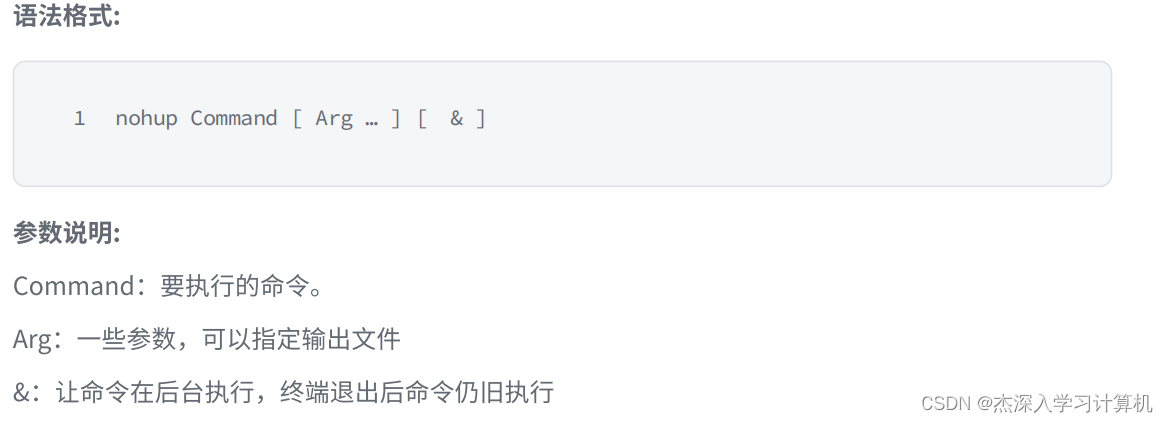
nohup java -jar blog-spring-0.0.1-SNAPSHOT.jar &
nohup : 后台运⾏程序. ⽤于在系统后台不挂断地运⾏命令,退出终端不会影响程序的运⾏
10. 总结
- 项目的基本需求
- 题目列表页
- 题目详情页
- ``
- 代码编辑框
- 提交给服务器编译运行
- 展示结果
- 利用了多进程编程, 基于多进程编程(Runtime) 封装了一个 CommandUtils 类, 就可以创建进程执行一个具体的任务, 同时把输出结果记录到指定的文件中;
- 创建了一个 Task 类, 调用 CommandUtils 封装了一个 完整的 “编译-运行” 过程, 后面又给 Task 类扩充了一个基于黑名单的安全代码校验
- 设计了数据库, 封装了数据库操作, OJInfo, OJMapper
- 设计了前后端交互的接口
- 获取题目列表
- 获取题目详情
- 编译运行
- 基于 Spring 实现了这几个接口
- 引入了代码模板, 基于代码模板进行了修改, 创建除了两个页面
- 题目列表页 index.html
- 题目详情页 problemDetail.html
- 通过 js 代码, 实现了前端调用 HTTP API 的过程引入
- 引入 ace.js 让代码编辑框变得更加友好


 1170
1170


 被折叠的 条评论
为什么被折叠?
被折叠的 条评论
为什么被折叠?
 到【灌水乐园】发言


