


目录
前言
LinearLayout的权重属性weight对屏幕适配有较大的帮助,但当界面比较复杂的时候,需要嵌套多层的LinearLayout,这样就会降低UI Render渲染速度,而且如果是listview或者GridView上的 item,效率会更低,另外太多层LinearLayout嵌套会占用更多的系统资源,还有可能引发stackoverflow。这时候用RelativeLayout就会显得高效一些。
基本属性
gravity:可设置该容器内的对其方式
ignoreGravity:通过索引设置子控件/子布局不受 gravity 属性的影响
实例
设置相对布局,该相对布局对齐方式设置为中心对齐
将该容器内的子相对布局 test1 设置为不受 gravity 影响
<?xml version="1.0" encoding="utf-8"?>
<RelativeLayout xmlns:android="http://schemas.android.com/apk/res/android"
    android:layout_width="match_parent"
    android:layout_height="match_parent"
    android:gravity="center"
    android:ignoreGravity="@id/test1">

    <View
        android:id="@+id/test"
        android:layout_width="100dp"
        android:layout_height="100dp"
        android:background="#000000"></View>

    <View
        android:layout_width="90dp"
        android:layout_height="90dp"
        android:background="#fff000"></View>

    <View
        android:layout_width="80dp"
        android:layout_height="80dp"
        android:background="#ff0000"></View>

    <RelativeLayout xmlns:android="http://schemas.android.com/apk/res/android"
        android:id="@+id/test1"
        android:layout_width="60dp"
        android:layout_height="60dp"
        android:background="#f00f" ></RelativeLayout>

</RelativeLayout>
为了方便查看颜色,贴出 Android Studio 编辑界面

效果图

Q:如何设置多个子控件/子布局不受 gravity 影响?
查阅官方API后,仍然无法解决...
有知道的小伙伴可以留言告诉我

根据父容器定位
相关属性

示例
<?xml version="1.0" encoding="utf-8"?>
<RelativeLayout xmlns:android="http://schemas.android.com/apk/res/android"
    android:layout_width="match_parent"
    android:layout_height="match_parent">

    <View
        android:id="@+id/test"
        android:layout_width="100dp"
        android:layout_height="100dp"
        android:background="#000000"
        android:layout_alignParentBottom="true"></View>

    <View
        android:layout_width="90dp"
        android:layout_height="90dp"
        android:background="#fff000"
        android:layout_alignParentRight="true"></View>

    <View
        android:layout_width="80dp"
        android:layout_height="80dp"
        android:background="#ff0000"></View>

    <RelativeLayout xmlns:android="http://schemas.android.com/apk/res/android"
        android:id="@+id/test1"
        android:layout_width="60dp"
        android:layout_height="60dp"
        android:background="#f00f"
        android:layout_centerInParent="true"></RelativeLayout>

</RelativeLayout>
效果图

根据兄弟组件定位
相关属性

示例
<?xml version="1.0" encoding="utf-8"?>
<RelativeLayout xmlns:android="http://schemas.android.com/apk/res/android"
    android:layout_width="match_parent"
    android:layout_height="match_parent">

    <View
        android:id="@+id/test"
        android:layout_width="100dp"
        android:layout_height="100dp"
        android:background="#000000"></View>

    <View
        android:layout_width="90dp"
        android:layout_height="90dp"
        android:background="#fff000"
        android:layout_alignRight="@id/test1"
        android:layout_alignTop="@id/view_red"></View>

    <View
        android:id="@+id/view_red"
        android:layout_width="80dp"
        android:layout_height="80dp"
        android:layout_below="@id/test"
        android:background="#ff0000"></View>

    <RelativeLayout xmlns:android="http://schemas.android.com/apk/res/android"
        android:id="@+id/test1"
        android:layout_width="180dp"
        android:layout_height="60dp"
        android:background="#f00f"
        android:layout_centerInParent="true">
        <view
            android:id="@+id/view_1"
            android:layout_width="50dp"
            android:layout_height="50dp"
            android:background="#555555"></view>

        <view
            android:layout_width="50dp"
            android:layout_height="50dp"
            android:layout_toRightOf="@id/view_1"
            android:background="#AC5959"></view>
    </RelativeLayout>

</RelativeLayout>
效果图


Q:注意到图中蓝色方块的控件 view 代码中设置了颜色,而显示颜色为灰色;为什么?
查阅后发现,此处 ![]() 为小写,改成
为小写,改成 ![]() 后即显色正常。
后即显色正常。
偏移(margin)
相关属性

示例
<RelativeLayout xmlns:android="http://schemas.android.com/apk/res/android"
    android:layout_width="match_parent"
    android:layout_height="match_parent">

    <Button
        android:id="@+id/btn1"
        android:layout_height="wrap_content"
        android:layout_width="wrap_content"
        android:text="Button"
        android:background="#fff000"></Button>

    <Button
        android:layout_marginLeft="10dp"
        android:layout_height="wrap_content"
        android:layout_width="wrap_content"
        android:text="Button"
        android:background="#f00000"
        android:layout_toRightOf="@id/btn1"></Button>

</RelativeLayout>
效果图

另外 margin 可以设置为负数,将上例程序做以下修改
android:layout_marginLeft = "-100dp"
填充 (padding)
相关属性

示例
<RelativeLayout xmlns:android="http://schemas.android.com/apk/res/android"
    android:layout_width="match_parent"
    android:layout_height="match_parent">

    <Button
        android:id="@+id/btn1"
        android:layout_height="wrap_content"
        android:layout_width="wrap_content"
        android:text="Button"
        android:background="#fff000"></Button>

    <Button
        android:paddingLeft="100dp"
        android:layout_height="wrap_content"
        android:layout_width="wrap_content"
        android:text="Button"
        android:background="#f00000"
        android:layout_toRightOf="@id/btn1"></Button>

</RelativeLayout>
效果图

margin与padding的区别
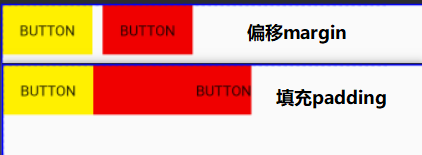
偏移 (margin) 代表外边距;表示组件与容器的距离
填充 (padding) 代表内边距;表示组件与内部元素的距离,例如按钮与内部 text 的距离


 9万+
9万+

 被折叠的 条评论
为什么被折叠?
被折叠的 条评论
为什么被折叠?
 到【灌水乐园】发言


