


文章目录
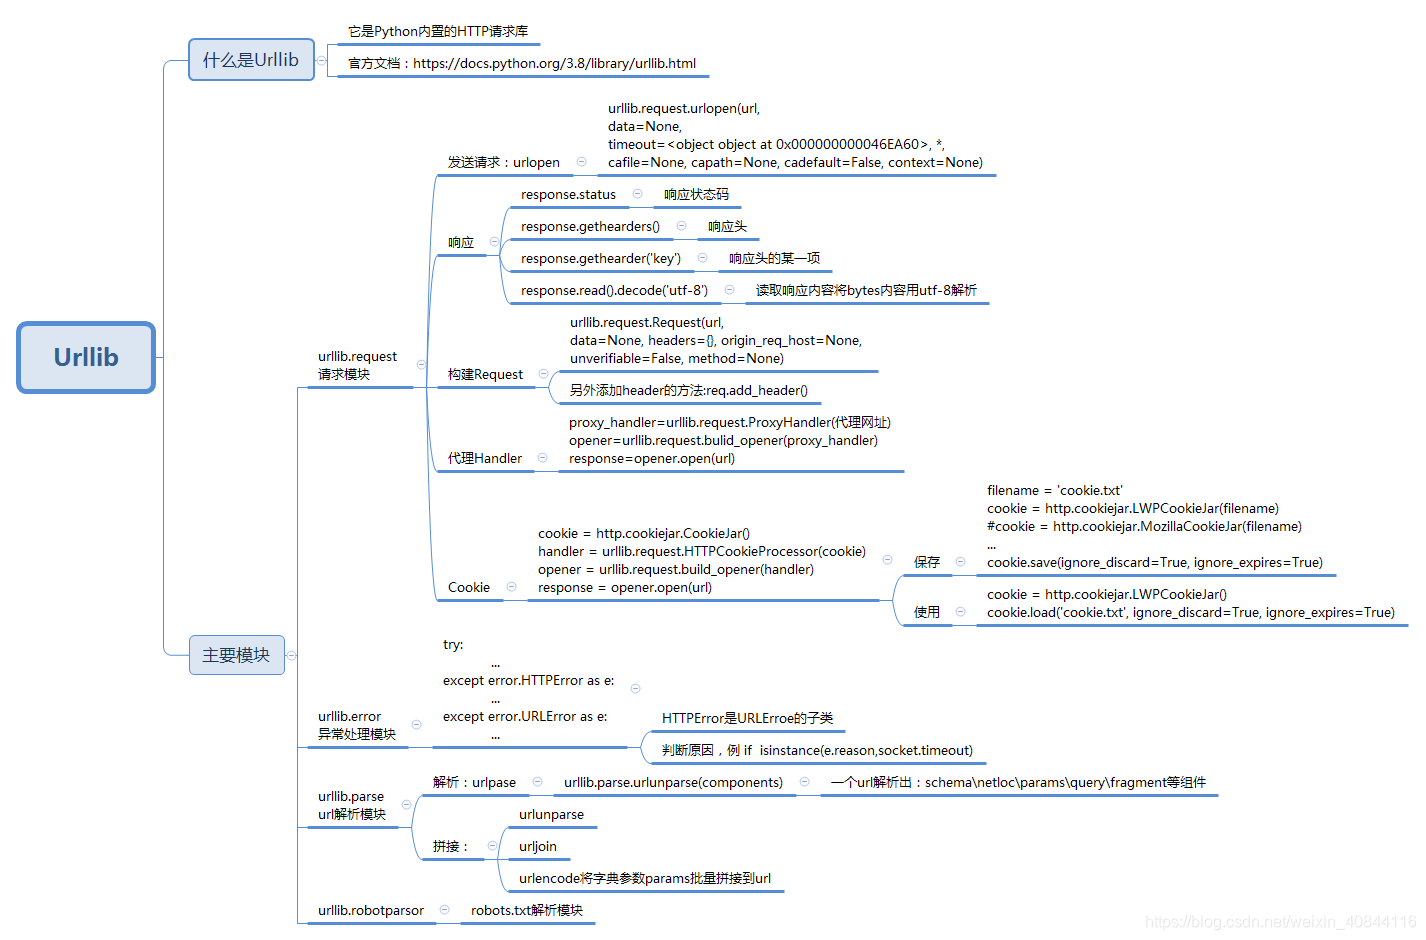
Urllib库
官方文档:https://docs.python.org/3/library/urllib.html
Requests库
官方文档 https://2.python-requests.org/en/master/api/
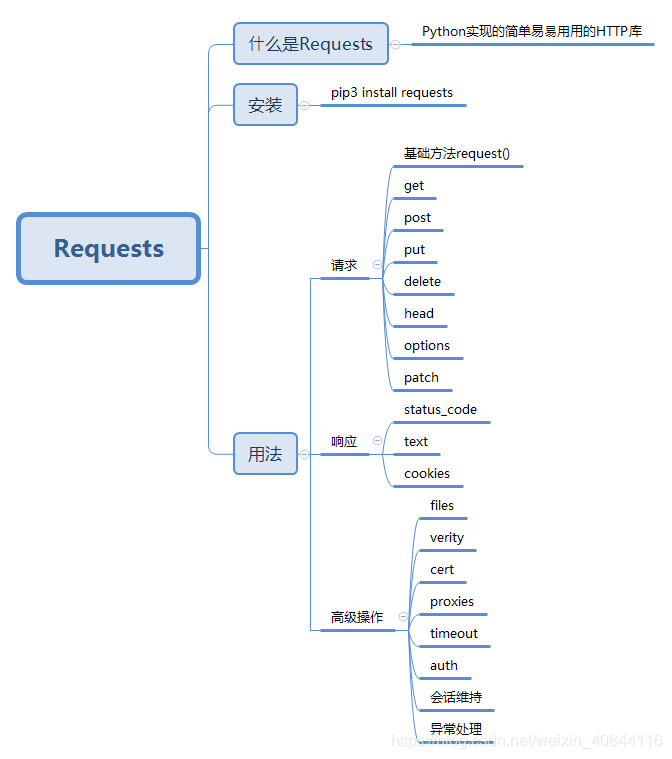
PART 1 请求
一、基础方法 request()
requests.request(method, url, **kwargs)
Parameters:
		method : method for the new Request object: GET, OPTIONS, HEAD, POST, PUT, PATCH, or DELETE.
		url : URL for the new Request object.
		params : (optional) Dictionary, list of tuples or bytes to send in the query string for the Request.
		data : (optional) Dictionary, list of tuples, bytes, or file-like object to send in the body of the Request.
		json : (optional) A JSON serializable Python object to send in the body of the Request.
		headers : (optional) Dictionary of HTTP Headers to send with the Request.
		cookies : (optional) Dict or CookieJar object to send with the Request.
		files : (optional) Dictionary of 'name': file-like-objects (or {'name': file-tuple}) for multipart encoding upload. file-tuple can be a 2-tuple ('filename', fileobj), 3-tuple ('filename', fileobj, 'content_type') or a 4-tuple ('filename', fileobj, 'content_type', custom_headers), where 'content-type' is a string defining the content type of the given file and custom_headers a dict-like object containing additional headers to add for the file.
		auth : (optional) Auth tuple to enable Basic/Digest/Custom HTTP Auth.
		timeout (float or tuple) : (optional) How many seconds to wait for the server to send data before giving up, as a float, or a (connect timeout, read timeout) tuple.
		allow_redirects (bool) : (optional) Boolean. Enable/disable GET/OPTIONS/POST/PUT/PATCH/DELETE/HEAD redirection. Defaults to True.
		proxies : (optional) Dictionary mapping protocol to the URL of the proxy.
		verify : (optional) Either a boolean, in which case it controls whether we verify the server’s TLS certificate, or a string, in which case it must be a path to a CA bundle to use. Defaults to True.
		stream : (optional) if False, the response content will be immediately downloaded.
		cert : (optional) if String, path to ssl client cert file (.pem). If Tuple, (‘cert’, ‘key’) pair.
>>> import requests
>>> req = requests.request('GET', 'https://httpbin.org/get')
>>> req
<Response [200]>
二、GET请求
1.基本写法
requests.get(url, params=None, **kwargs)
import requests
response = requests.get('http://httpbin.org/get')
print(response.text)
2.带参数
方法1:显式拼接url
import requests
response = requests.get("http://httpbin.org/get?name=germey&age=22")
print(response.text)
方法2:构造传参
data = {
    'name': 'germey',
    'age': 22
}
response = requests.get("http://httpbin.org/get", params=data)
print(response.text)
3.添加请求头headers
一些url,需要添加一些请求头信息才能访问,例如:知乎访问需要User-Agent
import requests

headers = {
    'User-Agent': 'Mozilla/5.0 (Windows NT 6.1; Win64; x64; rv:79.0) Gecko/20100101 Firefox/79.0'
}
response = requests.get("https://www.zhihu.com/explore", headers=headers)
print(response.text)
三、POST请求
1.基本写法
requests.post(url, data=None, json=None, **kwargs)
data参数和json参数的区别和使用:https://testerhome.com/topics/20066
import requests

data = {'name': 'germey', 'age': '22'}
response = requests.post("http://httpbin.org/post", data=data)
print(response.text)
2.添加请求头headers
import requests

data = {'name': 'germey', 'age': '22'}
headers = {
    'User-Agent': 'Mozilla/5.0 (Windows NT 6.1; Win64; x64; rv:79.0) Gecko/20100101 Firefox/79.0'
}
response = requests.post("http://httpbin.org/post", data=data, headers=headers)
print(response.json())
PART 2 响应
一、状态码status_code
状态码对应状态名,通过requests.codes.<TAB>查看,例如404对应的状态名是“404: not_found, -o-"
import requests

response = requests.get('http://www.jianshu.com/hello.html')
exit() if not response.status_code == requests.codes.not_found else print('404 Not Found')
>>>404 Not Found
这里requests.codes.not_found就等于404,所以当熟悉状态码及其含义后,这里也直接可以用404代替
(更多状态码和状态名对应请查看官方文档)
二、获取cookie
import requests

response = requests.get("https://www.baidu.com")
print(response.cookies)
for key, value in response.cookies.items():
    print(key + '=' + value)
PART 3 高级操作
一、文件上传 files
import requests

files = {'file': open('G:\\temp files\\result.png', 'rb')}
response = requests.post("http://httpbin.org/post", files=files)
print(response.text)
二、异常处理
import requests
from requests.exceptions import ReadTimeout, ConnectionError, RequestException
try:
    response = requests.get("http://httpbin.org/get", timeout = 0.5)
    print(response.status_code)
except ReadTimeout:
    print('Timeout')
except ConnectionError:
    print('Connection error')
except RequestException:
    print('Error')
三、会话维持
登录验证,相当于在同一个浏览器中打开url
import requests

s = requests.Session()
s.get('http://httpbin.org/cookies/set/number/123456789')
response = s.get('http://httpbin.org/cookies')
print(response.text)
四、证书验证verify cert
取消验证
#from requests.packages import urllib3
#urllib3.disable_warnings()  #禁用警告
response = requests.get('https://www.12306.cn', verify=False)
print(response.status_code)
指定证书
import requests

response = requests.get('https://www.12306.cn', cert=('/path/server.crt', '/path/key'))
print(response.status_code)
五、设置代理 proxies
import requests

#普通代理
proxies = {
  "http": "http://127.0.0.1:代理端口",
  "https": "https://127.0.0.1:代理端口",
}

#有用户名和密码
proxies = {
    "http": "http://user:password@127.0.0.1:代理端口/",
}

#不是http代理
pip3 install 'requests[socks]'
proxies = {
    'http': 'socks5://127.0.0.1:代理端口',
    'https': 'socks5://127.0.0.1:代理端口'
}

response = requests.get("https://www.taobao.com", proxies=proxies)
print(response.status_code)
六、超时设置 timeout
import requests
from requests.exceptions import ReadTimeout
try:
    response = requests.get("http://httpbin.org/get", timeout = 0.5)
    print(response.status_code)
except ReadTimeout:
    print('Timeout')
七、认证设置 auth
访问时需要输入用户名或者密码才能看到网站内容
import requests
from requests.auth import HTTPBasicAuth

r = requests.get('http://120.27.34.24:9001', auth=HTTPBasicAuth('user', '123'))
#或者
r = requests.get('http://120.27.34.24:9001', auth=('user', '123'))

print(r.status_code)
Selenium库
官方文档:
https://selenium-python.readthedocs.io/index.html
https://selenium-python-zh.readthedocs.io/en/latest/index.html(中文版)
https://www.selenium.dev/selenium/docs/api/py/api.html

要点补充
一、构建浏览器对象
安装驱动,放置在python.exe同路径下
或者
driverfile_path =浏览器驱动完整路径
driver = webdriver.Chrome(executable_path=driverfile_path)
二、浏览器屏蔽弹窗和设置下载路径
谷歌
    options = webdriver.ChromeOptions()
    prefs = {'profile.default_content_settings.popups': 0, 'download.default_directory': 'G:\\temp files'}#屏蔽弹窗,设置路径
    options.add_experimental_option('prefs', prefs)
    driver = webdriver.Chrome(options=options)
火狐
参考文档:https://blog.csdn.net/SD_JZZ/article/details/53048387
【开始】->【运行】->【firefox.exe -ProfileManager】->【创建配置文件】->【启动Firefox】->
将下载过程操作一遍,在浏览器里修改下载路径,将应用程序对应格式文件的操作“每次询问”改成“下载” ->
将新的firefoxProfile配置到浏览器驱动代码中
    profile=webdriver.FirefoxProfile(r'C:\Users\Administrator\AppData\Roaming\Mozilla\Firefox\Profiles\4a4m4hwv.ford')
    wd=webdriver.Firefox(firefox_profile=profile)
三、鼠标操作
官方文档:https://selenium-python.readthedocs.io/api.html#module-selenium.webdriver.common.action_chains
参考文章:https://www.jb51.net/article/92682.htm
click(on_element=None) ——单击鼠标左键
click_and_hold(on_element=None) ——点击鼠标左键,不松开
context_click(on_element=None) ——点击鼠标右键
double_click(on_element=None) ——双击鼠标左键
drag_and_drop(source, target) ——拖拽到某个元素然后松开
drag_and_drop_by_offset(source, xoffset, yoffset) ——拖拽到某个坐标然后松开
key_down(value, element=None) ——按下某个键盘上的键
key_up(value, element=None) ——松开某个键
move_by_offset(xoffset, yoffset) ——鼠标从当前位置移动到某个坐标
move_to_element(to_element) ——鼠标移动到某个元素
move_to_element_with_offset(to_element, xoffset, yoffset) ——移动到距某个元素(左上角坐标)多少距离的位置
perform() ——执行链中的所有动作
release(on_element=None) ——在某个元素位置松开鼠标左键
send_keys(*keys_to_send) ——发送某个键到当前焦点的元素
send_keys_to_element(element, *keys_to_send) ——发送某个键到指定元素
四、定位元素
官方文档:https://selenium-python-zh.readthedocs.io/en/latest/locating-elements.html
参考文章:
https://www.cnblogs.com/eastonliu/p/9088301.html
https://www.cnblogs.com/yufeihlf/p/5717291.html#test8
https://baijiahao.baidu.com/s?id=1645607565824624330&wfr=spider&for=pc
Xpath定位:https://www.cnblogs.com/simran/p/9234783.html
推荐使用插件:例如ChroPath

TIPS:使用浏览器的开发者工具,可以直接复制要定位元素的xpath路径等,谷歌相对智能得可以获取相对路径,也可以获取绝对路径。
五、元素交互
官方文档:https://selenium-python.readthedocs.io/api.html#module-selenium.webdriver.remote.webelement
六、显式等待判断条件
官方文档:http://selenium-python.readthedocs.io/api.html#module-selenium.webdriver.support.expected_conditions
title_is 标题是某内容
title_contains 标题包含某内容
presence_of_element_located 元素加载出,传入定位元组,如(By.ID, 'p')
visibility_of_element_located 元素可见,传入定位元组
visibility_of 可见,传入元素对象
presence_of_all_elements_located 所有元素加载出
text_to_be_present_in_element 某个元素文本包含某文字
text_to_be_present_in_element_value 某个元素值包含某文字
frame_to_be_available_and_switch_to_it frame加载并切换
invisibility_of_element_located 元素不可见
element_to_be_clickable 元素可点击
staleness_of 判断一个元素是否仍在DOM,可判断页面是否已经刷新
element_to_be_selected 元素可选择,传元素对象
element_located_to_be_selected 元素可选择,传入定位元组
element_selection_state_to_be 传入元素对象以及状态,相等返回True,否则返回False
element_located_selection_state_to_be 传入定位元组以及状态,相等返回True,否则返回False
alert_is_present 是否出现Alert
七、异常
官方文档:https://selenium-python.readthedocs.io/api.html#module-selenium.common.exceptions


 755
755


 被折叠的 条评论
为什么被折叠?
被折叠的 条评论
为什么被折叠?
 到【灌水乐园】发言


