


背景
核心原理是使用PorterDuffXfermode + Path来绘制进度,并实现圆角
效果图
Android笔记(三十)效果演示
进度条绘制步骤
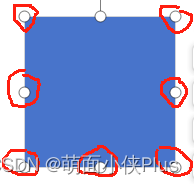
- 将ImageView矩形七个点的坐标存储起来(configNodes)
他们对应着7个不同的刻度,每个刻度的值 i * (1000 / 8)
- 配置开始的点(configStartPoint)
先计算坐标偏移量,再判断当前进度在哪个刻度范围内,设置正确的开始坐标 - 配置路径(configPath)
从中心点开始,第二个点为上一步配置的开始点,后面根据进度progress和7个刻度点对应的刻度值进行比较,接着连线顶部中间点,最后回到中心点
圆角绘制原理
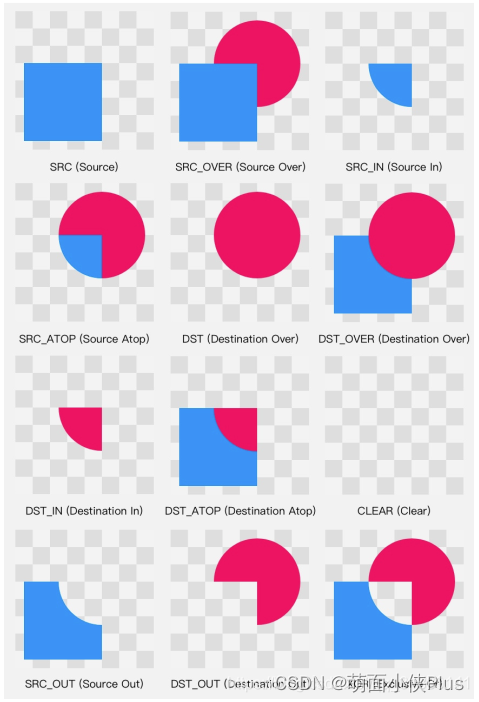
这里采用DST_OUT模式,DST是覆盖在ImageView上的半透明遮罩,SRC是动态绘制的白色进度条,取两者相交的区域并显示DST的像素,就能实现视频中的效果
完整代码
public class RingProgressView extends AppCompatImageView {

    /**
     * 每一个刻度为125,由1000/8获得
     */
    private final static int PER_SCALE = 125;

    private final static float DEFAULT_RADIUS = 12f;

    private int progress;// 小于等于0或者大于等于100为消失
    private float perX, perY = 0f;
    private final PathNode startPoint = new PathNode();
    private final List<PathNode> nodes = new ArrayList<>();
    private boolean hasLoadNodes;
    private final Path path = new Path();
    private final Paint paintFill = new Paint(Paint.ANTI_ALIAS_FLAG);
    private static Bitmap bitmap = null;
    private boolean isDowning;

    private final PorterDuffXfermode porterDuffXfermode;
    private RectF rectF;
    private final float radius;

    public RingProgressView(Context context) {
        this(context, null);
    }

    public RingProgressView(Context context, @Nullable AttributeSet attrs) {
        this(context, attrs, 0);
    }

    public RingProgressView(Context context, @Nullable AttributeSet attrs, int defStyleAttr) {
        super(context, attrs, defStyleAttr);
        paintFill.setStyle(Paint.Style.FILL);
        porterDuffXfermode = new PorterDuffXfermode(PorterDuff.Mode.DST_OUT);
        radius = dp2px(context, DEFAULT_RADIUS);
    }

    @Override
    protected void onSizeChanged(int w, int h, int oldw, int oldh) {
        super.onSizeChanged(w, h, oldw, oldh);
        rectF = new RectF(0, 0, getWidth(), getHeight());
    }

    public static float dp2px(Context context, float dpi) {
        return TypedValue.applyDimension(TypedValue.COMPLEX_UNIT_DIP, dpi, context.getResources().getDisplayMetrics());
    }

    @Override
    protected void onDraw(Canvas canvas) {
        super.onDraw(canvas);
        if (progress > 0) {
            if (perX == 0f) {
                perX = getWidth() / (2f * PER_SCALE);
            }
            if (perY == 0f) {
                perY = getHeight() / (2f * PER_SCALE);
            }
            configNodes();
            configStartPoint();
            configPath();

            int id = canvas.saveLayer(0, 0, getWidth(), getHeight(), paintFill, Canvas.ALL_SAVE_FLAG);
            paintFill.setColor(ContextCompat.getColor(getContext(), R.color.colorShadow));
            canvas.drawRoundRect(rectF, radius, radius, paintFill);

            paintFill.setXfermode(porterDuffXfermode);
            paintFill.setColor(Color.WHITE);
            canvas.drawPath(path, paintFill);
            paintFill.setXfermode(null);
            canvas.restoreToCount(id);
        }
    }

    /**
     * 统计所有节点
     */
    private void configNodes() {
        if (!hasLoadNodes) {
            nodes.add(new PathNode(0, 0, 7 * PER_SCALE));
            nodes.add(new PathNode(0, getHeight() / 2f, 6 * PER_SCALE));
            nodes.add(new PathNode(0, getHeight(), 5 * PER_SCALE));
            nodes.add(new PathNode(getWidth() / 2f, getHeight(), 4 * PER_SCALE));
            nodes.add(new PathNode(getWidth(), getHeight(), 3 * PER_SCALE));
            nodes.add(new PathNode(getWidth(), getHeight() / 2f, 2 * PER_SCALE));
            nodes.add(new PathNode(getWidth(), 0, PER_SCALE));
            hasLoadNodes = true;
        }
    }

    /**
     * 配置第一个节点
     */
    private void configStartPoint() {
        int pro = progress % PER_SCALE == 0 ? PER_SCALE : progress % PER_SCALE;
        float xPro = pro * perX;
        float yPro = pro * perY;
        if (progress <= PER_SCALE) {
            startPoint.setNode(getWidth() / 2f + xPro, 0, progress);
        } else if (progress <= 2 * PER_SCALE) {
            startPoint.setNode(getWidth(), yPro, progress);
        } else if (progress <= 3 * PER_SCALE) {
            startPoint.setNode(getWidth(), getHeight() / 2f + yPro, progress);
        } else if (progress <= 4 * PER_SCALE) {
            startPoint.setNode(getWidth() - xPro, getHeight(), progress);
        } else if (progress <= 5 * PER_SCALE) {
            startPoint.setNode(getWidth() / 2f - xPro, getHeight(), progress);
        } else if (progress <= 6 * PER_SCALE) {
            startPoint.setNode(0, getHeight() - yPro, progress);
        } else if (progress <= 7 * PER_SCALE) {
            startPoint.setNode(0, getHeight() / 2f - yPro, progress);
        } else if (progress < 8 * PER_SCALE) {
            startPoint.setNode(xPro, 0, progress);
        } else {
            progress = 0;
            invalidate();
        }
    }

    private void configPath() {
        path.reset();
        path.moveTo(getWidth() / 2f, getHeight() / 2f);
        path.lineTo(startPoint.x, startPoint.y);
        for (PathNode node : nodes) {
            if (node.weight < startPoint.weight) {
                path.lineTo(node.x, node.y);
            }
        }
        path.lineTo(getWidth() / 2f, 0);
        path.close();
    }

    /**
     * 设置进度 0-100
     *
     * @param progress 这里乘以10,方便计算,因为1000除以8没有小数
     */
    public void setProgress(int progress) {
        int temp = progress * 10;
        if (temp != this.progress) {
            this.progress = temp;
            invalidate();
        }
    }

    /**
     * 获取进度 0-100
     *
     * @return 这里除以10,因为{@link RingProgressView#setProgress(int)}乘以10
     */
    public int getProgress() {
        return progress / 10;
    }

    @Override
    protected void onDetachedFromWindow() {
        super.onDetachedFromWindow();
        progress = 0;
    }

    /**
     * 储存Path需要走过的节点
     * weight代表权重,当大于进度progress时才加入Path
     */
    private static class PathNode {
        private float x;
        private float y;
        private int weight;

        public PathNode() {

        }

        public PathNode(float x, float y, int weight) {
            this.x = x;
            this.y = y;
            this.weight = weight;
        }

        public void setNode(float x, float y, int weight) {
            this.x = x;
            this.y = y;
            this.weight = weight;
        }
    }
}


 876
876


 被折叠的 条评论
为什么被折叠?
被折叠的 条评论
为什么被折叠?
 到【灌水乐园】发言


