


2018-06-27
<ul class="tag">

  <li>
    <a href="https://yuan1028.github.io/tags#Ethereum">
      Ethereum
    </a>
  </li>

</ul>
写在篇头
本篇要介绍的内容大概是回答以下几个问题。
- geth是怎样或者使用何种技术在终端中实现了一个javascript的运行环境的。
- 在终端中输入的一个命令是如何调到以太坊的底层函数,从而拿到想要的结果的。
- 如何增加自己的web3接口,需要进行哪些修改。
1. JSRE(javascript runtime environment)
以太坊实现了一个javascript的运行环境即JSRE,可以在console这种交互模式或者script这种非交互模式中使用。详细使用见JavaScript Console
- 交互模式,其可以通过console和attach子命令来启动。console是在启动geth的时候在启动完节点后打开终端。attach是在一个运行中的geth实例上开启一个终端。
$geth console $geth attach - 非交互模式,是指使用JSRE来执行文件。console和attach子命令都可以接受–exec的参数。
$geth --exec "eth.blockNumber" attach
$geth --exec 'loadScript("/tmp/checkbalances.js")' attach
以太坊(这里特指go-ethereum)中使用Otto JS VM来实现JSRE,即可以在go语言中调用javascript,也可以获取javascript中变量的值等,甚至在javascript中也可以调用go语言中定义的函数。
下面的是Otto JS VM的一段代码示例
package main
import (
	"fmt"
	"github.com/robertkrimen/otto"
)
func main() {
	vm := otto.New()
	// 使用vm在go语言中运行一段简单的javascript代码
	vm.Run(`
    abc = 2 + 2;
    console.log("The value of abc is " + abc); // 4
	`)
	// 获取javascript中的变量的值
	if value, err := vm.Get("abc"); err == nil {
		if value_int, err := value.ToInteger(); err == nil {
			fmt.Println(value_int, err) //4 <nil>
		}
	}
	// 定义了一个sayHello的javascript方法,其调用的是一段go语言代码。
	vm.Set("sayHello", func(call otto.FunctionCall) otto.Value {
    	fmt.Printf("Hello, %s.\n", call.Argument(0).String())
    	return otto.Value{}
	})
	result, _ = vm.Run(`
    sayHello("Xyzzy");      // Hello, Xyzzy.
    `)
}
2. 终端中调用web3方法的执行流程
终端中调用web3方法的执行流程如下图,大致流程为: 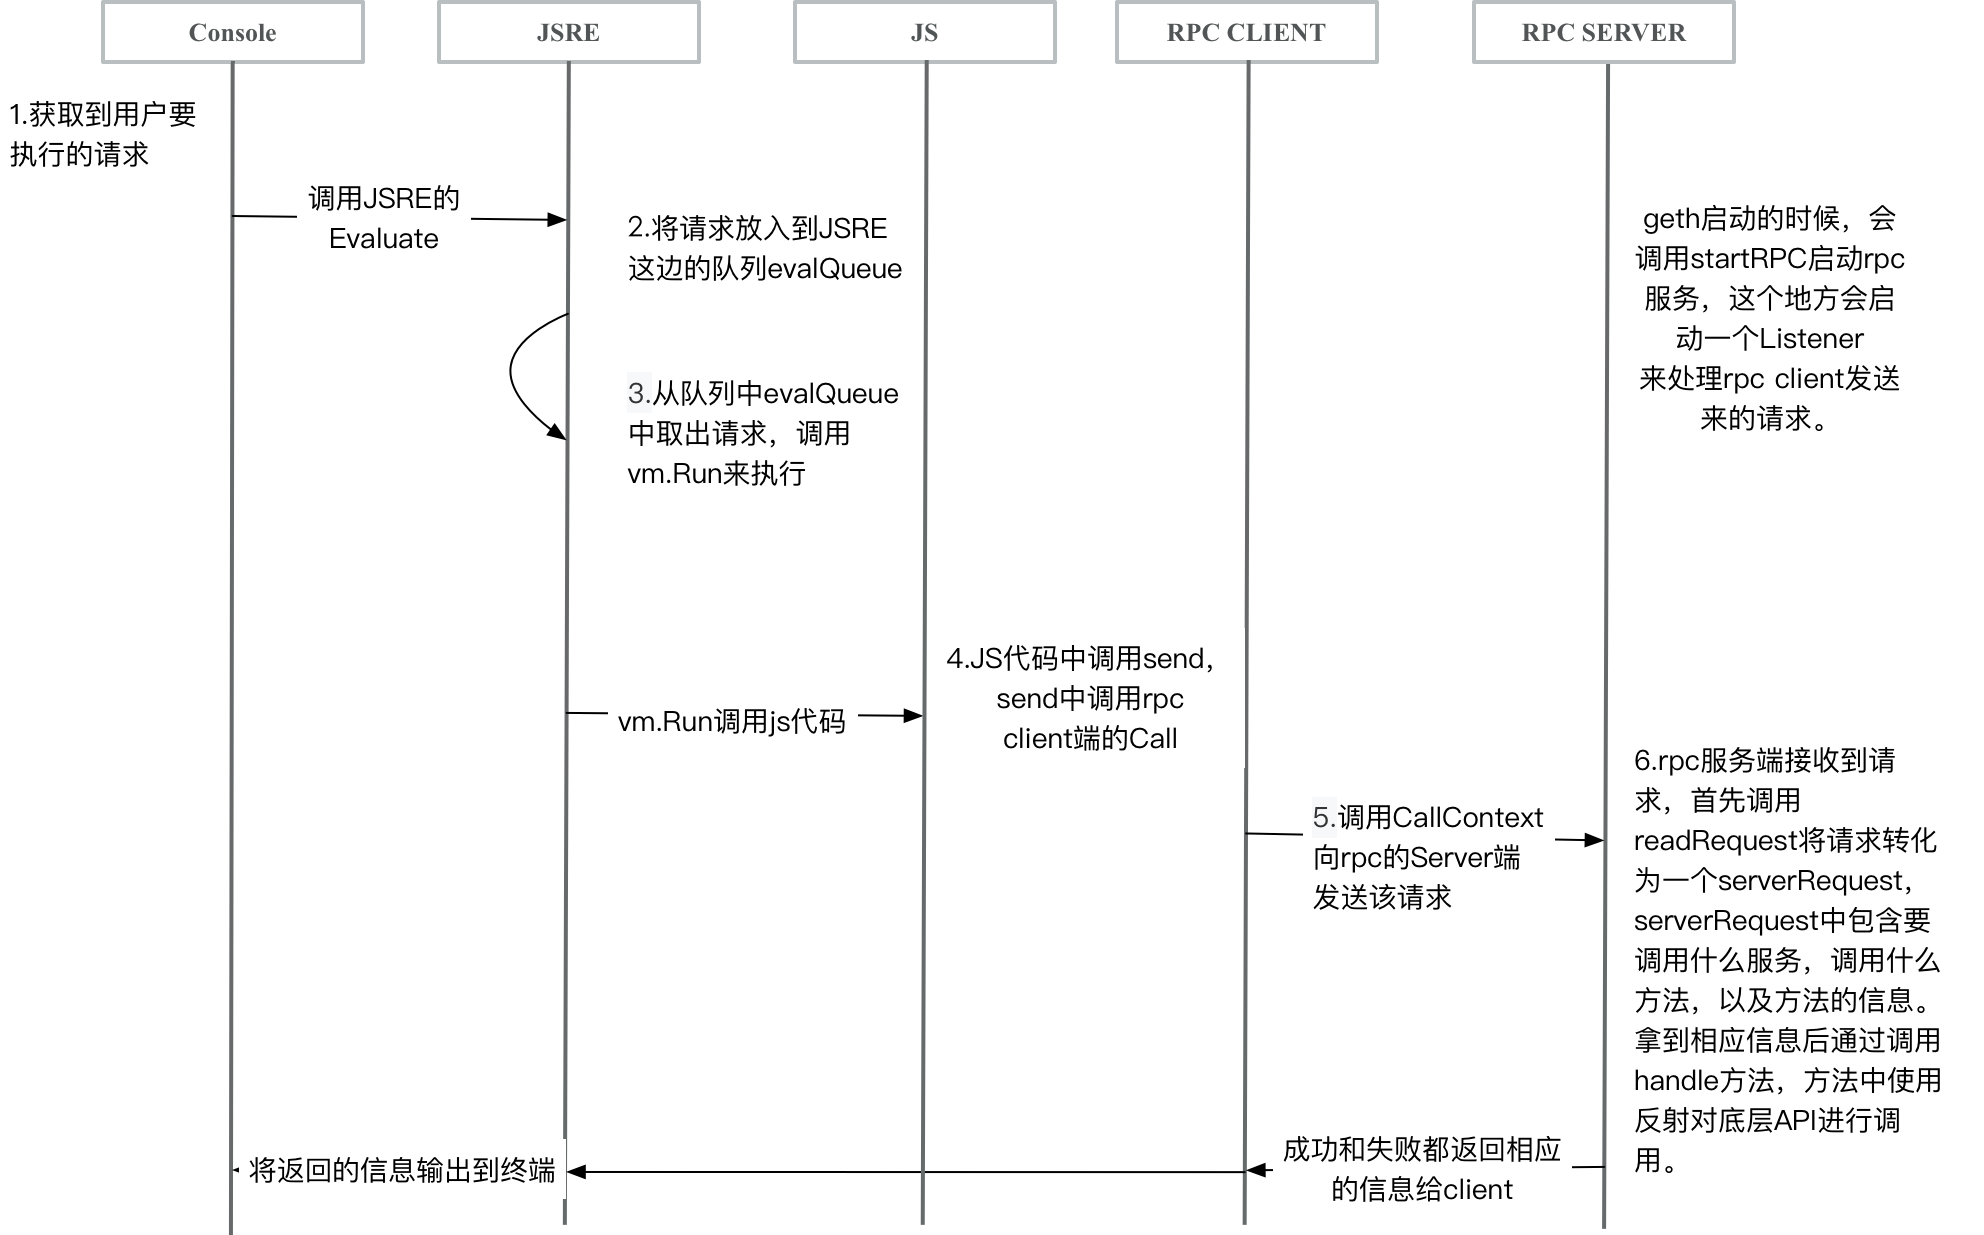
- 终端部分获取用户的请求(这部分交互模式与非交互模式略有不同)。
- 获取到用户请求后,调用JSRE的方法,将用户请求放入到JSRE的队列当中。
- JSRE从自己的队列中获取请求,然后使用Otto JS VM,调用相应的JS方法。
- JS代码中会调用其privider的Send方法。
- Send方法中,调用rpc client的Call方法。
- rpc client端向rpc服务端发送请求。
- rpc server端接收到请求,调用相应的底层API,然后将结果返回给client端。
- client端逐级返回结果,最终由终端输出显示。
使用非交互模式调用web3方法的流程与该流程类似。不同的部分主要是
- 交互模式下,用户的请求是通过终端协程获取用户输入得到的,其得到用户输入后调用JSRE的Evaluate方法。Evaluate方法将用户的请求放入evalQueue中。
2.1 终端
终端中有协程监控着用户的输入,当用户输入结束的时候(一行,或者多行结束了)。交由另一个协程处理,该协程调用jsre的Evaluate来对用户输入的请求进行处理。
// Interactive starts an interactive user session, where input is propted from
// the configured user prompter.
func (c *Console) Interactive() {
	var (
		prompt    = c.prompt          // Current prompt line (used for multi-line inputs)
		indents   = 0                 // Current number of input indents (used for multi-line inputs)
		input     = ""                // Current user input
		scheduler = make(chan string) // Channel to send the next prompt on and receive the input
	)
	// Start a goroutine to listen for promt requests and send back inputs
	go func() {
		for {
			// 获得用户的输入
			// Read the next user input
			line, err := c.prompter.PromptInput(<-scheduler)
			if err != nil {
				// In case of an error, either clear the prompt or fail
				if err == liner.ErrPromptAborted { // ctrl-C
					prompt, indents, input = c.prompt, 0, ""
					scheduler <- ""
					continue
				}
				close(scheduler)
				return
			}
			// User input retrieved, send for interpretation and loop
			scheduler <- line
		}
	}()
	// Monitor Ctrl-C too in case the input is empty and we need to bail
	abort := make(chan os.Signal, 1)
	signal.Notify(abort, syscall.SIGINT, syscall.SIGTERM)
	// Start sending prompts to the user and reading back inputs
	for {
		// Send the next prompt, triggering an input read and process the result
		scheduler <- prompt
		select {
		case <-abort:
			// User forcefully quite the console
			fmt.Fprintln(c.printer, "caught interrupt, exiting")
			return
		case line, ok := <-scheduler:
			// User input was returned by the prompter, handle special cases
			// ... 省略掉部分对输入进行格式化即合法性判断的处理
			// If all the needed lines are present, save the command and run
			if indents <= 0 {
				if len(input) > 0 && input[0] != ' ' && !passwordRegexp.MatchString(input) {
					if command := strings.TrimSpace(input); len(c.history) == 0 || command != c.history[len(c.history)-1] {
						c.history = append(c.history, command)
						if c.prompter != nil {
							c.prompter.AppendHistory(command)
						}
					}
				}
				// 拿到用户输入后调用Evaluate评估
				c.Evaluate(input)
				input = ""
			}
		}
	}
}
// Evaluate executes code and pretty prints the result to the specified output stream.
func (c *Console) Evaluate(statement string) error {
	defer func() {
		if r := recover(); r != nil {
			fmt.Fprintf(c.printer, "[native] error: %v\n", r)
		}
	}()
	// 调用jsre的Evaluate来执行请求
	return c.jsre.Evaluate(statement, c.printer)
}
2.2 JSRE中的调用
- Evaluate定义了请求的方法,方法是调用vm.Run,并调用Do方法。
- Do方法将用户请求放入到JSRE的队列evalQueue中。
- runEventLoop为JSRE的协程,从evalQueue中拿到请求后,调用相应的方法。在Evaluate的情况下即是调用vm.Run方法。
// Evaluate executes code and pretty prints the result to the specified output stream.
func (re *JSRE) Evaluate(code string, w io.Writer) error {
	var fail error
	// 定义了请求的处理方法,即调用vm.Run,并将结果进行相应的输出。
	re.Do(func(vm *otto.Otto) {
		val, err := vm.Run(code)
		if err != nil {
			prettyError(vm, err, w)
		} else {
			prettyPrint(vm, val, w)
		}
		fmt.Fprintln(w)
	})
	return fail
}
// Do executes the given function on the JS event loop.
func (re *JSRE) Do(fn func(*otto.Otto)) {
	done := make(chan bool)
	req := &evalReq{fn, done}
	re.evalQueue <- req
	<-done
}
// This function runs the main event loop from a goroutine that is started
// when JSRE is created. Use Stop() before exiting to properly stop it.
// The event loop processes vm access requests from the evalQueue in a
// serialized way and calls timer callback functions at the appropriate time.
// Exported functions always access the vm through the event queue. You can
// call the functions of the otto vm directly to circumvent the queue. These
// functions should be used if and only if running a routine that was already
// called from JS through an RPC call.
func (re *JSRE) runEventLoop() {
	defer close(re.closed)
	vm := otto.New()
	r := randomSource()
	vm.SetRandomSource(r.Float64)
	// 省略掉部分其他信息
loop:
	for {
		select {
		case req := <-re.evalQueue:
			// run the code, send the result back
			// 调用相应的方法
			req.fn(vm)
			close(req.done)
			if waitForCallbacks && (len(registry) == 0) {
				break loop
			}
		// 省略掉其他情况
	}
}
2.3 JS中的方法
简单看下web3.js,可以发现大致是定义方法的名字name,方法要调用的方法名eth_getBalance(表示调用eth服务的GetBalance方法),参数个数params,输入参数的格式化inputFormatter,输出参数的格式化outputFormatter。
var methods = function () {
	// web3.js中的getBalance方法
    var getBalance = new Method({
        name: 'getBalance',
        call: 'eth_getBalance',
        params: 2,
        inputFormatter: [formatters.inputAddressFormatter, formatters.inputDefaultBlockNumberFormatter],
        outputFormatter: formatters.outputBigNumberFormatter
    });
    // ...
};
真正执行的时候会怎么去像流程图中画的调用provider的send方法,这个代码在web3.js中,js我不是太懂,有些东西没整明白。把我的理解简单贴下,有错误再改。
- 如上的getBalance是一个Method对象(另外还有一种Property和Method略有差别,这里只分析Method)。
- js中对method和properties都分别进行了attachToObject和setRequestManager的操作。
- attachToObject中调用了buildCall方法,buildcall方法定义了send方法,方法中调用requestMananger的相应方法。
- requestMananger中调用的是provider的send或者sendAsync。
// 这里只给出了Eth,其他的也都类似
function Eth(web3) {
    this._requestManager = web3._requestManager;
    var self = this;
    methods().forEach(function(method) {
        method.attachToObject(self);
        method.setRequestManager(self._requestManager);
    });
    properties().forEach(function(p) {
        p.attachToObject(self);
        p.setRequestManager(self._requestManager);
    });
    this.iban = Iban;
    this.sendIBANTransaction = transfer.bind(null, this);
}
var Method = function (options) {
    this.name = options.name;
    this.call = options.call;
    this.params = options.params || 0;
    this.inputFormatter = options.inputFormatter;
    this.outputFormatter = options.outputFormatter;
    this.requestManager = null;
};
Method.prototype.setRequestManager = function (rm) {
    this.requestManager = rm;
};
Method.prototype.attachToObject = function (obj) {
    var func = this.buildCall();
    func.call = this.call; // TODO!!! that's ugly. filter.js uses it
    var name = this.name.split('.');
    if (name.length > 1) {
        obj[name[0]] = obj[name[0]] || {};
        obj[name[0]][name[1]] = func;
    } else {
        obj[name[0]] = func;
    }
};
Method.prototype.buildCall = function() {
    var method = this;
    var send = function () {
        var payload = method.toPayload(Array.prototype.slice.call(arguments));
        if (payload.callback) {
        	// 调用requestManager的sendAsync
            return method.requestManager.sendAsync(payload, function (err, result) {
                payload.callback(err, method.formatOutput(result));
            });
        }
        // 调用requestManager的send
        return method.formatOutput(method.requestManager.send(payload));
    };
    send.request = this.request.bind(this);
    return send;
};
// requestManager的send调用provider的send方法,
// sendAsync方法也类似,调用的是provider的sendAsync方法,在此不列出了
RequestManager.prototype.send = function (data) {
    if (!this.provider) {
        console.error(errors.InvalidProvider());
        return null;
    }
    var payload = Jsonrpc.toPayload(data.method, data.params);
    // 重点,这里调用的是provider的send方法
    var result = this.provider.send(payload);
    if (!Jsonrpc.isValidResponse(result)) {
        throw errors.InvalidResponse(result);
    }
    return result.result;
};
// provider是在最开始的Web3方法中设置的
function Web3 (provider) {
	// 设置provider
    this._requestManager = new RequestManager(provider);
    this.currentProvider = provider;
    this.eth = new Eth(this);
    this.db = new DB(this);
    this.shh = new Shh(this);
    this.net = new Net(this);
    this.personal = new Personal(this);
    this.bzz = new Swarm(this);
    this.settings = new Settings();
    this.version = {
        api: version.version
    };
    this.providers = {
        HttpProvider: HttpProvider,
        IpcProvider: IpcProvider
    };
    this._extend = extend(this);
    this._extend({
        properties: properties()
    });
}
2.4 provider的send方法
- 在console启动的时候对provider进行了设置,将其设置为空结构体jeth。
- 将jeth的send方法和sendAsync方法分别设置为bridge的send方法和sendAsync方法。
// init retrieves the available APIs from the remote RPC provider and initializes
// the console's JavaScript namespaces based on the exposed modules.
func (c *Console) init(preload []string) error {
	// Initialize the JavaScript <-> Go RPC bridge
	bridge := newBridge(c.client, c.prompter, c.printer)
	c.jsre.Set("jeth", struct{}{})
	jethObj, _ := c.jsre.Get("jeth")
	jethObj.Object().Set("send", bridge.Send)
	jethObj.Object().Set("sendAsync", bridge.Send)
	// ...省略其他部分
	if _, err := c.jsre.Run("var web3 = new Web3(jeth);"); err != nil {
		return fmt.Errorf("web3 provider: %v", err)
	}
	// ...省略其他部分
}
- bridge的send方法中(sendAsync方法类似不单独介绍了),首先将request转化为go的值,然后调用rpc client的Call方法。
- 根据rpc client返回的结果进行相应操作。
// Send implements the web3 provider "send" method.
func (b *bridge) Send(call otto.FunctionCall) (response otto.Value) {
	// ...省略掉将request转化为go的值的过程
	// Execute the requests.
	resps, _ := call.Otto.Object("new Array()")
	for _, req := range reqs {
		resp, _ := call.Otto.Object(`({"jsonrpc":"2.0"})`)
		resp.Set("id", req.Id)
		var result json.RawMessage
		// 调用rpc client的Call方法,将request的method和参数,以及回调的result地址传给Call
		err = b.client.Call(&result, req.Method, req.Params...)
		switch err := err.(type) {
		//...根据错误情况设置resp
		}
		resps.Call("push", resp)
	}
	// Return the responses either to the callback (if supplied)
	// or directly as the return value.
	if batch {
		response = resps.Value()
	} else {
		response, _ = resps.Get("0")
	}
	if fn := call.Argument(1); fn.Class() == "Function" {
		fn.Call(otto.NullValue(), otto.NullValue(), response)
		return otto.UndefinedValue()
	}
	return response
}
2.5 rpc Client端逻辑
rpc client端判断客户端是http链接,还是本地调用分别发送sendHTTP和send方法。并对调用的返回结果进行处理。
func (c *Client) Call(result interface{}, method string, args ...interface{}) error {
	ctx := context.Background()
	return c.CallContext(ctx, result, method, args...)
}
func (c *Client) CallContext(ctx context.Context, result interface{}, method string, args ...interface{}) error {
	msg, err := c.newMessage(method, args...)
	if err != nil {
		return err
	}
	op := &requestOp{ids: []json.RawMessage{msg.ID}, resp: make(chan *jsonrpcMessage, 1)}
	if c.isHTTP {
		err = c.sendHTTP(ctx, op, msg)
	} else {
		err = c.send(ctx, op, msg)
	}
	if err != nil {
		return err
	}
	// dispatch has accepted the request and will close the channel it when it quits.
	switch resp, err := op.wait(ctx); {
	//...省略对结果的处理
	}
}
2.6 rpc Server端逻辑
server端主要分成两部分,一部分是底层API实现,另一部分是rpc server端的处理。
底层API实现,以eth.getBalance为例。
func (s *PublicBlockChainAPI) GetBalance(ctx context.Context, address common.Address, blockNr rpc.BlockNumber) (*big.Int, error) {
	state, _, err := s.b.StateAndHeaderByNumber(ctx, blockNr)
	if state == nil || err != nil {
		return nil, err
	}
	b := state.GetBalance(address)
	return b, state.Error()
}
rpc server端的处理流程如下图:
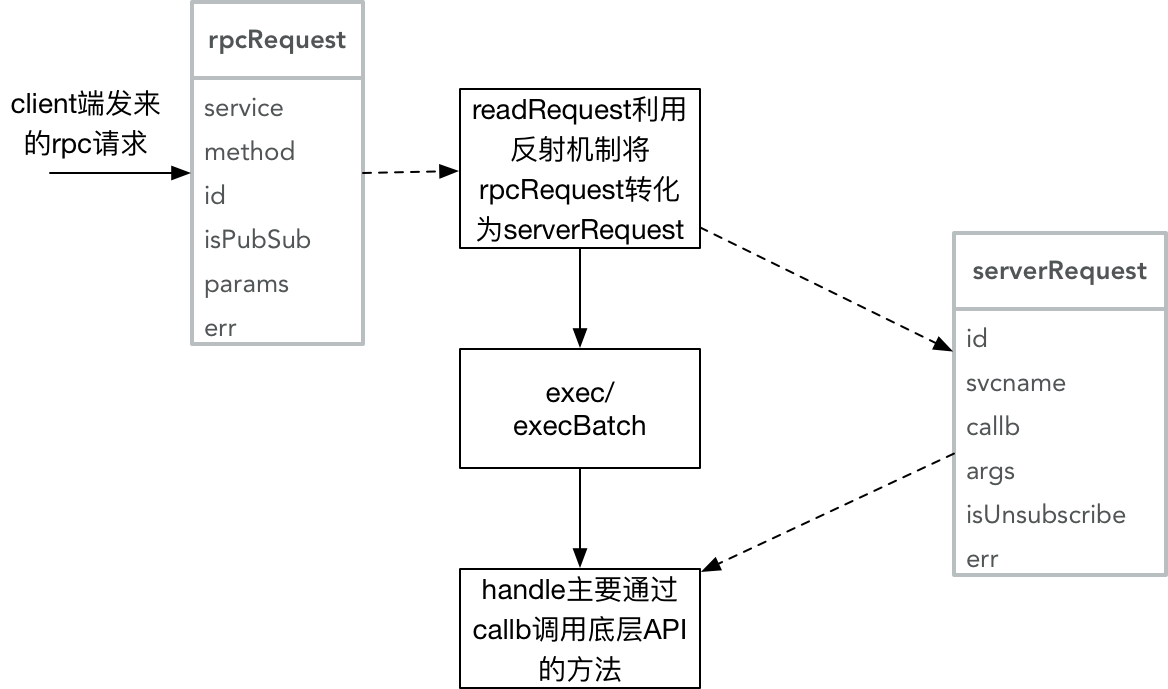
- readRequest主要是通过反射的机制将rpc的request,转化为serverRequest,可以理解为通过反射找到要调用的服务名svcname,要调用的方法callb,并将方法需要使用的参数args也传递到serverRequest中。
- 根据是否需要批量处理请求,调用execBatch和exec。
- exec和execBatch调用handle,并将结果返回给rpc client端。
- handle中通过读取serverRequest中的内容,调用相应服务的相应方法。
func (s *Server) serveRequest(ctx context.Context, codec ServerCodec, singleShot bool, options CodecOption) error {
	// ...省略其他部分
	// test if the server is ordered to stop
	for atomic.LoadInt32(&s.run) == 1 {
		// 从readRequest中读出请求
		reqs, batch, err := s.readRequest(codec)
		if err != nil {
			// If a parsing error occurred, send an error
			if err.Error() != "EOF" {
				log.Debug(fmt.Sprintf("read error %v\n", err))
				codec.Write(codec.CreateErrorResponse(nil, err))
			}
			// Error or end of stream, wait for requests and tear down
			pend.Wait()
			return nil
		}
		// ...省略检查server是否关闭,关闭返回错误的情况
		// 可以看到批量调用execBatch,否则调用exec
		// If a single shot request is executing, run and return immediately
		if singleShot {
			if batch {
				s.execBatch(ctx, codec, reqs)
			} else {
				s.exec(ctx, codec, reqs[0])
			}
			return nil
		}
		// For multi-shot connections, start a goroutine to serve and loop back
		pend.Add(1)
		go func(reqs []*serverRequest, batch bool) {
			defer pend.Done()
			if batch {
				s.execBatch(ctx, codec, reqs)
			} else {
				s.exec(ctx, codec, reqs[0])
			}
		}(reqs, batch)
	}
	return nil
}
3. 增加web3接口
如何在web3中增加新的接口。比方说想要增加一个eth.getNonce([addr])的接口。
- API中增加相应的接口。
func (s *PublicBlockChainAPI) GetNonce(ctx context.Context, address common.Address, blockNr rpc.BlockNumber) (uint64, error) {
	state, _, err := s.b.StateAndHeaderByNumber(ctx, blockNr)
	if state == nil || err != nil {
		return nil, err
	}
	b := state.GetNonce(address)
	return b, state.Error()
}
- web3.js中增加接口。
var methods = function(){
	var getNonce = new Method({
        name: 'getBalance',
        call: 'eth_getNonce',
        params: 2,
        inputFormatter: [formatters.inputAddressFormatter, formatters.inputDefaultBlockNumberFormatter],
        outputFormatter: formatters.outputBigNumberFormatter
    });
    //...
    return [
        getNonce,
        //...
    ];
};
- deps.go中有go:generate语句,用来重新生成bindata.go文件.
生成bindata.go文件,需要安装go-bindata。安装方法如下。
go get github.com/jteeuwen/go-bindata
go install github.com/jteeuwen/go-bindata/go-bindata
安装后生成bindata.go文件,可以在IDE中点击生成,也可以在命令行中执行命令生成。
cd $GOPATH/src/github.com/ethereum/go-ethereum/internal/jsre/deps
go-bindata -nometadata -pkg deps -o bindata.go bignumber.js web3.js
gofmt -w -s bindata.go
- 重编geth。
make clean make geth - 重新打开console就可以使用getNonce命令了。
> eth.getNonce(eth.accounts[0])
46


 6610
6610


 到【灌水乐园】发言


