


【实例介绍】:
在《轻松看懂的加解密系列(1)》中,我们用一个简单的 Windows Console 程序介绍了 Windows Crypto APIs 是如何进行 AES 对称加密和解密的。这次将通过另一个 Windows MFC 对话框程序,来讲解更复杂一些的 RSA 非对称加密接口的运用。当然本实例继续使用 Windows Crypto APIs。

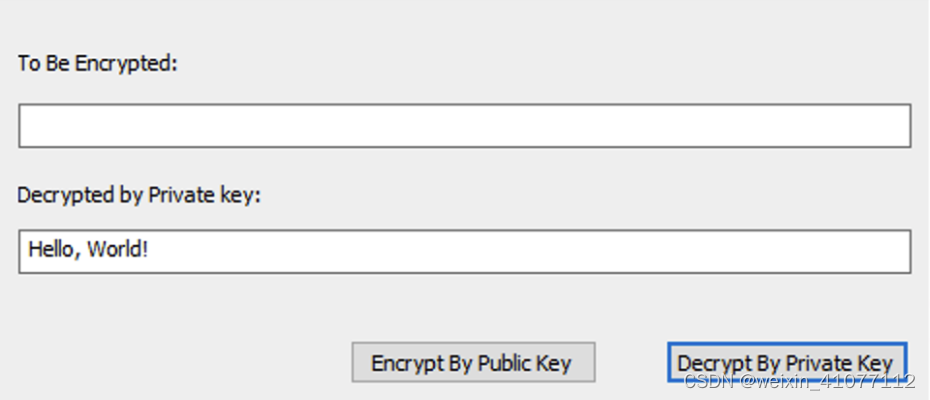
看到【图-1】中的对话框,如果稍有 Windows 编程基础,应该大致就能猜到点击【Encrypt By Public Key】按钮或【Decrypt By Private Key】按钮会各触发一个事件响应函数。函数名分别为【OnBnClickedButtonEncrypt】和【OnBnClickedButtonDecrypt】。其中【OnBnClickedButtonEncrypt】函数会从第一个对话框中取出用户输入的明文,然后用生成的公钥加密后,将密文以及对应生成的私钥一并存储在目标注册表项下。【OnBnClickedButtonDecrypt】函数会从目标注册表项读取密文和私钥,经解密后再输出到第二个对话框中。由于密钥和机器是无关的,所以可以在 A 电脑上用测试程序完成加密动作,然后将目标注册表项导出到 B 电脑上用同样的测试程序完成解密动作。
public:
	afx_msg void OnBnClickedButtonEncrypt();
	afx_msg void OnBnClickedButtonDecrypt();

private:
	void ShowError(const char* pszText);
	BOOL ReturnPublicKeyStorePrivateKey(BYTE** ppPublicKey, DWORD* pdwPublicKeyLength);
	BOOL RsaEncrypt(BYTE* pPublicKey, DWORD dwPublicKeyLength, BYTE* pData, DWORD& dwDataLength, DWORD dwBufferLength);
	BOOL RsaDecrypt(BYTE* pPrivateKey, DWORD dwProvateKeyLength, BYTE* pData, DWORD& dwDataLength);
为了完成以上描述的任务,例程封装了3个 private 函数:
- 【ReturnPublicKeyStorePrivateKey】负责生成公钥和私钥,然后存储私钥,导出公钥;
- 【RsaEncrypt】负责用公钥加密明文,并返回给调用方存储密文;
- 【RsaDecrypt】负责用私钥解密密文,并输出;
【OnBnClickedButtonEncrypt】:
void CCryptoApiRsaMfcTestDlg::OnBnClickedButtonEncrypt()
{
	// Generate public and store private key into target register path
	BYTE* pData = NULL;
	DWORD dwBufferLength = 2048;

	pData = new BYTE[dwBufferLength];
	if (NULL == pData)
	{
		AfxMessageBox(_T("Create pData failure!"), MB_ICONERROR);
		return;
	}

	CEdit* pEdit = (CEdit*)GetDlgItem(IDC_EDIT_TOBE);
	CString strText;
	pEdit->GetWindowText(strText);

	int bufferSize = WideCharToMultiByte(CP_UTF8, 0, strText, -1, NULL, 0, NULL, NULL);
	if (bufferSize > 0)
	{
		char* pMultiByteText = new char[bufferSize];
		WideCharToMultiByte(CP_UTF8, 0, strText, -1, pMultiByteText, bufferSize, NULL, NULL);
		DWORD dwTextLength = strlen(pMultiByteText);

		if (dwTextLength <= dwBufferLength)
		{
			memcpy(pData, pMultiByteText, dwTextLength);
			pData[dwTextLength] = '\0';
		}
		else
		{
			AfxMessageBox(_T("dwTextLength > dwBufferLength!"), MB_ICONERROR);
			return;
		}

		delete[] pMultiByteText;
	}
	else
	{
		AfxMessageBox(_T("No input, bufferSize <= 0!"), MB_ICONERROR);
		return;
	}

	BYTE* pPublicKey = NULL;
	DWORD dwPublicKeyLength = 0;
	ReturnPublicKeyStorePrivateKey(&pPublicKey, &dwPublicKeyLength);

	// Use public key to encrypt input
	DWORD dwDataLength = 0;
	dwDataLength = 1 + ::lstrlenA((char*)pData);
	RsaEncrypt(pPublicKey, dwPublicKeyLength, pData, dwDataLength, dwBufferLength);

	// Store encrypted input into target register path
	CString strAppName = AfxGetAppName();
	CString strRegistryPath;
	strRegistryPath.Format(_T("SOFTWARE\\%s"), strAppName);
	LPCTSTR lpRegistryPath = strRegistryPath.GetBuffer();

	HKEY hKey;
	LONG result = RegCreateKeyEx(HKEY_CURRENT_USER, lpRegistryPath, 0, NULL, 0, KEY_WRITE, NULL, &hKey, NULL);

	if (result == ERROR_SUCCESS)
	{
		result = RegSetValueEx(hKey, _T("EncryptedContent"), 0, REG_BINARY, pData, dwDataLength);

		if (result == ERROR_SUCCESS)
		{
			AfxMessageBox(_T("Write Encrypted content into register success."), MB_ICONINFORMATION);
		}
		else
		{
			AfxMessageBox(_T("Write Encrypted content into register failure!"), MB_ICONERROR);
		}

		RegCloseKey(hKey);
	}
	else
	{
		AfxMessageBox(_T("Open or create register item failure!"), MB_ICONERROR);
	}

	if (pData)
	{
		delete[]pData;
		pData = NULL;
	}

	if (pPublicKey)
	{
		delete[]pPublicKey;
		pPublicKey = NULL;
	}
}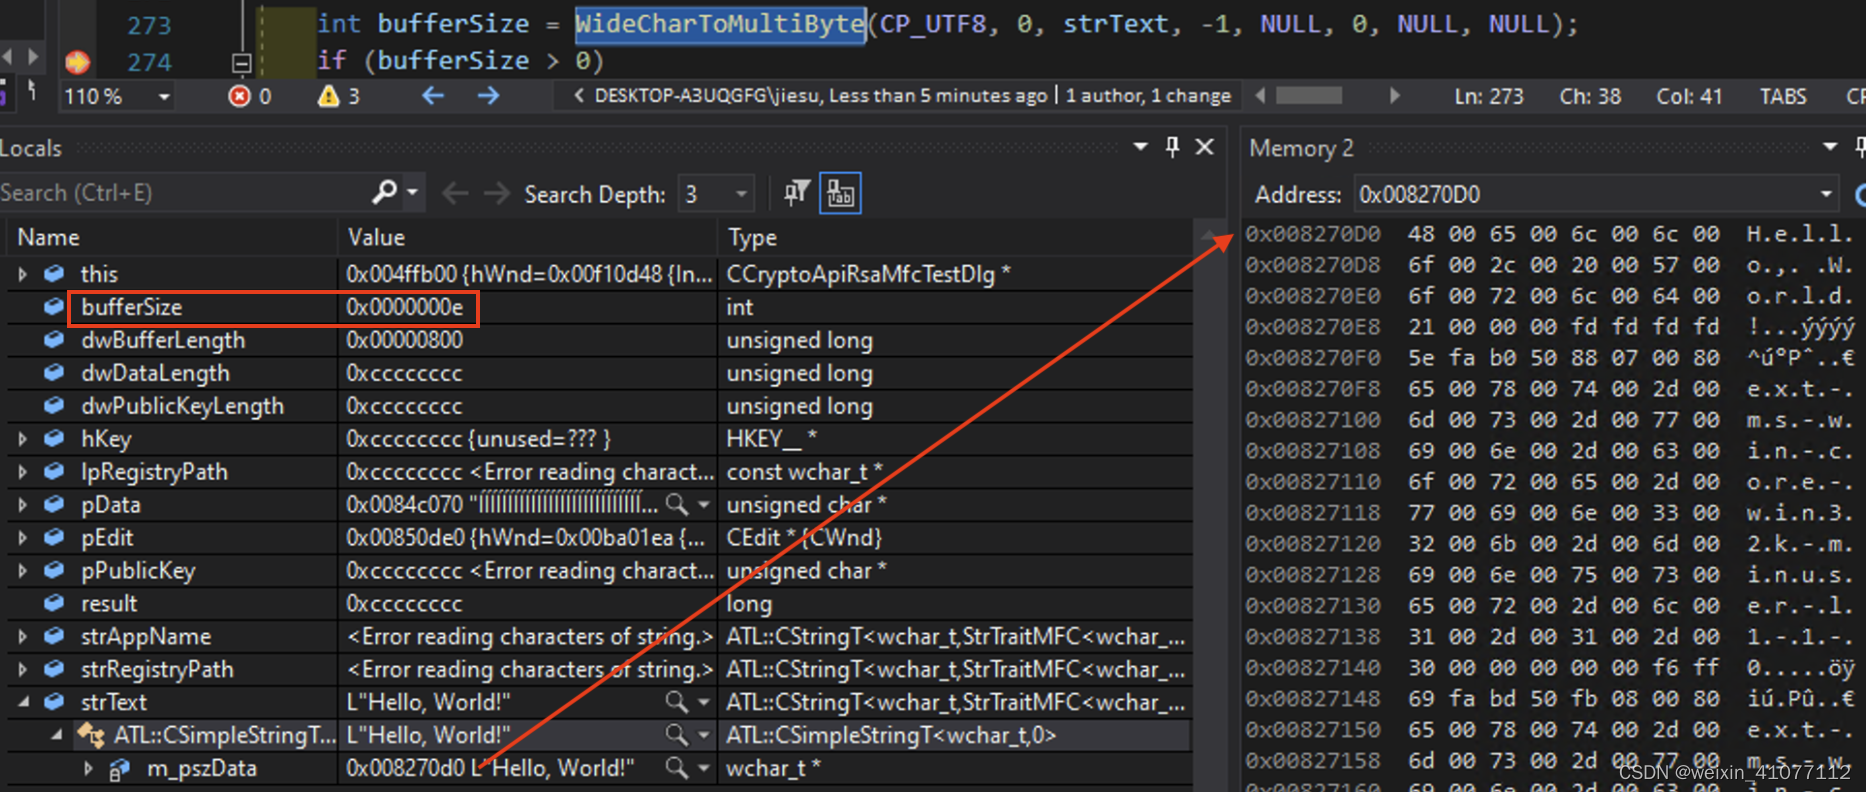
【讲解】因为从 MFC 程序对话框中取到的字符默认是宽字节的,而 Crypto APIs 加解密接口处理的数据是按字节为单位,故需要先利用系统函数【WideCharToMultiByte】将输入的字符串转换成 UTF-8 字符集。标准的转换步骤一般会调用两次【WideCharToMultiByte】,第一次得到转换后的字符串长度【图-2】,用来初始化接收转换后数据的缓冲区长度。第二次才是将转换后的字符串塞入准备好的缓冲区【图-3】。
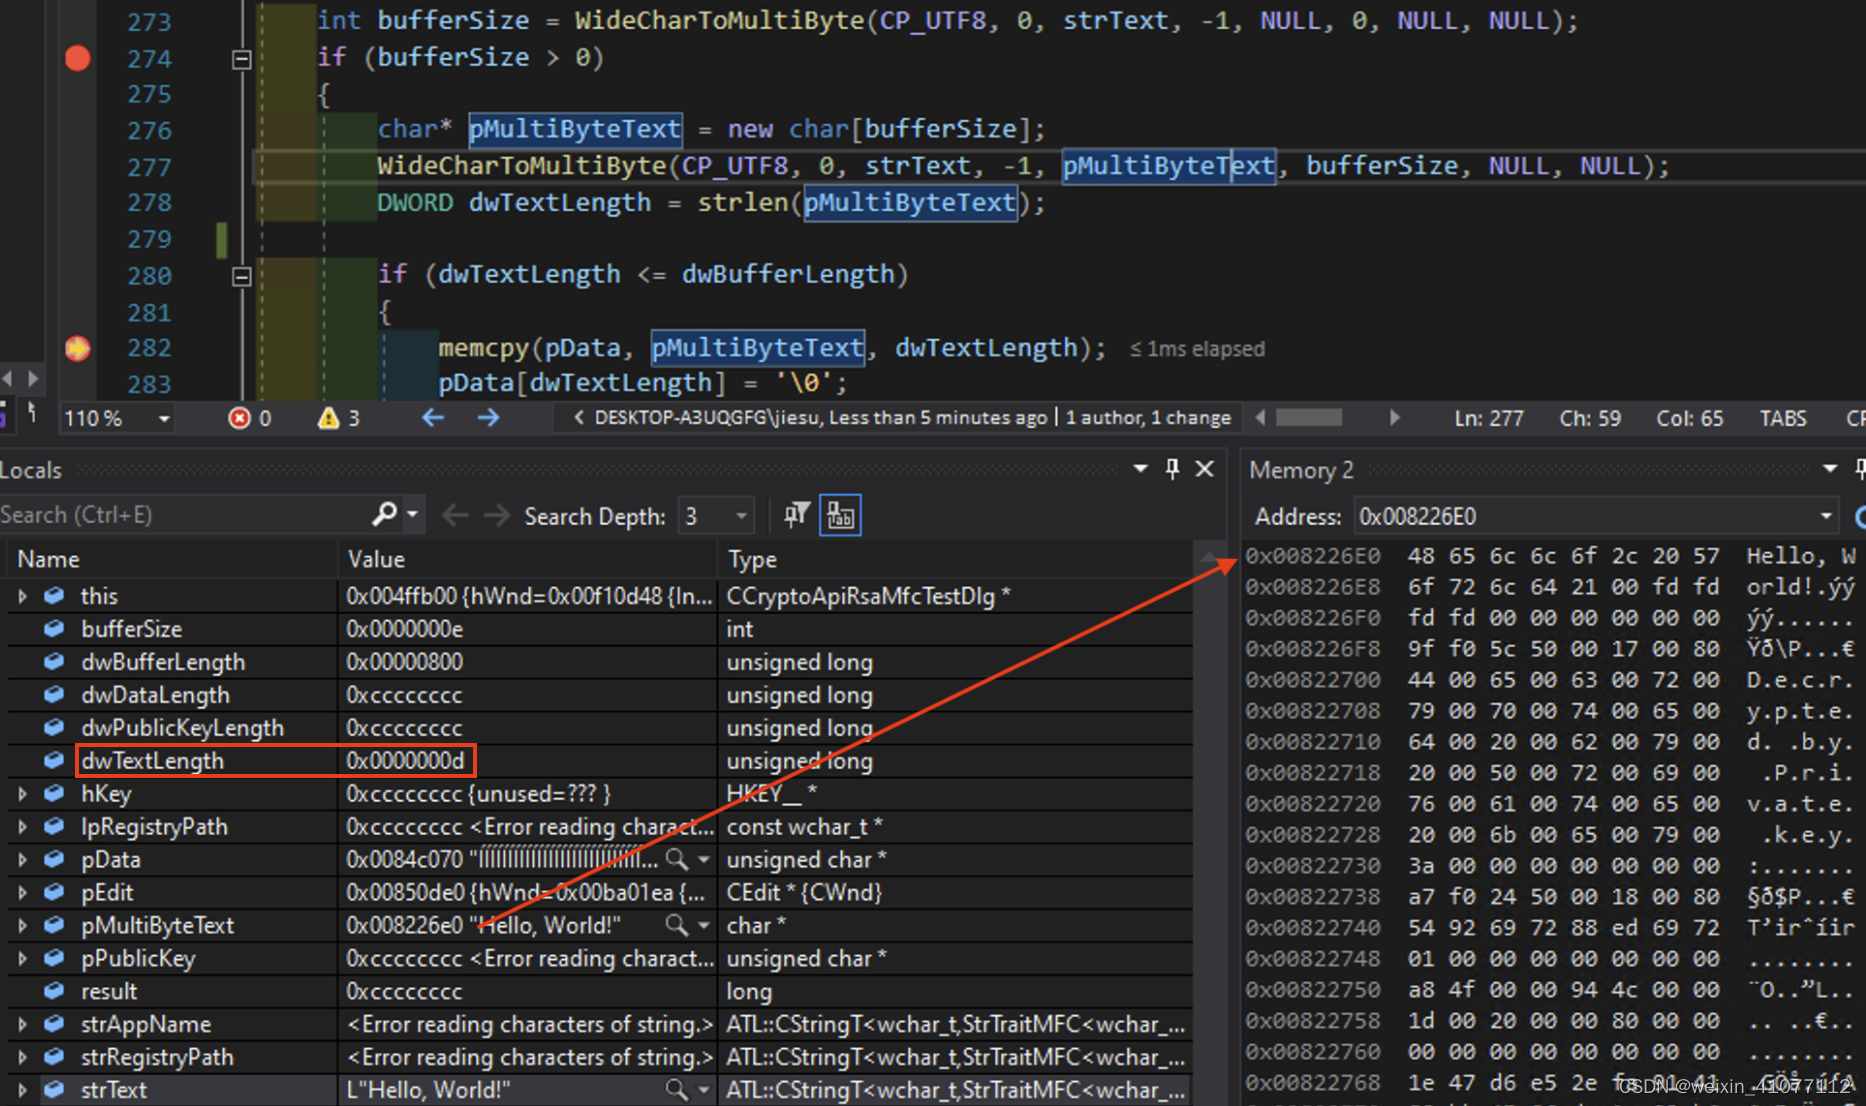

【讲解】在转换和拷贝给存储明文的缓冲区过程中需要注意的是,【WideCharToMultiByte】返回的是转换后的字符串带上末尾【'\0'】的长度,对于本例输入的“Hello, World!”来说就是14,而字符串本身的内容长度为13。由于为了防止溢出,pData 所指向的缓冲区空间被初始化为2048个字节,而且并没有将缓冲区内容全部清零,所以需要在对 pData 拷贝明文后在末尾加上一个【'\0'】以表示字符串结束【图-4】。如果对 pData 拷贝之前重置其缓冲区内容全部为零,也就不必在末尾追加【'\0'】了,这两种写法都是可以的。
【ReturnPublicKeyStorePrivateKey】:
BOOL CCryptoApiRsaMfcTestDlg::ReturnPublicKeyStorePrivateKey(BYTE** ppPublicKey, DWORD* pdwPublicKeyLength)
{
	BOOL bRet = TRUE;
	HCRYPTPROV hCryptProv = NULL;
	HCRYPTKEY hCryptKey = NULL;
	BYTE* pPublicKey = NULL;
	DWORD dwPublicKeyLength = 0;
	BYTE* pPrivateKey = NULL;
	DWORD dwPrivateKeyLength = 0;

	do
	{
		// Get CSP handler
		bRet = ::CryptAcquireContext(&hCryptProv, NULL, NULL, PROV_RSA_FULL, 0);
		if (FALSE == bRet)
		{
			ShowError("CryptAcquireContext");
			break;
		}

		// Generate public-private key pair
		bRet = ::CryptGenKey(hCryptProv, AT_KEYEXCHANGE, CRYPT_EXPORTABLE, &hCryptKey);
		if (FALSE == bRet)
		{
			ShowError("CryptGenKey");
			break;
		}

		// Get the length and content of a public key
		bRet = ::CryptExportKey(hCryptKey, NULL, PUBLICKEYBLOB, 0, NULL, &dwPublicKeyLength);
		if (FALSE == bRet)
		{
			ShowError("CryptExportKeyPublic");
			break;
		}
		pPublicKey = new BYTE[dwPublicKeyLength];
		::RtlZeroMemory(pPublicKey, dwPublicKeyLength);
		bRet = ::CryptExportKey(hCryptKey, NULL, PUBLICKEYBLOB, 0, pPublicKey, &dwPublicKeyLength);
		if (FALSE == bRet)
		{
			ShowError("CryptExportKeyPublic");
			break;
		}

		// Get the length and content of a private key
		bRet = ::CryptExportKey(hCryptKey, NULL, PRIVATEKEYBLOB, 0, NULL, &dwPrivateKeyLength);
		if (FALSE == bRet)
		{
			ShowError("CryptExportKeyPrivate");
			break;
		}
		pPrivateKey = new BYTE[dwPrivateKeyLength];
		::RtlZeroMemory(pPrivateKey, dwPrivateKeyLength);
		bRet = ::CryptExportKey(hCryptKey, NULL, PRIVATEKEYBLOB, 0, pPrivateKey, &dwPrivateKeyLength);
		if (FALSE == bRet)
		{
			ShowError("CryptExportKeyPrivate");
			break;
		}

		*ppPublicKey = pPublicKey;
		*pdwPublicKeyLength = dwPublicKeyLength;

		// Store private key and length to target register path
		CString strAppName = AfxGetAppName();
		CString strRegistryPath;
		strRegistryPath.Format(_T("SOFTWARE\\%s"), strAppName);
		LPCTSTR lpRegistryPath = strRegistryPath.GetBuffer();

		HKEY hKey;
		LONG result = RegCreateKeyEx(HKEY_CURRENT_USER, lpRegistryPath, 0, NULL, 0, KEY_WRITE, NULL, &hKey, NULL);

		if (result == ERROR_SUCCESS)
		{
			result = RegSetValueEx(hKey, _T("PrivateKey"), 0, REG_BINARY, pPrivateKey, dwPrivateKeyLength);

			if (result == ERROR_SUCCESS)
			{
				AfxMessageBox(_T("Write private key into register success."), MB_ICONINFORMATION);
			}
			else
			{
				AfxMessageBox(_T("Write private key into register failure!"), MB_ICONERROR);
			}

			RegCloseKey(hKey);
		}
		else
		{
			AfxMessageBox(_T("Open or create register item failure!"), MB_ICONERROR);
		}

	} while (FALSE);

	if (hCryptKey)
	{
		::CryptDestroyKey(hCryptKey);
	}
	if (hCryptProv)
	{
		::CryptReleaseContext(hCryptProv, 0);
	}

	if (pPrivateKey)
	{
		delete[]pPrivateKey;
		pPrivateKey = NULL;
	}

	return bRet;
}
【图-5 讲解】
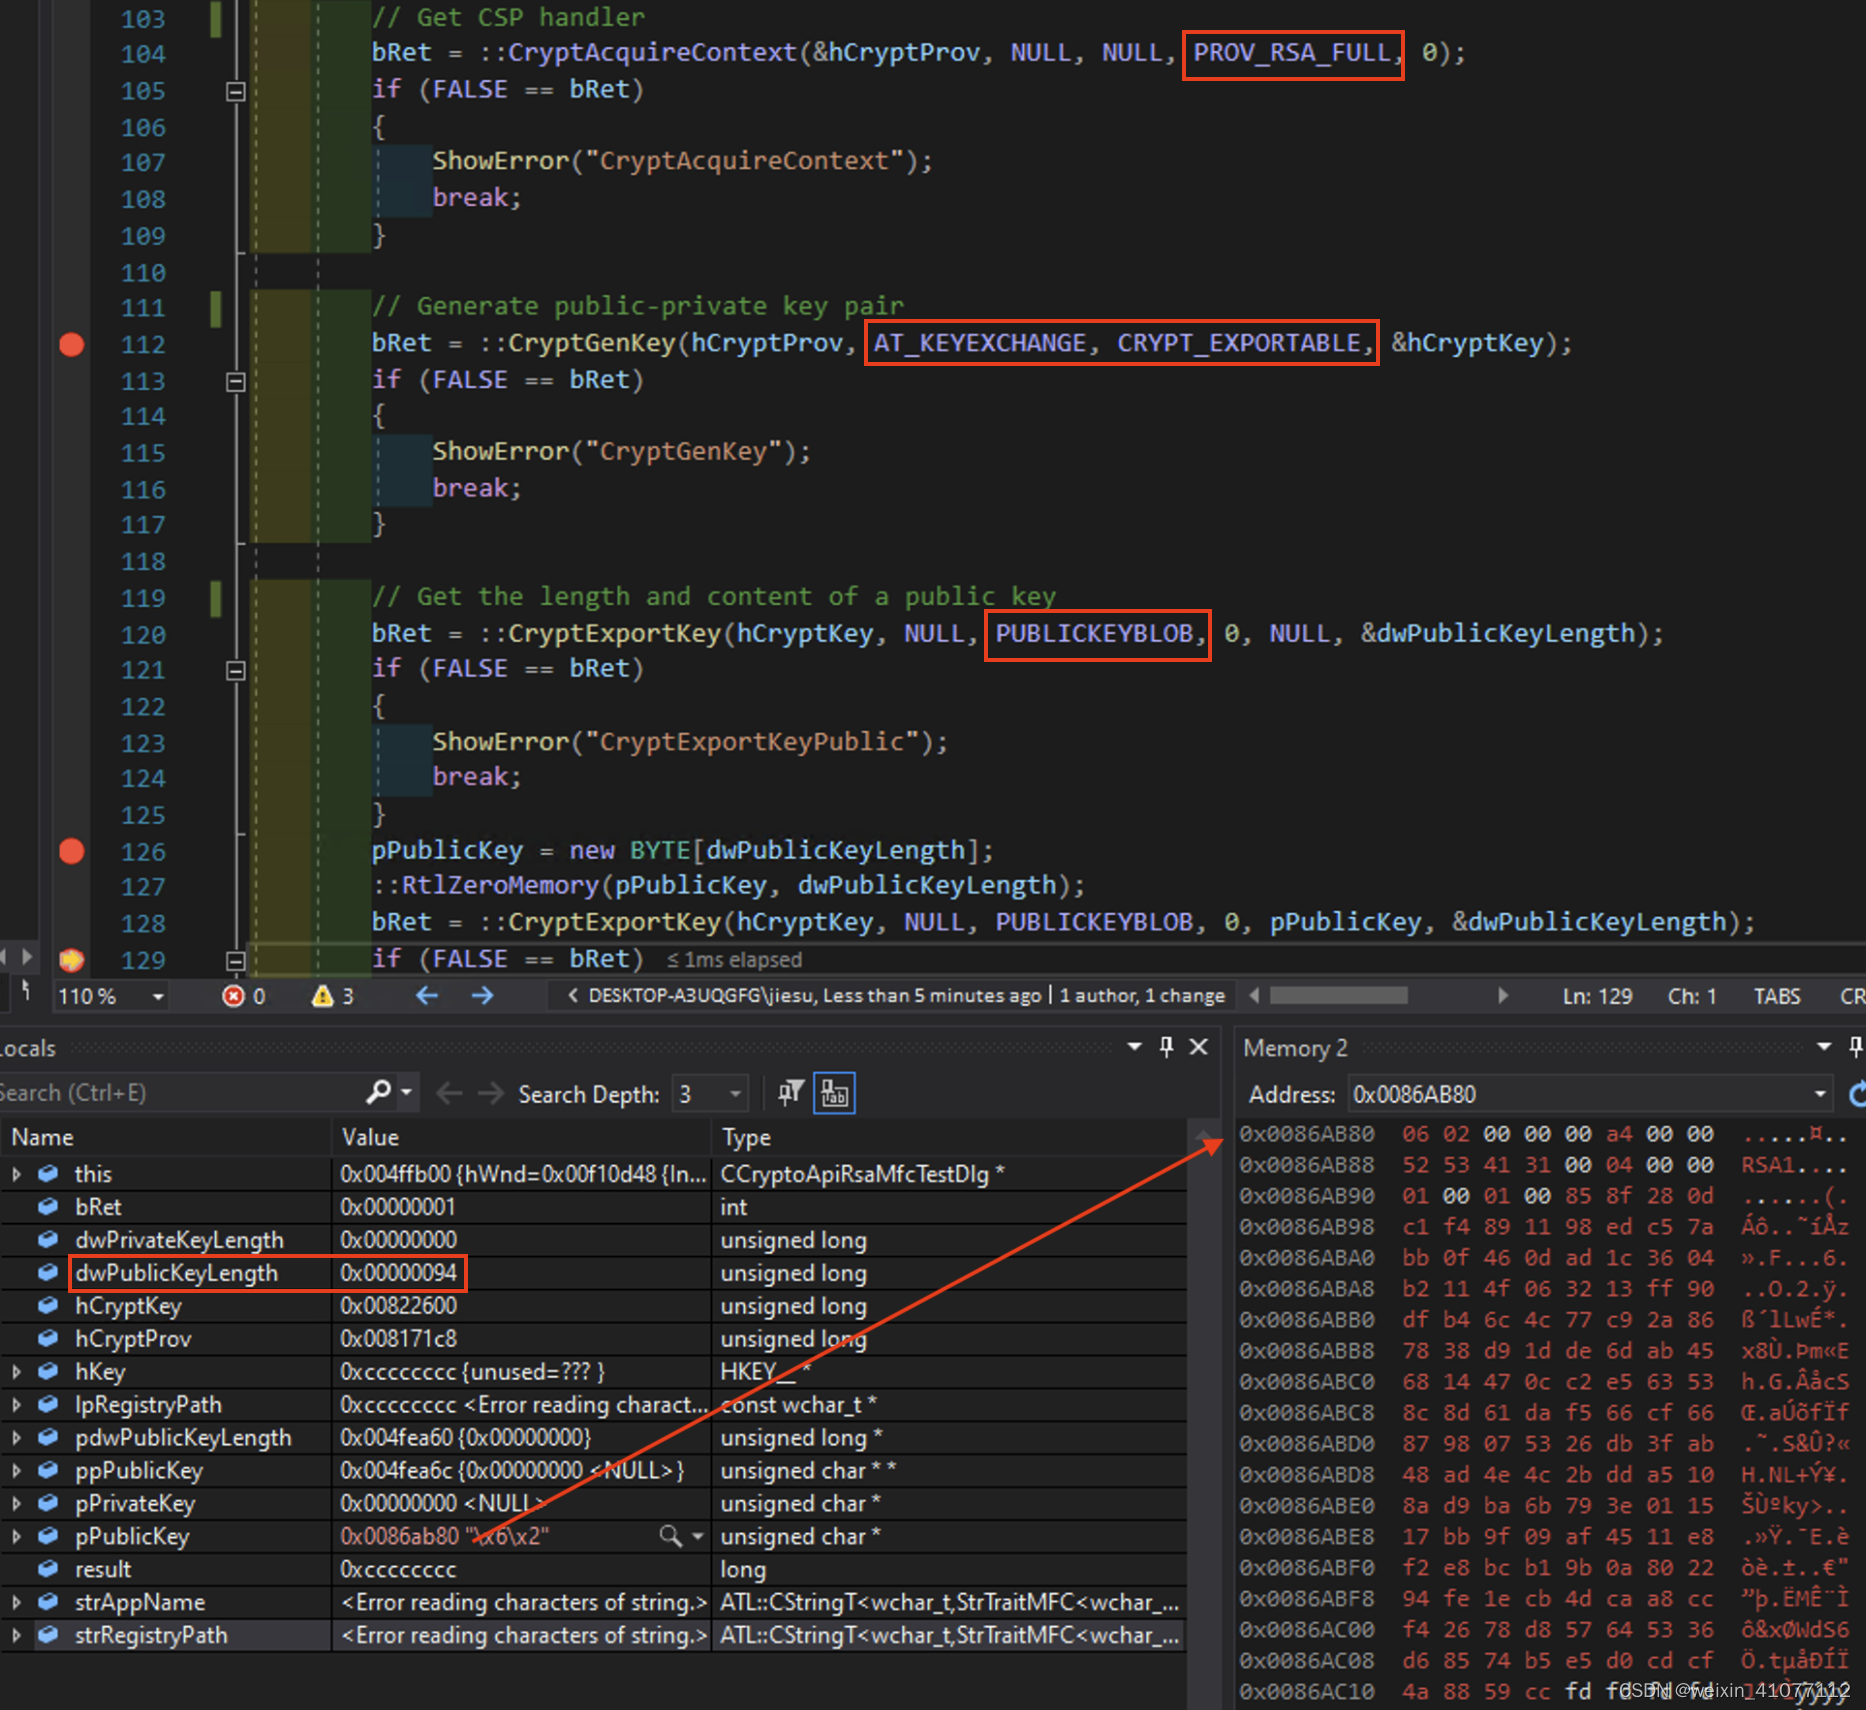
- 在创建 CSP 句柄的时候,指定了加解密类型为【PROV_RSA_FULL】。
- 在产生公钥私钥对的接口中,【AT_KEYEXCHANGE】 用于指示生成一个用于密钥交换的非对称密钥对,【CRYPT_EXPORTABLE】 则表示生成的密钥对可以导出并在其他地方使用。
- 在导出密钥接口中,【
PUBLICKEYBLOB】是一个标识要导出的密钥的格式的常量。在这里表示导出的是公钥部分。 - 导出接口 CryptExportKey 被调用两次,第一次得到公钥长度以初始化缓冲区,第二次实际赋值缓冲区。

【图-6 讲解】导出接口中参数为【PRIVATEKEYBLOB】,表示导出的是私钥部分,同样导出接口被调用了两次。而且可以发现,实例中对称密钥当中【私钥】的长度是明显大于【公钥】的。这其实是 RSA 非对称密钥的一个普遍特点。因为RSA密钥对的安全性和加密强度主要取决于密钥长度。较长的私钥增加了破解RSA加密的难度,提高了安全性。因此,为了在提供足够的安全性的同时保持合理的性能,公钥通常较短,私钥较长。
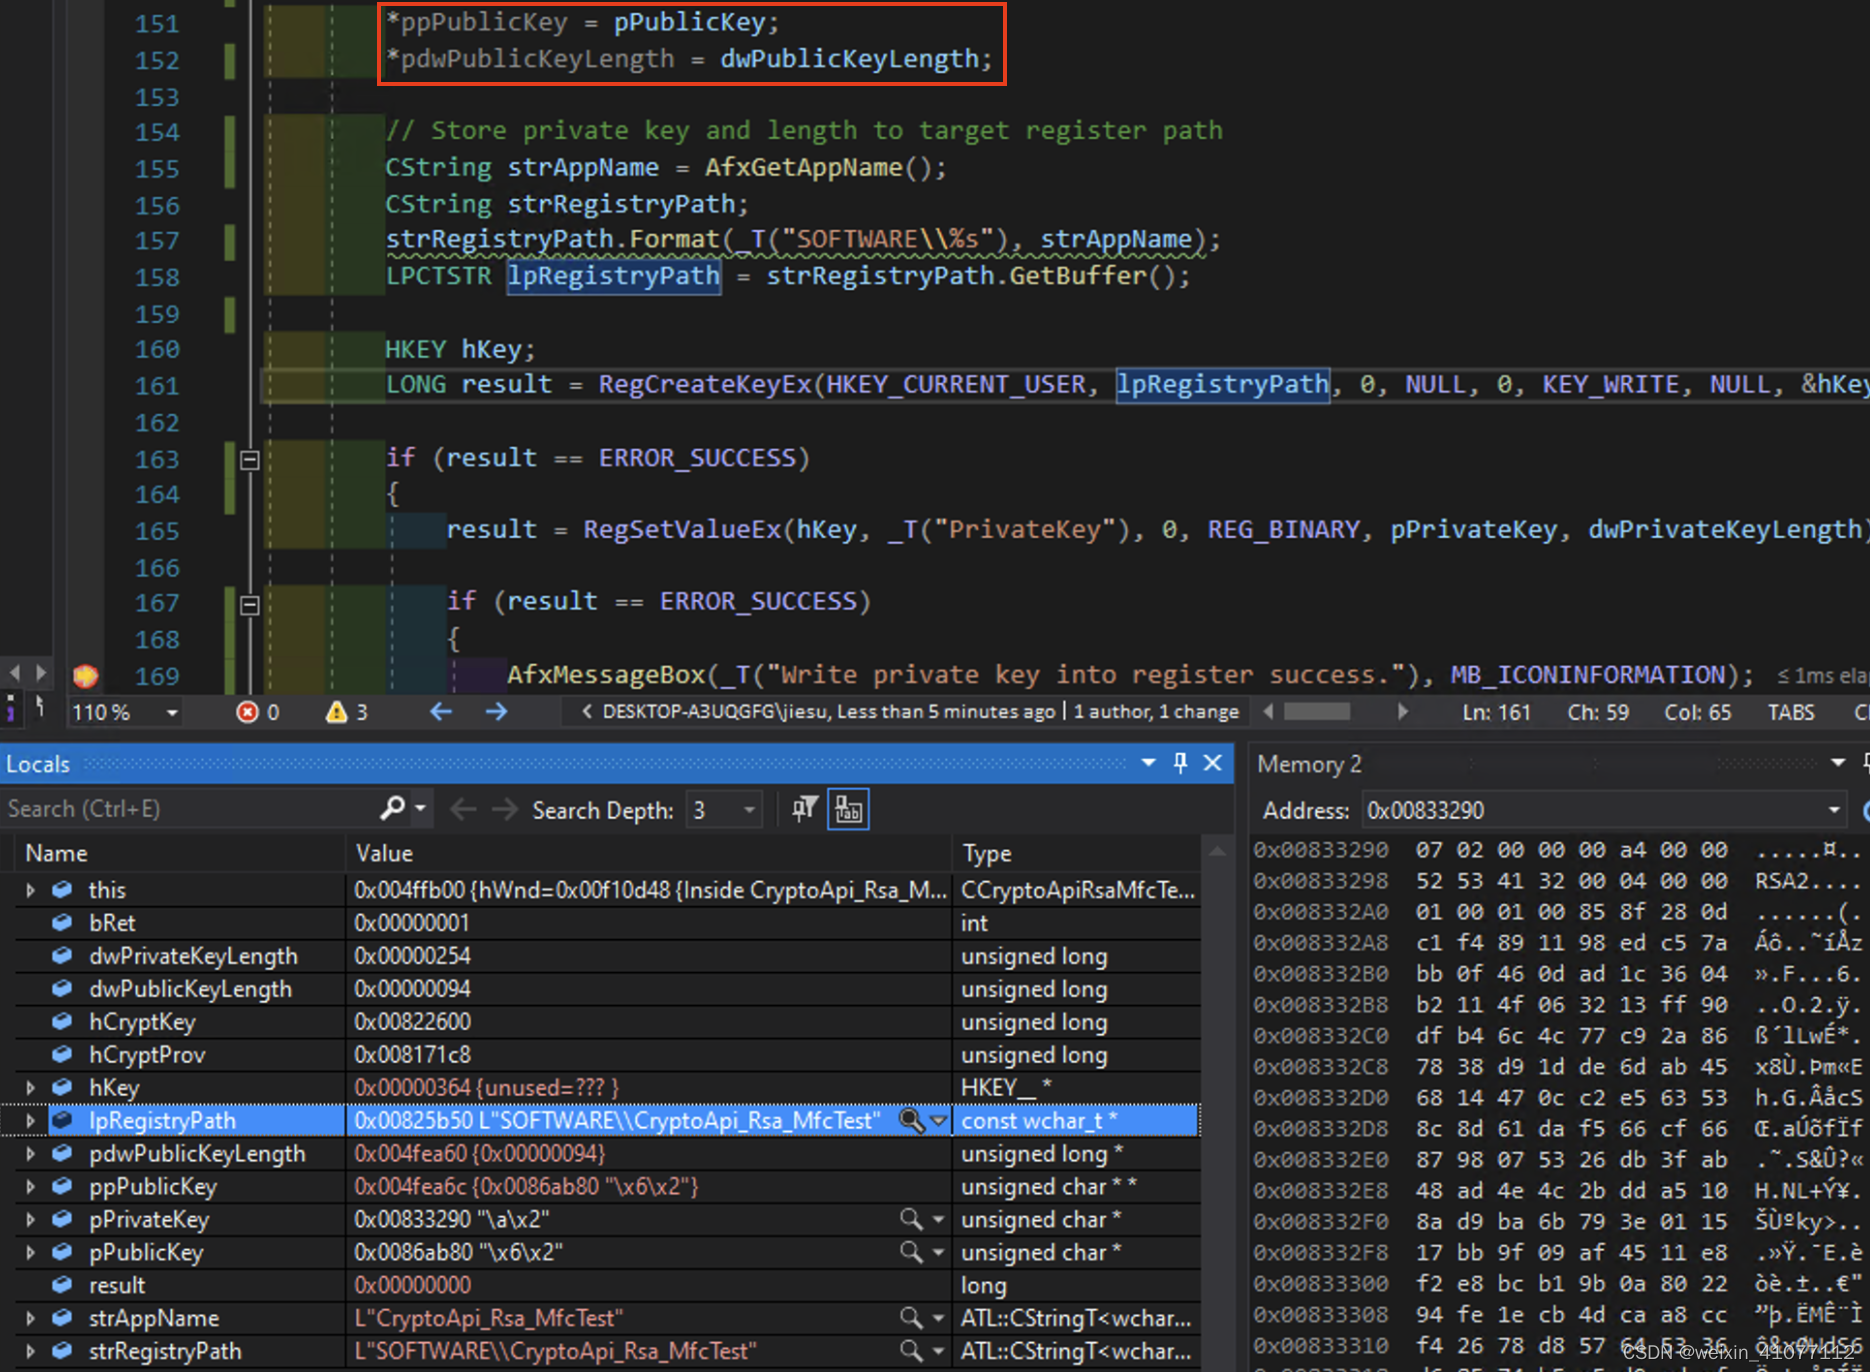
【图-7 讲解】产生的公钥通过引用参数传递到调用栈,供接下来的加密操作使用。而同时产生的私钥保存在以应用程序命名的注册表路径下,供接下来异步解密时读取。可以很清楚的看到指针 pPrivateKey【0x00833290】内存地址下的内容和注册表保存的二进制内容是一致的【图-8】。

【RsaEncrypt】:
BOOL CCryptoApiRsaMfcTestDlg::RsaEncrypt(BYTE* pPublicKey, DWORD dwPublicKeyLength, BYTE* pData, DWORD& dwDataLength, DWORD dwBufferLength)
{
	BOOL bRet = TRUE;
	HCRYPTPROV hCryptProv = NULL;
	HCRYPTKEY hCryptKey = NULL;

	do
	{
		// Get CSP handler
		bRet = ::CryptAcquireContext(&hCryptProv, NULL, NULL, PROV_RSA_FULL, 0);
		if (FALSE == bRet)
		{
			ShowError("CryptAcquireContext");
			break;
		}

		// Import public key
		bRet = ::CryptImportKey(hCryptProv, pPublicKey, dwPublicKeyLength, NULL, 0, &hCryptKey);
		if (FALSE == bRet)
		{
			ShowError("CryptImportKey");
			break;
		}

		// Encrypt data by public key
		bRet = ::CryptEncrypt(hCryptKey, NULL, TRUE, 0, pData, &dwDataLength, dwBufferLength);
		if (FALSE == bRet)
		{
			ShowError("CryptEncrypt");
			break;
		}

	} while (FALSE);

	if (hCryptKey)
	{
		::CryptDestroyKey(hCryptKey);
	}
	if (hCryptProv)
	{
		::CryptReleaseContext(hCryptProv, 0);
	}

	return bRet;
}
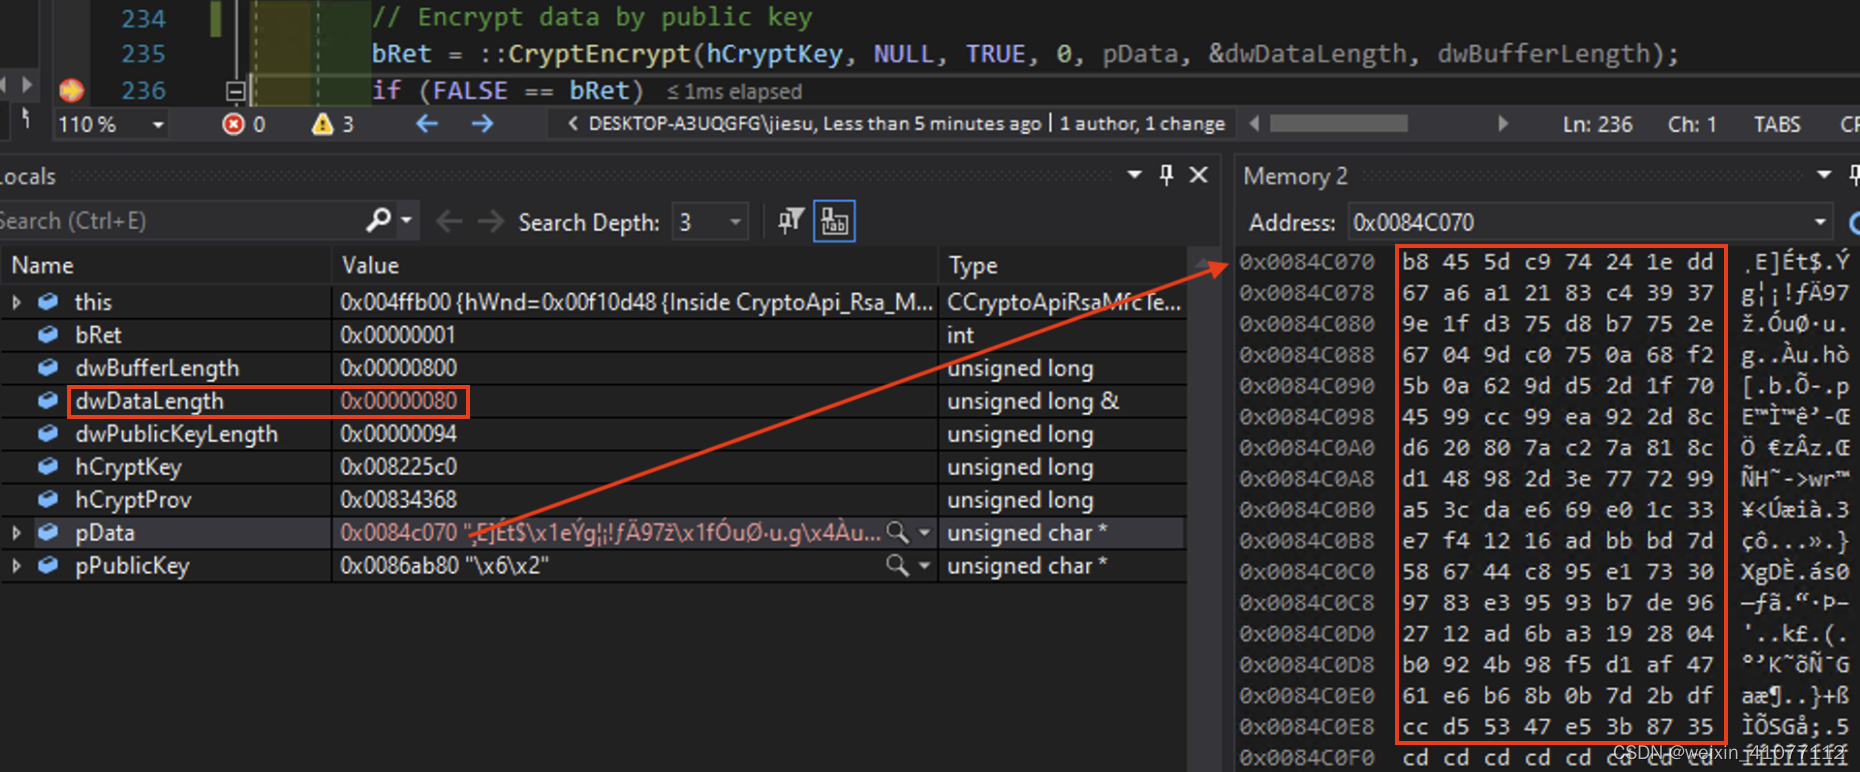
【讲解】CryptImportKey用于导入一个已经存在的密钥到加密服务提供程序(CSP)中,以便产生一个密钥句柄,在接下来的加密和解密操作中使用。本例导入的是公钥及其长度,产生了密钥句柄 hCryptKey【图-9】。在加密完成之后,pData 所指向的缓冲区内已经被密文重新填充,密文的长度也随之返回,刚好为128个字节【图-10】。对比缓冲区二进制内容和接下来存储到注册表内的【EncryptedContent】内容,二者也完全一致【图-11】。

【OnBnClickedButtonDecrypt】:
void CCryptoApiRsaMfcTestDlg::OnBnClickedButtonDecrypt()
{
	// Read encrypted info and private key from target register path
	BYTE* pPrivateKey = NULL;
	DWORD dwPrivateKeyLength = 0;
	BYTE* pData = NULL;
	DWORD dwDataLength = 0;

	CString strAppName = AfxGetAppName();
	CString strRegistryPath;
	strRegistryPath.Format(_T("SOFTWARE\\%s"), strAppName);
	LPCTSTR lpRegistryPath = strRegistryPath.GetBuffer();

	HKEY hKey;
	LONG result = RegOpenKeyEx(HKEY_CURRENT_USER, lpRegistryPath, 0, KEY_READ, &hKey);

	if (result != ERROR_SUCCESS)
	{
		AfxMessageBox(_T("OnBnClickedButtonDecrypt open target register failure!"), MB_ICONERROR);
		return;
	}

	// Read PrivateKey value
	DWORD dwKeyType;
	result = RegQueryValueEx(hKey, _T("PrivateKey"), NULL, &dwKeyType, NULL, &dwPrivateKeyLength);

	if (result != ERROR_SUCCESS)
	{
		AfxMessageBox(_T("OnBnClickedButtonDecrypt query target register for private key length failure!"), MB_ICONERROR);
		return;
	}

	if (dwKeyType != REG_BINARY)
	{
		AfxMessageBox(_T("OnBnClickedButtonDecrypt private key type is not expected REG_BINARY!"), MB_ICONERROR);
		return;
	}

	if (dwPrivateKeyLength <= 0)
	{
		AfxMessageBox(_T("OnBnClickedButtonDecrypt private key length <= 0!"), MB_ICONERROR);
		return;
	}

	pPrivateKey = new BYTE[dwPrivateKeyLength];
	result = RegQueryValueEx(hKey, _T("PrivateKey"), NULL, &dwKeyType, pPrivateKey, &dwPrivateKeyLength);

	if (result != ERROR_SUCCESS)
	{
		AfxMessageBox(_T("OnBnClickedButtonDecrypt query private key from target register failure!"), MB_ICONERROR);
		return;
	}

	// Read private key success, will do decrypt later
	result = RegQueryValueEx(hKey, _T("EncryptedContent"), NULL, &dwKeyType, NULL, &dwDataLength);

	if (result != ERROR_SUCCESS)
	{
		AfxMessageBox(_T("OnBnClickedButtonDecrypt query target register for encrypted content length failure!"), MB_ICONERROR);
		return;
	}

	if (dwKeyType != REG_BINARY)
	{
		AfxMessageBox(_T("OnBnClickedButtonDecrypt encrypted content type is not expected REG_BINARY!"), MB_ICONERROR);
		return;
	}

	if (dwPrivateKeyLength <= 0)
	{
		AfxMessageBox(_T("OnBnClickedButtonDecrypt encrypted content length <= 0!"), MB_ICONERROR);
		return;
	}

	pData = new BYTE[dwDataLength];
	result = RegQueryValueEx(hKey, _T("EncryptedContent"), NULL, &dwKeyType, pData, &dwDataLength);
	if (result != ERROR_SUCCESS)
	{
		AfxMessageBox(_T("OnBnClickedButtonDecrypt query encrypted content from target register failure!"), MB_ICONERROR);
		return;
	}

	// Decrypt info and output to Decrypted Editor
	RsaDecrypt(pPrivateKey, dwPrivateKeyLength, pData, dwDataLength);
	CEdit* pEdit = (CEdit*)GetDlgItem(IDC_EDIT_DECRYPT);
	pEdit->SetWindowText(CString(pData));

	if (pData)
	{
		delete[]pData;
		pData = NULL;
	}
	if (pPrivateKey)
	{
		delete[]pPrivateKey;
		pPrivateKey = NULL;
	}
}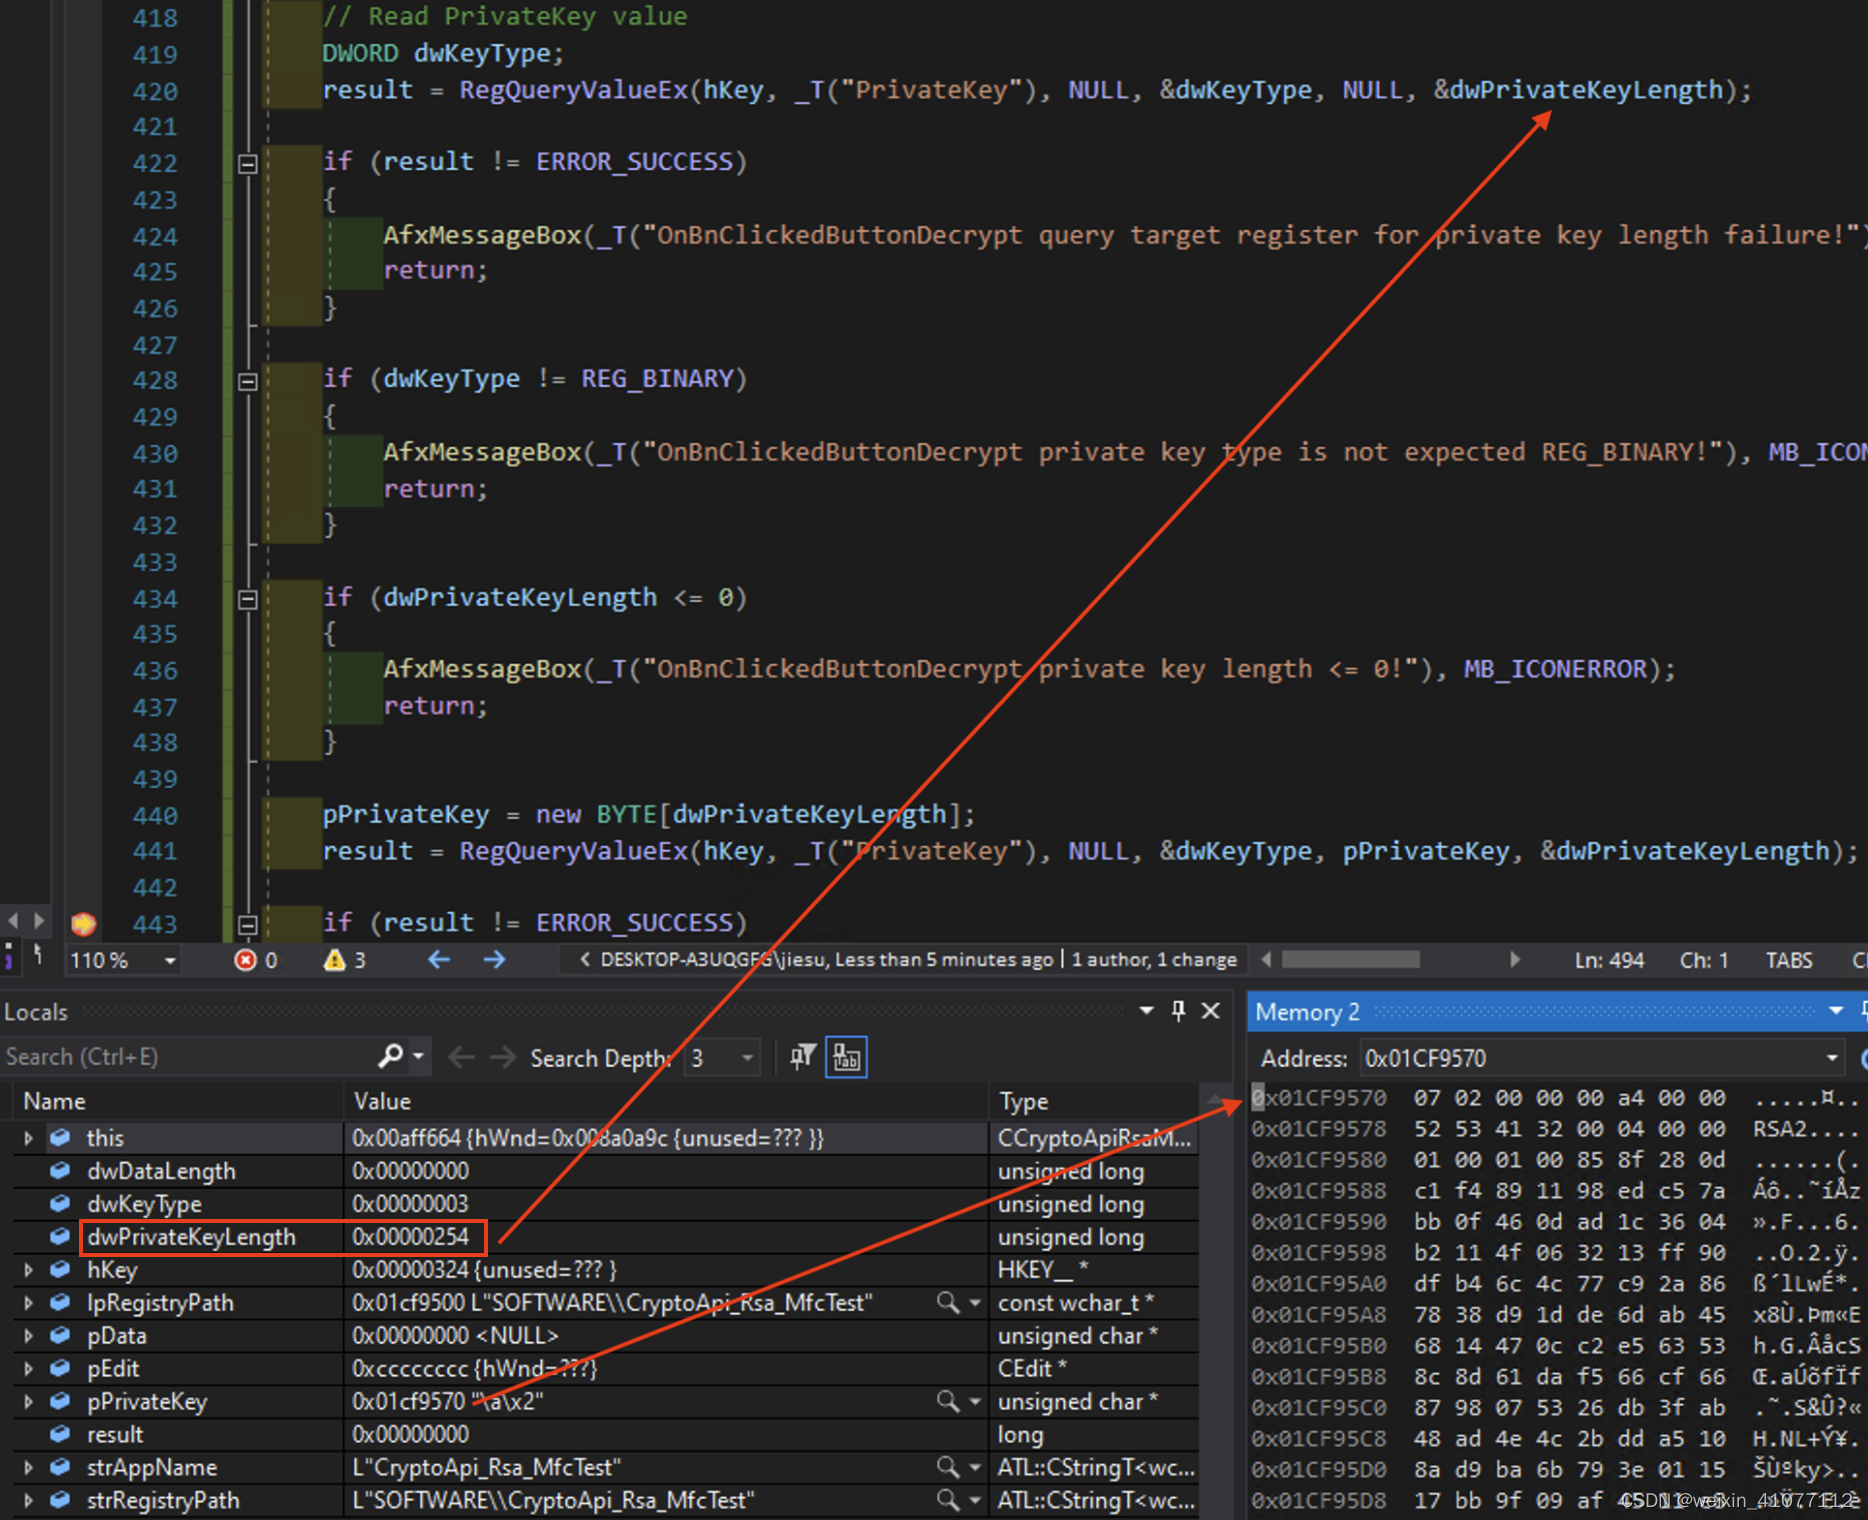
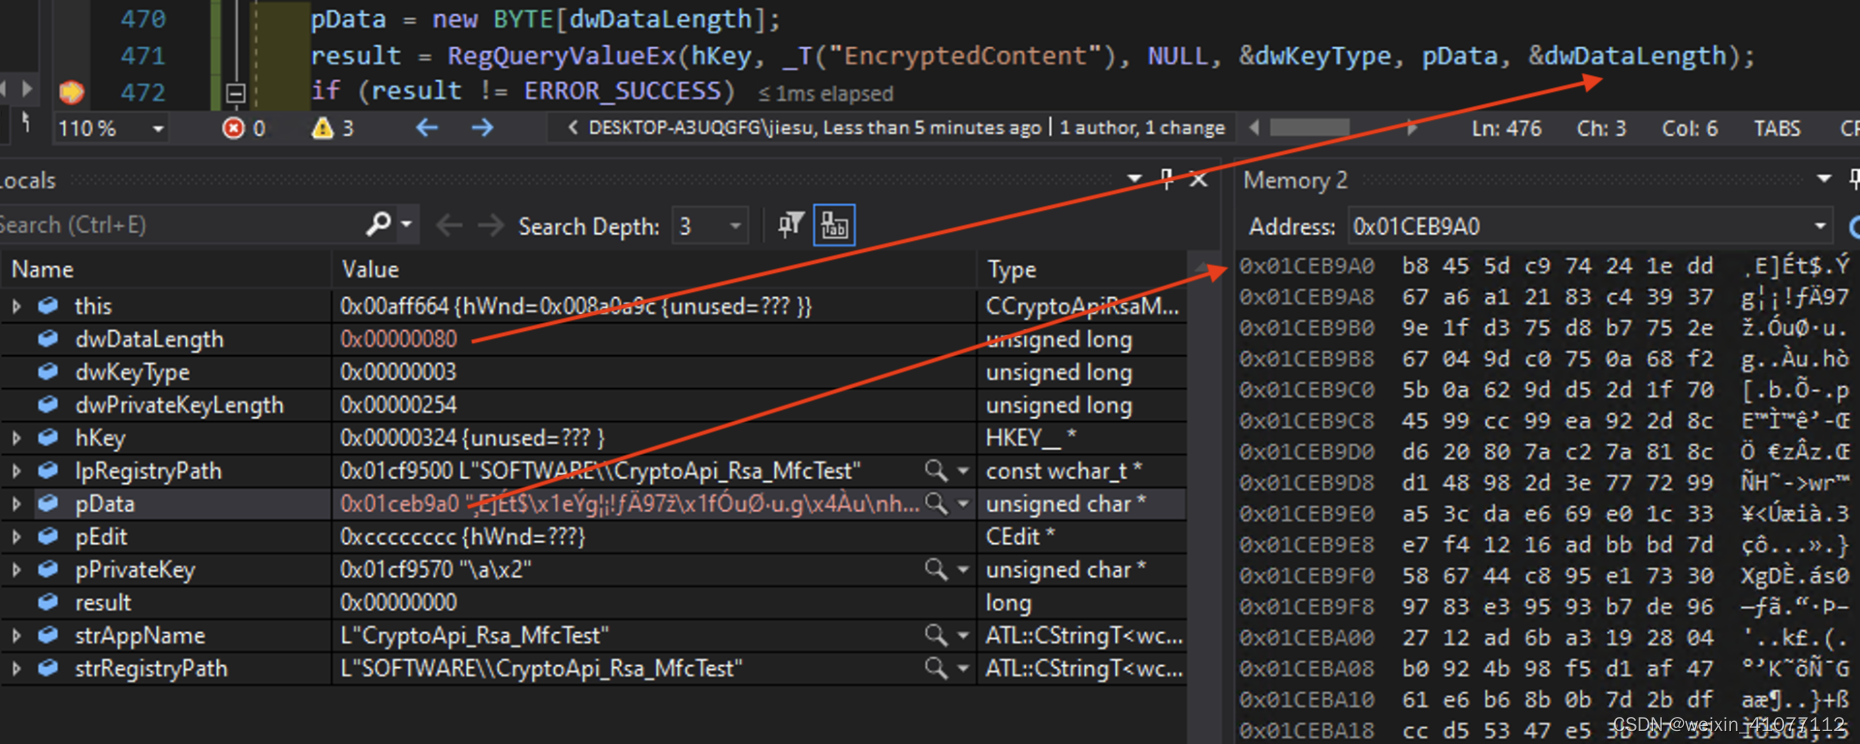
【讲解】 在解密过程中,【OnBnClickedButtonDecrypt】函数内部采用了“卫语句”写法,提高代码的可读性,减少嵌套条件和复杂的控制流程。很清晰地从约定好的注册表路径下,获取到了密钥和密文【图-12】【图-13】,并调用【RsaDecrypt】最终完成解密操作。
值得注意的是,笔者特意启动了一个新的例程来执行解密操作。如果继续使用完成加密操作的例程,或者将注册表内容导出到另一台机器运行同样的例程,都应该是可以同样完成解密操作的。这是正是本文一开始提及的,本例程的密钥和机器配置是无关的原因所致。
【RsaDecrypt】:
BOOL CCryptoApiRsaMfcTestDlg::RsaDecrypt(BYTE* pPrivateKey, DWORD dwProvateKeyLength, BYTE* pData, DWORD& dwDataLength)
{
	BOOL bRet = TRUE;
	HCRYPTPROV hCryptProv = NULL;
	HCRYPTKEY hCryptKey = NULL;

	do
	{
		// Get CSP handler
		bRet = ::CryptAcquireContext(&hCryptProv, NULL, NULL, PROV_RSA_FULL, 0);
		if (FALSE == bRet)
		{
			ShowError("CryptAcquireContext");
			break;
		}

		// import private key
		bRet = ::CryptImportKey(hCryptProv, pPrivateKey, dwProvateKeyLength, NULL, 0, &hCryptKey);
		if (FALSE == bRet)
		{
			ShowError("CryptImportKey");
			break;
		}

		// Decrypt data
		bRet = ::CryptDecrypt(hCryptKey, NULL, TRUE, 0, pData, &dwDataLength);
		if (FALSE == bRet)
		{
			ShowError("CryptDecrypt");
			break;
		}

	} while (FALSE);

	if (hCryptKey)
	{
		::CryptDestroyKey(hCryptKey);
	}
	if (hCryptProv)
	{
		::CryptReleaseContext(hCryptProv, 0);
	}

	return bRet;
}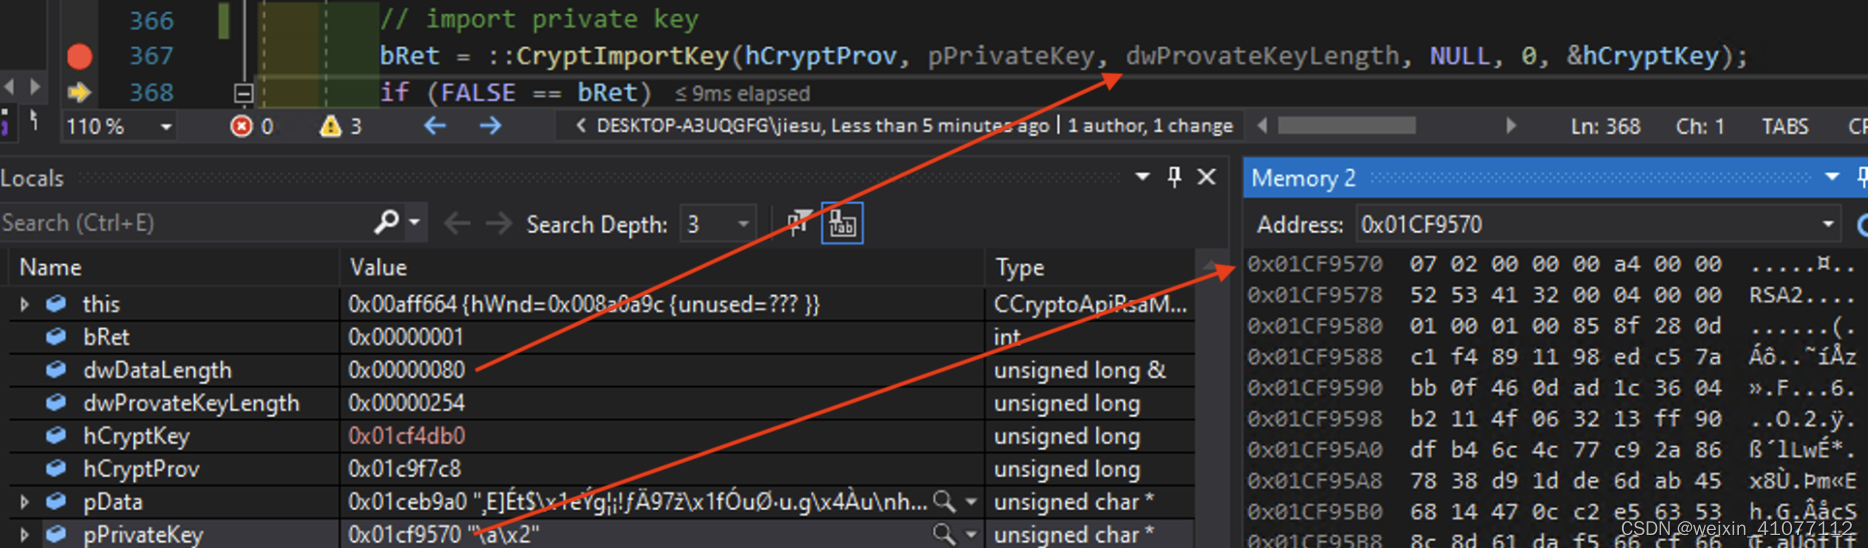

【讲解】执行解密之前,先导入私钥产生密钥句柄【图-14】,再传入密文和长度给 CryptDecrypt 接口来解密,最终 pData 被解密后的明文所覆盖。仔细观察可以发现 pData 指向的缓冲区中后续密文并没有被抹掉,只是将带【'\0'】结尾的“Hello, World!”覆盖在了缓冲区最前部而已【图-15】。相应的,解密后的内容被显示在对话框中【图-16】。至此,一个完整的非对称 RSA 加解密过程就演示完毕了。
本实例虽然简单,但已经基本涉及了 RSA 非对称加密的几点要素,包括公钥、私钥、密钥对、加密算法、加密和解密过程、密钥管理等,有助于读者快速加深对 RSA 非对称加密的概念理解。此外 RSA 非对称加密是基于数学理论和密码学原理的,它的安全性建立在大整数分解问题的困难性上,同时利用了模幂运算、欧拉定理、费马小定理等数学概念来实现加密和解密操作。理解这些数学原理对于深入了解 RSA 加密非常重要。当然这些理论知识就远超本文探讨的范围了。总之,RSA 非对称加密在许多领域中都有广泛的应用,主要用于数据保护、身份验证和加密通信,以满足隐私和安全的需求。这些应用场景中的一个关键优势是其提供了一种安全的机制,使得只有持有私钥的实体才能访问数据或执行特定的操作。


 1357
1357

 被折叠的 条评论
为什么被折叠?
被折叠的 条评论
为什么被折叠?
 到【灌水乐园】发言


