


一、引言
模块之间的耦合度过高,导致一个模块宕机后,全部功能都不能用了,并且同步通讯的成本过高,用户体验差。
| RabbitMQ引言 |
|---|
 |
二、RabbitMQ介绍
市面上比较火爆的几款MQ:消息队列完成模块之间异步通讯,消息是不允许重复消费的,一条消息只能被消费一次。
ActiveMQ,RocketMQ,Kafka,RabbitMQ。
语言的支持:ActiveMQ,RocketMQ只支持Java语言,Kafka可以支持多们语言,RabbitMQ支持多种语言。
效率方面:ActiveMQ,RocketMQ,Kafka效率都是毫秒级别,RabbitMQ是微秒级别的。
消息丢失,消息重复问题: RabbitMQ针对消息的持久化,和重复问题都有比较成熟的解决方案。
学习成本:RabbitMQ非常简单。
RabbitMQ是由Rabbit公司去研发和维护的,最终是在Pivotal,得到,后期与微服务的整合时非常方便的。
RabbitMQ严格的遵循AMQP协议,高级消息队列协议,帮助我们在进程之间传递异步消息。
AMQP,即Advanced Message Queuing Protocol,高级消息队列协议使得遵从该规范的客户端应用和消息中间件服务器的全功能互操作成为可能。
三、RabbitMQ安装
version: "3.8"
services:
  rabbitmq:
    image: daocloud.io/library/rabbitmq:3.8.7-management
    restart: always
    container_name: rabbitmq
    ports:
      - 5672:5672
      - 15672:15672
    volumes:
      - ./data:/var/lib/rabbitmq
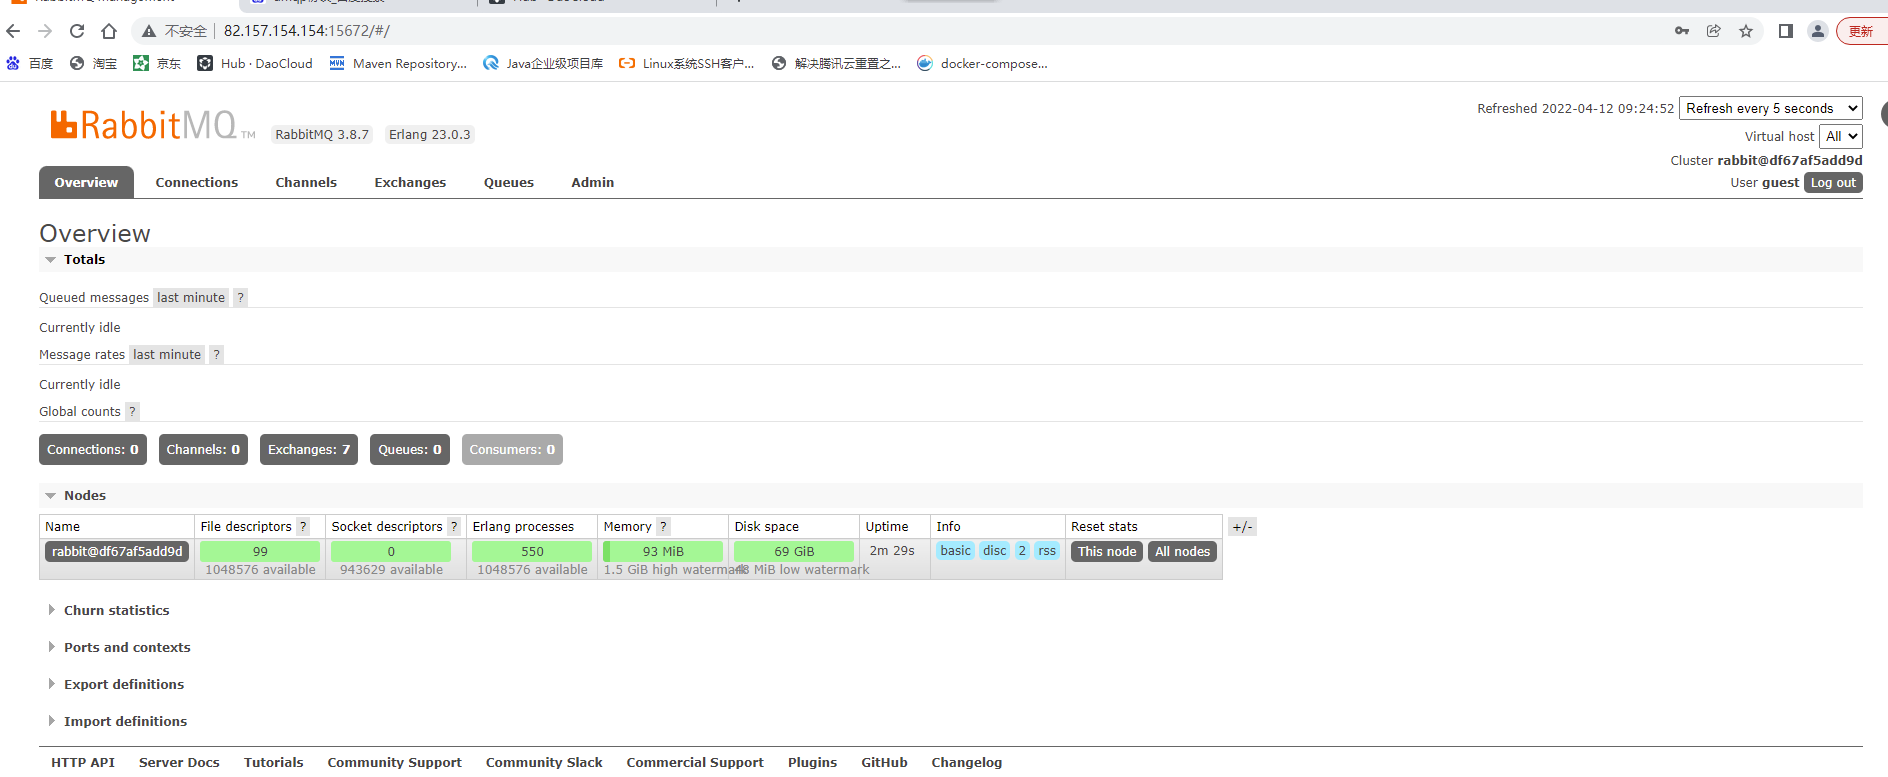
安装完成后,访问你的地址 http://ip:15672
成功出现登录界面表示安装成功:rabbitMQ默认的登录用户名和密码都是 guest
四、RabbitMQ架构【重点】
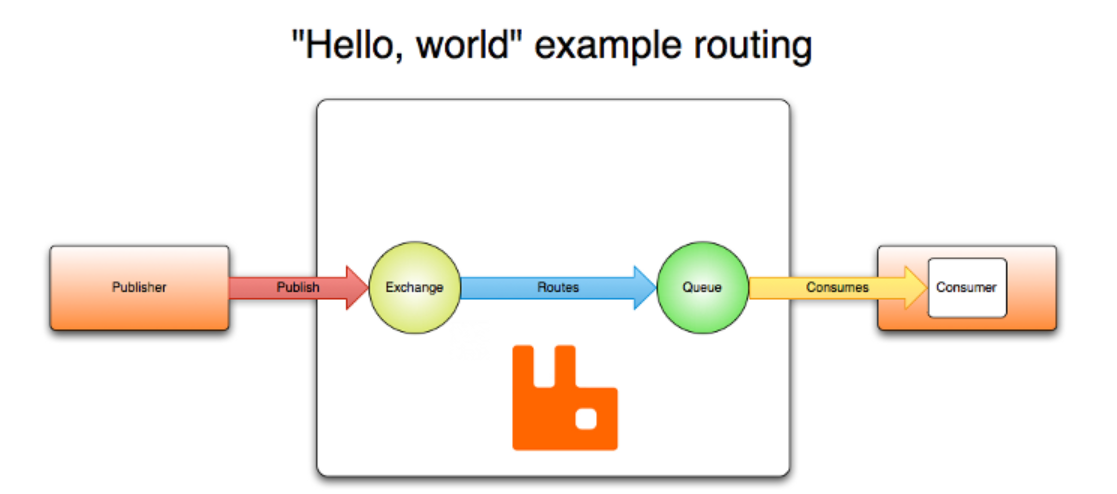
4.1 官方的简单架构图
Publisher - 生产者:发布消息到RabbitMQ中的Exchange
Consumer - 消费者:监听RabbitMQ中的Queue中的消息
Exchange - 交换机:和生产者建立连接并接收生产者的消息
Queue - 队列:Exchange会将消息分发到指定的Queue,Queue和消费者进行交互
Routes - 路由:交换机以什么样的策略将消息发布到Queue
| 简单架构图 |
|---|
 |
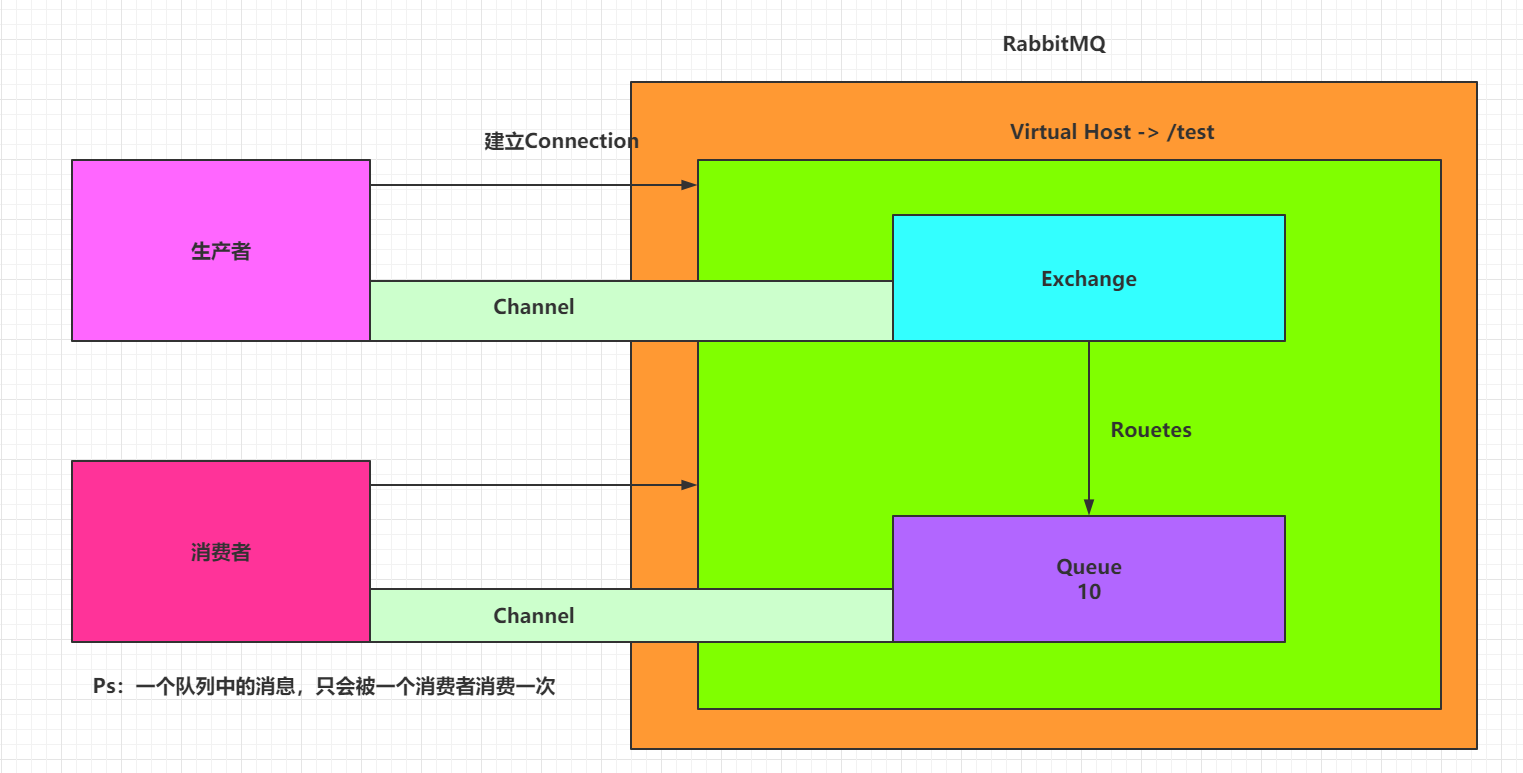
4.2 RabbitMQ的完整架构图
完整架构图
| 完整架构图 |
|---|
 |
4.3 查看图形化界面并创建一个Virtual Host
创建一个全新的用户和全新的Virtual Host,并且将test用户设置上可以操作/test的权限
| 监控界面 |
|---|
| [外链图片转存失败,源站可能有防盗链机制,建议将图片保存下来直接上传(img-Nt4uCOYz-1658382317348)(https://s2.loli.net/2022/07/21/IfCnZh9OXo4AljU.png)] |
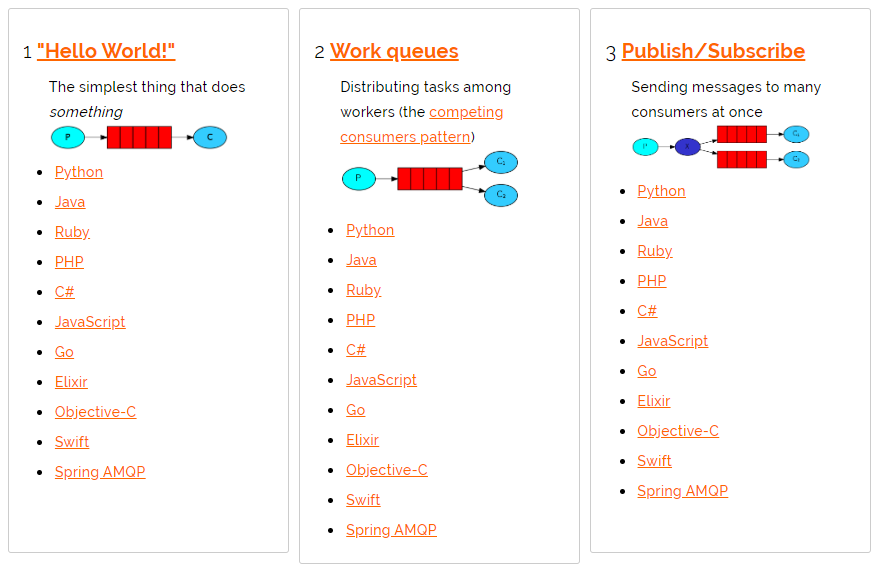
五、RabbitMQ的使用【重点】
5.1 RabbitMQ的通讯方式
通讯方式是指:可以通过不同的路由规则,将消息发送到不同的队列中,然后由不同的消费者进行消费这些小写。对消息进行过滤,符合某些条件的消息会发送到专门接收这些消息的队列中。规则就是所说的通讯方式路由规则。
| 通讯方式 |
|---|
  |
5.2 Java连接RabbitMQ
5.2.1 创建maven项目
…………
5.2.2 导入依赖
<dependencies>
    <dependency>
        <groupId>com.rabbitmq</groupId>
        <artifactId>amqp-client</artifactId>
        <version>5.6.0</version>
    </dependency>

    <dependency>
        <groupId>junit</groupId>
        <artifactId>junit</artifactId>
        <version>4.12</version>
    </dependency>
</dependencies>
5.2.3 创建工具类连接RabbitMQ
public static Connection getConnection(){
    // 创建Connection工厂
    ConnectionFactory factory = new ConnectionFactory();
    factory.setHost("192.168.199.109");
    factory.setPort(5672);
    factory.setUsername("test");
    factory.setPassword("test");
    factory.setVirtualHost("/test");

    // 创建Connection
    Connection conn = null;
    try {
        conn = factory.newConnection();
    } catch (Exception e) {
        e.printStackTrace();
    }
    // 返回
    return conn;
}
| 效果图 |
|---|
 |
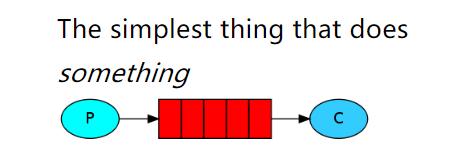
5.3 Hello-World
一个生产者,一个默认的交换机,一个队列,一个消费者
| 结构图 |
|---|
 |
创建生产者,创建一个channel,发布消息到exchange,指定路由规则。
@Test
public void publish() throws Exception {
    //1. 获取Connection
    Connection connection = RabbitMQClient.getConnection();

    //2. 创建Channel
    Channel channel = connection.createChannel();

    //3. 发布消息到exchange,同时指定路由的规则
    String msg = "Hello-World!";
    // 参数1:指定exchange,使用""。
    // 参数2:指定路由的规则,使用具体的队列名称。
    // 参数3:指定传递的消息所携带的properties,使用null。
    // 参数4:指定发布的具体消息,byte[]类型
    channel.basicPublish("","HelloWorld",null,msg.getBytes());
    // Ps:exchange是不会帮你将消息持久化到本地的,Queue才会帮你持久化消息。
    System.out.println("生产者发布消息成功!");
    //4. 释放资源
    channel.close();
    connection.close();
}
创建消费者,创建一个channel,创建一个队列,并且去消费当前队列
@Test
public void consume() throws Exception {
    //1. 获取连接对象
    Connection connection = RabbitMQClient.getConnection();

    //2. 创建channel
    Channel channel = connection.createChannel();

    //3. 声明队列-HelloWorld
    //参数1:queue - 指定队列的名称
    //参数2:durable - 当前队列是否需要持久化(true)
    //参数3:exclusive - 是否排外(conn.close() - 当前队列会被自动删除,当前队列只能被一个消费者消费)
    //参数4:autoDelete - 如果这个队列没有消费者在消费,队列自动删除
    //参数5:arguments - 指定当前队列的其他信息
    channel.queueDeclare("HelloWorld",true,false,false,null);

    //4. 开启监听Queue
    DefaultConsumer consume = new DefaultConsumer(channel){
        @Override
        public void handleDelivery(String consumerTag, Envelope envelope, AMQP.BasicProperties properties, byte[] body) throws IOException {
            System.out.println("接收到消息:" + new String(body,"UTF-8"));
        }
    };

    //参数1:queue - 指定消费哪个队列
    //参数2:autoAck - 指定是否自动ACK (true,接收到消息后,会立即告诉RabbitMQ)
    //参数3:consumer - 指定消费回调
    channel.basicConsume("HelloWorld",true,consume);

    System.out.println("消费者开始监听队列!");
    // System.in.read();
    System.in.read();

    //5. 释放资源
    channel.close();
    connection.close();
}
5.4 Work
一个生产者,一个默认的交换机,一个队列,两个消费者,
这两个消费者同时消费一个生产者发送的消息,默认情况下是平均消费。
| 结构图 |
|---|
| [外链图片转存失败,源站可能有防盗链机制,建议将图片保存下来直接上传(img-lyLZY0NG-1658382317354)(https://s2.loli.net/2022/07/21/QwFbGWiC4TYeysE.png)] |
只需要在消费者端,添加Qos能力以及更改为手动ack即可让消费者,根据自己的能力去消费指定的消息,而不是默认情况下由RabbitMQ平均分配了,生产者不变,正常发布消息到默认的exchange,并指定routing
消费者指定Qoa和手动ack
//1 指定当前消费者,一次消费多少个消息
channel.basicQos(1);
DefaultConsumer consumer = new DefaultConsumer(channel){
    @Override
    public void handleDelivery(String consumerTag, Envelope envelope, AMQP.BasicProperties properties, byte[] body) throws IOException {
        try {
            Thread.sleep(100);
        } catch (InterruptedException e) {
            e.printStackTrace();
        }
        System.out.println("消费者1号接收到消息:" + new String(body,"UTF-8"));

        //2. 手动ack
        channel.basicAck(envelope.getDeliveryTag(),false);
    }
};
//3. 指定手动ack
channel.basicConsume("Work",false,consumer);
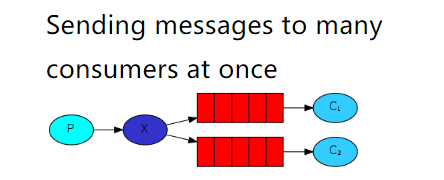
5.5 Publish/Subscribe
一个生产者,一个交换机,两个队列,两个消费者
一个消费者发送的消息可以同时被两个队列给接收,这两个队列接收的消息是一样,每个队列都有自己的消费者,这两个消费者消费的消息也是相同的。
注意:此处不是消息重复消费,因为消费者消费的是当前队列中的消息,而不是同一个队列中的消息。
| 结构图 |
|---|
 |
声明一个Fanout类型的exchange,并且将exchange和queue绑定在一起,绑定的方式就是直接绑定。
让生产者创建一个exchange并且指定类型,和一个或多个队列绑定到一起。
//3. 创建exchange - 绑定某一个队列
//参数1: exchange的名称
//参数2: 指定exchange的类型  FANOUT - pubsub ,   DIRECT - Routing , TOPIC - Topics
channel.exchangeDeclare("pubsub-exchange", BuiltinExchangeType.FANOUT);
channel.queueBind("pubsub-queue1","pubsub-exchange","");
channel.queueBind("pubsub-queue2","pubsub-exchange","");
消费者还是正常的监听某一个队列即可。
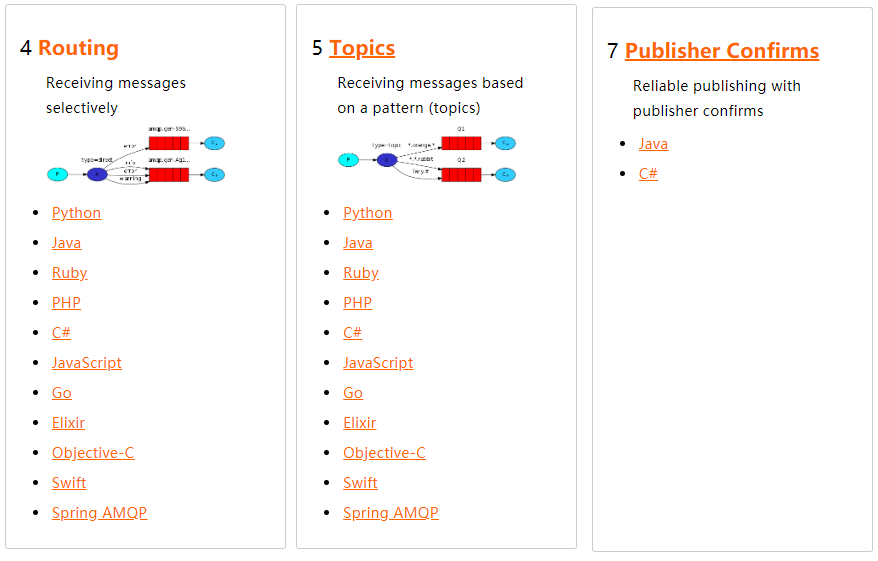
5.6 Routing
一个生产者,一个交换机,两个队列,两个消费者
有选择性的将发送者发送的消息路由到不同的队列中,对应的消费者可以消费当前队列中的消息,此时需要书写路由规则 routingkey
| 结构图 |
|---|
 |
生产者在创建DIRECT类型的exchange后,根据RoutingKey去绑定相应的队列,并且在发送消息时,指定消息的具体RoutingKey即可。
//3. 创建exchange, routing-queue-error,routing-queue-info,
channel.exchangeDeclare("routing-exchange", BuiltinExchangeType.DIRECT);
channel.queueBind("routing-queue-error","routing-exchange","ERROR");
channel.queueBind("routing-queue-info","routing-exchange","INFO");

//4. 发布消息到exchange,同时指定路由的规则
channel.basicPublish("routing-exchange","ERROR",null,"ERROR".getBytes());
channel.basicPublish("routing-exchange","INFO",null,"INFO1".getBytes());
channel.basicPublish("routing-exchange","INFO",null,"INFO2".getBytes());
channel.basicPublish("routing-exchange","INFO",null,"INFO3".getBytes());
消费者没有变化
5.7 Topic
一个生产者,一个交换机,两个队列,两个消费者
topic模式可以进行路由规则的模糊匹配,只要消息的路由规则符合队列需要的某个路由规则的范围,这条消息就可以发送到指定的队列中去。
| 结构图 |
|---|
 |
生产者创建Topic的exchange并且绑定到队列中,这次绑定可以通过*和#关键字,对指定RoutingKey内容,编写时注意格式 xxx.xxx.xxx去编写, * -> 一个xxx,而# -> 代表多个xxx.xxx,在发送消息时,指定具体的RoutingKey到底是什么。
//2. 创建exchange并指定绑定方式
channel.exchangeDeclare("topic-exchange", BuiltinExchangeType.TOPIC);
channel.queueBind("topic-queue-1","topic-exchange","*.red.*");
channel.queueBind("topic-queue-2","topic-exchange","fast.#");
channel.queueBind("topic-queue-2","topic-exchange","*.*.rabbit");

//3. 发布消息到exchange,同时指定路由的规则
channel.basicPublish("topic-exchange","fast.red.monkey",null,"红快猴子".getBytes());
channel.basicPublish("topic-exchange","slow.black.dog",null,"黑漫狗".getBytes());
channel.basicPublish("topic-exchange","fast.white.cat",null,"快白猫".getBytes());
消费者只是监听队列,没变化。
六、RabbitMQ整合SpringBoot【重点】
6.1 SpringBoot整合RabbitMQ
6.1.1 创建SpringBoot工程
6.1.2 导入依赖
<dependency>
    <groupId>org.springframework.boot</groupId>
    <artifactId>spring-boot-starter-amqp</artifactId>
</dependency>
6.1.3 编写配置文件
spring:
  rabbitmq:
    host: 192.168.199.109
    port: 5672
    username: test
    password: test
    virtual-host: /test
6.1.4 声明exchange、queue
@Configuration
public class RabbitMQConfig {
    //1. 创建exchange - topic
    @Bean
    public TopicExchange getTopicExchange(){
        return new TopicExchange("boot-topic-exchange",true,false);
    }

    //2. 创建queue
    @Bean
    public Queue getQueue(){
        return new Queue("boot-queue",true,false,false,null);
    }

    //3. 绑定在一起
    @Bean
    public Binding getBinding(TopicExchange topicExchange,Queue queue){
        return BindingBuilder.bind(queue).to(topicExchange).with("*.red.*");
    }
}
6.1.5 发布消息到RabbitMQ
@Autowired
private RabbitTemplate rabbitTemplate;

@Test
void contextLoads() {
    rabbitTemplate.convertAndSend("boot-topic-exchange","slow.red.dog","红色大狼狗!!");
}
6.1.6 创建消费者监听消息
@Component
public class Consumer {

    @RabbitListener(queues = "boot-queue")
    public void getMessage(Object message){
        System.out.println("接收到消息:" + message);
    }

}
6.2 手动Ack
6.2.1 添加配置文件
spring:
  rabbitmq:
    listener:
      simple:
        acknowledge-mode: manual
6.2.2 手动ack
@RabbitListener(queues = "boot-queue")
public void getMessage(String msg, Channel channel, Message message) throws IOException {
    System.out.println("接收到消息:" + msg);
    int i = 1 / 0;
    // 手动ack
    channel.basicAck(message.getMessageProperties().getDeliveryTag(),false);
}
七、RabbitMQ的其他操作
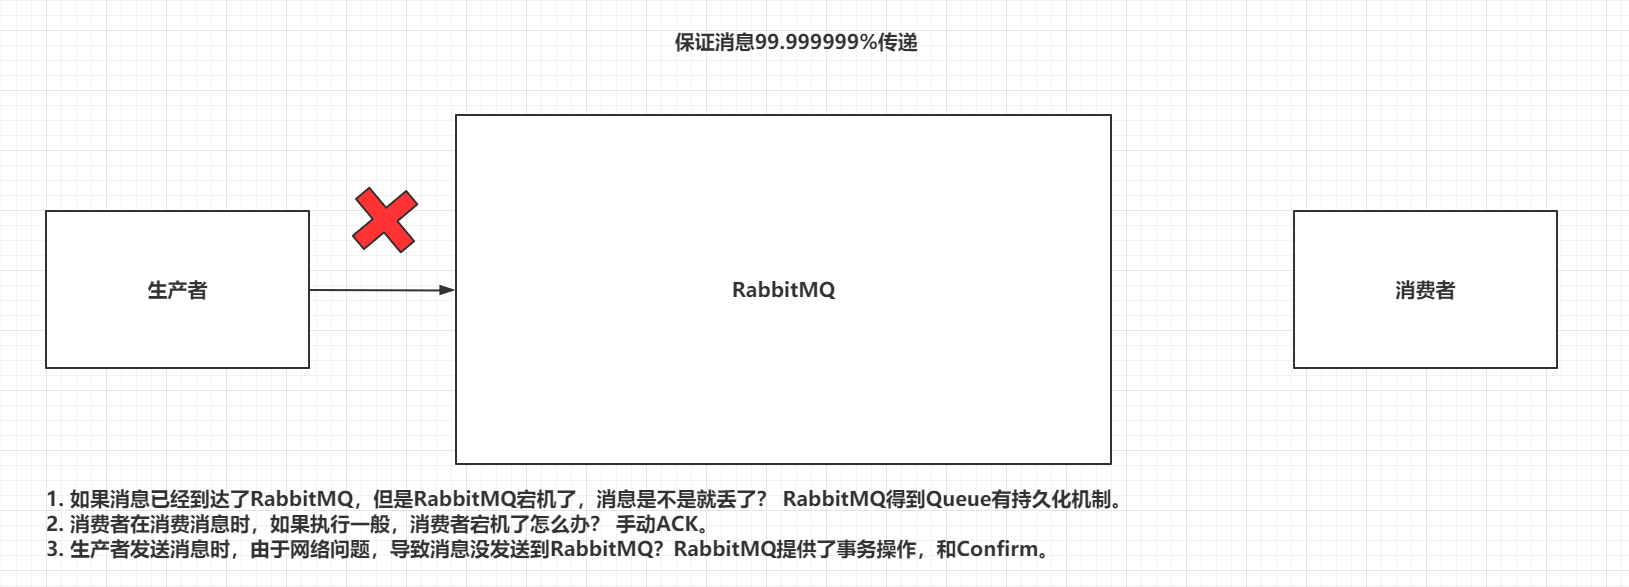
7.1 消息的可靠性
RabbitMQ的事务:事务可以保证消息100%传递,可以通过事务的回滚去记录日志,后面定时再次发送当前消息。事务的操作,效率太低(原因是发送的消息可能多,这个事务是一条一条消息排队判断,好比SQL事务中的序列化),加了事务操作后,比平时的操作效率至少要慢100倍。
RabbitMQ除了事务,还提供了Confirm的确认机制,这个效率比事务高很多。但是不能百分百保证没有问题,能保证成功率在99.9999%以上。
7.1.1 普通Confirm方式
//3.1 开启confirm
channel.confirmSelect();
//3.2 发送消息
String msg = "Hello-World!";
channel.basicPublish("","HelloWorld",null,msg.getBytes());
//3.3 判断消息发送是否成功
if(channel.waitForConfirms()){
    System.out.println("消息发送成功");
}else{
    System.out.println("发送消息失败");
}
7.1.2 批量Confirm方式。
//3.1 开启confirm
channel.confirmSelect();
//3.2 批量发送消息
for (int i = 0; i < 1000; i++) {
    String msg = "Hello-World!" + i;
    channel.basicPublish("","HelloWorld",null,msg.getBytes());
}
//3.3 确定批量操作是否成功
channel.waitForConfirmsOrDie();     // 当你发送的全部消息,有一个失败的时候,就直接全部失败 抛出异常IOException
7.1.3 异步Confirm方式。
//3.1 开启confirm
channel.confirmSelect();
//3.2 批量发送消息
for (int i = 0; i < 1000; i++) {
    String msg = "Hello-World!" + i;
    channel.basicPublish("","HelloWorld",null,msg.getBytes());
}
//3.3 开启异步回调
channel.addConfirmListener(new ConfirmListener() {

    @Override
    public void handleAck(long deliveryTag, boolean multiple) throws IOException {
        System.out.println("消息发送成功,标识:" + deliveryTag + ",是否是批量" + multiple);
    }

    @Override
    public void handleNack(long deliveryTag, boolean multiple) throws IOException {
        System.out.println("消息发送失败,标识:" + deliveryTag + ",是否是批量" + multiple);
    }
});
| 消息传递可靠性 |
|---|
 |
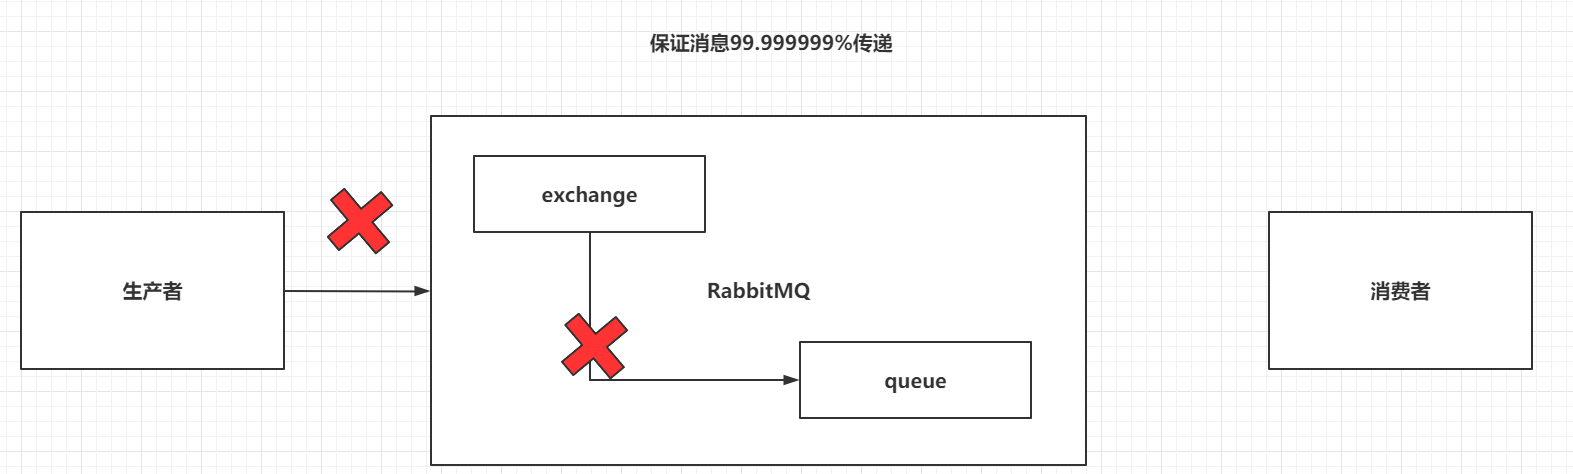
7.1.4 Return机制
Confirm只能保证消息到达exchange,无法保证消息可以被exchange分发到指定queue。
而且exchange是不能持久化消息的,queue是可以持久化消息。
采用Return机制来监听消息是否从exchange送到了指定的queue中
| 消息传递可靠性 |
|---|
 |
开启Return机制,并在发送消息时,指定mandatory为true
// 开启return机制
channel.addReturnListener(new ReturnListener() {
    @Override
    public void handleReturn(int replyCode, String replyText, String exchange, String routingKey, AMQP.BasicProperties properties, byte[] body) throws IOException {
        // 当消息没有送达到queue时,才会执行。
        System.out.println(new String(body,"UTF-8") + "没有送达到Queue中!!");
    }
});

// 在发送消息时,指定mandatory参数为true
channel.basicPublish("","HelloWorld",true,null,msg.getBytes());
7.2 SpringBoot实现
7.2.1 编写配置文件
spring:
  rabbitmq:
    publisher-confirm-type: simple
    publisher-returns: true
7.2.2 开启Confirm和Return
@Component
public class PublisherConfirmAndReturnConfig implements RabbitTemplate.ConfirmCallback ,RabbitTemplate.ReturnCallback {

    @Autowired
    private RabbitTemplate rabbitTemplate;

    @PostConstruct  // init-method
    public void initMethod(){
        rabbitTemplate.setConfirmCallback(this);
        rabbitTemplate.setReturnCallback(this);
    }

    @Override
    public void confirm(CorrelationData correlationData, boolean ack, String cause) {
        if(ack){
            System.out.println("消息已经送达到Exchange");
        }else{
            System.out.println("消息没有送达到Exchange");
        }
    }

    @Override
    public void returnedMessage(Message message, int replyCode, String replyText, String exchange, String routingKey) {
        System.out.println("消息没有送达到Queue");
    }
}
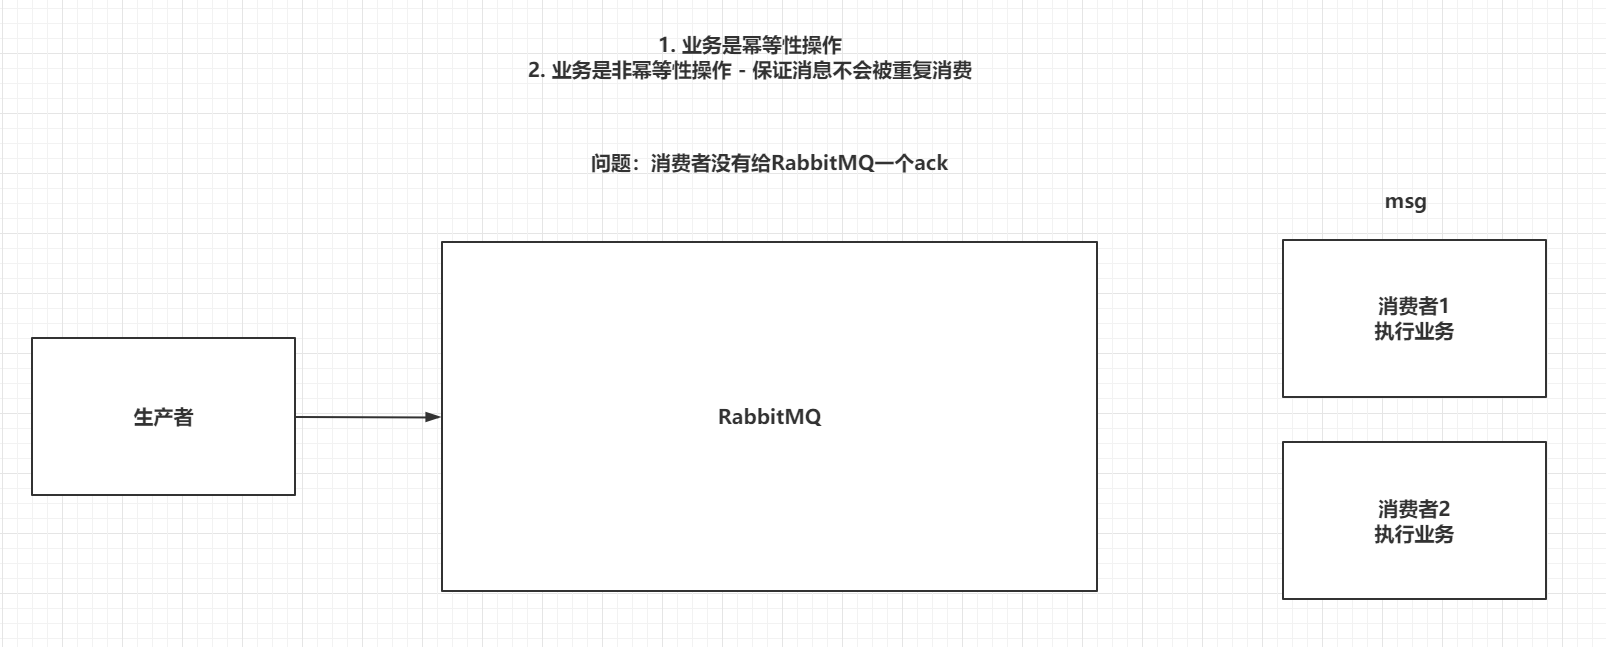
7.3 避免消息重复消费
重复消费消息,会对非幂等行操作造成问题
重复消费消息的原因是,消费者没有给RabbitMQ一个ack
| 重复消费 |
|---|
 |
为了解决消息重复消费的问题,可以采用Redis,在消费者消费消息之前,现将消息的id放到Redis中,
id-0(正在执行业务)
id-1(执行业务成功)
如果ack失败,在RabbitMQ将消息交给其他的消费者时,先执行setnx,如果key已经存在,获取他的值,如果是0,当前消费者就什么都不做,如果是1,直接ack。
极端情况:第一个消费者在执行业务时,出现了死锁,在setnx的基础上,再给key设置一个生存时间。
生产者,发送消息时,指定messageId
AMQP.BasicProperties properties = new AMQP.BasicProperties().builder()
    .deliveryMode(1)     //指定消息书否需要持久化 1 - 需要持久化  2 - 不需要持久化
    .messageId(UUID.randomUUID().toString())
    .build();
String msg = "Hello-World!";
channel.basicPublish("","HelloWorld",true,properties,msg.getBytes());
消费者,在消费消息时,根据具体业务逻辑去操作redis
DefaultConsumer consume = new DefaultConsumer(channel){
    @Override
    public void handleDelivery(String consumerTag, Envelope envelope, AMQP.BasicProperties properties, byte[] body) throws IOException {
        Jedis jedis = new Jedis("192.168.199.109",6379);
        String messageId = properties.getMessageId();
        //1. setnx到Redis中,默认指定value-0
        String result = jedis.set(messageId, "0", "NX", "EX", 10);
        if(result != null && result.equalsIgnoreCase("OK")) {
            System.out.println("接收到消息:" + new String(body, "UTF-8"));
            //2. 消费成功,set messageId 1
            jedis.set(messageId,"1");
            channel.basicAck(envelope.getDeliveryTag(),false);
        }else {
            //3. 如果1中的setnx失败,获取key对应的value,如果是0,return,如果是1
            String s = jedis.get(messageId);
            if("1".equalsIgnoreCase(s)){
                channel.basicAck(envelope.getDeliveryTag(),false);
            }
        }
    }
};
7.4 SpringBoot如何实现
7.4.1 导入依赖
<dependency>
    <groupId>org.springframework.boot</groupId>
    <artifactId>spring-boot-starter-data-redis</artifactId>
</dependency>
7.4.2 编写配置文件
spring:
  redis:
    host: 192.168.199.109
    port: 6379
7.4.3 修改生产者
@Test
void contextLoads() throws IOException {
    CorrelationData messageId = new CorrelationData(UUID.randomUUID().toString());
    rabbitTemplate.convertAndSend("boot-topic-exchange","slow.red.dog","红色大狼狗!!",messageId);
    System.in.read();
}
7.4.4 修改消费者
@Autowired
private StringRedisTemplate redisTemplate;


@RabbitListener(queues = "boot-queue")
public void getMessage(String msg, Channel channel, Message message) throws IOException {
    //0. 获取MessageId
    String messageId = message.getMessageProperties().getHeader("spring_returned_message_correlation");
    //1. 设置key到Redis
    if(redisTemplate.opsForValue().setIfAbsent(messageId,"0",10, TimeUnit.SECONDS)) {
        //2. 消费消息
        System.out.println("接收到消息:" + msg);

        //3. 设置key的value为1
        redisTemplate.opsForValue().set(messageId,"1",10,TimeUnit.SECONDS);
        //4.  手动ack
        channel.basicAck(message.getMessageProperties().getDeliveryTag(),false);
    }else {
        //5. 获取Redis中的value即可 如果是1,手动ack
        if("1".equalsIgnoreCase(redisTemplate.opsForValue().get(messageId))){
            channel.basicAck(message.getMessageProperties().getDeliveryTag(),false);
        }
    }
}
八、RabbitMQ应用
8.1 客户模块
8.1.1 导入依赖
<dependency>
    <groupId>org.springframework.boot</groupId>
    <artifactId>spring-boot-starter-amqp</artifactId>
</dependency>
8.1.2 编写配置文件
spring:
  rabbitmq:
    host: 192.168.199.109
    port: 5672
    username: test
    password: test
    virtual-host: /test
8.1.3 编写配置类
@Configuration
public class RabbitMQConfig {

    @Bean
    public TopicExchange topicExchange(){
        return new TopicExchange("openapi-customer-exchange",true,false);
    }

    @Bean
    public Queue queue(){
        return new Queue("openapi-customer-queue");
    }

    @Bean
    public Binding binding(Queue queue,TopicExchange topicExchange){
        return BindingBuilder.bind(queue).to(topicExchange).with("openapi.customer.*");
    }


}
8.1.4 修改Service
//3. 发送消息
rabbitTemplate.convertAndSend("openapi-customer-exchange","openapi.customer.add",JSON.toJSON(customer));


/*//3. 调用搜索模块,添加数据到ES
        //1. 准备请求参数和请求头信息
        String json = JSON.toJSON(customer);
        HttpHeaders headers = new HttpHeaders();
        headers.setContentType(MediaType.parseMediaType("application/json;charset=utf-8"));
        HttpEntity<String> entity = new HttpEntity<>(json,headers);
        //2. 使用RestTemplate调用搜索模块
        restTemplate.postForObject("http://localhost:8080/search/customer/add", entity, String.class);*/
8.2 客户模块
8.2.1 导入依赖
<dependency>
    <groupId>org.springframework.boot</groupId>
    <artifactId>spring-boot-starter-amqp</artifactId>
</dependency>
8.2.2 编写配置文件
spring:
  rabbitmq:
    host: 192.168.199.109
    port: 5672
    username: test
    password: test
    virtual-host: /test
    listener:
      simple:
        acknowledge-mode: manual
8.2.3 编写配置类
@Configuration
public class RabbitMQConfig {

    @Bean
    public TopicExchange topicExchange(){
        return new TopicExchange("openapi-customer-exchange",true,false);
    }

    @Bean
    public Queue queue(){
        return new Queue("openapi-customer-queue");
    }

    @Bean
    public Binding binding(Queue queue, TopicExchange topicExchange){
        return BindingBuilder.bind(queue).to(topicExchange).with("openapi.customer.*");
    }
}
8.2.4 编写消费者
@Component
public class CustomerListener {

    @Autowired
    private CustomerService customerService;

    @RabbitListener(queues = "openapi-customer-queue")
    public void consume(String json, Channel channel, Message message) throws IOException {
        //1. 获取RoutingKey
        String receivedRoutingKey = message.getMessageProperties().getReceivedRoutingKey();
        //2. 使用switch
        switch (receivedRoutingKey){
            case "openapi.customer.add":
                //3. add操作调用Service完成添加
                customerService.saveCustomer(JSON.parseJSON(json, Customer.class));
                //4. 手动ack
                channel.basicAck(message.getMessageProperties().getDeliveryTag(),false);
        }
    }
}


 410
410


 被折叠的 条评论
为什么被折叠?
被折叠的 条评论
为什么被折叠?
 到【灌水乐园】发言


