文章目录
一、Spring概述
1.1 概念
- Spring是一个项目管理框架,同时也是一套java EE解决方案。
- Spring是众多优秀设计模式的组合(工厂、单例、代理、适配器、包装器、观察者、模板、策略)。
- Spring并未替代现有框架产品,而是将众多框架进行有机整合,简化企业级开发,俗称“胶水框架”。
1.2 Spring架构组成
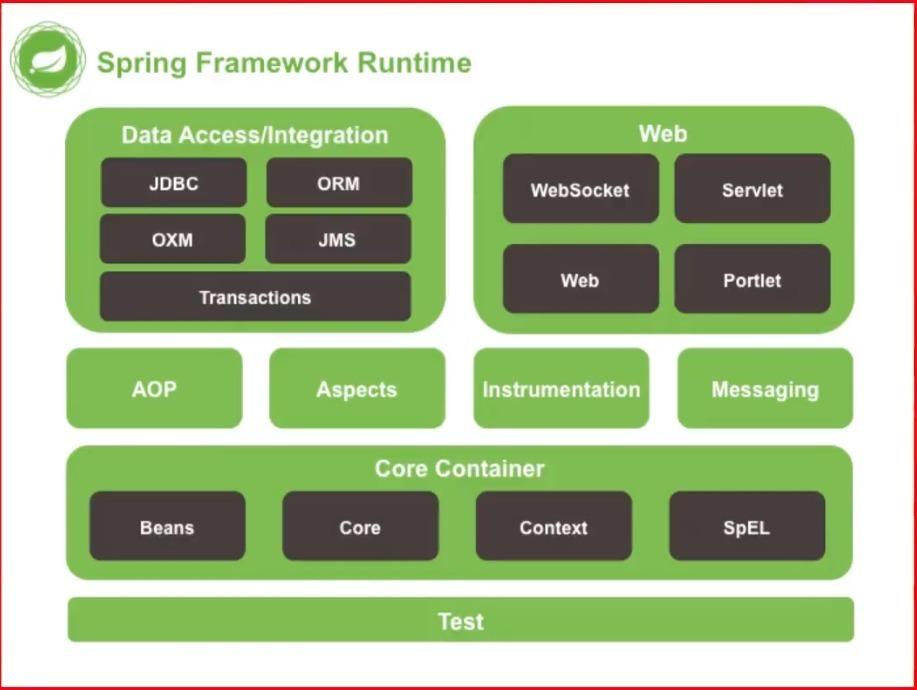
Spring架构由诸多模块组成,可分类为:
- 核心技术:依赖注入,事件,资源,i18n,验证,数据绑定,类型转换,SpEL,AOP。
- 测试:模拟对象,TestContext框架,SpringMVC测试,WebTestClient。
- 数据访问:事务,DAO支持,JDBC,ORM,封送XML。
- Spring MVC和Spring WebFlux Web框架。
- 集成:远程处理,JMS,JCA,JMX,电子邮件,任务,调度,缓存。
- 语言:Kotlin,Groovy,动态语言。

Spring架构中最核心的一块称为Core Container(核心容器),它搭建并管理着一个“工厂”的设计模式,工厂中用来生产一个一个的对象。Spring有了这样的生产能力之后就可以去管理它所生产的对象,进而把项目中这些对象的协作关系、运行模式加以调整优化,达到对整个项目的一种更优化地管理。
二、自定义工厂
在学习Spring之前我们可以自己搭建一个工厂,来看看工厂的基本工作原理是什么。
2.1 配置文件
bean.properties
userDao=lazydog.dao.UserDaoImpl
userService=lazydog.service.UserServiceImpl
配置文件中的两个类以及其实现类都只有一个deleteUser方法,方法内只有一个打印语句,所以此处省略。
2.2 工厂类
/*
 工厂类
 1.加载配置文件,以确定生产哪些类
 2.生产配置中记录的对应对象
 */
public class MyFactory {
    private Properties properties=new Properties();
    public MyFactory(){}
    public MyFactory(String config) throws IOException {
        //加载配置文件
        properties.load(MyFactory.class.getResourceAsStream(config));
    }
    public Object getBean(String name) throws ClassNotFoundException, IllegalAccessException, InstantiationException {
        //通过name获取类路径
        String classPath=properties.getProperty(name);
        //通过反射构建对象
        Class clazz=Class.forName(classPath);
        //返回对象
        return clazz.newInstance();
    }
}
2.3 测试类
public class FactoryTest {
    public static void main(String[] args) throws IOException, IllegalAccessException, InstantiationException, ClassNotFoundException {
        //1.创建工厂对象
        MyFactory myFactory=new MyFactory("/bean.properties");
        //2.利用工厂生产对象
        UserDao userDao = (UserDao) myFactory.getBean("userDao");
        userDao.deleteUser(1);
        UserService userService = (UserService) myFactory.getBean("userService");
        userService.deleteUser(2);
    }
}
运行结果如下,说明生产的类可以正常使用:
delete in Dao.
delete in Service.
三、环境搭建
3.1 构建Maven项目
在Idea中创建Maven项目并在pom中导入Spring相关依赖:
<dependencies>
	<dependency>
		<groupId>org.springframework</groupId>
		<artifactId>spring-context</artifactId>
		<version>5.1.6.RELEASE</version>
	</dependency>
</dependencies>
3.2 创建Spring配置文件
命名无限制,但约定成俗的命名有:spring-context.xml、applicationContext.xml、beans.xml。
<?xml version="1.0" encoding="UTF-8"?>
<beans xmlns="http://www.springframework.org/schema/beans"
       xmlns:xsi="http://www.w3.org/2001/XMLSchema-instance"
       xsi:schemaLocation="http://www.springframework.org/schema/beans http://www.springframework.org/schema/beans/spring-beans.xsd">
    <!-- 需要工厂生产的对象 -->
    <bean id="userDao" class="lazydog.dao.UserDaoImpl"/>
    <bean id="userService" class="lazydog.service.UserServiceImpl"/>
</beans>
3.3 测试一下
在pom中再导入junit包:
<dependency>
	<groupId>junit</groupId>
	<artifactId>junit</artifactId>
	<version>4.12</version>
	<scope>test</scope>
</dependency>
创建测试类进行测试:
public class SpringFactory {
    @Test
    public void testSpringFactory(){
        //1.启动工厂
        ApplicationContext context=new ClassPathXmlApplicationContext("/spring-context.xml");
        //2.生产对象
        UserDao userDao = (UserDao) context.getBean("userDao");
        UserService userService = (UserService) context.getBean("userService");
        //3.使用对象
        userDao.deleteUser(1);
        userService.deleteUser(1);
    }
}
运行结果正常。
四、依赖与配置文件
Spring框架包含多个模块,每个模块各司其职,可以结合需求引入相关依赖jar包实现功能。
在3.1节中,导入依赖时只导了一个,但项目实际导入了多个依赖,分别如下图所示:

4.1 依赖关系

箭头的指向表示A依赖需要依赖B依赖,那么导入A依赖时会自动导入B依赖。所以只需要导入最外层jar即可由Maven自动将相关依赖jar引入到项目中。
4.2 schema
schema的意思是规范,3.2节可以看到配置文件中的顶级标签中包含了语义化标签的相关信息。
- xmlns:语义化标签所在的命名空间。
- xmlns:xsi:XMLSchema-instance 标签遵循schema标签标准。
- xsi:schemaLocation:xsd文件位置,用以描述标签语义、属性、取值范围等。
xsd就是xml schema definition,xml规范定义。
五、IoC(控制反转)
Inversion of Control:控制反转。
反转了依赖关系的满足方式,由自己创建的依赖对象,变为由工厂推送(变主动为被动,即为反转)。解决了具有依赖关系的组件之间的强耦合,使得项目形态更加稳健。
所谓依赖关系,比如UserServiceImpl中需要调用Dao层方法,就会去new一个Dao对象;那么service就依赖dao,service满足依赖关系的方式就是new一个dao对象:
public class UserServiceImpl implements UserService{
    //满足依赖关系
    UserDao userDao=new UserDaoImpl();
    @Override
    public void deleteUser(Integer id){
        userDao.deleteUser(1);
        System.out.println("delete in Service.");
    }
}
用new一个对象的方式来满足依赖就会造成强耦合,强耦合是需要极力避免的,否则会有“牵一发而动全身”的麻烦。
我们可以只留一个dao接口,而不去new一个实例对象,然后设置get和set方法:
private UserDao userDao;
@Override
public void deleteUser(Integer id){
    userDao.deleteUser(1);
    System.out.println("delete in Service.");
}
public UserDao getUserDao() {
    return userDao;
}

public void setUserDao(UserDao userDao) {
    this.userDao = userDao;
}
以上代码就没有和任何一个dao类发生耦合,但是同样调用了deleteUser方法,然后修改配置文件:
<bean id="userService" class="lazydog.service.UserServiceImpl">
    <!--为userDao属性赋值,ref值为id为userDao的一个bean-->
    <property name="userDao" ref="userDao"/>
</bean>
然后重新测试一下代码,如果没有发生空指针异常,就说明配置文件生效了;最后运行正常。如果以后需要使用其他dao类,只需要在配置文件中添加响应的bean,然后在属性的ref中改成bean相应的id即可,所以我们并没有修改service本身的代码,这样就会使得代码稳健。这样的一种思想就是IoC。
六、DI(依赖注入)
6.1 概念
在Spring创建对象的同时,为其属性赋值,称之为依赖注入。
在第五节中配置属性的方法就叫做注入,之所以叫依赖注入是因为它是为了完成一种依赖关系,所以控制反转是一种思想,它其实就是一次一次的依赖注入。
6.2 set注入
创建对象时,Spring工厂会通过set方法为对象的属性赋值。
我们创建一个实体类,代码如下(省略了get和set方法):
public class User {
    private Integer id;
    private String password;
    private String sex;
    private Integer age;
    private Date bornDate;
    private String[] hobbies;
    private Set<String> phones;
    private List<String> names;
    private Map<String,String> countries;
    private Properties files;
    //省略了get和set方法
}
然后添加如下配置信息:
<bean id="user" class="lazydog.entity.User">
    <!--简单:包括8中基本类型,String,Date-->
    <property name="id" value="36"/>
    <property name="password" value="123456"/>
    <property name="sex" value="male"/>
    <property name="age" value="22"/>
    <property name="bornDate" value="1999/01/30 12:00:00"/>
    <!--数组-->
    <property name="hobbies">
        <array>
            <value>football</value>
            <value>basketball</value>
        </array>
    </property>
    <!--集合-->
    <property name="names">
        <list>
            <value>tang</value>
            <value>wang</value>
        </list>
    </property>
    <property name="phones">
        <set>
            <value>15299999999</value>
            <value>13566666666</value>
        </set>
    </property>
    <property name="countries">
        <map>
            <entry key="zh" value="china"/>
            <entry key="en" value="english"/>
        </map>
    </property>
    <property name="files">
        <props>
            <prop key="username">root</prop>
            <prop key="url">jdbc:mysql:xxx</prop>
        </props>
    </property>
</bean>
接下来编写一个测试类,来查看是否复制成功:
@Test
public void testSet(){
    ApplicationContext context=new ClassPathXmlApplicationContext("/spring-context.xml");
    User user = (User) context.getBean("user");
    System.out.println("ss");//此处设断点,然后debug
}
我们可以在调试界面看到user的属性已经成功通过set注入赋值了。
User类可能存在jdk之外的类型比如Address,称为自建类型,也可以通过set注入的方式赋值,只需要多写一个Address类的bean标签,然后设置属性值(方式同上),然后在user的bean标签中添加一个属性名为address,ref值为Address的bean的id即可。
七、Bean细节
7.1 控制简单对象的单、多例模式
在上几节的测试类中由工厂生产的对象都是同一个(哪怕调用多次getBean方法),这种叫做单例模式。
通过配置可以设置为单/多例模式。
<!--
	singleton(默认):每次调用工厂,得到的都是同一个对象;
	prototype:每次调用工厂,都会创建新的对象。
-->
- 需要根据场景决定对象的单例、多例模式。
- 可以共用:Service、Dao、SqlSessionFactory(或者是所有的工厂)。
- 不可共用:Connection、SqlSession、ShoppingCart。
八、Spring工厂特性
8.1 饿汉式创建优势
工厂创建之后,会将Spring配置文件中所有对象都创建完成(饿汉式)。
它可以提高程序运行效率,避免多次IO,减少对象创建时间(概念接近连接池,一次性创建好,使用时直接获取)。
8.2 生命周期方法
- 自定义初始化方法:添加“init-method”属性,Spring则会在创建对象之后,调用此方法。
- 自定义销毁方法:添加“destory-method”属性,Spring则会在销毁对象之前,调用此方法。
- 销毁:工厂的close方法被调用之后,Spring会销毁所有已创建的单例对象。
- 分类:Singleton对象由Spring容器销毁、Prototype对象由JVM销毁。
我们在使用工厂创建一个单例对象时,可以自己写一个初始化和销毁方法来体验单例对象的生命周期:
public class User{
    //属性及其他代码省略
    public User() {
        System.out.println("构造方法执行。");
    }
    //初始化方法
    public void initUser(){
        System.out.println("初始化。");
    }
    //销毁方法
    public void destoryUser(){
        System.out.println("销毁。");
    }
}
在配置文件中添加属性来使自定义方法生效:
<bean id="user" class="lazydog.entity.User" init-method="initUser" destroy-method="destoryUser" />
然后在测试类中进行测试:
@Test
public void testLife(){
    ClassPathXmlApplicationContext context=new ClassPathXmlApplicationContext("/spring-context.xml");
    User user = (User) context.getBean("user");
    System.out.println("==========");
    context.close();
}
运行结果如下:
构造方法执行。
初始化。
==========
销毁。
以上是单例对象的生命周期,多例对象略有不同。
8.3 生命周期阶段
单例bean: singleton
随工厂启动创建--》构造方法--》set方法(注入值)--》init(初始化)--》构建完成--》随工厂关闭 销毁
多例bean: prototype
被使用时创建--》构造方法--》set方法(注入值)--》init(初始化)--》构建完成--》JVM垃圾回收 销毁
九、代理设计模式
9.1 概念
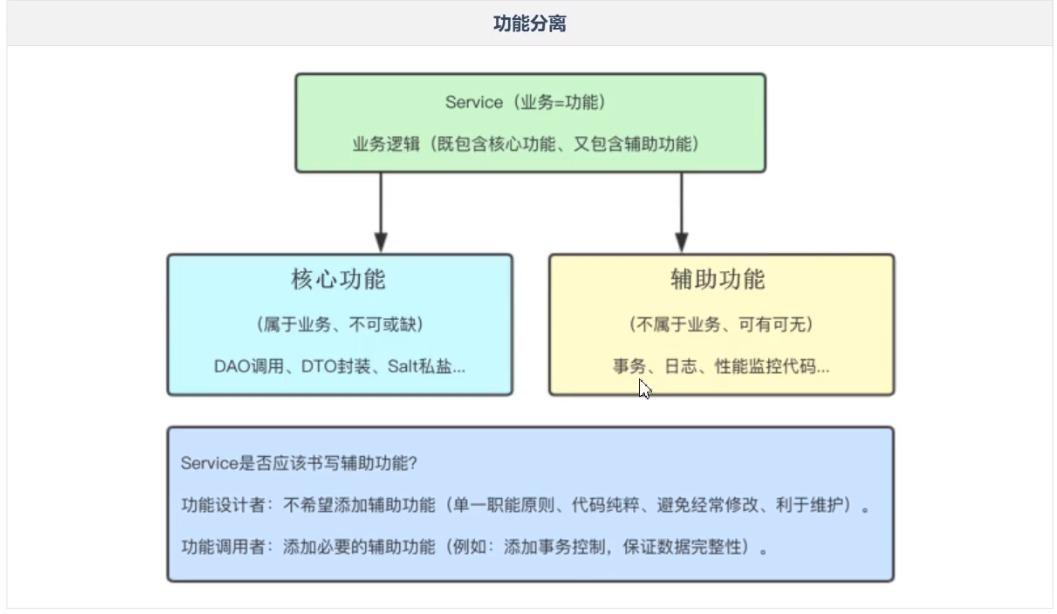
将核心功能与辅助功能(事务、日志、性能监控代码)分离,达到核心业务更纯粹,辅助功能业务可复用。

9.2 静态代理设计模式
通过代理类的对象,为原始类的对象(目标类的对象)添加辅助功能,更容易更换代理实现类,利于维护。
比如出租一个房子你需要做四件事,但作为房东你只关心两件事,这两件事就是核心功能:
public class landlordServiceImpl implements landlordService{
    @Override
    public void rent() {
        //辅助功能/额外功能
        System.out.println("发布租房信息。");
        System.out.println("带租客看房。");

        //核心功能
        System.out.println("签合同。");
        System.out.println("收房租。");
    }
}
我们可以写一个代理类,来将这个原始类的辅助功能处理掉:
public class landlordProxy implements landlordService{
    landlordService landlordService=new landlordServiceImpl();
    @Override
    public void rent() {
        //辅助功能/额外功能
        System.out.println("发布租房信息。");
        System.out.println("带租客看房。");

        landlordService.rent();
    }
}
这样原始类就可以专心关注核心功能,而作为租客,只需要调用这个代理类就可以了。
这种由我们明确写出来的代理类叫做静态代理类。
9.3 动态代理设计模式
动态创建代理类的对象,为原始类的对象添加辅助功能。
9.3.1 JDK动态代理实现(基于接口)
@Test
public void testJDK(){
    //目标
    landlordService ls=new landlordServiceImpl();
    //辅助功能,额外功能
    InvocationHandler invocationHandler=new InvocationHandler() {
        @Override
        public Object invoke(Object proxy, Method method, Object[] args) throws Throwable {
            System.out.println("发布租房信息。");
            System.out.println("带租客看房。");
            ls.rent();
            return null;
        }
    };
    //动态生成代理类
    landlordService proxy = (landlordService) Proxy.newProxyInstance(DynamicProxy.class.getClassLoader(),
                                                                     ls.getClass().getInterfaces(),
                                                                     invocationHandler);
    proxy.rent();
}
proxy这个对象是动态生成出来的,我们看不到它是哪一个类,这就是所谓的动态代理。
9.3.2 CGlib动态代理实现(基于继承)
@Test
public void testCGlib(){
    //目标
    landlordService ls=new landlordServiceImpl();
    Enhancer enhancer = new Enhancer();
    //代理类需要和目标类功能一致。所以它除了实现相同的接口外(jdk),还可以把代理类作为父类
    enhancer.setSuperclass(landlordServiceImpl.class);
    //辅助功能
    enhancer.setCallback(new org.springframework.cglib.proxy.InvocationHandler() {
        @Override
        public Object invoke(Object o, Method method, Object[] objects) throws Throwable {
            System.out.println("发布租房信息。");
            System.out.println("带租客看房。");
            ls.rent();
            return null;
        }
    });
    //动态生成代理类
    landlordServiceImpl proxy = (landlordServiceImpl) enhancer.create();
    proxy.rent();
}
这两种动态代理方法看上去是很抽象的,实际上也不会去这么去使用,这两种代理方法会在AOP中被封装到底层,所以我们真正使用动态代理的时候是会借助AOP的支持的。
十、面向切面编程
10.1 概念及术语
AOP(Aspect Oriented Programming),即面向切面编程,利用一种称为“横切”的技术,剖开封装的内部对象,并将那些影响了多个类的公共行为封装到一个可重用模块,并将其命名为“Aspect”,即切面。所谓”切面“,简单说就是那些与业务无关,却为业务模块所共同调用的逻辑或责任封装起来,便于减少系统的重复代码,降低模块之间的耦合度,并有利于未来的可操作性和可维护性。
Spring的AOP编程即是通过动态代理类为原始类的方法添加辅助功能。
- 连接点(Joinpoint):连接点是程序类中客观存在的方法,可被Spring拦截并切入内容。
- 切入点(Pointcut):被Spring切入连接点。
- 通知、增强(Advice):可以为切入点添加额外功能,分为前置通知、后置通知、异常通知、环绕通知等。
- 目标对象(Target):代理的目标对象。
- 引介(Introduction):一种特殊的增强,可在运行期为类动态添加Field和Method。
- 织入(Weaving) :把通知应用到具体的类,进而创建的代理类的过程。
- 代理(Proxy):被AOP织入通知后,产生的结果类。
- 切面(Aspect):由切点和通知组成,将横切逻辑织入切面所指定的连接点中。
10.2 开发流程
以前文的租房事件为案例,简单展示面向切面的开发流程。
10.2.1 环境搭建
引入AOP相关依赖:
<dependency>
<groupId>org.springframework</groupId>
<artifactId>spring-aop</artifactId>
<version>5.1.6.RELEASE</version>
</dependency>

<dependency>
<groupId>org.aspectj</groupId>
<artifactId>aspectjweaver</artifactId>
<version>1.9.6</version>
</dependency>
10.2.2 编写增强方法
同9.2节代码,将rent的额外功能提取出来,使rent方法保持单一职能,便于维护。
public class landlordBeforeAdvice implements MethodBeforeAdvice {
    //额外功能
    @Override
    public void before(Method method, Object[] objects, Object o) throws Throwable {
        System.out.println("发布租房信息。");
        System.out.println("带租客看房。");
    }
}
通知分为前后置通知等,因为rent的额外功能需要在核心功能前面出现,所以此处为前置通知,增强方法需要实现MethodBeforeAdvice接口,并实现before方法。
10.2.3 配置文件
新建spring配置文件,文件名通常为spring-context.xml,文件内容如下:
<?xml version="1.0" encoding="UTF-8" ?>
<beans xmlns="http://www.springframework.org/schema/beans"
       xmlns:aop="http://www.springframework.org/schema/aop"
       xmlns:xsi="http://www.w3.org/2001/XMLSchema-instance"
       xsi:schemaLocation="http://www.springframework.org/schema/beans
                           http://www.springframework.org/schema/beans/spring-beans.xsd
                           http://www.springframework.org/schema/aop
                           http://www.springframework.org/schema/aop/spring-aop.xsd">
    <!--目标对象:原始业务-->
    <bean id="landlordService" class="lazydog.service.landlordServiceImpl"/>
    <!--通知:额外功能-->
    <bean id="landlordBeforeAdvice" class="lazydog.advice.landlordBeforeAdvice"/>
    <!--编织-->
    <aop:config>
        <!--切入点-->
        <aop:pointcut id="landlord_rent" expression="execution(public void rent())"/>
        <!--组装-->
        <aop:advisor advice-ref="landlordBeforeAdvice" pointcut-ref="landlord_rent"/>
    </aop:config>
</beans>
同3.2节的配置文件比较,多了一个命名空间xmlns="http://www.springframework.org/schema/aop",因为命名空间不能重复,所以通常取名为aop。
config即为aop命名空间中的标签,其中定义切入点,也就是告诉spring谁是需要切入的方法(需要追加额外功能的方法)以及额外功能是什么,这一整个过程称为编织。
pointcut标签定义切入点,expression填写被增强的方法,需要使用execution()切入点表达式,括号中填写完整的方法定义。此处为rent方法,其中只包括租房的核心功能。
advisor标签有两个属性,advice-ref用来告诉spring谁是增强方法(额外功能),其值为增强方法bean的id值;pointcut-ref用来告诉spring把这个增强方法(额外功能)切入给谁,其值为对应pointcut标签的的id值。
将配置文件完成后,开发流程就大致结束了。
10.2.4 测试代码
@Test
public void testSpringAop(){
    //启动工厂
    ApplicationContext ApplicationContext = new ClassPathXmlApplicationContext("/spring-context.xml");
    //通过目标bean的id获得其代理类
    landlordService landlordService = (lazydog.service.landlordService) ApplicationContext.getBean("landlordService");
    landlordService.rent();
}
我们并没有创建代理类,也没有在配置文件中定义代理类的bean,但我们需要使用代理类来调用rent方法,是否有遗漏的地方?
其实在调用getBean()方法时,spring返回的就是目标类的代理类,方法参数写上目标类bean的id就可以了。
结果如下:
发布租房信息。
带租客看房。
签合同。
收房租。
这样,在rent方法中只有后两句核心功能,将代码耦合度降至了最低。
10.3 通知类
10.2.2节就是一个通知类,除了前置通知,还有以下几种通知:
- 后置通知:AfterAdvice
- 后置通知:AfterReturningAdvice
- 异常通知:ThrowsAdvice
- 环绕通知:MethodIntercptor
AfterAdvice是AfterReturningAdvice和ThrowsAdvice的父类。
AfterAdvice在核心功能之后执行,不论核心是否产生异常。
AfterReturningAdvice在核心功能之后执行,如果有异常则不执行,方法因异常而结束,无返回值。
ThrowsAdvice在核心功能之后执行,但只有产生异常时才执行。
MethodIntercptor在核心功能前后都执行。
本文只演示最后一种通知。
public class landlordAroundAdvice implements MethodInterceptor {

    @Override
    public Object invoke(MethodInvocation methodInvocation) throws Throwable {
        System.out.println("开始!");
        Object proceed = methodInvocation.proceed();
        System.out.println("结束!");
        return proceed;
    }
}
methodInvocation.proceed()方法触发核心功能的执行,在这前后分别编写环绕的功能。
在配置文件中写入通知类bean后组装:
<bean id="landlordAroundAdvice" class="lazydog.advice.landlordAroundAdvice"/>
<aop:config>
    <!--切入点-->
    <aop:pointcut id="landlord_rent" expression="execution(public void rent())"/>
    <!--组装-->
    <aop:advisor advice-ref="landlordAroundAdvice" pointcut-ref="landlord_rent"/>
</aop:config>
测试结果如下:
开始!
签合同。
收房租。
结束!
10.4 通配切入点
execution()切入点表达式中按照“访问修饰符(可省略)+返回值+包名.类+方法名(参数列表)”填写,但也有很多便捷的通配写法
-
匹配参数:<aop:pointcut id=“myPointCut” expression=“execution(* *(lazydog.entity.User))” />。
该表达式忽略返回值和方法名,只要是User类的参数就切入。
-
匹配方法名(无参):<aop:pointcut id=“myPointCut” expression=“execution(* rent())” />
该表达式忽略返回值,只要方法名为rent且无参就切入。
-
匹配方法名(任意参数):<aop:pointcut id=“myPointCut” expression=“execution(* rent(…))” />
该表达式忽略返回值和参数列表,只要方法名为rent就切入。
-
匹配返回值类型:<aop:pointcut id=“myPointCut” expression=“execution(lazydog.entity.User *(…))” />
该表达式忽略方法名和参数列表,只要返回值为User就切入。
-
匹配类名:<aop:pointcut id=“myPointCut” expression=“execution(* lazydog.entity.UserServiceImpl.*(…))” />
该表达式忽略返回值、方法名和参数列表,只要方法的类名为UserServiceImpl就切入。
-
匹配包名:<aop:pointcut id=“myPointCut” expression=“execution(* lazydog.service..(…))” />
该表达式忽略返回值、方法名和参数列表,只要是lazydog.service包下的方法就切入。
-
匹配包名以及子包名:<aop:pointcut id=“myPointCut” expression=“execution(* lazydog.service….(…))” />
该表达式忽略返回值、方法名和参数列表,只要是lazydog.service包及其子包下的方法就切入。
10.5 Spring代理实现的选择
Spring底层包含了JDK动态代理和CGlib动态代理两种机制,它是如何选择这两种机制的呢?
它的核心选择发生在DefaultAopProxyFactory类中,在idea中双击shift查找该类查看源代码:
public AopProxy createAopProxy(AdvisedSupport config) throws AopConfigException {
    if (!config.isOptimize() && !config.isProxyTargetClass() && !this.hasNoUserSuppliedProxyInterfaces(config)) {
        return new JdkDynamicAopProxy(config);
    } else {
        Class<?> targetClass = config.getTargetClass();
        if (targetClass == null) {
            throw new AopConfigException("TargetSource cannot determine target class: Either an interface or a target is required for proxy creation.");
        } else {
            return (AopProxy)(!targetClass.isInterface() && !Proxy.isProxyClass(targetClass) ? new ObjenesisCglibAopProxy(config) : new JdkDynamicAopProxy(config));
        }
    }
}
该方法中的if-else语句就是在做代理机制的选择。
第一个if有三个判断条件,config.isOptimize()和config.isProxyTargetClass()默认返回的false。前者通过cglib控制的代理使用优化策略;后者设置直接通过目标类来代理,而不是接口,可在配置文件中config标签里进行设置,为true就使用cglib代理机制:
<aop:config proxy-target-class="true">
</aop:config>
前两者默认为false,所以由this.hasNoUserSuppliedProxyInterfaces(config)决定代理机制。它的意思是目标(代理对象)是否实现了接口,有实现接口的话就return new JdkDynamicAopProxy(config);使用jdk代理机制。
最后一个else分支的返回语句使用了三目表达式,targetClass.isInterface的意思是代理对象是否是Interface类型,是的话仍然使用jdk代理;Proxy.isProxyClass(targetClass)的意思是当代理目标是getProxyClass方法或者newProxyInstance方法生成时,仍然使用jdk代理。
简而言之的基本规则为:
目标业务类如果有接口使用JDK代理,否则使用CDlib代理方式。
10.6 后处理器
Spring中定义了很多后处理器。每个bean在创建完成之前,都会有一个后处理器过程,即再加工,对bean做出相关改变和调整。
spring-AOP中就有一个专门的后处理器,负责通过原始业务组件(Service),再加工得到一个代理组件。
8.3节中展示了bean的生命周期,那么后处理器是在生命周期的哪个阶段呢?
我们自己定义一个后处理器,通过打印语句来体验bean的生命周期。
10.6.1 定义后处理器
首先定义一个实体User类供测试:
public class User {
    public Integer id;

    public Integer getId() {
        return id;
    }

    public void setId(Integer id) {
        System.out.println("Set User");
        this.id = id;
    }

    public User(Integer id) {
        this.id = id;
    }

    public User() {
        System.out.println("构造User");
    }
    public void initUser(){
        System.out.println("init User");
    }
}
编写后处理器类:
//后处理器
//bean生命周期:构造、set、init、destroy
public class MyBeanPostProcessor implements BeanPostProcessor {
    //参数bean是构造和set结束后的原始bean对象,beanName为bean对应的id
    public Object postProcessBeforeInitialization(Object bean, String beanName) throws BeansException {
        System.out.println("后处理1");
        System.out.println(bean+" :"+beanName);
        return bean;
    }

    public Object postProcessAfterInitialization(Object bean, String beanName) throws BeansException {
        System.out.println("后处理2");
        System.out.println(bean+" :"+beanName);
        return bean;
    }
}
自己创建的后处理器需要实现BeanPostProcessor接口,编译器不会提示你需要实现方法,可以通过按住ctrl同时点击接口名查看源代码,将这两个方法复制到自己的方法中。
10.6.2 配置后处理器
<bean class="lazydog.entity.User" init-method="initUser">
    <property name="id" value="1"/>
</bean>
<!--后处理器-->
<bean class="lazydog.processor.MyBeanPostProcessor"/>
通过注入一个id值来使bean展示生命阶段。
10.6.3 测试后处理器
@Test
public void testSpringAop(){
    //启动工厂
    ApplicationContext ApplicationContext = new ClassPathXmlApplicationContext("/spring-context.xml");
}
只需要启动一下工厂就可以了,bean随工厂启动而创建。
结果如下:
构造User
Set User
后处理1
lazydog.entity.User@77ec78b9 :lazydog.entity.User#0
init User
后处理2
lazydog.entity.User@77ec78b9 :lazydog.entity.User#0
10.6.4 Bean生命周期
实际工作中不用自己写后处理器,此处为了体验bean的生命阶段,由上述例子,可以看出bean的生命周期是:
构造--》注入属性--》后处理器前置过程--》初始化--》后处理器后置过程--》返回--》销毁
动态代理的创建时刻也是在后处理器过程中完成的。
十一、整合Mybatis
11.1 配置数据源
新建maven项目,创建配置文件ApplicationContext.xml,将数据源配置到项目中。
11.1.1 引入properties配置文件
#jdbc.properties
jdbc.driver=com.mysql.cj.jdbc.Driver
jdbc.url=jdbc:mysql://localhost:3306/userdb?useUnicode=true&characterEncoding=utf-8&serverTimezone=UTC
jdbc.username=root
jdbc.password=170912036
#初始化连接
initialSize=10
#最大连接数量
maxActive=50
#最小空闲连接
minIdle=5
#超时等待时间,以毫秒为单位
maxWait=10000
#配置间隔多久才进行一次检测,检测需要关闭的空闲连接,单位是毫秒
timeBetweenEvictionRunsMillis=60000
#配置一个连接在池中最小生存连接,单位是毫秒
minEvictableIdleTimeMillis=60000
11.1.2 整合Spring配置
<!--ApplicationContext.xml-->
<?xml version="1.0" encoding="UTF-8" ?>
<beans xmlns="http://www.springframework.org/schema/beans"
       xmlns:aop="http://www.springframework.org/schema/aop"
       xmlns:xsi="http://www.w3.org/2001/XMLSchema-instance"
       xmlns:context="http://www.springframework.org/schema/context"
       xsi:schemaLocation="http://www.springframework.org/schema/beans
                           http://www.springframework.org/schema/beans/spring-beans.xsd
                           http://www.springframework.org/schema/aop
                           http://www.springframework.org/schema/aop/spring-aop.xsd
                           http://www.springframework.org/schema/context
                           http://www.springframework.org/schema/context/spring-context.xsd">
    <context:property-placeholder location="classpath:jdbc.properties"/>
    <!--使用了Druid连接池-->
    <bean id="dataSource" class="com.alibaba.druid.pool.DruidDataSource">
        <property name="url" value="${jdbc.url}"/>
        <property name="driverClassName" value="${jdbc.driver}"/>
        <property name="username" value="${jdbc.username}"/>
        <property name="password" value="${jdbc.password}"/>
        <property name="initialSize" value="${initialSize}"/>
        <property name="maxActive" value="${maxActive}"/>
        <property name="minIdle" value="${minIdle}"/>
        <property name="maxWait" value="${maxWait}"/>
        <property name="timeBetweenEvictionRunsMillis" value="${timeBetweenEvictionRunsMillis}"/>
        <property name="minEvictableIdleTimeMillis" value="${minEvictableIdleTimeMillis}"/>
    </bean>
</beans>
11.1.3 导入相关依赖
<!--Spring相关依赖-->
<dependency>
    <groupId>org.springframework</groupId>
    <artifactId>spring-jdbc</artifactId>
    <version>5.3.5</version>
</dependency>
<dependency>
    <groupId>org.springframework</groupId>
    <artifactId>spring-aspects</artifactId>
    <version>5.1.6.RELEASE</version>
</dependency>
<dependency>
    <groupId>org.springframework</groupId>
    <artifactId>spring-context</artifactId>
    <version>5.1.6.RELEASE</version>
</dependency>
<!--Mybatis-->
<dependency>
    <groupId>org.mybatis</groupId>
    <artifactId>mybatis</artifactId>
    <version>3.5.6</version>
</dependency>
<!--Mysql驱动-->
<dependency>
    <groupId>mysql</groupId>
    <artifactId>mysql-connector-java</artifactId>
    <version>8.0.21</version>
</dependency>
<!--druid连接池-->
<dependency>
    <groupId>com.alibaba</groupId>
    <artifactId>druid</artifactId>
    <version>1.2.5</version>
</dependency>
11.2 整合Mybatis
11.2.1 导入项目依赖
<!--Spring整合Mybatis-->
<dependency>
    <groupId>org.mybatis</groupId>
    <artifactId>mybatis-spring</artifactId>
    <version>2.0.6</version>
</dependency>
11.2.2 配置SqlSessionFactory
<!--ApplicationContext.xml-->
<!--生产SqlSessionFactory-->
<bean id="sqlSessionFactory" class="org.mybatis.spring.SqlSessionFactoryBean">
    <!--注入连接池-->
    <property name="dataSource" ref="dataSource"/>
    <!--注入dao-mapper文件信息,如果映射文件和dao接口同包且同名,则此配置可省略-->
    <property name="mapperLocations">
        <list>
            <value>classpath:lazydog/dao/*.xml</value>
        </list>
    </property>
    <!--为dao-mapper文件中的实体定义省缺包路径-->
    <property name="typeAliasesPackage" value="lazydog.entity"/>
</bean>
mapperLocations属性指定映射文件存放目录;typeAliasesPackage属性指定别名的同名策略,别名与实体类名同名。
11.2.3 整合测试
测试需要一个数据库表,表名为t_user,其中插入几条数据,其对应的实体类如下:
public class User {
    public Integer id;
    public String username;
    public String password;
    public Character gender;
    public Date register_time;
    //get和set方法、构造方法等省略
}
创建DAO接口及其映射文件:
public interface UserDao {
    List<User> queryAllUsers();
}
<!--UserDaoMapper.xml-->
<?xml version="1.0" encoding="UTF-8" ?>
<!DOCTYPE mapper PUBLIC "-//mybatis.org//DTD Mapper 3.0//EN"
        "http://mytais.org/dtd/mybatis-3-mapper.dtd">
<mapper namespace="lazydog.dao.UserDao">
    <select id="queryAllUser" resultType="User">
        select id,username,password,gender,register_time
        from t_user
    </select>
</mapper>
导入junit测试依赖:
<dependency>
    <groupId>junit</groupId>
    <artifactId>junit</artifactId>
    <version>4.12</version>
    <scope>test</scope>
</dependency>
编写测试代码:
public class testSpringMybatis {
    @Test
    public void test01(){
        ApplicationContext applicationContext = new ClassPathXmlApplicationContext("/ApplicationContext.xml");
        SqlSessionFactory sqlSessionFactory = (SqlSessionFactory) applicationContext.getBean("sqlSessionFactory");
        SqlSession sqlSession = sqlSessionFactory.openSession();
        List<User> users=new ArrayList<>();
        UserDao mapper = sqlSession.getMapper(UserDao.class);
        List<User> allUser = mapper.queryAllUser();
        for (User user:allUser
            ) {
            System.out.println(user);
        }
    }
}
首先加载spring配置文件启动工厂,bean随工厂启动而创建,利用工厂获取sqlSessionFactory对象,然后得到sqlSession对象,之后就和Mybatis操作一样,获得mapper对象,调用方法,结果执行正常。
11.2.4 配置MapperScannerConfigurer
<bean id="mapperScannerConfigurer" class="org.mybatis.spring.mapper.MapperScannerConfigurer">
    <!--dao接口所在的包,如果有多个包用逗号或分号隔开-->
    <property name="basePackage" value="lazydog.dao"/>
    <!--如果工厂中只有一个SqlSessionFactory的bean,此配置可省略-->
    <property name="sqlSessionFactoryBeanName" value="sqlSessionFactory"/>
</bean>
MapperScannerConfigurer管理DAO实现类的创建,它扫描所有DAO接口并构建DAO实现,创建DAO对象存入工厂管理。
DAO实现类的对象在工厂中的id是“首字母小写+接口类的类名”,如UserDao=》userDao;OrderDao=》orderDao。
编写测试代码:
@Test
public void testDao(){
    ApplicationContext applicationContext = new ClassPathXmlApplicationContext("/ApplicationContext.xml");
    UserDao userDao = (UserDao) applicationContext.getBean("userDao");
    List<User> users = userDao.queryAllUser();
    for (User user:users
        ) {
        System.out.println(user);
    }
}
ApplicationContext.xml并没有定义id为userDao的bean,却成功拿到了bean对象,说明配置成功。
11.2.5 配置Service
首先创建service接口及其实现类:
public interface UserService {
    List<User> queryAllUsers();
}
public class UserServiceImpl implements UserService {
    UserDao userDao;

    public UserDao getUserDao() {
        return userDao;
    }

    public void setUserDao(UserDao userDao) {
        this.userDao = userDao;
    }

    @Override
    public List<User> queryAllUsers() {
        return userDao.queryAllUsers();
    }
}
配置文件:
<bean id="userService" class="lazydog.service.UserServiceImpl">
    <property name="userDao" ref="userDao"/>
</bean>
ref的值为 id为userDao的bean,这个bean是不是我们写的,而是上一节中MapperScannerConfigurer配置所创建的。
测试代码:
@Test
public void testService(){
    ApplicationContext applicationContext = new ClassPathXmlApplicationContext("/ApplicationContext.xml");
    UserService userService = (UserService) applicationContext.getBean("userService");
    List<User> users = userService.queryAllUser();
    for (User user:users
        ) {
        System.out.println(user);
    }
}
运行成功。
十二、事务
12.1 配置事务管理器
DataSourceTransactionManager是一个事务管理器组件,它帮我们管理事务管理的相关功能,比如提交和回滚。
<bean id="tx" class="org.springframework.jdbc.datasource.DataSourceTransactionManager">
    <property name="dataSource" ref="dataSource"/>
</bean>
DataSourceTransactionManager和SqlSessionFactoryBean需要注入同一个dataSource的bean,否则事务控制失败。
12.2 配置事务通知
它基于事务管理器,进一步定制,生成一个额外功能(Advice)。
事务需要在核心之前开启,核心之后提交,据此我们可以写一个环绕通知来完成事务控制;但实际上Spring帮我们完成了大部分工作,我们只需要做一些配置就可以拥有控制事务的额外功能。
<tx:advice id="txManager" transaction-manager="tx">
    <!--定义事务属性-->
    <tx:attributes>
        <!--对于以User结尾的方法,切入时实行对应事务-->
        <tx:method name="*User" rollback-for="Exception"/>
        <!--对于以query开头的方法,切入时实行对应事务-->
        <tx:method name="query*" propagation="SUPPORTS"/>
        <!--剩余所有方法-->
        <tx:method name="*"/>
    </tx:attributes>
</tx:advice>
注意advice标签使用了tx别名,在文件头加入以下内容:
<beans <!--加入如下内容-->
       xmlns:tx="http://www.springframework.org/schema/tx"
       xsi:schemaLocation="http://www.springframework.org/schema/tx
                           http://www.springframework.org/schema/tx/spring-tx.xsd">
</beans>
advice标签的id属性填写一个标识即可(任意);transaction-manager指定事务管理器,也就是12.1节的bean的id;该标签基于事务管理器的逻辑定制出一个事务通知。
method标签的name属性添加被切入的方法名,除此之外还能定制其他的事务属性,下面会对事务属性进行详细介绍。
12.3 事务属性
12.3.1 隔离级别
事务之间是有隔离的,隔离级别有高有低,它们主要影响着并发性和安全性两个方面。
安全性:级别越高,多事务并发时,越安全;因为共享的数据越来越少,事务间彼此干扰减少。
并发性:级别越高,多事务并发时,并发越差;因为共享的数据越来越少,事务间阻塞情况增多。
method标签的属性isolation即隔离级别,它有如下的取值:
- DEFAULT:默认值,采用数据库默认的设置(建议);
- READ-UNCOMMITED:读未提交;
- READ-COMMITED:读提交;(Oracle数据库默认隔离级别)
- REPEATABLE-READ:可重复读;(MySql数据库默认隔离级别)
- SERIALIZED-READ:序列化读。
隔离级别从低到高为:
READ-UNCOMMITED < READ-COMMITED < REPEATABLE-READ < SERIALIZED-READ
多事务并发时的安全问题:
- 脏读:一个事务读取到另一个事务还未提交的数据。隔离级别大于等于READ-COMMITED可防止。
- 不可重复读:一个事务内多次读取一行数据的相同内容,其结果不一致。隔离级别大于等于REPEATABLE-READ可防止。
- 幻影读:个事务内多次读取一张表中的相同内容,其结果(表行数)不一致。隔离级别大于等于SERIALIZED-READ可防止。
12.3.2 传播行为
method标签的属性propagation即传播行为。
先来解释以下什么叫事务嵌套。假设有两个Service,它们分别有各自的方法,方法内有自己的事务控制;当Service1调用了Service2的方法时,就会发生事务嵌套,当Service2的方法发生回滚时,可能只会影响Service2的事务控制,而不影响Service1的事务控制。
当涉及到事务嵌套时,可能会存在问题。属性propagation有以下取值:
- SUPPORTS:不存在外部事务,则不开启新事务;存在外部事物,则合并到外部事务中,也就是说自己发生错误会回滚,外部发生错误也会跟它回滚。(适合查询)
- REQUIRED:不存在外部事务,则开启新事务;存在外部事物,则合并到外部事务中。(默认值,适合增删改)
据此,我们可以再配置一下事务通知:
<tx:method name="queryAllUser" isolation="DEFAULT" propagation="SUPPORTS" rollback-for="Exception"/>
<tx:method name="insertUser" propagation="REQUIRED"/>
12.3.3 读写性
method标签的属性read-only即读写性,它有以下取值:
- true:只读,可以提高查询效率。
- false:默认值,可读可写,适合增删改。
据此,我们可以再配置一下事务通知:
<tx:method name="queryAllUser" read-only="true" propagation="SUPPORTS" rollback-for="Exception"/>
<tx:method name="insertUser" />
12.3.4 事务超时
method标签的属性timeout即事务超时时间(单位秒)。
事务在执行过程中拿不到需要的资源就会被阻塞,进入等待状态,如果一直等待有可能变成出现死锁,所以需要给事务设置一个等待时间,超时后就会报错并停止事务。
该属性取值为**-1**时,由数据库指定等待时间,这也是默认值(建议设置)。
12.3.5 事务回滚
method标签的属性rollback-for即事务回滚。
默认如果事务中抛出RuntimeException,则自动回滚;
如果事务中抛出CheckException(非运行时异常),不会自动回滚,而是默认提交事务。
可以通过将该属性值设为“Exception”来进行回滚,或者将CheckException转换成RuntimeException上抛。
据此,我们可以再配置一下事务通知:
<tx:method name="queryAllUser" read-only="true" propagation="SUPPORTS" rollback-for="Exception"/>
<tx:method name="insertUser" rollback-for="Exception" />
12.3.6 编织
最后的事务通知定义:
<tx:advice id="txManager" transaction-manager="tx">
    <!--定义事务属性-->
    <tx:attributes>
        <tx:method name="queryAllUsers" propagation="SUPPORTS" rollback-for="Exception"/>
        <tx:method name="*User" rollback-for="Exception"/>
        <!--剩余所有方法-->
        <tx:method name="*"/>
    </tx:attributes>
</tx:advice>
定义完事务通知后,要将事务管理的Advice切入需要事务的业务方法中。
<aop:config>
    <aop:pointcut id="tx_userService" expression="execution(* lazydog.service.UserServiceImpl.*(..))"/>
    <aop:advisor advice-ref="txManager" pointcut-ref="tx_userService"/>
</aop:config>
测试代码:
@Test
public void testTx(){
    ApplicationContext applicationContext = new ClassPathXmlApplicationContext("/ApplicationContext.xml");
    UserService userService = (UserService) applicationContext.getBean("userService");
    userService.deleteUser(2);
}
查看数据库已成功删除。
这种控制事务的方法叫做声明式控制。
十三、注解开发
使用注解可以简化我们的开发步骤,很多注解都可以代替代码配置。
13.1 声明Bean
这类注解可以替换自建类型组件的标签,更快速的声明bean。
声明Bean的注解有如下几类:
- @Service:业务类专用;
- @Repository:dao实现类专业;
- @Controller:web层专用;
- @Component:通用;
- @Scope:用户控制bean的创建模式。
前四个注解除了名称不一样其他基本一样。
@Service("userService")
public class UserServiceImpl implements UserService {
    //代码略
}
在类上标注一个注解,这样写就相当于在配置文件中的:
<bean id="userService" class="lazydog.service.UserServiceImpl"/>
也可以单写注解,不加括号,id名即为首字母小写的类名,即userServiceImpl。
前四种用法一致,不再一一演示。
Spring默认是单例模式,如果你需要多例模式就可以使用Scope注解:
@Service("userService")
@Scope("prototype")
public class UserServiceImpl implements UserService {
    //代码略
}
13.2 注入
注入注解用于完成bean属性的注入。
注入注解有以下几类:
- @Autowired:基于类型自动注入;
- @Resource:基于名称自动注入;
- @Qualifier(“userDao”):限定注入的bean的id,一般与@Autowired联用。
- @Value:注入简单类型数据(jdk8中基本类型+String)
@Service("userService")
public class UserServiceImpl implements UserService {
    @Resource(name = "userDao")
    private UserDao userDao;
}
@Resource括号内的name属性指定了注入的bean的id值为userDao;括号可以省略,那么它就会寻找与属性同名的bean id进行注入。
@Autowired
@Qualifier("userDao")
private UserDao userDao;
@Autowired会寻找类型为UserDao类型的bean进行注入,当配置文件中有多个同类型的bean时可能会出现问题,那么可以使用@Qualifier(“userDao”)来指定id值。
@Value("10")
private Integer testId;
@Value的使用很简单,在属性上打赏标注,括号内填值即可。
13.3 事务控制
这类注解用于控制事务切入,专用于业务类,因为业务类才需要做事务控制。
- @Transactional:可以加在类上或者方法上,加在类上表示应用于类种所有方法。
@Transactional(isolation = Isolation.DEFAULT,propagation = Propagation.REQUIRED,timeout = -1,readOnly = false,rollbackFor = Exception.class)
public class UserServiceImpl implements UserService {
}
同配置文件,我们也可以在括号种设置事务属性。
当给方法单独添加事务注解时,类上的事务注解就会失效。
13.4 注解所需配置
进行注解开发后,注解可能存在在各种类和方法上,我们需要告诉Spring这些注解位置,然后进行识别和解析。
<!--告诉Spring注解位置,填写一个父包,Spring就会寻找包下类的注解-->
<context:component-scan base-package="lazydog"/>
<!--单独配置Transactional注解,指定事务管理器-->
<tx:annotation-driven transaction-manager="tx"/>
进行完如上的设置后,12.6.6节的配置就可以全部注释掉了。
我们可以自行使用注解进行配置,繁琐操作不再演示。
13.5 AOP开发
//声明此类是一个切面类,包含切入点(pointcut)和通知(Advice)
@Aspect
//声明bean,进入工厂
@Component
public class MyAspect {
    //定义切入点,pc()方法只是一种形式
    @Pointcut("execution(* lazydog.service.UserServiceImpl.*())")
    public void pc(){}

    //前置通知
    //引用pc()方法,本质是在引入切入点
    //参数JoinPoint是连接点类
    @Before("pc()")
    public void MyBefore(JoinPoint a){
        //该方法获得当前目标
        System.out.println("target : "+a.getTarget());
        //该方法获得当前方法的参数表
        System.out.println("args : "+a.getArgs());
        //该方法获得当前调用方法的名称
        System.out.println("method's name : "+a.getSignature().getName());
        //以上都是可选方法
        System.out.println("before~~~");
    }

    //后置通知
    //value引用切入点;returning获得核心功能的返回值,同方法参数的ret
    @AfterReturning(value = "pc()",returning = "ret")
    public void MyAfterReturning(JoinPoint a,Object ret){
        System.out.println("after~~~ : "+ret);
    }

    //环绕通知
    //proceed()方法执行核心功能,proceed对象存放核心功能返回的代码
    @Around("pc()")
    public Object MyInterceptor(ProceedingJoinPoint p) throws Throwable {
        System.out.println("interceptor~~~1");
        Object proceed = p.proceed();
        System.out.println("interceptor~~~2");
        return proceed;
    }

    //异常通知
    //ex用来保存当前的异常,对应参数中的e
    @AfterThrowing(value = "pc()",throwing = "ex")
    public void MyThrows(JoinPoint a,Exception e){
        System.out.println("throws : "+e.getMessage());
    }
}
代码区块中所展示的6个标签分别为:
- @Aspect:声明切面类;
- @Pointcut:定义切入点;
- @Before:前置通知;
- @AfterReturning:后置通知;
- @Around:环绕通知;
- @AfterThrowing:异常通知。
但仅仅是添加注解是没用的,还需要再配置中开启:
<!--启用aop注解-->
<aop:aspectj-autoproxy></aop:aspectj-autoproxy>
当然上述配置是在13.4配置的基础上。


 305
305

 被折叠的 条评论
为什么被折叠?


