


RestTemplate:
RestTemplate是Spring提供的用于访问Rest服务的客户端,RestTemplate提供了多种便捷访问远程Http服务的方法,能够大大提高客户端的编写效率。
我之前的HTTP开发是用apache的HttpClient开发,代码复杂,还得操心资源回收等。代码很复杂,冗余代码多;
简述:
是Spring用于同步client端的核心类,简化了与http服务的通信,并满足RestFul原则,程序代码可以给它提供URL,并提取结果。默认情况下,RestTemplate默认依赖jdk的HTTP连接工具。当然你也可以 通过setRequestFactory属性切换到不同的HTTP源,比如Apache HttpComponents、Netty和OkHttp;
RestTemplate能大幅简化了提交表单数据的难度,并且附带了自动转换JSON数据的功能,但只有理解了HttpEntity的组成结构(header与body),且理解了与uriVariables之间的差异,才能真正掌握其用法。这一点在Post请求更加突出;
该类的入口主要是根据HTTP的六个方法制定:
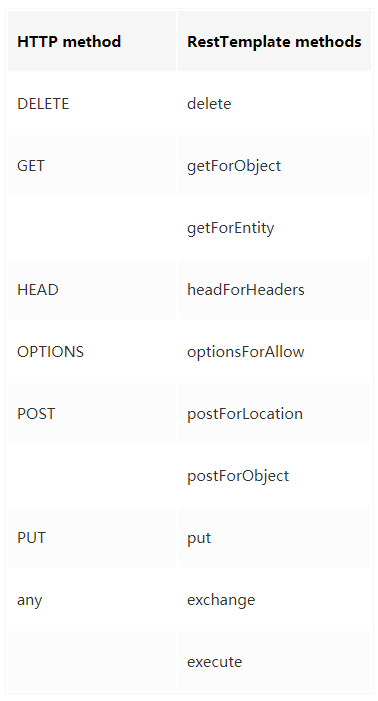
此外,exchange和excute可以通用上述方法。
在内部,RestTemplate默认使用HttpMessageConverter实例将HTTP消息转换成POJO或者从POJO转换成HTTP消息。默认情况下会注册主mime类型的转换器,但也可以通过setMessageConverters注册其他的转换器。
其实这点在使用的时候是察觉不到的,很多方法有一个responseType 参数,它让你传入一个响应体所映射成的对象,然后底层用HttpMessageConverter将其做映射。
HttpMessageConverterExtractor<T> responseExtractor =
                new HttpMessageConverterExtractor<>(responseType, getMessageConverters(), logger);
HttpMessageConverter.java源码:
public interface HttpMessageConverter<T> {
        //指示此转换器是否可以读取给定的类。
    boolean canRead(Class<?> clazz, @Nullable MediaType mediaType);

        //指示此转换器是否可以写给定的类。
    boolean canWrite(Class<?> clazz, @Nullable MediaType mediaType);

        //返回List<MediaType>
    List<MediaType> getSupportedMediaTypes();

        //读取一个inputMessage
    T read(Class<? extends T> clazz, HttpInputMessage inputMessage)
            throws IOException, HttpMessageNotReadableException;

        //往output message写一个Object
    void write(T t, @Nullable MediaType contentType, HttpOutputMessage outputMessage)
            throws IOException, HttpMessageNotWritableException;

}
在内部,RestTemplate默认使用SimpleClientHttpRequestFactory和DefaultResponseErrorHandler来分别处理HTTP的创建和错误,但也可以通过setRequestFactory和setErrorHandler来覆盖。
get请求实践
getForObject()方法
public <T> T getForObject(String url, Class<T> responseType, Object... uriVariables){}
public <T> T getForObject(String url, Class<T> responseType, Map<String, ?> uriVariables)
public <T> T getForObject(URI url, Class<T> responseType)getForObject()其实比getForEntity()多包含了将HTTP转成POJO的功能,但是getForObject没有处理response的能力。因为它拿到手的就是成型的pojo。省略了很多response的信息。
/**
     * 不带参的get请求
     */
    @Test
    public void restTemplateGetTest(){
        RestTemplate restTemplate = new RestTemplate();
        Notice notice = restTemplate.getForObject("http://xxx.top/notice/list/1/5"
                , Notice.class);
        System.out.println(notice);
    }

---------------------------------------------------------------
Notice notice = restTemplate.getForObject("http://fantj.top/notice/list/{1}/{2}"
                , Notice.class,1,5);
用了占位符{1}。
--------------------------------------------------------------

Map<String,String> map = new HashMap();
        map.put("start","1");
        map.put("page","5");
        Notice notice = restTemplate.getForObject("http://fantj.top/notice/list/"
                , Notice.class,map);
getForEntity()方法
public <T> ResponseEntity<T> getForEntity(String url, Class<T> responseType, Object... uriVariables){}
public <T> ResponseEntity<T> getForEntity(String url, Class<T> responseType, Map<String, ?> uriVariables){}
public <T> ResponseEntity<T> getForEntity(URI url, Class<T> responseType){}
与getForObject()方法不同的是返回的是ResponseEntity对象,如果需要转换成pojo,还需要json工具类的引入;
ResponseEntity包含了HttpStatus和BodyBuilder的这些信息,这更方便我们处理response原生的东西:
ResponseEntity.java
public HttpStatus getStatusCode(){}
public int getStatusCodeValue(){}
public boolean equals(@Nullable Object other) {}
public String toString() {}
public static BodyBuilder status(HttpStatus status) {}
public static BodyBuilder ok() {}
public static <T> ResponseEntity<T> ok(T body) {}
public static BodyBuilder created(URI location) {}
...

=====

public enum HttpStatus {
public boolean is1xxInformational() {}
public boolean is2xxSuccessful() {}
public boolean is3xxRedirection() {}
public boolean is4xxClientError() {}
public boolean is5xxServerError() {}
public boolean isError() {}
}

====

public interface BodyBuilder extends HeadersBuilder<BodyBuilder> {
    //设置正文的长度,以字节为单位,由Content-Length标头
      BodyBuilder contentLength(long contentLength);
    //设置body的MediaType 类型
      BodyBuilder contentType(MediaType contentType);
    //设置响应实体的主体并返回它。
      <T> ResponseEntity<T> body(@Nullable T body);
}
post请求实践
同样的,post请求也有postForObject和postForEntity
public <T> T postForObject(String url, @Nullable Object request, Class<T> responseType, Object... uriVariables)
            throws RestClientException {}
public <T> T postForObject(String url, @Nullable Object request, Class<T> responseType, Map<String, ?> uriVariables)
            throws RestClientException {}
public <T> T postForObject(URI url, @Nullable Object request, Class<T> responseType) throws RestClientException {}
示例:
@Test
public void rtPostObject(){
    RestTemplate restTemplate = new RestTemplate();
    String url = "http://47.xxx.xxx.96/register/checkEmail";
    HttpHeaders headers = new HttpHeaders();
    headers.setContentType(MediaType.APPLICATION_FORM_URLENCODED);
    MultiValueMap<String, String> map= new LinkedMultiValueMap<>();
    map.add("email", "844072586@qq.com");

    HttpEntity<MultiValueMap<String, String>> request = new HttpEntity<>(map, headers);
    ResponseEntity<String> response = restTemplate.postForEntity( url, request , String.class );
    System.out.println(response.getBody());
执行结果:
{"status":500,"msg":"该邮箱已被注册","data":null}代码中,MultiValueMap是Map的一个子类,它的一个key可以存储多个value,简单的看下这个接口:
| 1 |
|
为什么用MultiValueMap?因为HttpEntity接受的request类型是它。
| 1 2 |
|
为什么用HttpEntity是因为restTemplate.postForEntity方法虽然表面上接收的request是@Nullable Object request类型,但是你追踪下去会发现,这个request是用HttpEntity来解析。核心代码如下:
if (requestBody instanceof HttpEntity) {
    this.requestEntity = (HttpEntity<?>) requestBody;
}else if (requestBody != null) {
    this.requestEntity = new HttpEntity<>(requestBody);
}else {
    this.requestEntity = HttpEntity.EMPTY;
}
我曾尝试用map来传递参数,编译不会报错,但是执行不了,是无效的url request请求(400 ERROR)。其实这样的请求方式已经满足post请求了,cookie也是属于header的一部分。可以按需求设置请求头和请求体。其它方法与之类似。
使用exchange指定调用方式
exchange()方法跟上面的getForObject()、getForEntity()、postForObject()、postForEntity()等方法不同之处在于它可以指定请求的HTTP类型。
但是你会发现exchange的方法中似乎都有@Nullable HttpEntity requestEntity这个参数,这就意味着我们至少要用HttpEntity来传递这个请求体,之前说过源码所以建议就使用HttpEntity提高性能。
@Test
    public void rtExchangeTest() throws JSONException {
        RestTemplate restTemplate = new RestTemplate();
        String url = "http://xxx.top/notice/list";
        HttpHeaders headers = new HttpHeaders();
        headers.setContentType(MediaType.APPLICATION_FORM_URLENCODED);
        JSONObject jsonObj = new JSONObject();
        jsonObj.put("start",1);
        jsonObj.put("page",5);

        HttpEntity<String> entity = new HttpEntity<>(jsonObj.toString(), headers);
        ResponseEntity<JSONObject> exchange = restTemplate.exchange(url,
                                          HttpMethod.GET, entity, JSONObject.class);
        System.out.println(exchange.getBody());
    }
这次可以看到,我使用了JSONObject对象传入和返回。
当然,HttpMethod方法还有很多,用法类似。
excute()指定调用方式
excute()的用法与exchange()大同小异了,它同样可以指定不同的HttpMethod,不同的是它返回的对象是响应体所映射成的对象,而不是ResponseEntity。
需要强调的是,execute()方法是以上所有方法的底层调用。随便看一个:
@Override
    @Nullable
    public <T> T postForObject(String url, @Nullable Object request, Class<T> responseType, Map<String, ?> uriVariables)
            throws RestClientException {

        RequestCallback requestCallback = httpEntityCallback(request, responseType);
        HttpMessageConverterExtractor<T> responseExtractor =
                new HttpMessageConverterExtractor<>(responseType, getMessageConverters(), logger);
        return execute(url, HttpMethod.POST, requestCallback, responseExtractor, uriVariables);
    }
创建RestTemplateConfig配置类
根据自己的需要配置即可
package org.lvgang;

import org.springframework.context.annotation.Bean;
import org.springframework.context.annotation.Configuration;
import org.springframework.http.client.ClientHttpRequestFactory;
import org.springframework.http.client.SimpleClientHttpRequestFactory;
import org.springframework.web.client.RestTemplate;

/**
 * RestTemplate配置
 */
@Configuration
public class RestTemplateConfig {

    @Bean
    public RestTemplate restTemplate(ClientHttpRequestFactory factory) {
        return new RestTemplate(factory);
    }

    @Bean
    public ClientHttpRequestFactory simpleClientHttpRequestFactory() {
        SimpleClientHttpRequestFactory factory = new SimpleClientHttpRequestFactory();
        factory.setReadTimeout(5000);//ms
        factory.setConnectTimeout(15000);//ms
        return factory;
    }
}
配置代理和超时时间:
application.properties:
#代理设置
proxy.enabled=false
proxy.host=192.168.18.233
proxy.port=8888

#REST超时配置
rest.ReadTimeout=35000
rest.ConnectTimeout=5000
代理配置类:
 1 import org.springframework.boot.context.properties.ConfigurationProperties;
 2 import org.springframework.stereotype.Component;
 3
 4 import lombok.Data;
 5
 6 /**
 7  * 网络代理设置
 8  *
 9  * @author yangzhilong
10  *
11  */
12 @Component
13 @ConfigurationProperties(prefix="proxy")
14 @Data
15 public class ProxyConfig {
16     /**
17      * 是否启用代理
18      */
19     private Boolean enabled;
20     /**
21      * 代理主机地址
22      */
23     private String host;
24     /**
25      * 代理端口
26      */
27     private Integer port;
28 }
SpringBoot的Configuration:
1 import java.net.InetSocketAddress;
 2 import java.net.Proxy;
 3 import java.net.SocketAddress;
 4
 5 import org.springframework.beans.factory.annotation.Autowired;
 6 import org.springframework.beans.factory.annotation.Value;
 7 import org.springframework.boot.autoconfigure.condition.ConditionalOnClass;
 8 import org.springframework.context.annotation.Bean;
 9 import org.springframework.context.annotation.Configuration;
10 import org.springframework.http.client.SimpleClientHttpRequestFactory;
11 import org.springframework.web.client.RestTemplate;
12
13 import com.yzl.vo.ProxyConfig;
14
15 @Configuration
16 @ConditionalOnClass(ProxyConfig.class)
17 public class RestConfiguration {
18     @Value("${rest.ReadTimeout}")
19     private int readTimeout;
20     @Value("${rest.ConnectTimeout}")
21     private int connectionTimeout;
22     @Autowired
23     private ProxyConfig proxyConfig;
24
25     @Bean
26     public SimpleClientHttpRequestFactory httpClientFactory() {
27         SimpleClientHttpRequestFactory httpRequestFactory = new SimpleClientHttpRequestFactory();
28         httpRequestFactory.setReadTimeout(readTimeout);
29         httpRequestFactory.setConnectTimeout(connectionTimeout);
30
31         if(proxyConfig.getEnabled()){
32             SocketAddress address = new InetSocketAddress(proxyConfig.getHost(), proxyConfig.getPort());
33             Proxy proxy = new Proxy(Proxy.Type.HTTP, address);
34             httpRequestFactory.setProxy(proxy);
35         }
36
37         return httpRequestFactory;
38     }
39
40     @Bean
41     public RestTemplate restTemplate(SimpleClientHttpRequestFactory httpClientFactory) {
42         RestTemplate restTemplate = new RestTemplate(httpClientFactory);
43         return restTemplate;
44     }
45 }
如果不希望这种全局的超时时间污染正常的SpringCloud中restTemplate的时间设置,可以使用如下方法:
 1 package com.yzl.autoconfig;
 2
 3 import org.springframework.beans.factory.annotation.Value;
 4 import org.springframework.context.annotation.Bean;
 5 import org.springframework.context.annotation.Configuration;
 6 import org.springframework.http.client.HttpComponentsClientHttpRequestFactory;
 7 import org.springframework.web.client.RestTemplate;
 8
 9 import com.yzl.util.RestClient;
10
11 /**
12  * 工具类引导装配类
13  * @author yangzhilong
14  *
15  */
16 @Configuration
17 public class RestClientAutoConfiguration {
18     @Value("${rest.config.connectTimeout:10000}")
19     private int connectTimeout;
20     @Value("${rest.config.readTimeout:30000}")
21     private int readTimeout;
22
23     /**
24      * 使用Bootstrap来装配RestClient中的RestTemplate属性,
25      * 避免直接装配RestTemplate来污染了正常的spring Cloud的调用
26      * @return
27      */
28     @Bean
29     public RestClientBootstrap bootstrap(){
30         HttpComponentsClientHttpRequestFactory httpRequestFactory = new HttpComponentsClientHttpRequestFactory();
31         httpRequestFactory.setConnectTimeout(connectTimeout);
32         httpRequestFactory.setReadTimeout(readTimeout);
33         RestTemplate restTemplate = new RestTemplate(httpRequestFactory);
34         RestClient.setRestTemplate(restTemplate);
35         return new RestClientBootstrap();
36     }
37
38     /**
39      * 空的引导类
40      * @author yangzhilong
41      *
42      */
43     static class RestClientBootstrap {
44
45     }
46 }
RestClient工具类:
package com.nike.gcsc.auth.utils;

import java.util.Map;

import org.springframework.http.HttpEntity;
import org.springframework.http.HttpHeaders;
import org.springframework.http.HttpMethod;
import org.springframework.http.MediaType;
import org.springframework.util.LinkedMultiValueMap;
import org.springframework.util.MultiValueMap;
import org.springframework.web.client.RestTemplate;

import com.alibaba.fastjson.JSON;

/**
 * HTTP Rest Util
 * @author yangzhilong
 *
 */
public class RestClient {

    private static RestTemplate restTemplate;

    /**
     * @param client
     */
    public static void setRestTemplate(RestTemplate client) {
        restTemplate = client;
    }

    /**
     *
     * @param <T>
     * @param url
     * @param clasz
     * @return
     */
    public static <T> T get(String url, Class<T> clasz) {
        return restTemplate.getForObject(url , clasz);
    }

    /**
     *
     * @param <T>
     * @param url
     * @param headMap
     * @param bodyObj
     * @param clasz
     * @return
     */
    public static <T> T postJson(String url, Map<String, String> headMap, Object bodyObj, Class<T> clasz) {
        HttpHeaders headers = new HttpHeaders();
        MediaType type = MediaType.parseMediaType("application/json; charset=UTF-8");
        headers.setContentType(type);
        headers.add("Accept", MediaType.APPLICATION_JSON.toString());
        if(null != headMap) {
            headMap.entrySet().forEach(item -> {
                headers.add(item.getKey(), item.getValue());
            });
        }
        String result = null;
        if(bodyObj == null){
            result = "{}";
        }else{
            result = JSON.toJSONString(bodyObj);
        }
        HttpEntity<String> formEntity = new HttpEntity<String>(result,headers);
        return restTemplate.postForObject(url , formEntity, clasz);
    }

    /**
     *
     * @param <T>
     * @param url
     * @param attrMap
     * @param clasz
     * @return
     */
    public static <T> T postForm(String url, Map<String , String> attrMap, Class<T> clasz){
        HttpHeaders headers = new HttpHeaders();
        headers.setContentType(MediaType.APPLICATION_FORM_URLENCODED);
        MultiValueMap<String, String> params= new LinkedMultiValueMap<>();
        attrMap.entrySet().forEach(item -> {
            params.add(item.getKey() , item.getValue());

        });
        HttpEntity<MultiValueMap<String, String>> requestEntity = new HttpEntity<>(params, headers);
        return restTemplate.exchange(url, HttpMethod.POST, requestEntity, clasz).getBody();
    }

}


 1121
1121


 被折叠的 条评论
为什么被折叠?
被折叠的 条评论
为什么被折叠?
 到【灌水乐园】发言


