


今日内容
- 用户角色
- 树形组件ZTree
- 角色权限
- 用户登录
- 动态左侧菜单
- 系统日志记录
第一章 用户分配角色
1. 需求和分析
1.1 需求说明
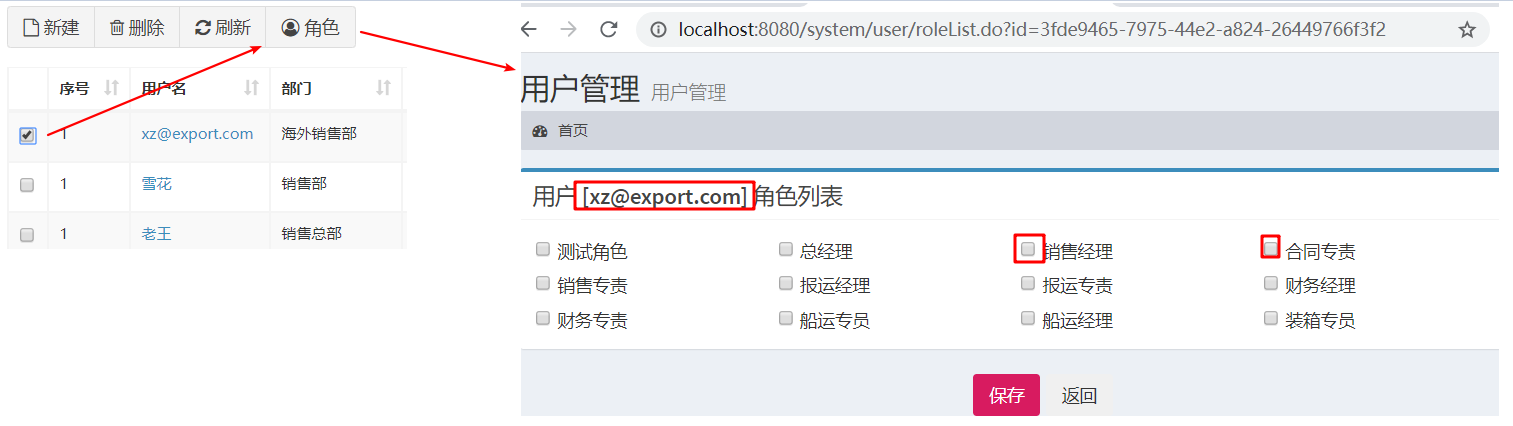
进入用户分配角色的页面, 首先回显用户的当前角色, 然后修改角色点击提交, 后台执行修改操作
1.2 数据模型分析
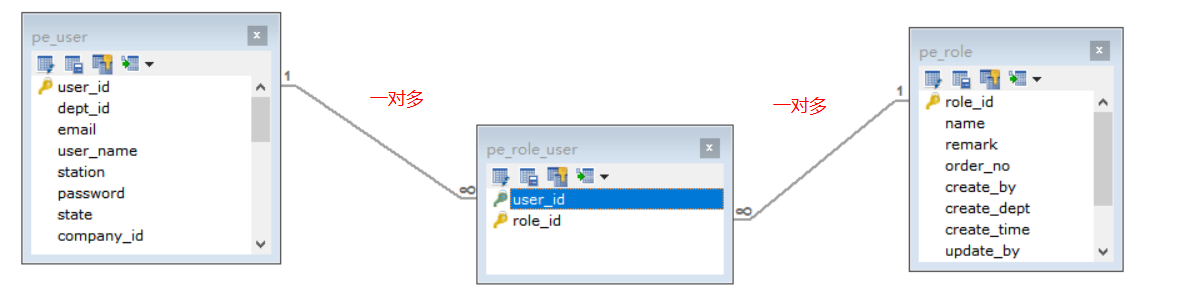
一条中间表的数据, 就代表一个用户拥有的一条角色
所谓的分配角色其实就是对中间表数据的调整(先删除 再新增), pe_user和pe_role表中的数据不会变化
2. 跳转分配角色页面
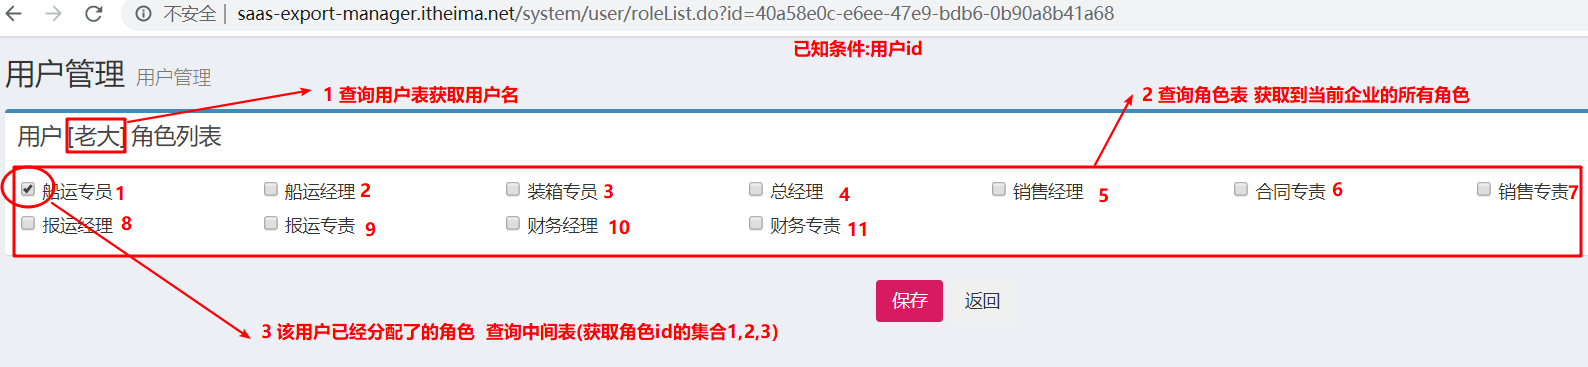
任务:
- 显示出用户名称(查询用户信息)
- 显示出所有的角色, 等待勾选( 查询所有角色)
- 回显当前用户已经分配了的角色 ( 查询中间表 )
- 跳转到给用户分配角色页面
2.1 UserController
/**
* 角色分配跳转
*/
(value = "/roleList", name = "角色分配跳转")
public String roleList(String id) {
//1. 显示出用户名称(查询用户信息)
User user = userService.findById(id);
//返回到前台页面
request.setAttribute("user",user);
//2. 显示出所有的角色, 等待勾选( 查询所有角色)
List<Role> roleList = roleService.findAll(user.getCompanyId());
// 将查询到的角色返回到前台页面
request.setAttribute("roleList",roleList);
//3. 回显当前用户已经分配了的角色 ( 查询中间表 )
List<String> userRoleStr =userService.findRolesIdByUserID(id);
// 返回查询结果
request.setAttribute("userRoleStr",userRoleStr);
//4. 跳转到给用户分配角色页面
return "/system/user/user-role";
}
2.2 UserService
List<String> findRolesIdByUserID(String id);
public List<String> findRolesIdByUserID(String id) {
return userDao.findRolesIdByUserID(id);
}
2.3 UserDao
List<String> findRolesIdByUserID(String id);
<select id="findRolesIdByUserID" resultType="java.lang.String">
        select  role_id from pe_role_user where user_id = #{id}
    </select>
3. 分配角色
任务:
- 删除中间表中用户的现有角色对应的id
- 重新向中间表插入新的用户和角色id
3.1 UserController
/**
* 保存角色
*/
(value = "/changeRole", name = "保存用户分配的角色信息")
public String changeRole(@RequestParam("userid") String userId,String[] roleIds) {
//考虑到那个事务安全的问题,将此功能转移到service层完成
userService.changeRole(userId,roleIds);
//重定向到list方法
return "redirect:/system/user/list.do";
}
3.2 UserService
void changeRole(String userId, String[] roleIds);
public void changeRole(String userId, String[] roleIds) {
//1. 删除中间表中用户的现有角色对应的id
userDao.deleteUserRoleByUserId(userId);
//2. 重新向中间表插入新的用户和角色id
// 判断前台传入内容是否为空
if (roleIds != null && roleIds.length > 0) {
for (String roleId : roleIds) {
userDao.saveUserRole(userId,roleId);
}
}
}
3.3 UserDao
void deleteUserRoleByUserId(String userId);
// 多属性传值需要使用@Param注解进行属性名的指定
void saveUserRole(@Param("userId") String userId, @Param("roleId") String roleId);
<insert id="saveUserRole">
    insert into pe_role_user  values (#{userId},#{roleId});
</insert>
<delete id="deleteUserRoleByUserId">
    delete from pe_role_user where user_id = #{id}
</delete>
第二章 树形组件ZTree
1. 介绍
ZTree 是一个依靠 jQuery 实现的多功能 “树插件”。优异的性能、灵活的配置、多种功能的组合是 zTree 最大优点。
官方网址为: http://www.treejs.cn/v3/main.php
2. 入门
2.1 入门指南
步骤 1、文件准备
- 将需要使用的 zTree v3.x 相关的 js、css、img 文件分别放置到相应目录,并且保证相对路径正确
步骤 2、编写 html 页面
- 按照以下代码,制作 html 页面,访问试试看吧,注意:
1) ““ 是必需的!
2) zTree 的容器 className 别忘了设置为 “ztree”
3) 入门成功后,就可以按照顺序去看 Demo 了,直接看看源码,应该能看懂的
<HTML>
<HEAD>
<TITLE> ZTREE DEMO </TITLE>
<meta http-equiv="content-type" content="text/html; charset=UTF-8">
<!--此处引入的文件需与本地文件相对应-->
<script src="../plugins/ztree/js/jquery-1.4.4.min.js"></script>
<script src="../plugins/ztree/js/jquery.ztree.all-3.5.js"></script>
<link rel="stylesheet" href="../plugins/ztree/css/zTreeStyle/zTreeStyle.css">
<link rel="stylesheet" href="../plugins/ztree/css/demo.css">
<SCRIPT LANGUAGE="JavaScript">
// 声明树
var zTreeObj;
// zTree 的参数配置,深入使用请参考 API 文档(setting 配置详解)
var setting = {};
// zTree 的数据属性,深入使用请参考 API 文档(zTreeNode 节点数据详解)
var zNodes = [
{name:"test1", open:true, children:[
{name:"test1_1"}, {name:"test1_2"}]},
{name:"test2", open:true, children:[
{name:"test2_1"}, {name:"test2_2"}]}
];
$(document).ready(function(){
zTreeObj = $.fn.zTree.init($("#treeDemo"), setting, zNodes);
});
</SCRIPT>
</HEAD>
<BODY>
<div>
<ul id="treeDemo" class="ztree"></ul>
</div>
</BODY>
</HTML>- 按照以下代码,制作 html 页面,访问试试看吧,注意:
2.2 学习的知识点有:
1、构建ztree的json数据格式 简单的json数据格式 pId、标准的json数据格式 children
2、开启复选框 setting中设置
3、如何在复选框中显示选中状态 ,在数据上添加属性: checked:true
4、如何获取已勾选的数据节点 方法:getCheckedNodes
5、展开所有的树形节点 方法 expandAll(true);
要求: 将demo案例全部点一遍.了解功能
<HTML>
<HEAD>
<TITLE> ZTREE DEMO </TITLE>
<meta http-equiv="content-type" content="text/html; charset=UTF-8">
<!--此处引入的文件需与本地文件相对应-->
<script src="../plugins/ztree/js/jquery-1.4.4.min.js"></script>
<script src="../plugins/ztree/js/jquery.ztree.all-3.5.js"></script>
<link rel="stylesheet" href="../plugins/ztree/css/zTreeStyle/zTreeStyle.css">
<link rel="stylesheet" href="../plugins/ztree/css/demo.css">
<SCRIPT LANGUAGE="JavaScript">
var zTreeObj;
// zTree 的参数配置,深入使用请参考 API 文档(setting 配置详解)
var setting = {
// 使用简单json必须配置此项
data: {
simpleData: {
enable: true,//true / false 分别表示 使用 / 不使用 简单数据模式
// 下面字段对应了json的字段格式,区分大小写
idKey: "id",
pIdKey: "pId",
rootPId: 0
}
},
check: {
enable: true,
autoCheckTrigger: true// 自动关联
}
};
// zTree 的数据属性,深入使用请参考 API 文档(zTreeNode 节点数据详解)
// 简单 JSON 数据
var zNodes = [
{id:1, pId:0, name: "父节点1"},
{id:11, pId:1, name: "子节点1",checked:true},
{id:12, pId:1, name: "子节点2"}
];
$(document).ready(function(){
zTreeObj = $.fn.zTree.init($("#treeDemo"), setting, zNodes);
// expandAll 展开树的所有节点
zTreeObj.expandAll(true);
});
</SCRIPT>
</HEAD>
<BODY>
<div>
<ul id="treeDemo" class="ztree"></ul>
</div>
<button id="btn">保存</button>
<script>
$("#btn").click(function () {
//getCheckedNodes(true) 获取所有选中的节点
var nodes = zTreeObj.getCheckedNodes(true);
alert(nodes[0].name);
})
</script>
</BODY>
</HTML>
1. 使用简单json构建树
2. 展开树的所有节点
3. 会使用复选框
4. 默认初始化的树的时候勾选某个节点
5. 获取所有选中的节点
第三章 角色分配权限
1. 需求和分析
1.1 需求说明
进入角色分配权限的页面, 首先回显角色的当前权限, 然后修改权限点击提交, 后台执行修改操作
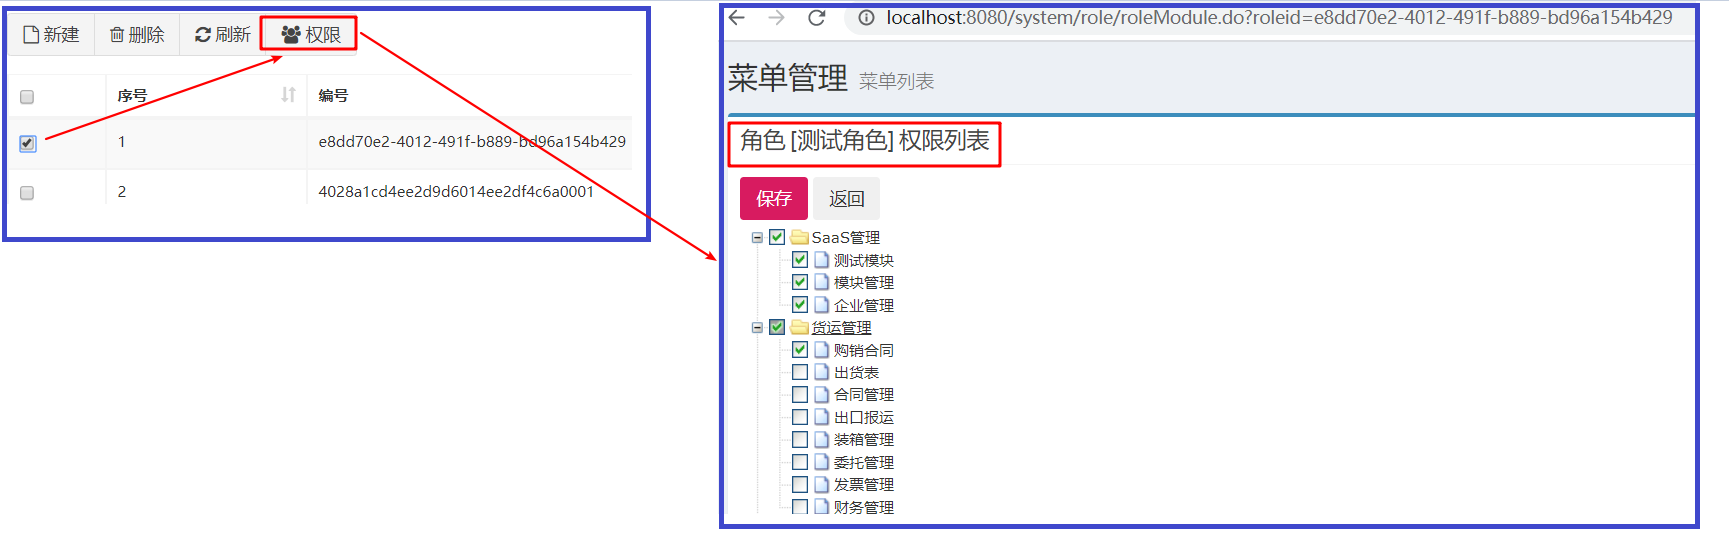
1.2 数据模型分析
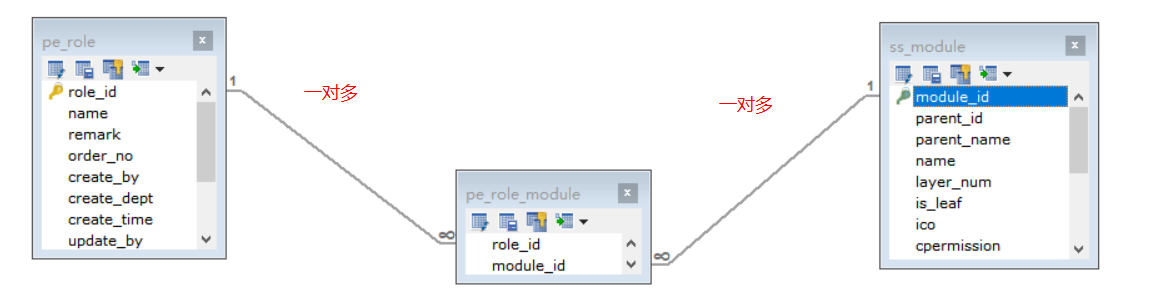
一条中间表的数据, 就代表一个角色拥有的一个菜单/按钮的访问权限
所谓的分配权限其实就是对中间表数据的调整, pe_role和ss_module表中的数据不会变化
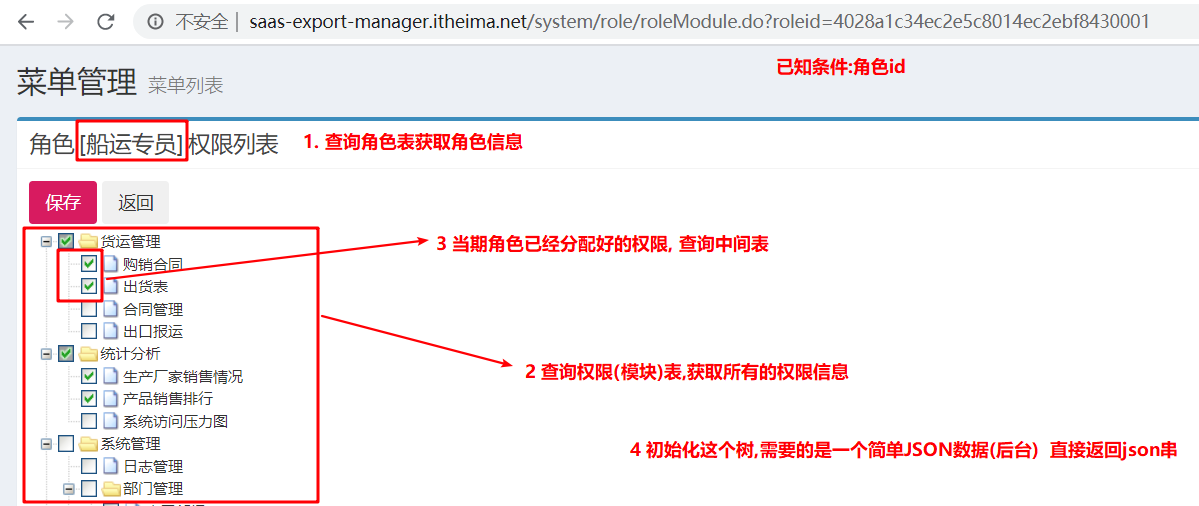
2. 跳转分配权限页面
任务:
- 显示出角色名称(查询角色信息)
- 显示出所有的权限, 等待勾选( 查询所有权限)
- 回显当前角色已经分配了的权限( 查询中间表 )
- 将上面两部分数据做成ZTree需要的json格式
- 跳转到给角色分配权限页面
2.1 RoleController
/**
* 跳转分配权限页面
*/
(value = "/roleModule", name = "跳转分配权限页面")
public String roleModule(@RequestParam("roleid") String roleId) throws JsonProcessingException {
//1. 显示出角色名称(查询角色信息)
Role role = roleService.findById(roleId);
request.setAttribute("role",role);
//2. 显示出所有的权限, 等待勾选( 查询所有权限)
List<Module> moduleList = moduleService.findAll();
//3. 回显当前角色已经分配了的权限( 查询中间表 )
List<String> moduleIds = roleService.findModuleByRoleId(roleId);
//4. 将上面两部分数据做成ZTree需要的json格式
List<Map> list = new ArrayList<>();
for (Module module : moduleList) {
Map<String,Object> map = new HashMap<String,Object>();
map.put("id",module.getId());
map.put("pId",module.getParentId());
map.put("name",module.getName());
if (moduleIds.contains(module.getId())){
map.put("checked", true);
}
list.add(map);
}
String value = new ObjectMapper().writeValueAsString(list);
request.setAttribute("data",value);
//5. 跳转到给角色分配权限页面
return "/system/role/role-module";
}
2.2 RoleService
List<String> findModuleByRoleId(String roleId);
public List<String> findModuleByRoleId(String roleId) {
return roleDao.findModuleByRoleId(roleId);
}
2.3 RoleDao
List<String> findModuleByRoleId(String roleId);
<select id="findModuleByRoleId" resultType="java.lang.String">
    select module_id from pe_role_module where role_id = #{roleId}
</select>
3. 角色分配权限
任务:
- 删除中间表中角色的现有权限对应的id
- 重新向中间表插入新的角色和权限id
3.1 RoleController
/**
* 保存角色权限
* 存在事务问题
*/
(value = "/changeModule", name = "保存角色权限")
public String changeModule(@RequestParam("roleid") String roleId,String[] moduleIds) {
roleService.changeModule(roleId,moduleIds);
//重定向到list方法
return "redirect:/system/role/list.do";
}
3.2 RoleService
void changeModule(String roleId, String[] moduleIds);
public void changeModule(String roleId, String[] moduleIds) {
//1. 删除中间表中角色的现有权限对应的id
roleDao.deleteRoleModuleByRoleId(roleId);
//2. 重新向中间表插入新的角色和权限id
if (moduleIds != null && moduleIds.length > 0) {
for (String moduleId : moduleIds) {
roleDao.saveRoleModule(roleId,moduleId);
}
}
}
3.3 RoleDao
void deleteRoleModuleByRoleId(String roleId);

void saveRoleModule(@Param("roleId") String roleId, @Param("moduleId") String moduleId);
   <delete id="deleteRoleModuleByRoleId">
        delete from pe_role_module where role_id=#{roleId}
   </delete>
<insert id="saveRoleModule">
       insert into pe_role_module values (#{roleId},#{moduleId});
   </insert>
第四章 用户登录
1. 需求分析
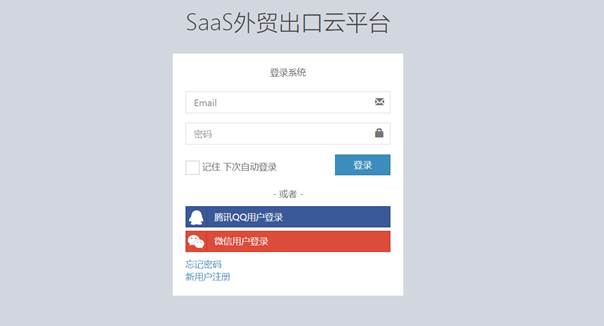
1.1 需求说明
完成用户登录,然后跳转至主页面
1.2 数据模型分析
用户登录使用的是pe_user表, 主要关注的是email和password字段

2. 登录实现
2.1 系统默认欢迎页调整
修改web模块的webapp/WEB-INF/web.xml, 将默认的访问页面修改为login.jsp
<!--系统欢迎页-->
<welcome-file-list>
    <welcome-file>login.jsp</welcome-file>
</welcome-file-list>
2.2 login.jsp核心代码

2.3 LoginController代码
("/login")
public String login(String email,String password) {
// 根据email查询用户
User user = userService.findByEmail(email);
// 进行判空
if (user == null) {
request.setAttribute("error","您所登陆的用户不存在!!");
return "forward:/login.jsp";
}
// 对前台传入的密码进行加密
String pwd2 = new Md5Hash(password, email, 2).toString();
// 进行密码对比
if (!StringUtils.equals(pwd2,user.getPassword())) {
request.setAttribute("error","密码错误!!");
return "forward:/login.jsp";
}
// 通过则保存用户数据
session.setAttribute("loginUser",user);
//根据用户查询对应的权限
List<Module> moduleList=userService.findModuleByUser(user);
session.setAttribute("modules", moduleList);
return "redirect:/home/main.do";
}
2.4 UserService
User findByEmail(String email);

List<Module> findModuleByUser(User user);
public User findByEmail(String email) {
return userDao.findByEmail(email);
}
public List<Module> findModuleByUser(User user) {
//1. 确定身份
Integer degree = user.getDegree();
//2. 查找权限
if (degree == 0) {//saas管理员
return moduleDao.findByBelong(0);
} else if (degree == 1) {//企业管理员
return moduleDao.findByBelong(1);
} else {//企业普通员工
return moduleDao.findByUserId(user.getId());
}
}
2.5 UserDao
List<Module> findByBelong(Integer ibelong);

List<Module> findByUserId(String userId);
<select id="findByBelong" resultMap="BaseResultMap">
    select * from ss_module where belong = #{belong}
</select>
<select id="findByUserId" resultMap="BaseResultMap">
    SELECT DISTINCT m.* FROM pe_user u
    JOIN `pe_role_user` ru ON u.user_id = ru.`user_id`
    JOIN `pe_role` r ON ru.`role_id` = r.`role_id`
    JOIN `pe_role_module` rm ON r.`role_id` = rm.`role_id`
    JOIN `ss_module` m ON rm.`module_id` = m.`module_id`
    WHERE u.`user_id` = #{userId};
</select>
3. 代码优化
修改BaseController的代码,改为使用真正登录人的信息
package com.itheima.web.controller;
import com.itheima.domain.system.User;
import org.springframework.beans.factory.annotation.Autowired;
import javax.servlet.http.HttpServletRequest;
import javax.servlet.http.HttpServletResponse;
import javax.servlet.http.HttpSession;
public class BaseController {
protected HttpServletRequest request;
protected HttpServletResponse response;
protected HttpSession session;
protected String getCompanyId() {
return getUser().getCompanyId();
}
protected String getCompanyName() {
return getUser().getCompanyName();
}
protected User getUser() {
User user = (User) session.getAttribute("loginUser");
if (user == null) {
throw new RuntimeException("session超时");
}
return user;
}
}
第五章 动态左侧菜单
1. 需求分析
1.1 需求说明
每个人登录系统之后根据自己的身份或角色, 看到的左侧菜单, 应该是不一样的
1.2 数据模型分析
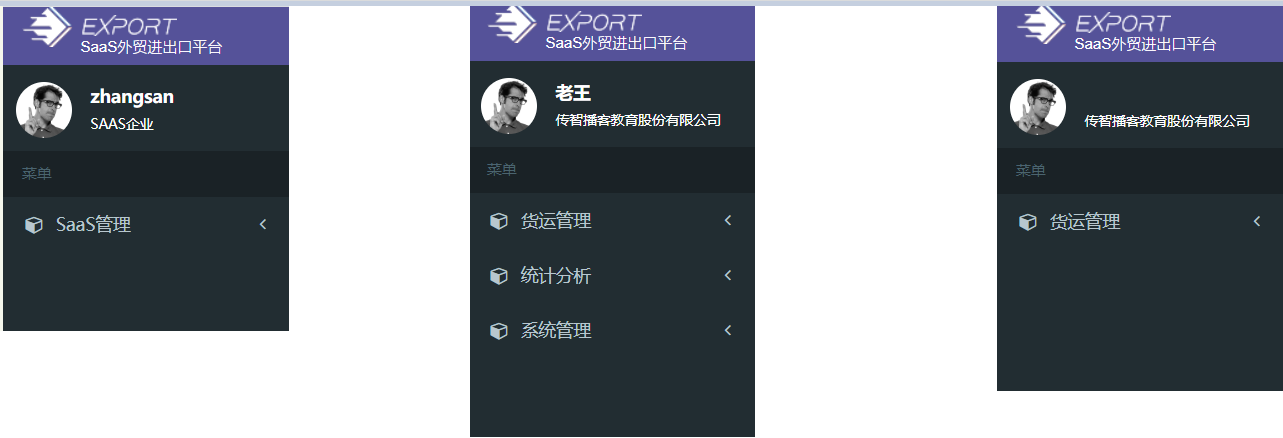
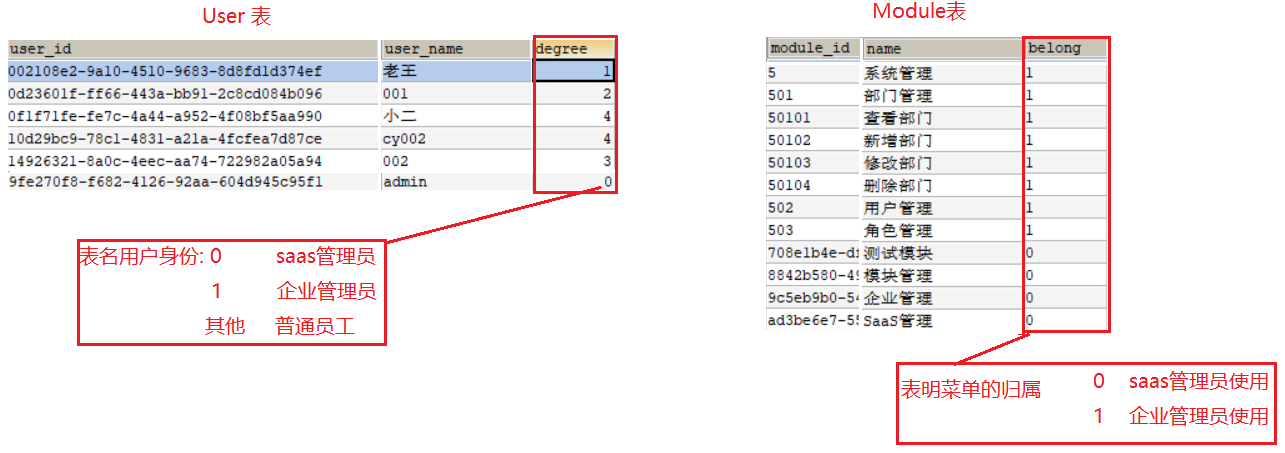
首先大家要明确, 系统主要包含三类用户:
- SaaS管理员:属于SaaS系统,主要责任是维护SaaS管理模块(企业管理、模块管理) 菜单是固定的
- 企业管理员: 属于某个企业,主要责任是维护企业相关模块(系统管理、货运管理、统计分析)菜单是固定的
- 企业普通员工:属于某个企业,主要责任是负责维护企业中某块信息的维护(比如合同专员负责合同模块)菜单是跟随角色改变的
三类用户的菜单显示分别由什么决定呢?
- 管理员的菜单是由身份决定的,只要是saas管理员、企业管理员身份,便可以访问规定(由module表中的belong值决定)的菜单
- 企业普通员工的菜单是由角色(RBAC权限)决定的,即员工–角色–权限
// 当用户登录之后, 就可以查询到当前用户的degree
if(user.degree == 0){// saas管理员
    select * from ss_module where belong = 0
}else if(user.degree == 1){// 企业管理员
    select * from ss_module where belong = 1
}else{// 企业普通员工
    select module.* from (员工--角色--权限 5表联查)
}
-- ( 员工--角色--权限 5表联查)sql
SELECT DISTINCT m.* FROM pe_user u
	JOIN `pe_role_user` ru ON u.user_id = ru.`user_id`
	JOIN `pe_role` r ON ru.`role_id` = r.`role_id`
	JOIN `pe_role_module` rm ON r.`role_id` = rm.`role_id`
	JOIN `ss_module` m ON rm.`module_id` = m.`module_id`
WHERE u.`user_id` = 'e4b161f2-a6f8-48d5-b4a5-c82546512a36';
2. 代码实现
步骤:
- 登录之后,根据登录的用户信息确定身份
- 然后根据身份对应的查找方式去查询模块信息
- 将模块信息放入session中存储
- jsp页面从session中取出module信息显示在左侧菜单(已经有了)
2.1 LoginController
("/login")
public String login(String email, String password) {
//1. 根据email调用service查询用户
User user = userService.findByEmail(email);
//2. 用户为空,说明用户不存在,提示错误,退出
if (user == null) {
request.setAttribute("error", "当前用户不存在");
return "forward:/login.jsp";//强制不去拼接前后缀
}
//3. 判断密码, 如果密码比对失败,说明密码错误, 提示错误,退出
String pass = new Md5Hash(password, email, 2).toString();
if (!StringUtils.equals(pass, user.getPassword())) {
request.setAttribute("error", "密码错误");
return "forward:/login.jsp";//强制不去拼接前后缀
}
//4. 登录成功了
//向session中存储用户信息
session.setAttribute("loginUser", user);
//根据用户查询对应的权限
List<Module> moduleList = userService.findModuleByUser(user);
session.setAttribute("modules", moduleList);
//跳转主页面
return "redirect:/home/main.do";
}
2.1 UserService
List<Module> findModuleByUser(User user);
public List<Module> findModuleByUser(User user) {
//1. 确定身份
Integer degree = user.getDegree();
//2. 查找权限
if (degree == 0) {//saas管理员
return moduleDao.findByBelong(0);
} else if (degree == 1) {//企业管理员
return moduleDao.findByBelong(1);
} else {//企业普通员工
return moduleDao.findByUserId(user.getId());
}
}
2.3 ModuleDao
List<Module> findByBelong(Integer belong);

List<Module> findByUserId(String userId);
<select id="findById" resultMap="BaseResultMap">
    select * from ss_module where module_id=#{id}
</select>

<select id="findByBelong" resultMap="BaseResultMap">
    select * from ss_module where belong = #{belong}
</select>
2.4 aside.jsp
<%@ taglib prefix="c" uri="http://java.sun.com/jsp/jstl/core" %>
<%@ include file="../base.jsp" %>
<%@ page contentType="text/html;charset=UTF-8" pageEncoding="utf-8" language="java" %>
<aside class="main-sidebar">
    <!-- sidebar: style can be found in sidebar.less -->
    <section class="sidebar">
        <!-- Sidebar user panel -->
        <div class="user-panel">
            <div class="pull-left image">
                <img src="../img/user2-160x160.jpg" class="img-circle" alt="User Image">
            </div>
            <div class="pull-left info">
                <p> ${sessionScope.loginUser.userName}</p>
                <a href="#">${sessionScope.loginUser.companyName}</a>
            </div>
        </div>

        <ul class="sidebar-menu">
            <li class="header">菜单</li>

            <c:forEach items="${sessionScope.modules}" var="item">
                <c:if test="${item.ctype==0}">
                    <li class="treeview">
                        <a href="#">
                            <i class="fa fa-cube"></i> <span>${item.name}</span>
                            <span class="pull-right-container"><i class="fa fa-angle-left pull-right"></i></span>
                        </a>
                        <ul class="treeview-menu">
                            <c:forEach items="${sessionScope.modules}" var="item2">
                                <c:if test="${item2.ctype==1 && item2.parentId == item.id}">
                                    <li id="${item2.id}">
                                        <a onclick="setSidebarActive(this)" href="${item2.curl}" target="iframe">
                                            <i class="fa fa-circle-o"></i>${item2.name}
                                        </a>
                                    </li>
                                </c:if>
                            </c:forEach>
                        </ul>
                    </li>
                </c:if>
            </c:forEach>
        </ul>
    </section>
</aside>
第六章 系统日志记录
1. 需求和分析
1.1 需求描述
作为一个后台管理系统,用户的所有操作都应该以日志的形式保存下来,并且支持以页面的形式进行查询
现在希望在不改变代码的前提下添加系统的操作日志数据,可以考虑使用aop技术
1.2 数据模型分析

2. 代码实现
2.1 domain
public class SysLog implements Serializable {
private String id;
private String userName;
private String ip;
private Date time;
private String method;
private String action;
private String companyId;
private String companyName;
}
2.1 dao
public interface SysLogDao {
    List<SysLog> findAll(String companyId);

    void save(SysLog log);
}
<mapper namespace="com.itheima.dao.system.SysLogDao">
<resultMap id="BaseResultMap" type="com.itheima.domain.system.SysLog">
<id column="id" property="id" />
<result column="user_name" property="userName" />
<result column="ip" property="ip" />
<result column="time" property="time" />
<result column="method" property="method" />
<result column="action" property="action" />
<result column="company_id" property="companyId" />
<result column="company_name" property="companyName" />
</resultMap>
<select id="findAll" resultMap="BaseResultMap">
select * from st_sys_log where company_id=#{companyId} order by time desc
</select>
<insert id="save" >
insert into st_sys_log (
id, user_name, ip, time, method, action,company_id,company_name
)values (
#{id}, #{userName}, #{ip}, #{time}, #{method},#{action},#{companyId},#{companyName}
)
</insert>
</mapper>
2.3 service
public interface SysLogService {
    void save(SysLog sysLog);

    PageInfo<SysLog> findByPage(String companyId, int pageNum, int pageSize);
}
public class SysLogServiceImpl implements SysLogService {
private SysLogDao sysLogDao;
//保存日志
public void save(SysLog sysLog) {
sysLogDao.save(sysLog);
}
//分页查询日志
public PageInfo findByPage(String companyId, int page, int size) {
PageHelper.startPage(page, size);
List<SysLog> list = sysLogDao.findAll(companyId);
return new PageInfo(list,10);
}
}
3. 查询日志
在web模块的com.itheima.web.controller.system包下创建SysLogController类
("/system/log")
public class SysLogController extends BaseController {
private SysLogService sysLogService;
/**
* 生成列表
*/
(value = "/list", name = "生成日志列表")
public String list(
@RequestParam(defaultValue = "1", name = "page") Integer pageNum,
@RequestParam(defaultValue = "10") Integer pageSize) {
PageInfo pageInfo = sysLogService.findByPage(getCompanyId(), pageNum, pageSize);
request.setAttribute("page", pageInfo);
return "/system/log/log-list";
}
}
4. 记录日志
使用aop完成日志记录, aop的使用分为三步
- 准备目标对象 ( 所有的Controller ) [ 切点就是其中的所有方法 ]
- 准备增强对象 ( 自己开发一个WriteLog的类 ) [ 记录日志 ]
- 配置切面( 使用注解完成配置, 注意配置文件中需要激活切面自动代理 ) [注解 @Aspect @Around ]
在web模块的com.itheima.web.aspect包下创建WriteLog类
package com.itheima.web.aspect;
import com.itheima.domain.system.SysLog;
import com.itheima.service.system.SysLogService;
import com.itheima.web.controller.BaseController;
import org.aspectj.lang.ProceedingJoinPoint;
import org.aspectj.lang.annotation.Around;
import org.aspectj.lang.annotation.Aspect;
import org.aspectj.lang.reflect.MethodSignature;
import org.springframework.beans.factory.annotation.Autowired;
import org.springframework.stereotype.Component;
import org.springframework.web.bind.annotation.RequestMapping;
import java.lang.reflect.Method;
import java.util.Date;
import java.util.UUID;
public class WriteLog extends BaseController {
private SysLogService sysLogService;
//记录日志
("execution(* com.itheima.web.controller.*.*.*(..))")
public Object log(ProceedingJoinPoint pjp) throws Throwable {
//创建一个日志对象
SysLog sysLog = new SysLog();
sysLog.setId(UUID.randomUUID().toString());
sysLog.setUserName(getUser().getUserName());
sysLog.setIp(request.getRemoteAddr());
sysLog.setTime(new Date());
//这就是切点方法
//MethodSignature 里面存储的就是当前切点方法的所有信息
MethodSignature methodSignature = (MethodSignature) pjp.getSignature();
//方法对象
Method method = methodSignature.getMethod();
sysLog.setMethod(method.getName());//方法名
//如果方法上存在RequestMapping注解,就获取RequestMapping注解中name属性的值
if (method.isAnnotationPresent(RequestMapping.class)) {
RequestMapping requestMapping = method.getAnnotation(RequestMapping.class);
sysLog.setAction(requestMapping.name());
}
sysLog.setCompanyId(getCompanyId());
sysLog.setCompanyName(getCompanyName());
sysLogService.save(sysLog);
//调用原方法逻辑
return pjp.proceed();
}
}
在web模块的resources/spring/spring-mvc.xml文件中加入下面配置:
<!--激活切面自动代理-->
<aop:aspectj-autoproxy/>


 1680
1680


 被折叠的 条评论
为什么被折叠?
被折叠的 条评论
为什么被折叠?
 到【灌水乐园】发言


