


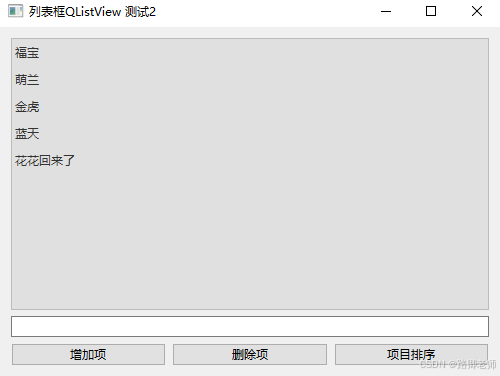
本文介绍如何实现列表增加删除和排序的功能,效果如下:
1 页面设计
1.1 列表
#列表数据
		self.list = ['福宝', '萌兰', '金虎','蓝天']
        # 创建四行一列标准数据模型
        self.mode=QStandardItemModel(4,1)
        # 将数据中的列表项作为标准数据模型输出
        for i in range(self.mode.rowCount()):
            item = QStandardItem(self.list[i])
            self.mode.setItem(i,0,item)
        self.mode.insertRow(4,QStandardItem("花花回来了"))
        self.listView =QListView()
self.listView.setModel(self.mode)- 1.
- 2.
- 3.
- 4.
- 5.
- 6.
- 7.
- 8.
- 9.
- 10.
- 11.
该模块引用了QStandardItemModel,创建四行一列的标准数据模型对象,因为我们定义的数据有四个大熊猫名字。然后通过循环遍历将里面的数据对象展示到列表视图上。
1.2 输入框和按钮
接下来是文本输入框和三个按钮的UI设计:
1.3 布局
#创建水平布局,并将所有元素放进去
		hLayout=QHBoxLayout()
        hLayout.setContentsMargins(0,0,0,0)
        hLayout.addWidget(self.addPb)
        hLayout.addWidget(self.delPb)
        hLayout.addWidget(self.sortPb)
        self.vLayout=QVBoxLayout(self)
        self.vLayout.addWidget(self.listView)
        self.vLayout.addWidget(self.le)
self.vLayout.addLayout(hLayout)- 1.
- 2.
- 3.
- 4.
- 5.
- 6.
- 7.
- 8.
- 9.
- 10.
为了使效果更好看,我们对列表添加了样式表,你可以在这里修改样式,使得列表更好看:
效果如下:
2 功能实现
功能实现很简单,就一个增删排序,配置三个函数:
增加的时候获取文本框里的文字内容,然后通过self.mode.appendRow追加行的方式放到数据model里就可以了。
删除,直接通过self.mode.removeRow删除行就可以了,不过这里设置的是删除最后行,您也可以自己指定删除哪一行。
3 完整代码
给大家列出完整的代码,包含测试的main方法。
# -*- coding:utf-8 -*-
"""
------------------------------------------------
File Name: 列表框2.py
Description:
Author: lzq
date:2024-07-27 15:13
------------------------------------------------
"""
import sys
import PyQt6
from PyQt6.QtCore import Qt, QStringListModel
from PyQt6.QtGui import QPainter, QPixmap, QStandardItemModel, QStandardItem
from PyQt6.QtWidgets import QWidget, QTextEdit, QPushButton, QVBoxLayout, QApplication, QRadioButton, QHBoxLayout, \
QLabel, QCheckBox, QListView, QMessageBox, QLineEdit
class MyWidget(QWidget):
def __init__(self, parent=None):
super(MyWidget, self).__init__(parent)
self.setWindowTitle("列表框QListView 测试2")
self.resize(500,350)
self.list = ['福宝', '萌兰', '金虎','蓝天']
# 创建四行一列标准数据模型
self.mode=QStandardItemModel(4,1)
# 将数据中的列表项作为标准数据模型输出
for i in range(self.mode.rowCount()):
item = QStandardItem(self.list[i])
self.mode.setItem(i,0,item)
self.mode.insertRow(4,QStandardItem("花花回来了"))
self.listView =QListView()
self.listView.setModel(self.mode)
self.le = QLineEdit()
self.addPb=QPushButton("增加项",clicked=self.addItem)
self.delPb=QPushButton("删除项",clicked=self.delItem)
self.sortPb=QPushButton("项目排序",clicked=self.sortItem)
hLayout=QHBoxLayout()
hLayout.setContentsMargins(0,0,0,0)
hLayout.addWidget(self.addPb)
hLayout.addWidget(self.delPb)
hLayout.addWidget(self.sortPb)
self.vLayout=QVBoxLayout(self)
self.vLayout.addWidget(self.listView)
self.vLayout.addWidget(self.le)
self.vLayout.addLayout(hLayout)
# 添加样式
        self.listView.setStyleSheet("""
                    QListView {
                        background-color: #E0E0E0;
                        color: #333333;
                        border: 1px solid #BBBBBB;
                    }
                    QListView::Item {
                        padding: 5px;
                    }
                    QListView::Item:hover {
                        background-color: #CCCCCC;
                        color:red;
                    }
                """)
def addItem(self):
num=self.mode.rowCount()
s =self.le.text()
if s!='':
self.mode.appendRow(QStandardItem(s))
def delItem(self):
num=self.mode.rowCount()
self.mode.removeRow(num-1)
def sortItem(self):
self.mode.sort(0)
if __name__=='__main__':
app = QApplication(sys.argv)
w = MyWidget()
w.show()
sys.exit(app.exec())- 1.
- 2.
- 3.
- 4.
- 5.
- 6.
- 7.
- 8.
- 9.
- 10.
- 11.
- 12.
- 13.
- 14.
- 15.
- 16.
- 17.
- 18.
- 19.
- 20.
- 21.
- 22.
- 23.
- 24.
- 25.
- 26.
- 27.
- 28.
- 29.
- 30.
- 31.
- 32.
- 33.
- 34.
- 35.
- 36.
- 37.
- 38.
- 39.
- 40.
- 41.
- 42.
- 43.
- 44.
- 45.
- 46.
- 47.
- 48.
- 49.
- 50.
- 51.
- 52.
- 53.
- 54.
- 55.
- 56.
- 57.
- 58.
- 59.
- 60.
- 61.
- 62.
- 63.
- 64.
- 65.
- 66.
- 67.
- 68.
- 69.
- 70.
- 71.
- 72.
- 73.
- 74.
- 75.
- 76.
- 77.
- 78.
- 79.
- 80.
- 81.
- 82.


 7871
7871

 被折叠的 条评论
为什么被折叠?
被折叠的 条评论
为什么被折叠?
 到【灌水乐园】发言


