


Spring如何解析@Transactional注解
我们先来看一个方法调用栈:
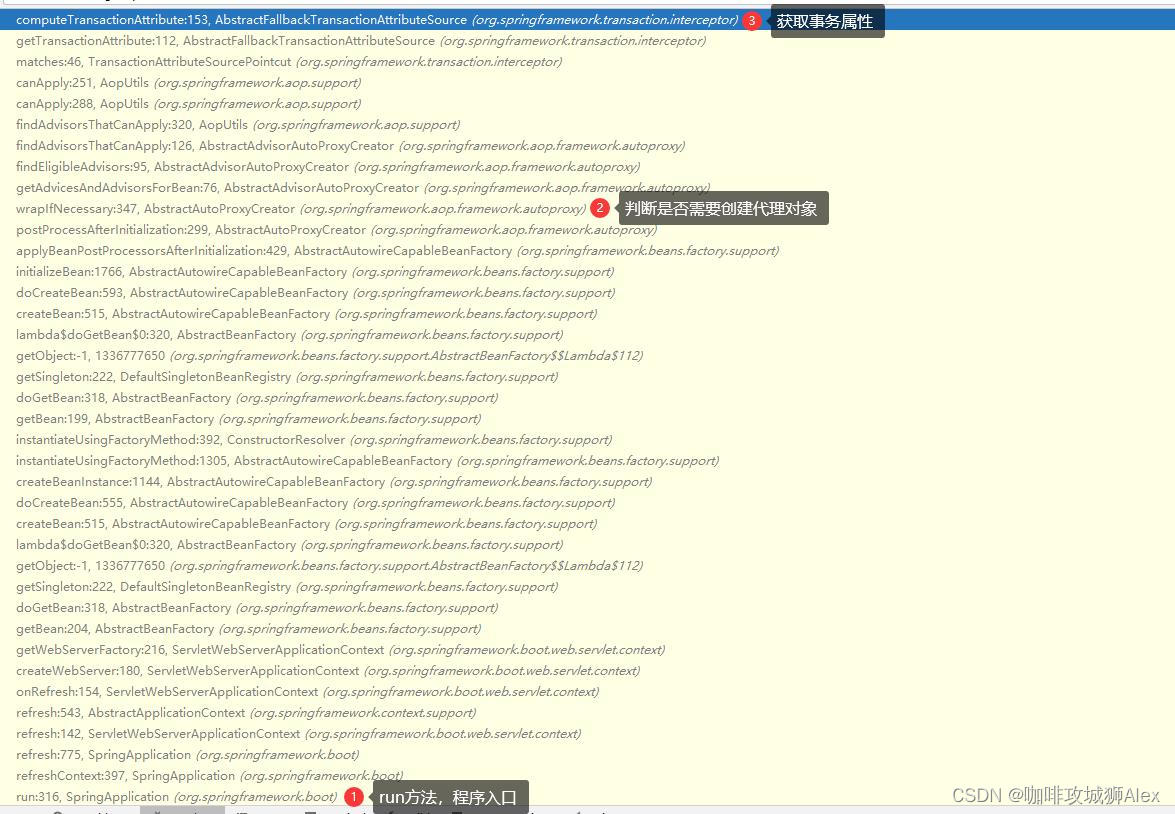
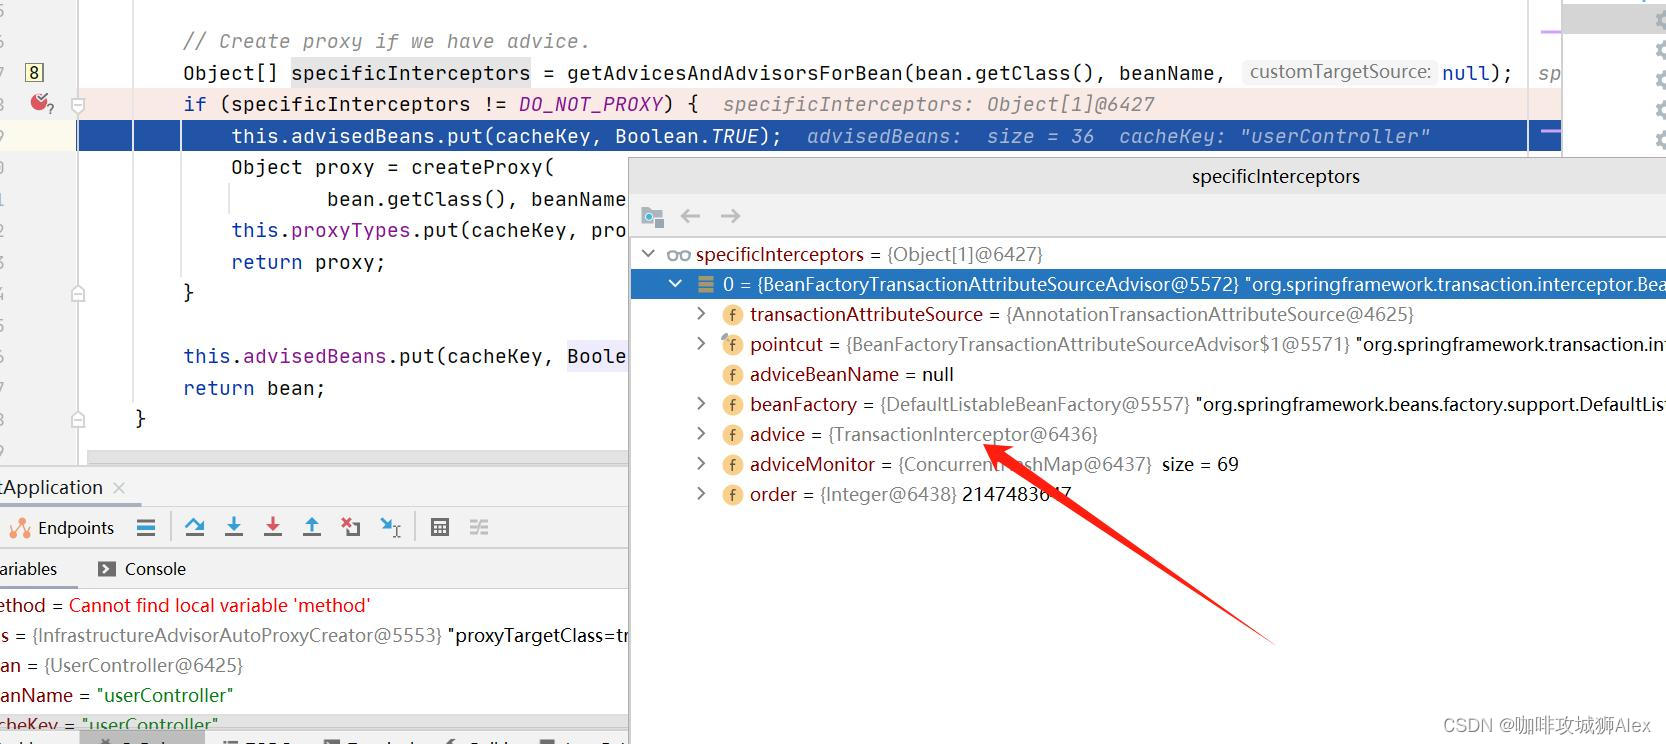
我们通过SpringApplication.run开始断点追踪,最终SpringBoot扫描bean时会走到org.springframework.aop.framework.autoproxy.AbstractAutoProxyCreator#wrapIfNecessary中,其内容如下:
protected Object wrapIfNecessary(Object bean, String beanName, Object cacheKey) {
		if (StringUtils.hasLength(beanName) && this.targetSourcedBeans.contains(beanName)) {
			return bean;
		}
		if (Boolean.FALSE.equals(this.advisedBeans.get(cacheKey))) {
			return bean;
		}
		if (isInfrastructureClass(bean.getClass()) || shouldSkip(bean.getClass(), beanName)) {
			this.advisedBeans.put(cacheKey, Boolean.FALSE);
			return bean;
		}

		// Create proxy if we have advice.
		Object[] specificInterceptors = getAdvicesAndAdvisorsForBean(bean.getClass(), beanName, null);
		if (specificInterceptors != DO_NOT_PROXY) {
			this.advisedBeans.put(cacheKey, Boolean.TRUE);
			Object proxy = createProxy(
					bean.getClass(), beanName, specificInterceptors, new SingletonTargetSource(bean));
			this.proxyTypes.put(cacheKey, proxy.getClass());
			return proxy;
		}

		this.advisedBeans.put(cacheKey, Boolean.FALSE);
		return bean;
	}
我们发现该方法是发现该对象存在通知(advice)就会为其创建代理对象,大家都知道Spring的声明式事务是通过动态代理实现的,那走到这里,说明我们的方向没有错,于是我们继续往下追踪,走到org.springframework.transaction.interceptor.AbstractFallbackTransactionAttributeSource#computeTransactionAttribute,名字简单明了,就是计算事务属性,其内容如下:
protected TransactionAttribute computeTransactionAttribute(Method method, @Nullable Class<?> targetClass) {
		// Don't allow no-public methods as required.
		if (allowPublicMethodsOnly() && !Modifier.isPublic(method.getModifiers())) {
			return null;
		}

		// The method may be on an interface, but we need attributes from the target class.
		// If the target class is null, the method will be unchanged.
		Method specificMethod = AopUtils.getMostSpecificMethod(method, targetClass);

		// First try is the method in the target class.
		TransactionAttribute txAttr = findTransactionAttribute(specificMethod);
		if (txAttr != null) {
			return txAttr;
		}

		// Second try is the transaction attribute on the target class.
		txAttr = findTransactionAttribute(specificMethod.getDeclaringClass());
		if (txAttr != null && ClassUtils.isUserLevelMethod(method)) {
			return txAttr;
		}

		if (specificMethod != method) {
			// Fallback is to look at the original method.
			txAttr = findTransactionAttribute(method);
			if (txAttr != null) {
				return txAttr;
			}
			// Last fallback is the class of the original method.
			txAttr = findTransactionAttribute(method.getDeclaringClass());
			if (txAttr != null && ClassUtils.isUserLevelMethod(method)) {
				return txAttr;
			}
		}

		return null;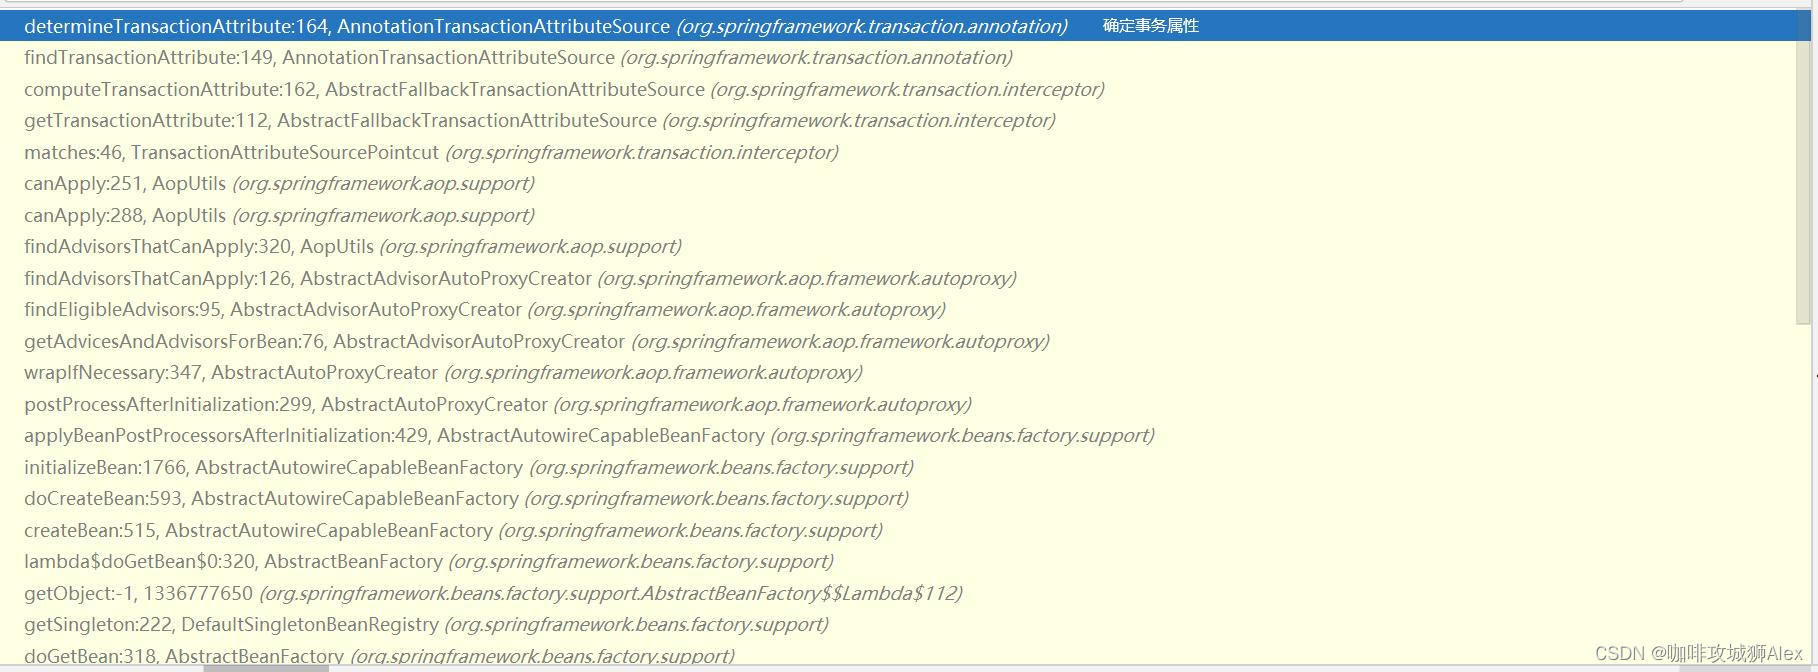
}注释写的很清楚,首先如果方法不是public直接过滤,然后首先从方法上尝试获取事务属性,再者尝试从目标类上获取事务属性,看到这里就算不看方法内部实现,也不难猜到,就是分别对应各位同学把@Transactional写在方法上,以及把@Transactional写在类上。
那到底是不是呢,我们继续往下看,我们把断点打到这个方法:org.springframework.transaction.annotation.AnnotationTransactionAttributeSource#determineTransactionAttribute(各位同学留意这个方法所在类)
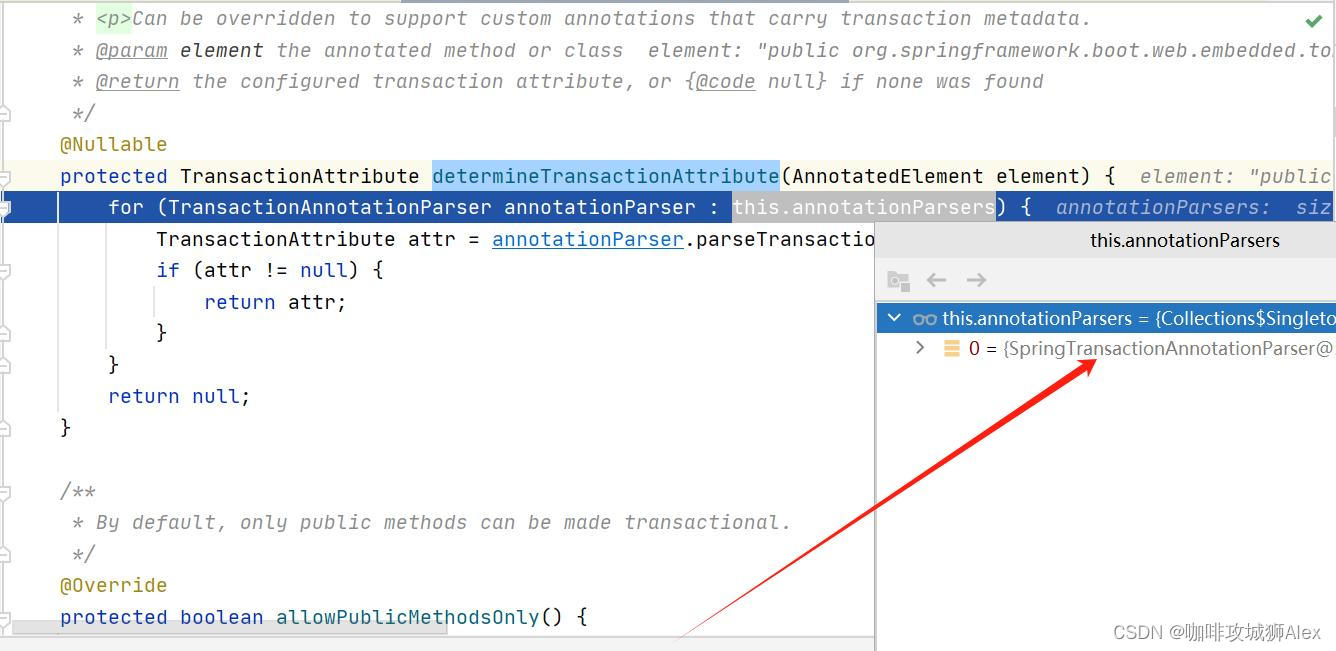
我们把this.annotationParsers展开,发现集合里面只有一个SpringTransactionAnnotationParser,于是我们进入到其方法内部:
@Override
	@Nullable
	public TransactionAttribute parseTransactionAnnotation(AnnotatedElement element) {
		AnnotationAttributes attributes = AnnotatedElementUtils.findMergedAnnotationAttributes(
				element, Transactional.class, false, false);
		if (attributes != null) {
			return parseTransactionAnnotation(attributes);
		}
		else {
			return null;
		}
}Transactional.class注解千呼万唤始出来,我们再进入parseTransactionAnnotation中,其实现为:
protected TransactionAttribute parseTransactionAnnotation(AnnotationAttributes attributes) {
		RuleBasedTransactionAttribute rbta = new RuleBasedTransactionAttribute();

		Propagation propagation = attributes.getEnum("propagation");
		rbta.setPropagationBehavior(propagation.value());
		Isolation isolation = attributes.getEnum("isolation");
		rbta.setIsolationLevel(isolation.value());
		rbta.setTimeout(attributes.getNumber("timeout").intValue());
		rbta.setReadOnly(attributes.getBoolean("readOnly"));
		rbta.setQualifier(attributes.getString("value"));

		List<RollbackRuleAttribute> rollbackRules = new ArrayList<>();
		for (Class<?> rbRule : attributes.getClassArray("rollbackFor")) {
			rollbackRules.add(new RollbackRuleAttribute(rbRule));
		}
		for (String rbRule : attributes.getStringArray("rollbackForClassName")) {
			rollbackRules.add(new RollbackRuleAttribute(rbRule));
		}
		for (Class<?> rbRule : attributes.getClassArray("noRollbackFor")) {
			rollbackRules.add(new NoRollbackRuleAttribute(rbRule));
		}
		for (String rbRule : attributes.getStringArray("noRollbackForClassName")) {
			rollbackRules.add(new NoRollbackRuleAttribute(rbRule));
		}
		rbta.setRollbackRules(rollbackRules);

		return rbta;
	}
这不就是我们配置@Transactional注解里面的属性吗。Spring开始解析咱们配置的参数。
小结一下:Spring工厂在注册bean时,会去判断是否要为该bean创建事务代理,判断的方式是该类或者类中方法是否存在@Transactional注解,如果有,则解析事务属性,并穿创建代理对象。
这里补充一个小知识点,刚才我们说的SpringTransactionAnnotationParser又是怎么来的呢?
我们先看下这张图

我们进入到TransactionAutoConfiguration内部,这里需要提一嘴的是,这里是SpringBoot提供的SPI机制拓展点,即各位同学只要在自己包的META-INF目录下,定义spring.factories文件,注意该文件名是固定的,然后在文件里面写上org.springframework.boot.autoconfigure.EnableAutoConfiguration=\你需要注入的对象全例名,SpringBoot就会将你的对象注入到Spring容器当中,详细的大家参考SpringBoot自定义Starter写法。这里不过多赘述。
按照上面的知识点,也就是SpringBoot会将TransactionAutoConfiguration注入到Spring容器当中,那我们看下其实现:
@Configuration
@ConditionalOnClass(PlatformTransactionManager.class)
@AutoConfigureAfter({ JtaAutoConfiguration.class, HibernateJpaAutoConfiguration.class,
		DataSourceTransactionManagerAutoConfiguration.class,
		Neo4jDataAutoConfiguration.class })
@EnableConfigurationProperties(TransactionProperties.class)
public class TransactionAutoConfiguration {

	@Bean
	@ConditionalOnMissingBean
	public TransactionManagerCustomizers platformTransactionManagerCustomizers(
			ObjectProvider<PlatformTransactionManagerCustomizer<?>> customizers) {
		return new TransactionManagerCustomizers(
				customizers.orderedStream().collect(Collectors.toList()));
	}

	@Configuration
	@ConditionalOnSingleCandidate(PlatformTransactionManager.class)
	public static class TransactionTemplateConfiguration {

		private final PlatformTransactionManager transactionManager;

		public TransactionTemplateConfiguration(
				PlatformTransactionManager transactionManager) {
			this.transactionManager = transactionManager;
		}

		@Bean
		@ConditionalOnMissingBean
		public TransactionTemplate transactionTemplate() {
			return new TransactionTemplate(this.transactionManager);
		}

	}

	@Configuration
	@ConditionalOnBean(PlatformTransactionManager.class)
	@ConditionalOnMissingBean(AbstractTransactionManagementConfiguration.class)
	public static class EnableTransactionManagementConfiguration {

		@Configuration
		@EnableTransactionManagement(proxyTargetClass = false)
		@ConditionalOnProperty(prefix = "spring.aop", name = "proxy-target-class", havingValue = "false", matchIfMissing = false)
		public static class JdkDynamicAutoProxyConfiguration {

		}

		@Configuration
		@EnableTransactionManagement(proxyTargetClass = true)
		@ConditionalOnProperty(prefix = "spring.aop", name = "proxy-target-class", havingValue = "true", matchIfMissing = true)
		public static class CglibAutoProxyConfiguration {

		}

	}

}
这里我们重点关注org.springframework.boot.autoconfigure.transaction.TransactionAutoConfiguration.EnableTransactionManagementConfiguration这个对象,其中有一个非常重要的注解@EnableTransactionManagement,很明显,这个注解是开启事务管理。
这里我们也可以看到Spring的动态代理是支持两种,一种是jdk动态代理,另一种是cglib动态代理。默认是使用cglib动态代理,我们可以通过spring.aop.proxy-target-class来指定使用哪种动态代理。
说回@EnableTransactionManagement,我们进入其内部:
@Target(ElementType.TYPE)
@Retention(RetentionPolicy.RUNTIME)
@Documented
@Import(TransactionManagementConfigurationSelector.class)
public @interface EnableTransactionManagement {

	/**
	 * Indicate whether subclass-based (CGLIB) proxies are to be created ({@code true}) as
	 * opposed to standard Java interface-based proxies ({@code false}). The default is
	 * {@code false}. <strong>Applicable only if {@link #mode()} is set to
	 * {@link AdviceMode#PROXY}</strong>.
	 * <p>Note that setting this attribute to {@code true} will affect <em>all</em>
	 * Spring-managed beans requiring proxying, not just those marked with
	 * {@code @Transactional}. For example, other beans marked with Spring's
	 * {@code @Async} annotation will be upgraded to subclass proxying at the same
	 * time. This approach has no negative impact in practice unless one is explicitly
	 * expecting one type of proxy vs another, e.g. in tests.
	 */
	boolean proxyTargetClass() default false;

	/**
	 * Indicate how transactional advice should be applied.
	 * <p><b>The default is {@link AdviceMode#PROXY}.</b>
	 * Please note that proxy mode allows for interception of calls through the proxy
	 * only. Local calls within the same class cannot get intercepted that way; an
	 * {@link Transactional} annotation on such a method within a local call will be
	 * ignored since Spring's interceptor does not even kick in for such a runtime
	 * scenario. For a more advanced mode of interception, consider switching this to
	 * {@link AdviceMode#ASPECTJ}.
	 */
	AdviceMode mode() default AdviceMode.PROXY;

	/**
	 * Indicate the ordering of the execution of the transaction advisor
	 * when multiple advices are applied at a specific joinpoint.
	 * <p>The default is {@link Ordered#LOWEST_PRECEDENCE}.
	 */
	int order() default Ordered.LOWEST_PRECEDENCE;

}
我们发现其使用了@Import注解,熟悉Spring的都知道这个注解会将指定的类,以及其selectImports方法返回的对象全部注入到Spring容器当中,其selectImports方法如下:
@Override
	protected String[] selectImports(AdviceMode adviceMode) {
		switch (adviceMode) {
			case PROXY:
				return new String[] {AutoProxyRegistrar.class.getName(),
						ProxyTransactionManagementConfiguration.class.getName()};
			case ASPECTJ:
				return new String[] {determineTransactionAspectClass()};
			default:
				return null;
		}
	}
我们关注到其将ProxyTransactionManagementConfiguration这个对象注入到了Spring容器当中,我们进入其内部:
@Configuration
public class ProxyTransactionManagementConfiguration extends AbstractTransactionManagementConfiguration {

	@Bean(name = TransactionManagementConfigUtils.TRANSACTION_ADVISOR_BEAN_NAME)
	@Role(BeanDefinition.ROLE_INFRASTRUCTURE)
	public BeanFactoryTransactionAttributeSourceAdvisor transactionAdvisor() {
		BeanFactoryTransactionAttributeSourceAdvisor advisor = new BeanFactoryTransactionAttributeSourceAdvisor();
		advisor.setTransactionAttributeSource(transactionAttributeSource());
		advisor.setAdvice(transactionInterceptor());
		if (this.enableTx != null) {
			advisor.setOrder(this.enableTx.<Integer>getNumber("order"));
		}
		return advisor;
	}

	@Bean
	@Role(BeanDefinition.ROLE_INFRASTRUCTURE)
	public TransactionAttributeSource transactionAttributeSource() {
		return new AnnotationTransactionAttributeSource();
	}

	@Bean
	@Role(BeanDefinition.ROLE_INFRASTRUCTURE)
	public TransactionInterceptor transactionInterceptor() {
		TransactionInterceptor interceptor = new TransactionInterceptor();
		interceptor.setTransactionAttributeSource(transactionAttributeSource());
		if (this.txManager != null) {
			interceptor.setTransactionManager(this.txManager);
		}
		return interceptor;
	}

}
我们关注AnnotationTransactionAttributeSource这个bean对象,因为咱们刚才这个方法determineTransactionAttribute就是在这个类中,我们点入这个类的构造方法:
public AnnotationTransactionAttributeSource(boolean publicMethodsOnly) {
		this.publicMethodsOnly = publicMethodsOnly;
		if (jta12Present || ejb3Present) {
			this.annotationParsers = new LinkedHashSet<>(4);
			this.annotationParsers.add(new SpringTransactionAnnotationParser());
			if (jta12Present) {
				this.annotationParsers.add(new JtaTransactionAnnotationParser());
			}
			if (ejb3Present) {
				this.annotationParsers.add(new Ejb3TransactionAnnotationParser());
			}
		}
		else {
			this.annotationParsers = Collections.singleton(new SpringTransactionAnnotationParser());
		}
	}
我们会发现其将publicMethodsOnly设置为true,然后将SpringTransactionAnnotationParser添加到this.annotationParsers。
至此,相信各位同学已经知道Spring是在什么时刻开始解析@Transactional,并且是如何将解析@Transactional的对象注入到Spring容器中的全过程了。
Spring如何使用@Transactional
既然已经知道Spring是通过动态代理为对象添加事务功能的,那我们回到org.springframework.aop.framework.autoproxy.AbstractAutoProxyCreator#wrapIfNecessary,我们添加条件断点,让断点在当该当前bean存在@Transactional注解是停下:

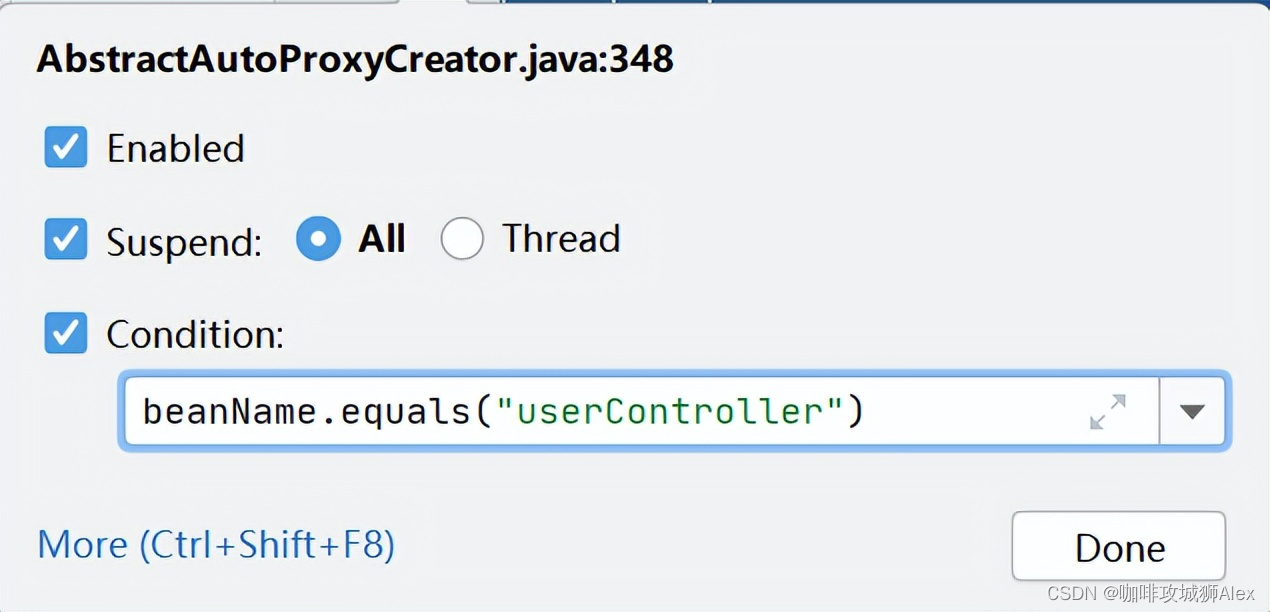
我们发现Spring在创建代理对象时给加上了一个TransactionInterceptor拦截器,我们进入到org.springframework.aop.framework.autoproxy.AbstractAutoProxyCreator#createProxy内部
protected Object createProxy(Class<?> beanClass, @Nullable String beanName,
			@Nullable Object[] specificInterceptors, TargetSource targetSource) {

		if (this.beanFactory instanceof ConfigurableListableBeanFactory) {
			AutoProxyUtils.exposeTargetClass((ConfigurableListableBeanFactory) this.beanFactory, beanName, beanClass);
		}

		ProxyFactory proxyFactory = new ProxyFactory();
		proxyFactory.copyFrom(this);

		if (!proxyFactory.isProxyTargetClass()) {
			if (shouldProxyTargetClass(beanClass, beanName)) {
				proxyFactory.setProxyTargetClass(true);
			}
			else {
				evaluateProxyInterfaces(beanClass, proxyFactory);
			}
		}

		Advisor[] advisors = buildAdvisors(beanName, specificInterceptors);
		proxyFactory.addAdvisors(advisors);
		proxyFactory.setTargetSource(targetSource);
		customizeProxyFactory(proxyFactory);

		proxyFactory.setFrozen(this.freezeProxy);
		if (advisorsPreFiltered()) {
			proxyFactory.setPreFiltered(true);
		}

		return proxyFactory.getProxy(getProxyClassLoader());
	}
发现specificInterceptors最终被转换成advisors了,熟悉Spring中advisor的同学应该都知道,这个就是要为当前对象代理增强的逻辑。然后我们看下TransactionInterceptor的类图:
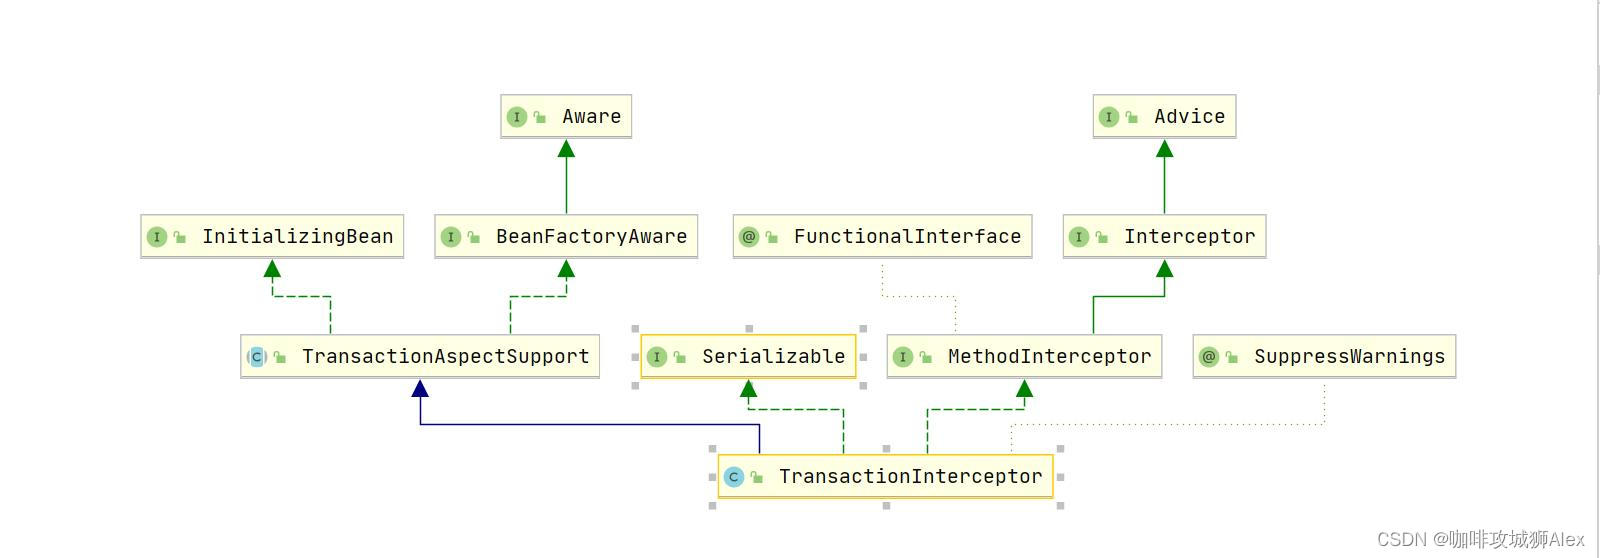
我们发现其实现了MethodInterceptor接口,不难想到最终的增强逻辑应该在invoke方法中,我们打开TransactionInterceptor的invoke方法:
@Override
	@Nullable
	public Object invoke(MethodInvocation invocation) throws Throwable {
		// Work out the target class: may be {@code null}.
		// The TransactionAttributeSource should be passed the target class
		// as well as the method, which may be from an interface.
		Class<?> targetClass = (invocation.getThis() != null ? AopUtils.getTargetClass(invocation.getThis()) : null);

		// Adapt to TransactionAspectSupport's invokeWithinTransaction...
		return invokeWithinTransaction(invocation.getMethod(), targetClass, invocation::proceed);
}看到invokeWithinTransaction是不是豁然开朗了,以事务方式调用,我们进入该方法:
@Nullable
	protected Object invokeWithinTransaction(Method method, @Nullable Class<?> targetClass,
			final InvocationCallback invocation) throws Throwable {

		// If the transaction attribute is null, the method is non-transactional.
		TransactionAttributeSource tas = getTransactionAttributeSource();
		final TransactionAttribute txAttr = (tas != null ? tas.getTransactionAttribute(method, targetClass) : null);
		final PlatformTransactionManager tm = determineTransactionManager(txAttr);
		final String joinpointIdentification = methodIdentification(method, targetClass, txAttr);

		if (txAttr == null || !(tm instanceof CallbackPreferringPlatformTransactionManager)) {
			// Standard transaction demarcation with getTransaction and commit/rollback calls.
			TransactionInfo txInfo = createTransactionIfNecessary(tm, txAttr, joinpointIdentification);
			Object retVal = null;
			try {
				// This is an around advice: Invoke the next interceptor in the chain.
				// This will normally result in a target object being invoked.
				retVal = invocation.proceedWithInvocation();
			}
			catch (Throwable ex) {
				// target invocation exception
				completeTransactionAfterThrowing(txInfo, ex);
				throw ex;
			}
			finally {
				cleanupTransactionInfo(txInfo);
			}
			commitTransactionAfterReturning(txInfo);
			return retVal;
		}

		else {
			final ThrowableHolder throwableHolder = new ThrowableHolder();

			// It's a CallbackPreferringPlatformTransactionManager: pass a TransactionCallback in.
			try {
				Object result = ((CallbackPreferringPlatformTransactionManager) tm).execute(txAttr, status -> {
					TransactionInfo txInfo = prepareTransactionInfo(tm, txAttr, joinpointIdentification, status);
					try {
						return invocation.proceedWithInvocation();
					}
					catch (Throwable ex) {
						if (txAttr.rollbackOn(ex)) {
							// A RuntimeException: will lead to a rollback.
							if (ex instanceof RuntimeException) {
								throw (RuntimeException) ex;
							}
							else {
								throw new ThrowableHolderException(ex);
							}
						}
						else {
							// A normal return value: will lead to a commit.
							throwableHolder.throwable = ex;
							return null;
						}
					}
					finally {
						cleanupTransactionInfo(txInfo);
					}
				});

				// Check result state: It might indicate a Throwable to rethrow.
				if (throwableHolder.throwable != null) {
					throw throwableHolder.throwable;
				}
				return result;
			}
			catch (ThrowableHolderException ex) {
				throw ex.getCause();
			}
			catch (TransactionSystemException ex2) {
				if (throwableHolder.throwable != null) {
					logger.error("Application exception overridden by commit exception", throwableHolder.throwable);
					ex2.initApplicationException(throwableHolder.throwable);
				}
				throw ex2;
			}
			catch (Throwable ex2) {
				if (throwableHolder.throwable != null) {
					logger.error("Application exception overridden by commit exception", throwableHolder.throwable);
				}
				throw ex2;
			}
		}
	}
我们看到整个事务执行的全过程,创建事务 -> 执行目标方法 -> 提交事务/异常回滚事务。
至此各位同学应该已经知道我们添加的@Transactional是如何被Spring解析,以及如何生效的全过程啦。
事务为什么失效了
既然已经知道了声明式事务实现的原理,那对于事务失效的场景,我们逐一分析就简单很多了。
- 非public方法事务失效
根据源码,我们发现Spring判断当前方法如果非public方法,则直接过滤。
- 标注了@Transactional,但方法被final或static修饰
根据源码,Spring默认使用cglib创建代理对象,而cglib创建代理对象的原理是继承目标对象并重写目标方法,所以如果目标方法是被final或static修饰的,那将导致无法重写,从而导致事务失效。
- 多线程使用事务
根据invokeWithinTransaction中所示,事务是基于ThreadLocal的(这里代码不再展开,有兴趣的同学自行查看,这块代码相对比较简单),也就是线程隔离的,所以多线程环境下事务失效。
- 通过this调用事务方法,事务失效
这个很容易理解,没有经过Spring管理,也就是没有调用代理对象,直接调用了原生被@Transactional注解的方法,并不是代理对象的事务方法。
- 未指定rollbackFor,但抛出了非RuntimeException并且非Error,事务失效
这个在invokeWithinTransaction方法中也能看到,默认回滚RuntimeException与Error,若未指定rollbackFor,当抛出FileNotFoundException这种非RuntimeException时,事务失效。
- 数据库引擎本身不支持事务
例如咱们的MySQL数据库,支持多种数据引擎,其中InnoDB支持事务,但是MyISAM则本身不支持事务,如果有同学的公司使用这种数据库引擎,那就不要说Spring是不是出bug啦。如果各位同学觉得对你有所帮助,请关注、点赞、评论、收藏来支持我,手头宽裕的话也可以赞赏来表达各位的认可,各位同学的支持是对我最大的鼓励。未来为大家带来更好的创作。
分享一句非常喜欢的话:把根牢牢扎深,再等春风一来,便会春暖花开。
版权声明:以上引用信息以及图片均来自网络公开信息,如有侵权,请留言或联系
504401503@qq.com,立马删除。


 1565
1565


 被折叠的 条评论
为什么被折叠?
被折叠的 条评论
为什么被折叠?
 到【灌水乐园】发言


