


文章目录
requests+pytest+allure接口测试框架搭建
一、创建项目
- case:接口测试用例
- common:公共方法
- config:配置相关
- report:测试报告
1.创建配置文件
将测试环境、url及登录账户等信息维护在此

2.common文件夹下
维护一些公用方法,例如读取配置文件、获取环境cookie等
读取配置如下
import os
import configparser

class readConfig():
    def __init__(self, locator):
        self.locator = locator
        # 获取文件当前位置(此处避免出错,获取文件绝对位置)
        cur_path = os.path.dirname(os.path.abspath(__file__))
        # 拼接配置文件路径
        config_path = os.path.join(cur_path, "..\\config\\", self.locator)
        # 引用configparser类
        self.conf = configparser.ConfigParser()
        # 读取配置文件
        self.conf.read(config_path, encoding='utf-8')

    # 读取测试环境
    def read_test_evn(self, emo):
        test_evn = self.conf.get('TEST_EVN', emo)
        return test_evn

    # 读取测试账户
    def read_test_usr(self, msg):
        test_usr = self.conf.get('TEST_USER', msg)
        return test_usr

    def read_test_module(self):
        test_module = self.conf.get("TEST_MODULE", "registration")
        return test_module
获取cookie
import requests
from readConfig import readConfig

def get_cookie():
    # 调用读取文件类
    rc = readConfig('conf.ini')
    # 读取环境ip及端口
    ip_port = rc.read_test_evn('ip_port')
    # 读取登录path
    login_url = rc.read_test_evn('login_url')
    # 读取登录账户信息
    userid = rc.read_test_usr('usr')
    pwd = rc.read_test_usr('pwd')
    r = requests.post(ip_port + login_url, data={"username": userid, "password": pwd}, verify=False, allow_redirects=False)
    cookies = r.cookies.get_dict()
    # 将获取的cookie重新拼装
    cookies = "SESSION=" + cookies['SESSION']
    return cookies
3.case文件夹下
存放我们需要测试的用例,举例测试一个查询接口:
import os
import sys
import time
import allure
import pytest
import requests
from pytest import assume

sys.path.append((os.path.abspath(os.path.join(os.path.dirname(__file__), '../common'))))
from readConfig import readConfig
from get_cookie import get_cookie

# 读取配置文件
rc = readConfig('conf.ini')
ip_port = rc.read_test_evn('ip_port')
select_url = rc.read_test_evn('select')
module_id = rc.read_test_module()
# 参数化
userdata1 = ["测试", "多多"]
# 获取cookie
cookies = get_cookie()

@pytest.mark.parametrize("username", userdata1)
def test_01(username):
    """
    @function:测试查询接口
    @param username:搜素姓名
    """
    h = {
        "Content-Type": "application/x-www-form-urlencoded; charset=UTF-8",
        "Cookie": cookies
    }
    print(h)
    r = requests.post(ip_port+select_url, data={"patientname": username, "_modulePartId_": module_id}, headers=h, verify=False).json()
    code = r["code"]
    print(r)
    with assume: assert (code == 200)


if __name__ == "__main__":
    pytest.main(["-s", "-v", "test_select.py"])
二、pytest输出HTML报告
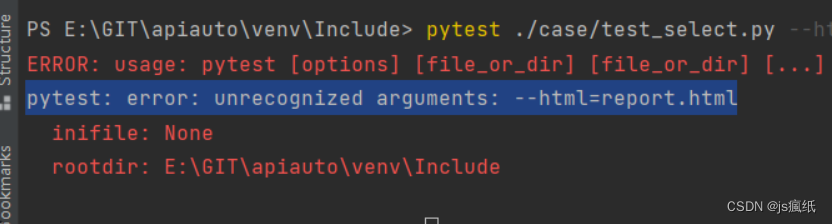
命令:pytest ./case/test_select.py --html=report/report.html
指定运行test_select.py中的所有用例,report.html生成在report路径下,拖拽到浏览器中即可打开。
PS:如果出现下面的报错,安装pytest-html(pip install pytest-html)
三、将allure报告输出到report目录中
pytest是可以直接扫描符合条件的testcase的,因此不用像unittest框架那样在根目录下建一个main.py来运行,直接使用命令行工具即可运行。
1、这里使用了allure报告,需要先安装allure工具:
pip install allure-pytest==2.8.6 --index-url https://pypi.douban.com/simple
安装完成之后,打开一个你之前写的pytest脚本,看能不正常使用,如果报错:AttributeError: module ‘allure’ has no attribute ‘severity_level’,这个是之前 pytest-allure-adaptor 这个插件与 allure-pytest 不能共存,卸载掉 pytest-allure-adaptor。
2、然后去github上下载allure插件
https://repo.maven.apache.org/maven2/io/qameta/allure/allure-commandline/
下载完成后解压到本地,将bin的路径添加到环境变量中。
3、随后在项目根目录下打开cmd窗口启用
输入:
pytest --alluredir ./report/allure_raw
4、生成html报表并在浏览器中打开
执行完成后,在当前目录下,report目录会生成一个allure_raw的原始文件,这个只是测试报告的原始文件,不能打开成html的报搞,再命令行启动一下即可:
allure serve report/allure_raw


 5852
5852


 被折叠的 条评论
为什么被折叠?
被折叠的 条评论
为什么被折叠?
 到【灌水乐园】发言


