


本章主要讲解的是QN9021在使用过程中经常使用到的延时函数,由于咱们这颗蓝牙SoC没有SystemTick这个功能,所以就不能使用系统节拍来作为准确的延时工具,这里我推荐的是使用定时器时钟来作为基本的延时函数,实测较为精准。
基本的延时函数定义如下:
/**
 ****************************************************************************************
 * @brief Start the timer delay in micro seconds, until elapsed
 *
 * @param[in]    TIMER          QN_TIMER0,1,2,3
 * @param[in]    pscal          timer prescaler value
 * @param[in]    count          counter value
 * @description
 *  This function is used to set a precise delay. HOW TO SET? e.g:
 *  - if TIMER_CLK = 8000000(8MHz), PSCL_DIV = 7, then
 *  - PSCL_CLK = (TIMER_CLK) / (PSCL_DIV + 1) = 1000000Hz(1MHz), so
 *  - delayInUs range: 1us - 4294967295 us  (32bit)
 *  - delayInUs range: 1us - 65535 us       (16bit)
 *
 *  timer_delay(QN_TIMER0, 7, TIMER_COUNT_US(100, 7)); // timer delay 100us
 *
 ****************************************************************************************
 */
void timer_delay(QN_TIMER_TypeDef *TIMER, uint32_t pscal, uint32_t count)
{
    uint32_t reg;

    // set the timer top count value
    timer_timer_SetTOPR(TIMER, count);

    reg = CLK_PSCL                              /* set clock source to prescaler clock */
        | (pscal << TIMER_POS_PSCL)             /* set prescaler value */
        | FREE_RUNNING_MOD;                     /* select free running mode */
    timer_timer_SetCR(TIMER, reg);              /* must disable timer first */

    timer_timer_SetCRWithMask(TIMER, TIMER_MASK_TEN, MASK_ENABLE);
    /* wait until delay time has elapsed */
    while (!(timer_timer_GetIntFlag(TIMER) & TIMER_MASK_TOVF));

    // disable timer
    timer_timer_SetCRWithMask(TIMER, TIMER_MASK_TEN, MASK_DISABLE);
    /* clear interrupt flag */
    timer_timer_ClrIntFlag(TIMER, TIMER_MASK_TOVF);
}
例如我这里需要延时1s,则我可以调用如下函数接口,传入相关参数便可实现:
timer_delay(QN_TIMER0, 7, TIMER_COUNT_MS(1000, 7)); //延时1s从此函数可以看出使用的是定时器TIMER0来作为延时函数的时钟基准;预分频系数为(7),实际会在此基础上+1,变为8分频;TIMER_COUNT_MS(1000,7)有两个参数,1000代表延时1000ms,(7)则和前面预分频系数对应,这样就可以实现毫秒级延时了,当然 系统还提供了微秒和秒级别的延时函数
/// Set timer counter top value  (TOPR = delayInS * (PSCL_CLK))
#define TIMER_COUNT_S(s, pscl_div)      ((s) * PSCL_CLK(TIMER_DIV, pscl_div))
/// Set timer counter top value  (TOPR = delayInMs * (PSCL_CLK / 1000))
#define TIMER_COUNT_MS(ms, pscl_div)    ((ms) * (PSCL_CLK(TIMER_DIV, pscl_div) / 1000))
/// Set timer counter top value  (TOPR = delayInUs * (PSCL_CLK / 1000000))
#define TIMER_COUNT_US(us, pscl_div)    ((us) * (PSCL_CLK(TIMER_DIV, pscl_div) / 1000000))
只需要对应修改这个参数就可以轻松实现想要的延时效果了~
PS:当然 在使用该延时函数时,可别忘了 初始化TIMER0这个定时器,对应的源码如下:
#include "uart.h"
#include "timer.h"
#include "system.h"
#include "stdio.h"

int fputc(int ch, FILE *f)
{
    UartPutc((uint8_t) *&ch);
    return ch;
}

//extern void Uart_Process(void);
/**
 * @brief Uart example
 */
int main (void)
{
    SystemInit();
	timer_init(QN_TIMER0,NULL);
    uart_init(QN_UART0, __USART_CLK, UART_115200);//初始化串口0

    uart_tx_enable(QN_UART0, MASK_ENABLE);
    uart_rx_enable(QN_UART0, MASK_ENABLE);

    uart_printf(QN_UART0, (uint8_t *)"Hello NXP!\r\n");
    while (1)                                /* Loop forever */
    {
			printf("Hello NXP QN9021!ing......\r\n");
			timer_delay(QN_TIMER0, 7, TIMER_COUNT_MS(1000, 7)); //延时1s
    }
}
下面我介绍一种在单片机中经常使用到的时间片轮询方法,是基于定时器中断实现的,代码如下:
#include "timer.h"
#include "system.h"
#include "uart.h"

#define TIMER_SPACE 1 //定时间隔
typedef unsigned char 	u8;
typedef unsigned short 	u16;

DEVICE_CONTEXT  g_Context;

//时间片参数
u8 Time_1ms_flag = 0;
u8 Time_10ms_flag = 0;
u8 Time_20ms_flag = 0;
u8 Time_100ms_flag = 0;
u8 Time_500ms_flag = 0;
u8 Time_1s_flag = 0;

int fputc(int ch, FILE *f)
{
    UartPutc((uint8_t) *&ch);
    return ch;
}

void timer0_callback(void)
{
		static u16 count = 0;				//时间计数
		count++;

		if((count % 1) == 0)//1ms
		{
				Time_1ms_flag = 1;
		}
		if((count % 10) == 0)//10ms
		{
				Time_10ms_flag = 1;
		}
		if((count % 20) == 0)//20ms
		{
				Time_20ms_flag = 1;
		}
		if(count % 100 == 0) //100ms
		{
				Time_100ms_flag = 1;
		}
		if(count % 500 == 0) //500ms
		{
				Time_500ms_flag = 1;
		}
		if(count % 1000 == 0) //1s
		{
				Time_1s_flag = 1;
				count = 0;
		}
}

int main (void)
{
    SystemInit();

		timer_init(QN_TIMER0, timer0_callback);
		timer_config(QN_TIMER0, TIMER_PSCAL_DIV, TIMER_COUNT_MS(TIMER_SPACE, TIMER_PSCAL_DIV));
    timer_enable(QN_TIMER0, MASK_ENABLE);

		uart_init(QN_UART0, __USART_CLK, UART_115200);//初始化串口0
		uart_tx_enable(QN_UART0, MASK_ENABLE);

    uart_printf(QN_UART0, (uint8_t *)"Hello NXP Timer!\r\n");
		printf("Hello NXP QN9021!\r\n");

    while (1)                                /* Loop forever */
    {
				if(Time_1ms_flag)
				{
						Time_1ms_flag = 0;
				}
				if(Time_10ms_flag)
				{
						Time_10ms_flag = 0;
				}
				if(Time_20ms_flag)
				{
						Time_20ms_flag = 0;
				}
				if(Time_100ms_flag)
				{
						Time_100ms_flag = 0;
				}
				if(Time_500ms_flag)
				{
						Time_500ms_flag = 0;
				}
				if(Time_1s_flag)
				{
						Time_1s_flag = 0;
						printf("Hello NXP QN9021!Timer ing......\r\n");
				}
    }
}
打印如下:
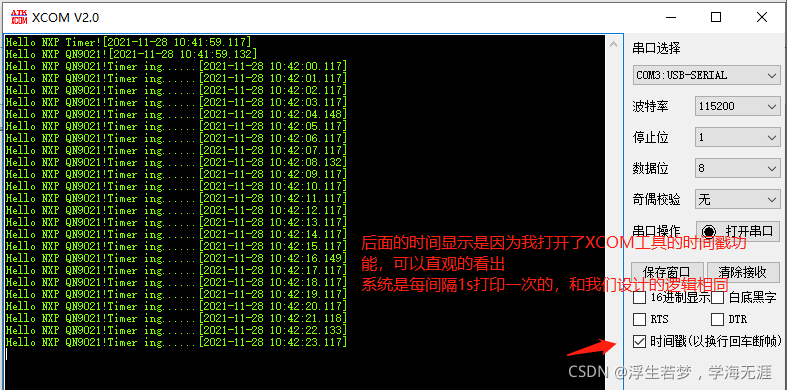
但是我这里发现一个问题 1s的延时时间中间可能会有些许误差,可能和串口传输以及自身的定时误差有关~
在没有很多的单片机内存资源时,我们往往会使用以上的方式进行程序设计,但是在系统资源足够的前提下,FreeRTOS、UCOSII/III、RT-Thread等实时操作系统肯定是更具有优势和价值的!
以上就是本篇文章的全部内容了,有疑问的小伙伴欢迎留言.
如有错误,也欢迎指正
感谢观看!下期再见.


 1241
1241


 被折叠的 条评论
为什么被折叠?
被折叠的 条评论
为什么被折叠?
 到【灌水乐园】发言


