


Servlet+JDBC应用
- 在Servlet中可以使用JDBC技术访问数据库,常见功能如下:
- 查询DB数据,然后生成显示页面,例如:列表显示功能。
- 接收请求参数,然后对DB操作,例如:注册、登录、修改密码等功能。
- 为了方便重用和便于维护等目的,经常会采用DAO(Data Access Object)模式对数据库操作进行独立封装。
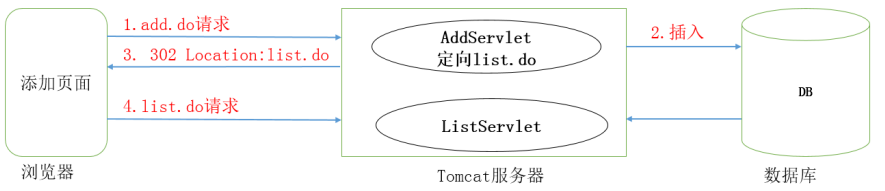
- 请求流程:

– DAO层
public class UserDao {

    public int createUser(User user) {
        Connection con = null;
        PreparedStatement ps = null;
        int row = 0;
        try {
            //获取连接
            con = DBUtbil.getConnection();
            //准备sql
            String sql = "insert into t_user values(null,?,?)";
            //获取PrepareStatement 类型的引用
            ps = con.prepareStatement(sql);
            //向问号所占的位置设置数据
            ps.setString(1, user.getUserName());
            ps.setString(2, user.getPassword());
            //执行sql语句
            row = ps.executeUpdate();
            return row;
        } catch (SQLException e) {
            e.printStackTrace();
        } finally {
            try {
                //关闭连接
                DBUtbil.closeConnection(con, ps);
            } catch (SQLException e) {
                e.printStackTrace();
            }
        }
        return row;//返回0为失败
    }
}
– model User实体类
public class User {
    private int id;
    private String userName;
    private String password;

    public User() {
    }

    public User(String userName, String password) {
        this.userName = userName;
        this.password = password;
    }

    public int getId() {
        return id;
    }

    public void setId(int id) {
        this.id = id;
    }

    public String getUserName() {
        return userName;
    }

    public void setUserName(String userName) {
        this.userName = userName;
    }

    public String getPassword() {
        return password;
    }

    public void setPassword(String password) {
        this.password = password;
    }

    @Override
    public boolean equals(Object o) {
        if (this == o) return true;
        if (o == null || getClass() != o.getClass()) return false;
        User user = (User) o;
        return id == user.id &&
                Objects.equals(userName, user.userName) &&
                Objects.equals(password, user.password);
    }

    @Override
    public int hashCode() {
        return Objects.hash(id, userName, password);
    }

    @Override
    public String toString() {
        return "User{" +
                "userName='" + userName + '\'' +
                ", password='" + password + '\'' +
                '}';
    }
}
– servlet层
public class RegisterServlet extends HttpServlet {
    protected void doPost(HttpServletRequest request, HttpServletResponse response) throws ServletException, IOException {
        //1.获取请求对象中保存的用户名和密码信息
        String userName = request.getParameter("userName");
        System.out.println("获取到的用户名为:" + userName);
        String password = request.getParameter("password");
        System.out.println("获取到的密码为:" + password);
        //将接收到的用户信息和密码信息打包成类对象交给DAO层
        User user = new User(userName, password);

        UserDao userDao = new UserDao();
        int rew= userDao.createUser(user);
        //将结果响应到浏览器、
        response.setContentType("text/html;charset=utf-8");
        PrintWriter writer = response.getWriter();

        if (1== rew){
            System.out.println("储存成功");
            writer.write("<h1>注册成功</h1>");
        }else {
            writer.write("<h1>注册失败</h1>");
        }
        writer.close();
    }

    protected void doGet(HttpServletRequest request, HttpServletResponse response) throws ServletException, IOException {
        this.doPost(request, response);
    }
}
web配置文件,web.xml
<?xml version="1.0" encoding="UTF-8"?>
<web-app xmlns="http://xmlns.jcp.org/xml/ns/javaee"
                   xmlns:xsi="http://www.w3.org/2001/XMLSchema-instance"
                   xsi:schemaLocation="http://xmlns.jcp.org/xml/ns/javaee http://xmlns.jcp.org/xml/ns/javaee/web-app_4_0.xsd"
                   version="4.0">

    <servlet>
        <servlet-name>RegisterServlet</servlet-name>
        <servlet-class>com.zyp.demo01.servlet.RegisterServlet</servlet-class>
    </servlet>
    <servlet-mapping>
        <servlet-name>RegisterServlet</servlet-name>
        <url-pattern>/registerServlet</url-pattern>
    </servlet-mapping>
</web-app>
HTML页面
<!DOCTYPE html>
<html lang="en">
<head>
<meta charset="UTF-8">
<title>实现简单的注册功能</title>
</head>
<body>
<form action="registerServlet" method="post">
用户名:<input type="text" name="userName"/><br/>
密   码:<input type="text" name="password"/><br/>
<input type="submit" value="注册"/>
</form>
</body>
</html>
– 数据库连接工具类ubil
public class DBUtbil {
    private static String jdbcName; //驱动信息
    private static String dbUrl;    //用于描述URL信息
    private static String dbUserName; //用于描述用户名的信息
    private static String dbPassword; //用于描述密码信息

    //成员的初始化操作
    static {
        jdbcName = "com.mysql.jdbc.Driver";
        dbUrl = "jdbc:mysql://localhost:3306/db_web";
        dbUserName = "root";
        dbPassword = "qwer1234";
        try {
            Class.forName(jdbcName);
        } catch (ClassNotFoundException e) {
            e.printStackTrace();
        }
    }

    /**
     *获取连接
     * @return
     * @throws SQLException
     */
    public static Connection getConnection() throws SQLException {
        Connection con = DriverManager.getConnection(dbUrl,dbUserName,dbPassword);
        return con;
    }

    /**
     * 关闭连接
     * @param con
     * @throws SQLException
     */
    public static void closeConnection(Connection con) throws SQLException {
        if (null!=con){
            con.close();
        }
    }

    public static void closeConnection(Connection con, PreparedStatement preparedStatement) throws SQLException {
        if (null!=con){
            con.close();
        }
        if (null!=preparedStatement){
            con.close();
        }
    }
}
- DAO工厂(工厂模式)
- 工厂类:封装了对象的创建细节,为调用者提供符合要求的对象。
重定向和转发
重定向的概述
- 重定向的概念
首先客户浏览器发送http请求,当web服务器接受后发送302状态码响应及对应新的location给客户浏览器,客户浏览器发现是302响应,则自动再发送一个新的http请求,请求url是新的location地址,服务器根据此请求寻找资源并发送给客户。 - 重定向的实现
实现重定向需要借助javax.servlet.http.HttpServletResponse接口中的以下方法:
| 方法声明 | 功能介绍 |
|---|---|
| void sendRedirect(String location) | 使用指定的重定向位置URL向客户端发送临时重定向响应 |
- Servlet类:
public class RedirectyServlet extends HttpServlet {
    protected void doPost(HttpServletRequest request, HttpServletResponse response) throws ServletException, IOException {
        System.out.println("接收到了浏览器的请求");
        //重定向,也就是给浏览器发送一个新的位置
        response.sendRedirect("https://www.baidu.com/?tn=62095104_19_oem_dg");
    }

    protected void doGet(HttpServletRequest request, HttpServletResponse response) throws ServletException, IOException {
        this.doPost(request, response);
    }
}
- xml文件配置
    <servlet>
        <servlet-name>RedirectyServlet</servlet-name>
        <servlet-class>com.zyp.demo02.servlet.RedirectyServlet</servlet-class>
    </servlet>
    <servlet-mapping>
        <servlet-name>RedirectyServlet</servlet-name>
        <url-pattern>/RS</url-pattern>
    </servlet-mapping>
- html页面效果 redirect.html
<!DOCTYPE html>
<html lang="en">
<head>
    <meta charset="UTF-8">
    <title>重定向测试</title>
</head>
<body>
<form action="RS" method="post">
    <input type="submit" value="重定向">
</form>
</body>
</html>
– 重定项页面 target.html
<!DOCTYPE html>
<html lang="en">
<head>
    <meta charset="UTF-8">
    <title>重定向后的页面</title>
</head>
<body>
<h1>服务器重新指定位置后的页面</h1>
</body>
</html>
- 重定向的原理
- 重定向的特点
– 重定向之后,浏览器地址栏的URL会发生改变。
– 重定向过程中会将前面Request对象销毁,然后创建一个新的Request对象。
– 重定向的URL可以是其它项目工程。
转发的概述
- 转发的概念
– 一个Web组件(Servlet/JSP)将未完成的处理通过容器转交给另外一个Web组件继续处理,转发的各个组件会共享Request和Response对象。 - 转发的实现
– 绑定数据到Request对象
| 方法声明 | 功能介绍 |
|---|---|
| Object getAttribute(String name) | 将指定属性值作为对象返回,若给定名称属性不存在,则返回空值 |
| void setAttribute(String name,Object o) | 在此请求中存储属性值 |
– 获取转发器对象
| 方法声明 | 功能介绍 |
|---|---|
| RequestDispatcher getRequestDispatcher(String path) | 返回一个RequestDispatcher对象,该对象充当位于给定路径上的资源的包装器 |
– 转发操作
| 方法声明 | 功能介绍 |
|---|---|
| void forward(ServletRequest request, ServletResponse response) | 将请求从一个servlet转发到服务器上的另一个资源(Servlet、JSP文件或HTML文件) |
– servlet类
public class TargetServlet extends HttpServlet {
    protected void doPost(HttpServletRequest request, HttpServletResponse response) throws ServletException, IOException {
        System.out.println("接收到转发过来的信息");
        //获取request对象中的属性值判断是否共享
        Object key1 = request.getAttribute("key1");
        System.out.println("获取到的值为:" + key1);

        //通过打印流向页面写入转发成功的信息
        response.setContentType("text/html;charset=utf-8");
        response.getWriter().write("<h1>接收到了转发信息</h1>");
    }

    protected void doGet(HttpServletRequest request, HttpServletResponse response) throws ServletException, IOException {
        this.doPost(request, response);
    }
}
public class ForwardServlet extends HttpServlet {
    protected void doPost(HttpServletRequest request, HttpServletResponse response) throws ServletException, IOException {
        System.out.println("接收到了浏览器的请求");
        //向request中设置信息
        request .setAttribute("key1","test1");
        //转发,也就是让web组件将任务转交给另外一个web组件
        RequestDispatcher requestDispatcher = request.getRequestDispatcher("/targetServlet");
        //测试跳转页面的效果
//        RequestDispatcher requestDispatcher = request.getRequestDispatcher("https://www.baidu.com/");
        requestDispatcher.forward(request,response);
    }

    protected void doGet(HttpServletRequest request, HttpServletResponse response) throws ServletException, IOException {
        this.doPost(request, response);
    }
}
xml配置
    <servlet>
        <servlet-name>ForwardServlet</servlet-name>
        <servlet-class>com.zyp.demo02.servlet.ForwardServlet</servlet-class>
    </servlet>
    <servlet-mapping>
        <servlet-name>ForwardServlet</servlet-name>
        <url-pattern>/forwardServlet</url-pattern>
    </servlet-mapping>
    <servlet>
        <servlet-name>TargetServlet</servlet-name>
        <servlet-class>com.zyp.demo02.servlet.TargetServlet</servlet-class>
    </servlet>
    <servlet-mapping>
        <servlet-name>TargetServlet</servlet-name>
        <url-pattern>/targetServlet</url-pattern>
    </servlet-mapping>
html配置
<!DOCTYPE html>
<html lang="en">
<head>
    <meta charset="UTF-8">
    <title>转发测试</title>
</head>
<body>
<form action="forwardServlet" method="post">
    <input type="submit" value="转发">
</form>
</body>
</html>
- 转发的特点
– 转发之后浏览器地址栏的URL不会发生改变。
– 转发过程中共享Request对象。
– 转发的URL不可以是其它项目工程。 - 重定向和转发的比较

Servlet线程安全
- 服务器在收到请求之后,会启动一个线程来进行相应的请求处理。
- 默认情况下,服务器为每个Servlet只创建一个对象实例。当多个请求访问同一个Servlet时,会有多个线程访问同一个Servlet对象,此时就可能发生线程安全问题。
- 多线程并发逻辑,需要使用synchronized对代码加锁处理,但尽量避免使用。
– servlet类
/**
 * 进行线程安全测试
 */
@WebServlet(name = "ThreadServlet", urlPatterns = "/threadServlet")
public class ThreadServlet extends HttpServlet {
    //private String name;//准备一个成员变量,作为共享数据
    protected void doPost(HttpServletRequest request, HttpServletResponse response) throws ServletException, IOException {
        synchronized (this) {//通过锁的方式来防止输出
            //1.获取request对象中获取名字为name的测试数值并赋值给成员变量name
            String name = request.getParameter("name");//如果不通过锁的方式来进行处理,那么就不设置成员变量,而是每次请求是进行重新创建
            System.out.println("获取到的name数值为:"+name);
            //2.睡眠5秒
            try {
                Thread.sleep(5000);
            } catch (InterruptedException e) {
                e.printStackTrace();
            }
            //3.使用打印流将成员变量name的数值发送给浏览器
//        response.setContentType("text/html;charset=UTF-8");
            PrintWriter writer = response.getWriter();
            writer.write("<h1>"+name+"</h1>");
            writer.close();
        }
    }

    protected void doGet(HttpServletRequest request, HttpServletResponse response) throws ServletException, IOException {
        this.doPost(request, response);
    }
}
– thml测试页面
<!DOCTYPE html>
<html lang="en">
<head>
    <meta charset="UTF-8">
    <title>Servlet线程安全的测试</title>
</head>
<body>
<iframe width="600px" height="100px" src="threadServlet?name=zhangfei"></iframe><br/>
<iframe width="600px" height="100px" src="threadServlet?name=lisi"></iframe><br/>
<iframe width="600px" height="100px" src="threadServlet?name=wangwu"></iframe><br/>
<iframe width="600px" height="100px" src="threadServlet?name=zhaoliu"></iframe><br/>
</body>
</html>
状态管理
- Web程序基于HTTP协议通信,而HTTP协议是”无状态”的协议,一旦服务器响应完客户的请求之后,就断开连接,而同一个客户的下一次请求又会重新建立网络连接。
- 服务器程序有时是需要判断是否为同一个客户发出的请求,比如客户的多次选购商品。因此,有必要跟踪同一个客户发出的一系列请求。
- 把浏览器与服务器之间多次交互作为一个整体,将多次交互所涉及的数据保存下来,即状态管理。
- 多次交互的数据状态可以在客户端保存,也可以在服务器端保存。状态管理主要分为以下两类:
- 客户端管理:将状态保存在客户端。基于Cookie技术实现。
- 服务器管理:将状态保存在服务器端。基于Session技术实现。
Cookie技术
基本概念
- Cookie本意为”饼干“的含义,在这里表示客户端以“名-值”形式进行保存的一种技术。
- 浏览器向服务器发送请求时,服务器将数据以Set-Cookie消息头的方式响应给浏览器,然后浏览器会将这些数据以文本文件的方式保存起来。
- 当浏览器再次访问服务器时,会将这些数据以Cookie消息头的方式发送给服务器。
相关的方法
– 使用javax.servlet.http.Cookie类的构造方法实现Cookie的创建。
| 方法声明 | 功能介绍 |
|---|---|
| Cookie(String name, String value) | 根据参数指定数值构造对象 |
– 使用javax.servlet.http.HttpServletResponse接口的成员方法实现Cookie的添加。
| 方法声明 | 功能介绍 |
|---|---|
| void addCookie(Cookie cookie) | 添加参数指定的对象到响应 |
servlet类
@WebServlet(name = "CookieServlet",urlPatterns = "/cookie")
public class CookieServlet extends HttpServlet {
    protected void doPost(HttpServletRequest request, HttpServletResponse response) throws ServletException, IOException {
        //1.测试浏览器的请求是否到达
        System.out.println("看看是否被执行");
        //2.创建Cookie对象并且添加到响应信息中
        Cookie cookie=new Cookie("name","zhangsan");
        //发送到浏览器中
        response.addCookie(cookie);
        System.out.println("添加cookie成功");

    }

    protected void doGet(HttpServletRequest request, HttpServletResponse response) throws ServletException, IOException {
        this.doPost(request, response);
    }
}
通过f12进入浏览器调试,查看Cookie

– 使用javax.servlet.http.HttpServletRequest接口的成员方法实现Cookie对象的获取。
| 方法声明 | 功能介绍 |
|---|---|
| Cookie[] getCookies() | 返回此请求中包含的所有Cookie对象 |
servlet类
@WebServlet(name = "CookieServlet2", urlPatterns = "/cookie2")
public class CookieServlet2 extends HttpServlet {
    protected void doPost(HttpServletRequest request, HttpServletResponse response) throws ServletException, IOException {
        //获取客户端发来的Cookie信息并且打印出来
        Cookie[] cookies = request.getCookies();
        System.out.println("获取到的Cookie:");
        for (Cookie tc : cookies) {
            //遍历
            System.out.println(tc.getName() + "对应的值为:" + tc.getValue());
            System.out.println("获取到Cookie的时间:"+ tc.getMaxAge());

        }

    }

    protected void doGet(HttpServletRequest request, HttpServletResponse response) throws ServletException, IOException {
        this.doPost(request, response);
    }
}
– 使用javax.servlet.http.Cookie类的构造方法实现Cookie对象中属性的获取和修改。
| 方法声明 | 功能介绍 |
|---|---|
| String getName() | 返回此Cookie对象中的名字 |
| String getValue() | 返回此Cookie对象的数值 |
| void setValue(String newValue) | 设置Cookie的数值 |
servlet类
@WebServlet(name = "CookieServlet3", urlPatterns = "/cookie3")
public class CookieServlet3 extends HttpServlet {
    protected void doPost(HttpServletRequest request, HttpServletResponse response) throws ServletException, IOException {
        //1.获取到cookie的信息
        Cookie[] cookies = request.getCookies();
        response.setContentType("text/html;charset=utf-8");
        for (Cookie tc : cookies) {
            //2.当获取到的Cookie对象的名字为name,将对应的數值修改為guanyu并添加信息
            if ("Name".equalsIgnoreCase(tc.getName())){
                tc.setValue("刘备");
                response.addCookie(tc);
                break;
            }
            System.out.println("修改Cookie信息成功!");
        }
    }

    protected void doGet(HttpServletRequest request, HttpServletResponse response) throws ServletException, IOException {
        this.doPost(request, response);
    }
}
Cookie的生命周期
– 默认情况下,浏览器会将Cookie信息保存在内存中,只要浏览器关闭,Cookie信息就会消失。
– 如果希望关闭浏览器后Cookie信息仍有效,可以通过Cookie类的成员方法实现。
| 方法声明 | 功能介绍 |
|---|---|
| int getMaxAge() | 返回cookie的最长使用期限(以秒为单位) |
| void setMaxAge(int expiry) | 设置cookie的最长保留时间(秒) |
servlet类
@WebServlet(name = "CookieServlet4",urlPatterns = "/cookie4")
public class CookieServlet4 extends HttpServlet {
    protected void doPost(HttpServletRequest request, HttpServletResponse response) throws ServletException, IOException {
        //1.创建Cookie信息
        Cookie cookie = new Cookie("name", "liubei");
        //2.获取Cookie信息的默认使用期限
        int maxAge = cookie.getMaxAge();
        System.out.println("该Cookie的使用期限为:"+maxAge);
        //3.修改Cookie信息的使用期限,正数表示在指定的秒数后失效 负数表示浏览器关闭后失效 0表示马上失效
        cookie.setMaxAge(1000);
        //4.添加到响应信息中
        response.addCookie(cookie);
        System.out.println("设置生命周期成功!");
    }

    protected void doGet(HttpServletRequest request, HttpServletResponse response) throws ServletException, IOException {
        this.doPost(request, response);
    }
}
Cookie的路径问题
– 浏览器在访问服务器时,会比较Cookie的路径与请求路径是否匹配,只有匹配的Cookie才会发送给服务器。
– 访问的请求地址必须符合Cookie的路径或者其子路径时,浏览器才会发送Cookie信息。
Cookie的默认路径等于添加这个Cookie信息时的组件路径,例如:/项目名/目录/add.do请求添加
了一个Cookie信息,则该Cookie的路径是 /项目名/目录。
| 方法声明 | 功能介绍 |
|---|---|
| void setPath(String uri) | 设置cookie的路径信息 |
servlet类
@WebServlet(name = "CookieServlet5",urlPatterns = "/cookie5")
public class CookieServlet5 extends HttpServlet {
    protected void doPost(HttpServletRequest request, HttpServletResponse response) throws ServletException, IOException {
        //1.创建Cookie对象并指定数值
//        Cookie cookie = new Cookie("name","zhaoyun");
        Cookie cookie = new Cookie("name","huangzhong");
        //3.修改Cookie的路径信息
        cookie.setPath(request.getContextPath()+"/hello");
        //2.添加响应信息中
        response.addCookie(cookie);
        System.out.println("设置路径成功");
    }

    protected void doGet(HttpServletRequest request, HttpServletResponse response) throws ServletException, IOException {
        this.doPost(request, response);
    }
}
Cookie的特点
- Cookie技术不适合存储所有数据,程序员只用于存储少量、非敏感信息,原因如下:
- 将状态数据保存在浏览器端,不安全。
- 保存数据量有限制,大约4KB左右。
- 只能保存字符串信息。
- 可以通过浏览器设置为禁止使用。
Session技术
基本概念
- Session本意为"会话"的含义,是用来维护一个客户端和服务器关联的一种技术。
- 浏览器访问服务器时,服务器会为每一个浏览器都在服务器端的内存中分配一个空间,用于创建一个Session对象,该对象有一个id属性且该值唯一,我们称为SessionId,并且服务器会将这个SessionId以Cookie方式发送给浏览器存储。
- 浏览器再次访问服务器时会将SessionId发送给服务器,服务器可以依据SessionId查找相对应的Session对象
相关的方法
– 使用javax.servlet.http.HttpServletRequest接口的成员方法实现Session的获取
| 方法声明 | 功能介绍 |
|---|---|
| HttpSession getSession() | 返回此请求关联的当前Session,若此请求没有则创建一个 |
– 使用javax.servlet.http.HttpSession接口的成员方法实现判断和获取。
| 方法声明 | 功能介绍 |
|---|---|
| boolean isNew() | 判断是否为新创建的Session |
| String getId() | 获取Session的编号 |
@WebServlet(name = "SessionServlet", urlPatterns = "/sessionServlet")
public class SessionServlet extends HttpServlet {
    protected void doPost(HttpServletRequest request, HttpServletResponse response) throws ServletException, IOException {
        //1.调用getSession方法获取或者创建Session
        HttpSession session = request.getSession();
        //2.判断该Session对象是否为新建对象
        System.out.println(session.isNew() ? "新创建的session对象" : "已有的session对象");
        //3.获取编号并打印
        String id = session.getId();
        System.out.println("获取到的id为:" + id);
    }

    protected void doGet(HttpServletRequest request, HttpServletResponse response) throws ServletException, IOException {
        this.doPost(request, response);
    }
}
– 使用javax.servlet.http.HttpSession接口的成员方法实现属性的管理。
| 方法声明 | 功能介绍 |
|---|---|
| Object getAttribute(String name) | 返回在此会话中用指定名称绑定的对象,如果没有对象在该名称下绑定,则返回空值 |
| void setAttribute(String name, Object value) | 使用指定的名称将对象绑定到此会话 |
| void removeAttribute(String name) | 从此会话中删除与指定名称绑定的对象 |
@WebServlet(name = "SessionServlet2", urlPatterns = "/sessionServlet2")
public class SessionServlet2 extends HttpServlet {
    protected void doPost(HttpServletRequest request, HttpServletResponse response) throws ServletException, IOException {
        HttpSession session = request.getSession();
        //1.设置属性名和属性值
        session.setAttribute("name", "machao");
        //2.获取指定属性名对应的属性值
        System.out.println("获取到的属性值为:" + session.getAttribute("name"));//machao
        //3.删除指定的属性名
        session.removeAttribute("name");
        //4.获取指定的属性名对应的属性值
        System.out.println("获取到的属性值为:" + session.getAttribute("name"));//null
    }

    protected void doGet(HttpServletRequest request, HttpServletResponse response) throws ServletException, IOException {
        this.doPost(request, response);
    }
}
Session的生命周期
– 为了节省服务器内存空间资源,服务器会将空闲时间过长的Session对象自动清除掉,服务器默认的超时限制一般是30分钟。
– 使用javax.servlet.http.HttpSession接口的成员方法实现失效实现的获取和设置。
| 方法声明 | 功能介绍 |
|---|---|
| int getMaxInactiveInterval() | 获取失效时间 |
| void setMaxInactiveInterval(int interval) | 设置失效时间 |
@WebServlet(name = "SessionServlet3", urlPatterns = "/sessionServlet3")
public class SessionServlet3 extends HttpServlet {
    protected void doPost(HttpServletRequest request, HttpServletResponse response) throws ServletException, IOException {
        //获取Session对象
        HttpSession session = request.getSession();
        //获取对象的默认失效时间
        int maxInactiveInterval = session.getMaxInactiveInterval();
        System.out.println("获取到的失效时间为:" + maxInactiveInterval);
        //修改失效时间后重新获取并且打印
        session.setMaxInactiveInterval(1200);
        //重新获取
        maxInactiveInterval = session.getMaxInactiveInterval();
        System.out.println("获取到的失效时间为:" + maxInactiveInterval);

    }

    protected void doGet(HttpServletRequest request, HttpServletResponse response) throws ServletException, IOException {
        this.doPost(request, response);
    }
}
– 可以配置web.xml文件修改失效时间。
web.xml
<?xml version="1.0" encoding="UTF-8"?>
<web-app xmlns="http://xmlns.jcp.org/xml/ns/javaee"
         xmlns:xsi="http://www.w3.org/2001/XMLSchema-instance"
         xsi:schemaLocation="http://xmlns.jcp.org/xml/ns/javaee http://xmlns.jcp.org/xml/ns/javaee/web-app_4_0.xsd"
         version="4.0">
    <session-config>
        <session-timeout>10</session-timeout>
    </session-config>
</web-app>
Session的特点
- 数据比较安全。
- 能够保存的数据类型丰富,而Cookie只能保存字符串。
- 能够保存更多的数据,而Cookie大约保存4KB。
- 数据保存在服务器端会占用服务器的内存空间,如果存储信息过多、用户量过大,会严重影响服务器的性能。


 728
728


 被折叠的 条评论
为什么被折叠?
被折叠的 条评论
为什么被折叠?
 到【灌水乐园】发言


